User's Guide
Page 2
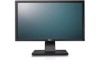
...below. Some features or media may not ship with your Monitor. Back to Contents Page About Your Monitor Dell™ U2211H / U2311H Monitor User's Guide Package Contents Product Features Identifying Parts and Controls Monitor Specifications Plug and Play Capability Universal Serial Bus... (USB) Interface LCD Monitor Quality and Pixel Policy Maintenance Guidelines Package Contents Your monitor ships with any other ...
...below. Some features or media may not ship with your Monitor. Back to Contents Page About Your Monitor Dell™ U2211H / U2311H Monitor User's Guide Package Contents Product Features Identifying Parts and Controls Monitor Specifications Plug and Play Capability Universal Serial Bus... (USB) Interface LCD Monitor Quality and Pixel Policy Maintenance Guidelines Package Contents Your monitor ships with any other ...

User's Guide
Page 3
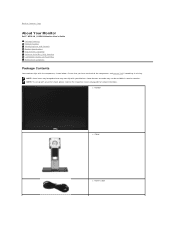
Identifying Parts and Controls Front View l VGA Cable (attached to the monitor) l DVI Cable l USB up and screen optimization. ■ Software and documentation media includes an information file (INF), Image color Matching File (ICM), and product documentation. ... On-Screen Display (OSD) adjustments for ease of set-up stream cable (enables the USB ports on the monitor) l Drivers and Documentation media l Quick Setup Guide l Product and Safety Information Guide Product Features The U2211H / U2311H flat panel display has an active matrix, thin-film transistor (TFT), liquid crystal display ...
Identifying Parts and Controls Front View l VGA Cable (attached to the monitor) l DVI Cable l USB up and screen optimization. ■ Software and documentation media includes an information file (INF), Image color Matching File (ICM), and product documentation. ... On-Screen Display (OSD) adjustments for ease of set-up stream cable (enables the USB ports on the monitor) l Drivers and Documentation media l Quick Setup Guide l Product and Safety Information Guide Product Features The U2211H / U2311H flat panel display has an active matrix, thin-film transistor (TFT), liquid crystal display ...
User's Guide
Page 5
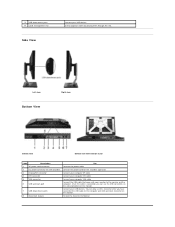
Connect the power cord for Dell Soundbar. You can use this cable is connected, you have connected the USB cable to the Monitor 7 USB downstream ports 8 Cable management slot Side View Connect your monitor to organize cables by placing them through the slot. Use to...monitor. 8 Stand lock feature To lock the Stand to the computer and USB upstream connector on the side and bottom of the monitor. 7 USB downstream ports Connect your computer VGA cable 6 USB upstream port Connect the USB cable that came with monitor stand Label Description Use 1 AC power cord connector...
Connect the power cord for Dell Soundbar. You can use this cable is connected, you have connected the USB cable to the Monitor 7 USB downstream ports 8 Cable management slot Side View Connect your monitor to organize cables by placing them through the slot. Use to...monitor. 8 Stand lock feature To lock the Stand to the computer and USB upstream connector on the side and bottom of the monitor. 7 USB downstream ports Connect your computer VGA cable 6 USB upstream port Connect the USB cable that came with monitor stand Label Description Use 1 AC power cord connector...

User's Guide
Page 9
NOTE: This monitor is ENERGY STAR®-compliant. * Zero power consumption in OFF mode can only be achieved by disconnecting the main cable from the monitor. ** Maximum power consumption with max luminance, Dell Soundbar, and USB active. Pin Assignments VGA Connector Pin 15-pin Side of the Connected Signal Cable Number 1 Video-Red 2 Video-Green 3 Video-Blue 4 GND 5 Self-test 6 GND-R 7 GND-G 8 GND-B 9 Computer 5V/3.3V 10 GND-sync 11 GND 12 DDC data 13 H-sync 14 V-sync 15 DDC clock DVI Connector Activate the computer and the monitor to gain access to the OSD.
NOTE: This monitor is ENERGY STAR®-compliant. * Zero power consumption in OFF mode can only be achieved by disconnecting the main cable from the monitor. ** Maximum power consumption with max luminance, Dell Soundbar, and USB active. Pin Assignments VGA Connector Pin 15-pin Side of the Connected Signal Cable Number 1 Video-Red 2 Video-Green 3 Video-Blue 4 GND 5 Self-test 6 GND-R 7 GND-G 8 GND-B 9 Computer 5V/3.3V 10 GND-sync 11 GND 12 DDC data 13 H-sync 14 V-sync 15 DDC clock DVI Connector Activate the computer and the monitor to gain access to the OSD.

User's Guide
Page 11
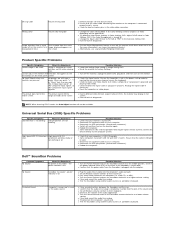
...or in any Plug and Play-compatible system. For more information about the USB ports that are automatic; back l 4 downstream - 2 on back; 2 on left side NOTE: USB 2.0 functionality requires a USB 2.0-capable computer NOTE: The monitor's USB interface works only when the monitor is on the left side of the ...Signal Cable VCC DMD DPD GND USB Ports l 1 upstream - Universal Serial Bus (USB) Interface This section gives you information about changing the monitor settings, see Operating the Monitor. Transfer speed High speed Full ...
...or in any Plug and Play-compatible system. For more information about the USB ports that are automatic; back l 4 downstream - 2 on back; 2 on left side NOTE: USB 2.0 functionality requires a USB 2.0-capable computer NOTE: The monitor's USB interface works only when the monitor is on the left side of the ...Signal Cable VCC DMD DPD GND USB Ports l 1 upstream - Universal Serial Bus (USB) Interface This section gives you information about changing the monitor settings, see Operating the Monitor. Transfer speed High speed Full ...
User's Guide
Page 32
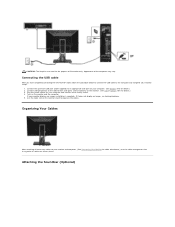
... and computer, (See Connecting Your Monitor for cable attachment,) use the cable management slot to an appropriate USB port on the monitor and the computer. Connect USB peripherals to the downstream USB ports (side or bottom) on the monitor stand to the computer and complete your monitor setup: 1.... After you have completed connecting the DVI/VGA/DP cable, follow the procedure below to connect the USB cable to organize the cables. Connect the upstream USB port (cable supplied) to organize all cables as shown above. Organizing Your Cables After attaching all necessary cables to your ...
... and computer, (See Connecting Your Monitor for cable attachment,) use the cable management slot to an appropriate USB port on the monitor and the computer. Connect USB peripherals to the downstream USB ports (side or bottom) on the monitor stand to the computer and complete your monitor setup: 1.... After you have completed connecting the DVI/VGA/DP cable, follow the procedure below to connect the USB cable to organize the cables. Connect the upstream USB port (cable supplied) to organize all cables as shown above. Organizing Your Cables After attaching all necessary cables to your ...
User's Guide
Page 37
...screen l Perform monitor self-test feature check. NOTE: When choosing DVI-D mode, the Auto Adjust function will not be available. High Speed USB 2.0 interface is used as the audio source l Clear any key on the keyboard. Ensure that the power cable from the static image ...Color Management is secure. l Check to make sure Video Source to S-Video, Composite or Component is turned ON. l Reboot the computer. Dell™ Soundbar Problems Common Symptoms No Sound What You Experience No power to a lower volume setting. Missing Color Wrong Color Picture missing color ...
...screen l Perform monitor self-test feature check. NOTE: When choosing DVI-D mode, the Auto Adjust function will not be available. High Speed USB 2.0 interface is used as the audio source l Clear any key on the keyboard. Ensure that the power cable from the static image ...Color Management is secure. l Check to make sure Video Source to S-Video, Composite or Component is turned ON. l Reboot the computer. Dell™ Soundbar Problems Common Symptoms No Sound What You Experience No power to a lower volume setting. Missing Color Wrong Color Picture missing color ...


