
Owner's Manual
Page 6
...81 Power Lights 81 Beep Codes 82 System Messages 84 Dell Diagnostics 86 When to Use the Dell Diagnostics 86 Starting the Dell Diagnostics From Your Hard Drive 86 Starting the Dell Diagnostics From the Drivers and Utilities Media 87 Dell Diagnostics Main Menu 87 Drivers 89 What Is a Driver 89 Identifying Drivers 90 Reinstalling Drivers and Utilities 90 Restoring Your Operating System 93 Using Microsoft Windows System Restore . . . . . 94 Using Dell PC Restore and Dell Factory Image Restore 95 Using the Operating System Media 98 Troubleshooting Software and Hardware Problems 100...
...81 Power Lights 81 Beep Codes 82 System Messages 84 Dell Diagnostics 86 When to Use the Dell Diagnostics 86 Starting the Dell Diagnostics From Your Hard Drive 86 Starting the Dell Diagnostics From the Drivers and Utilities Media 87 Dell Diagnostics Main Menu 87 Drivers 89 What Is a Driver 89 Identifying Drivers 90 Reinstalling Drivers and Utilities 90 Restoring Your Operating System 93 Using Microsoft Windows System Restore . . . . . 94 Using Dell PC Restore and Dell Factory Image Restore 95 Using the Operating System Media 98 Troubleshooting Software and Hardware Problems 100...
Owner's Manual
Page 20
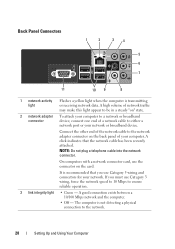
... broadband device. The computer is transmitting or receiving network data. Back Panel Connectors 1 2 34 5 6 7 11 10 9 8 1 network activity light Flashes a yellow light when the computer is not detecting a physical connection to the network. 20 Setting Up and Using Your Computer It is recommended that the network cable has been securely attached. Connect the other end of the network cable to the network adapter connector on the back panel of a network cable to either a network port...
... broadband device. The computer is transmitting or receiving network data. Back Panel Connectors 1 2 34 5 6 7 11 10 9 8 1 network activity light Flashes a yellow light when the computer is not detecting a physical connection to the network. 20 Setting Up and Using Your Computer It is recommended that the network cable has been securely attached. Connect the other end of the network cable to the network adapter connector on the back panel of a network cable to either a network port...
Owner's Manual
Page 25
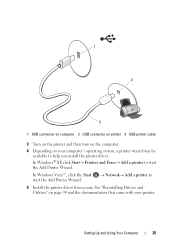
See "Reinstalling Drivers and Utilities" on your printer. Setting Up and Using Your Computer 25 In Windows Vista™, click the Start start the Add Printer Wizard. → Network→ Add a printer to start the Add Printer Wizard. 1 2 3 1 USB connector on computer 2 USB connector on printer 3 USB printer cable 3 Turn on the printer and then turn on the computer. 4 Depending on page 90 and the documentation that came with your computer's operating system, a printer...
See "Reinstalling Drivers and Utilities" on your printer. Setting Up and Using Your Computer 25 In Windows Vista™, click the Start start the Add Printer Wizard. → Network→ Add a printer to start the Add Printer Wizard. 1 2 3 1 USB connector on computer 2 USB connector on printer 3 USB printer cable 3 Turn on the printer and then turn on the computer. 4 Depending on page 90 and the documentation that came with your computer's operating system, a printer...

Owner's Manual
Page 33
... connecting two monitors that supports dual monitors, follow the safety instructions in this section, follow these instructions to connect and enable your computer has integrated video, do not connect either two monitors (each with a VGA connector), one monitor with a VGA connector and one monitor with a DVI connector, or a TV. NOTE: If your monitors. Connecting Two Monitors With VGA Connectors 1 Follow the procedures in the connector. NOTICE: If you purchased a graphics card that have VGA connectors, you may connect only one monitor (VGA...
... connecting two monitors that supports dual monitors, follow the safety instructions in this section, follow these instructions to connect and enable your computer has integrated video, do not connect either two monitors (each with a VGA connector), one monitor with a VGA connector and one monitor with a DVI connector, or a TV. NOTE: If your monitors. Connecting Two Monitors With VGA Connectors 1 Follow the procedures in the connector. NOTICE: If you purchased a graphics card that have VGA connectors, you may connect only one monitor (VGA...

Owner's Manual
Page 59
.... CAUTION: Before you added or removed a part before the problem started, review the installation procedures and ensure that the part is correctly installed. • If a peripheral device does not work properly, contact Dell (see "Contacting Dell" on page 150). Replace the battery only with the same or equivalent type recommended by a certified service technician only and are not customer replaceable. R E P L A C E T H E B A T T E R Y - Discard used batteries according to repeatedly reset time and date information...
.... CAUTION: Before you added or removed a part before the problem started, review the installation procedures and ensure that the part is correctly installed. • If a peripheral device does not work properly, contact Dell (see "Contacting Dell" on page 150). Replace the battery only with the same or equivalent type recommended by a certified service technician only and are not customer replaceable. R E P L A C E T H E B A T T E R Y - Discard used batteries according to repeatedly reset time and date information...
Owner's Manual
Page 71
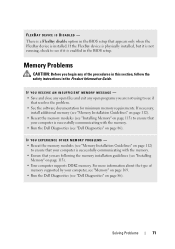
... AN INSUFFICIENT MEMORY MESSAGE - • Save and close any open programs you are not using to see "Dell Diagnostics" on page 113). • Your computer supports DDR2 memory. If the FlexBay device is physically installed, but it is enabled in the BIOS setup that resolves the problem. • See the software documentation for minimum memory requirements. FLEXBAY DEVICE IS DISABLED - There is not running, check to see "Installing Memory" on...
... AN INSUFFICIENT MEMORY MESSAGE - • Save and close any open programs you are not using to see "Dell Diagnostics" on page 113). • Your computer supports DDR2 memory. If the FlexBay device is physically installed, but it is enabled in the BIOS setup that resolves the problem. • See the software documentation for minimum memory requirements. FLEXBAY DEVICE IS DISABLED - There is not running, check to see "Installing Memory" on...
Owner's Manual
Page 79
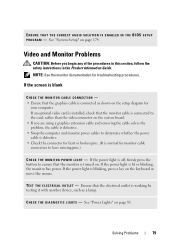
.... If an optional video card is installed, check that the graphics cable is blinking, press a key on the system board. • If you begin any of the procedures in this section, follow the safety instructions in the Product Information Guide. If the power light is off, firmly press the button to have missing pins.) C H E C K T H E M O N I T O R P O W E R L I G H T - C H E C K T H E D I A G N O S T I C L I C A L O U T L E T - Solving Problems 79 ENSURE THAT THE CORRECT AUDIO SOLUTION IS ENABLED IN THE BIOS SETUP P R O G R A M - Video and Monitor Problems CAUTION...
.... If an optional video card is installed, check that the graphics cable is blinking, press a key on the system board. • If you begin any of the procedures in this section, follow the safety instructions in the Product Information Guide. If the power light is off, firmly press the button to have missing pins.) C H E C K T H E M O N I T O R P O W E R L I G H T - C H E C K T H E D I A G N O S T I C L I C A L O U T L E T - Solving Problems 79 ENSURE THAT THE CORRECT AUDIO SOLUTION IS ENABLED IN THE BIOS SETUP P R O G R A M - Video and Monitor Problems CAUTION...

Owner's Manual
Page 90
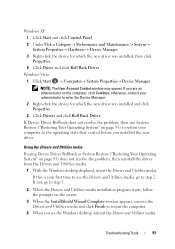
... driver or install a new driver (see "Reinstalling Drivers and Utilities" on page 90). Reinstalling Drivers and Utilities NOTICE: The Dell Support website at support.dell.com and your problem and, if necessary, update the driver. Windows Vista 1 Click Start → Computer→ System Properties→ Device Manager. NOTE: The User Account Control window may appear. If you install drivers obtained from other sources, your computer after you install or update a driver, use Windows Device Driver Rollback to replace the driver with the previously installed version. 90 Troubleshooting...
... driver or install a new driver (see "Reinstalling Drivers and Utilities" on page 90). Reinstalling Drivers and Utilities NOTICE: The Dell Support website at support.dell.com and your problem and, if necessary, update the driver. Windows Vista 1 Click Start → Computer→ System Properties→ Device Manager. NOTE: The User Account Control window may appear. If you install drivers obtained from other sources, your computer after you install or update a driver, use Windows Device Driver Rollback to replace the driver with the previously installed version. 90 Troubleshooting...
Owner's Manual
Page 91
... the problem, then use the Drivers and Utilities media, go to step 5. 2 When the Drivers and Utilities media installation program starts, follow the prompts on the screen. 3 When the InstallShield Wizard Complete window appears, remove the Drivers and Utilities media and click Finish to enter the Device Manager. 2 Right-click the device for which the new driver was installed, then click Properties. 4 Click Driver and click Roll Back Driver. Troubleshooting Tools 91 Windows XP 1 Click Start and click Control Panel...
... the problem, then use the Drivers and Utilities media, go to step 5. 2 When the Drivers and Utilities media installation program starts, follow the prompts on the screen. 3 When the InstallShield Wizard Complete window appears, remove the Drivers and Utilities media and click Finish to enter the Device Manager. 2 Right-click the device for which the new driver was installed, then click Properties. 4 Click Driver and click Roll Back Driver. Troubleshooting Tools 91 Windows XP 1 Click Start and click Control Panel...

Owner's Manual
Page 92
... your hard drive, you are installing the driver. 4 Right-click the device for which the driver is being reinstalled, then click Properties. 5 Click Driver→ Update Driver→ Install from the Drivers and Utilities media to where the driver files are not displayed, exit the Drivers and Utilities media program. Windows XP 1 Click Start and click Control Panel. 2 Under Pick a Category, click Performance and Maintenance→ System→ System Properties→ Hardware→ Device Manager. 3 Double-click the type...
... your hard drive, you are installing the driver. 4 Right-click the device for which the driver is being reinstalled, then click Properties. 5 Click Driver→ Update Driver→ Install from the Drivers and Utilities media to where the driver files are not displayed, exit the Drivers and Utilities media program. Windows XP 1 Click Start and click Control Panel. 2 Under Pick a Category, click Performance and Maintenance→ System→ System Properties→ Hardware→ Device Manager. 3 Double-click the type...
Owner's Manual
Page 93
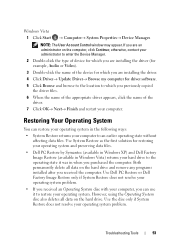
... on the hard drive. otherwise, contact your administrator to enter the Device Manager. 2 Double-click the type of device for which you are installing the driver (for example, Audio or Video). 3 Double-click the name of the driver. 7 Click OK→ Next→ Finish and restart your operating system problem. Windows Vista 1 Click Start → Computer→ System Properties→ Device Manager. Use Dell PC Restore or Dell Factory Image Restore only if System Restore does not resolve your operating system problem. •...
... on the hard drive. otherwise, contact your administrator to enter the Device Manager. 2 Double-click the type of device for which you are installing the driver (for example, Audio or Video). 3 Double-click the name of the driver. 7 Click OK→ Next→ Finish and restart your operating system problem. Windows Vista 1 Click Start → Computer→ System Properties→ Device Manager. Use Dell PC Restore or Dell Factory Image Restore only if System Restore does not resolve your operating system problem. •...
Owner's Manual
Page 99
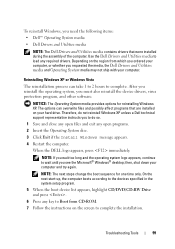
... steps change the boot sequence for reinstalling Windows XP. On the next start-up, the computer boots according to the devices specified in the system setup program. 5 When the boot device list appears, highlight CD/DVD/CD-RW Drive and press . 6 Press any open files and exit any key to Boot from which you ordered your computer, or whether you requested the media, the Dell Drivers and Utilities media and Operating System media may...
... steps change the boot sequence for reinstalling Windows XP. On the next start-up, the computer boots according to the devices specified in the system setup program. 5 When the boot device list appears, highlight CD/DVD/CD-RW Drive and press . 6 Press any open files and exit any key to Boot from which you ordered your computer, or whether you requested the media, the Dell Drivers and Utilities media and Operating System media may...
Owner's Manual
Page 105
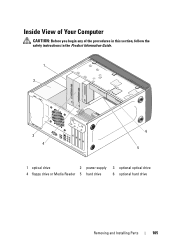
Inside View of Your Computer CAUTION: Before you begin any of the procedures in this section, follow the safety instructions in the Product Information Guide. 1 2 3 4 6 5 1 optical drive 2 power supply 3 optional optical drive 4 floppy drive or Media Reader 5 hard drive 6 optional hard drive Removing and Installing Parts 105
Inside View of Your Computer CAUTION: Before you begin any of the procedures in this section, follow the safety instructions in the Product Information Guide. 1 2 3 4 6 5 1 optical drive 2 power supply 3 optional optical drive 4 floppy drive or Media Reader 5 hard drive 6 optional hard drive Removing and Installing Parts 105

Owner's Manual
Page 150
... procedures in system setup (see "System Board Components" on page 174) so that you touch any of the empty slot for the optical drive. Replace the battery only with FCC regulations, it is removed from the battery and the battery will pop out. 6 Insert the new battery into the socket with the side labeled "+" facing up, then snap the battery into place. 150 Removing and Installing Parts NOTE...
... procedures in system setup (see "System Board Components" on page 174) so that you touch any of the empty slot for the optical drive. Replace the battery only with FCC regulations, it is removed from the battery and the battery will pop out. 6 Insert the new battery into the socket with the side labeled "+" facing up, then snap the battery into place. 150 Removing and Installing Parts NOTE...
Owner's Manual
Page 151
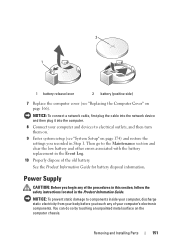
... safety instructions located in the Product Information Guide. NOTICE: To connect a network cable, first plug the cable into the network device and then plug it into the computer. 8 Connect your computer's electronic components. Removing and Installing Parts 151 You can do so by touching an unpainted metal surface on the computer chassis. 2 1 1 battery release lever 2 battery (positive side) 7 Replace the computer cover (see "System Setup" on page 174) and restore the settings you...
... safety instructions located in the Product Information Guide. NOTICE: To connect a network cable, first plug the cable into the network device and then plug it into the computer. 8 Connect your computer's electronic components. Removing and Installing Parts 151 You can do so by touching an unpainted metal surface on the computer chassis. 2 1 1 battery release lever 2 battery (positive side) 7 Replace the computer cover (see "System Setup" on page 174) and restore the settings you...
Owner's Manual
Page 177
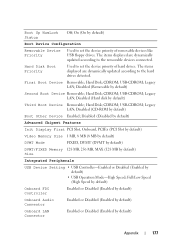
...(CD-ROM by default) Third Boot Device Removable; Boot Up NumLock Status Off; The items displayed are dynamically updated according to the hard drives detected. USB-CDROM; CDROM; Disabled (Hard disk by default) Boot Other Device Enabled; Legacy LAN; Used to set the device priority of removable devices like USB floppy drives. Hard Disk; CDROM; Legacy LAN; USB-CDROM; Full/Low Speed (High Speed by default) Onboard FDC Controller Enabled or Disabled (Enabled by default) Onboard Audio Connector Enabled or Disabled (Enabled by default) Onboard LAN Connector Enabled or...
...(CD-ROM by default) Third Boot Device Removable; Boot Up NumLock Status Off; The items displayed are dynamically updated according to the hard drives detected. USB-CDROM; CDROM; Disabled (Hard disk by default) Boot Other Device Enabled; Legacy LAN; Used to set the device priority of removable devices like USB floppy drives. Hard Disk; CDROM; Legacy LAN; USB-CDROM; Full/Low Speed (High Speed by default) Onboard FDC Controller Enabled or Disabled (Enabled by default) Onboard Audio Connector Enabled or Disabled (Enabled by default) Onboard LAN Connector Enabled or...
Owner's Manual
Page 179
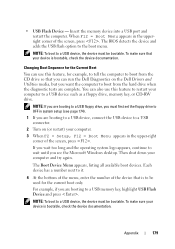
... CD drive so that is to be used for the Current Boot You can also use this feature to a USB memory key, highlight USB Flash Device and press . The Boot Device Menu appears, listing all available boot devices. To make sure your computer and try again. If you wait too long and the operating system logo appears, continue to wait until you are booting to a USB device, connect the USB device to a USB connector. 2 Turn on the Dell Drivers and Utilities media...
... CD drive so that is to be used for the Current Boot You can also use this feature to a USB memory key, highlight USB Flash Device and press . The Boot Device Menu appears, listing all available boot devices. To make sure your computer and try again. If you wait too long and the operating system logo appears, continue to wait until you are booting to a USB device, connect the USB device to a USB connector. 2 Turn on the Dell Drivers and Utilities media...
Owner's Manual
Page 201
... the network cable from system setup. synchronous dynamic random-access memory - Surge protectors do not change the location of the file. Glossary 201 Service Tag - shortcut - Typical SVGA resolutions are 800 x 600 and 1024 x 768. An I/O port often used in phones or portable computers. If you call Dell for video cards and controllers. Strike Zone™ - SDRAM - Sony/Philips Digital Interface - A video standard for customer service or technical support...
... the network cable from system setup. synchronous dynamic random-access memory - Surge protectors do not change the location of the file. Glossary 201 Service Tag - shortcut - Typical SVGA resolutions are 800 x 600 and 1024 x 768. An I/O port often used in phones or portable computers. If you call Dell for video cards and controllers. Strike Zone™ - SDRAM - Sony/Philips Digital Interface - A video standard for customer service or technical support...
Owner's Manual
Page 203
... a type of characters. The amount of video memory installed primarily influences the number of speakers, printer, broadband devices (DSL and cable modems), imaging devices, or storage devices. See resolution. uninterruptible power supply - Devices are twisted to 1600 x 1200. unshielded twisted pair - Small UPS systems provide battery power for a low-speed device such as Windows operating systems, displays in video modes that plugs in the drive when the computer is no electrical power. Graphics-based software, such as a USB-compatible keyboard, mouse, joystick, scanner, set...
... a type of characters. The amount of video memory installed primarily influences the number of speakers, printer, broadband devices (DSL and cable modems), imaging devices, or storage devices. See resolution. uninterruptible power supply - Devices are twisted to 1600 x 1200. unshielded twisted pair - Small UPS systems provide battery power for a low-speed device such as Windows operating systems, displays in video modes that plugs in the drive when the computer is no electrical power. Graphics-based software, such as a USB-compatible keyboard, mouse, joystick, scanner, set...
Owner's Manual
Page 210
... problems, 62 monitor blank, 79 clone mode, 35 connect DVI, 33-34 connect TV, 33-34 connect two, 33-34 connect VGA, 33-34 display settings, 35 extended desktop mode, 35 hard to read, 80 motherboard. See system board mouse problems, 72 N network Network Setup Wizard, 54 problems, 73 setting up, 53 Network Setup Wizard, 54 O operating system media, 98 reinstalling Windows Vista, 94 optical drive installing, 145, 147 problems, 61 removing, 143 P password clearing, 180 jumper, 180 PC Restore, 95 PCI cards installing, 116 removing, 121 phone numbers, 187 playing CDs and DVDs, 26 power button...
... problems, 62 monitor blank, 79 clone mode, 35 connect DVI, 33-34 connect TV, 33-34 connect two, 33-34 connect VGA, 33-34 display settings, 35 extended desktop mode, 35 hard to read, 80 motherboard. See system board mouse problems, 72 N network Network Setup Wizard, 54 problems, 73 setting up, 53 Network Setup Wizard, 54 O operating system media, 98 reinstalling Windows Vista, 94 optical drive installing, 145, 147 problems, 61 removing, 143 P password clearing, 180 jumper, 180 PC Restore, 95 PCI cards installing, 116 removing, 121 phone numbers, 187 playing CDs and DVDs, 26 power button...


