Service Manual
Page 1
...Dell Studio™ Slim 540s Service Manual Technical Overview Before You Begin Replacing the Computer Cover Replacing the Support Bracket Replacing the Front Panel Replacing Memory Module(s) Replacing PCI/PCI Express Card(s) Replacing Drives Replacing Fans Replacing the Front I/O Panel Replacing the Processor Replacing the System Board Replacing the Power...document is subject to change without the written permission of Microsoft Corporation in this text: Dell, the DELL logo, and Dell Studio are either potential damage to either the entities claiming the marks and names or their ...
...Dell Studio™ Slim 540s Service Manual Technical Overview Before You Begin Replacing the Computer Cover Replacing the Support Bracket Replacing the Front Panel Replacing Memory Module(s) Replacing PCI/PCI Express Card(s) Replacing Drives Replacing Fans Replacing the Front I/O Panel Replacing the Processor Replacing the System Board Replacing the Power...document is subject to change without the written permission of Microsoft Corporation in this text: Dell, the DELL logo, and Dell Studio are either potential damage to either the entities claiming the marks and names or their ...
Service Manual
Page 2
...computer and attached devices did not automatically turn off your own personal safety. If your operating system, press and hold the power button while the system is flat and clean to prevent the computer cover from the network device. 3. NOTICE: When you...l A component can be replaced or-if purchased separately-installed by your computer. Back to Contents Page Before You Begin Dell Studio™ Slim 540s Service Manual Technical Specifications Recommended Tools Turning Off Your Computer Safety Instructions This chapter provides procedures for about 4 seconds to turn...
...computer and attached devices did not automatically turn off your own personal safety. If your operating system, press and hold the power button while the system is flat and clean to prevent the computer cover from the network device. 3. NOTICE: When you...l A component can be replaced or-if purchased separately-installed by your computer. Back to Contents Page Before You Begin Dell Studio™ Slim 540s Service Manual Technical Specifications Recommended Tools Turning Off Your Computer Safety Instructions This chapter provides procedures for about 4 seconds to turn...
Service Manual
Page 12
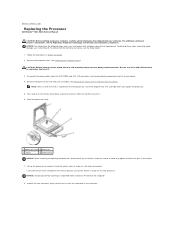
... it has had sufficient time to cool before you touch it aside in Before You Begin. 2. Be sure that secures it from the ATX POWER and ATX_CPU connectors (see System Board Components) on the back of the processor. Leave the release lever extended in the socket. 7. CAUTION:...technical assistance, see Replacing the Computer Cover). Lift up the processor to remove it . 6. Back to Contents Page Replacing the Processor Dell Studio™ Slim 540s Service Manual CAUTION: Before working inside the socket or allow any objects to touch the underside of the computer. 8. Remove the ...
... it has had sufficient time to cool before you touch it aside in Before You Begin. 2. Be sure that secures it from the ATX POWER and ATX_CPU connectors (see System Board Components) on the back of the processor. Leave the release lever extended in the socket. 7. CAUTION:...technical assistance, see Replacing the Computer Cover). Lift up the processor to remove it . 6. Back to Contents Page Replacing the Processor Dell Studio™ Slim 540s Service Manual CAUTION: Before working inside the socket or allow any objects to touch the underside of the computer. 8. Remove the ...
Service Manual
Page 14
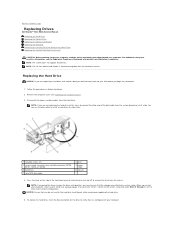
Back to Contents Page Replacing Drives Dell Studio™ Slim 540s Service Manual Replacing the Hard Drive Replacing the Optical Drive Replacing the Media Card Reader Replacing the FlexDock Removing the FlexBay/FlexDock Break-Away Metal ... that the changes are reflected in Before You Begin. 2. NOTE: The system does not support IDE devices. Follow the procedures in system setup. Disconnect the power and data cables from the chassis. NOTICE: Ensure that you begin this procedure. 1. Replacing the Hard Drive NOTICE: If you are not replacing the hard...
Back to Contents Page Replacing Drives Dell Studio™ Slim 540s Service Manual Replacing the Hard Drive Replacing the Optical Drive Replacing the Media Card Reader Replacing the FlexDock Removing the FlexBay/FlexDock Break-Away Metal ... that the changes are reflected in Before You Begin. 2. NOTE: The system does not support IDE devices. Follow the procedures in system setup. Disconnect the power and data cables from the chassis. NOTICE: Ensure that you begin this procedure. 1. Replacing the Hard Drive NOTICE: If you are not replacing the hard...
Service Manual
Page 27
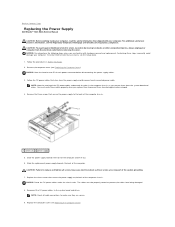
... 5. Remove the three screws that secure the power supply to the back of the DC power cables underneath the tabs in Before You Begin. 2. Slide the replacement power supply towards the front of the computer chassis. Back to Contents Page Replacing the Power Supply Dell Studio™ Slim 540s Service Manual CAUTION: Before working inside your computer, read...
... 5. Remove the three screws that secure the power supply to the back of the DC power cables underneath the tabs in Before You Begin. 2. Slide the replacement power supply towards the front of the computer chassis. Back to Contents Page Replacing the Power Supply Dell Studio™ Slim 540s Service Manual CAUTION: Before working inside your computer, read...
Service Manual
Page 31
... return to navigate. Key Functions - System Setup Options NOTE: Depending on the right side of your computer, including installed hardware, power conservation, and security features. Displays the SATA drive integrated on SATA1. Displays the SATA drive integrated on SATA0. As an option ... the SATA drive integrated on top of hard drive installed. SATA port not present. Back to Contents Page System Setup Dell Studio™ Slim 540s Service Manual Overview Clearing Forgotten Passwords Clearing CMOS Settings Flashing the BIOS Overview Use system setup to: l Change the system...
... return to navigate. Key Functions - System Setup Options NOTE: Depending on the right side of your computer, including installed hardware, power conservation, and security features. Displays the SATA drive integrated on SATA1. Displays the SATA drive integrated on SATA0. As an option ... the SATA drive integrated on top of hard drive installed. SATA port not present. Back to Contents Page System Setup Dell Studio™ Slim 540s Service Manual Overview Clearing Forgotten Passwords Clearing CMOS Settings Flashing the BIOS Overview Use system setup to: l Change the system...
Service Manual
Page 35
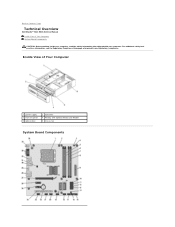
Back to Contents Page Technical Overview Dell Studio™ Slim 540s Service Manual Inside View of Your Computer 1 power supply 3 front I/O panel 5 optical drive 2 hard drive 4 FlexBay with your computer. Inside View of Your Computer System Board Components CAUTION: Before working inside your computer, read the safety information that shipped with optional Media Card Reader 6 chassis fan System Board Components For additional safety best practices information, see the Regulatory Compliance Homepage at www.dell.com/regulatory_compliance.
Back to Contents Page Technical Overview Dell Studio™ Slim 540s Service Manual Inside View of Your Computer 1 power supply 3 front I/O panel 5 optical drive 2 hard drive 4 FlexBay with your computer. Inside View of Your Computer System Board Components CAUTION: Before working inside your computer, read the safety information that shipped with optional Media Card Reader 6 chassis fan System Board Components For additional safety best practices information, see the Regulatory Compliance Homepage at www.dell.com/regulatory_compliance.
Setup Guide
Page 5
...Connect the Network Cable (Optional 9 Connect the Power Cables for Your Display and Computer 10 Press the Power Buttons on Your Computer and Display 10 Windows Vista® Setup 11 Connect to the Internet (Optional 11 Using Your Studio Slim 540s 14 Front View Features 14 Back View Features... 17 Back Panel Connectors 18 Software Features 20 Solving Problems 22 Network Problems 22 Power Problems 23 Memory Problems 24 Lockups and Software Problems 25 Using Support Tools 28 Dell Support Center 28 System...
...Connect the Network Cable (Optional 9 Connect the Power Cables for Your Display and Computer 10 Press the Power Buttons on Your Computer and Display 10 Windows Vista® Setup 11 Connect to the Internet (Optional 11 Using Your Studio Slim 540s 14 Front View Features 14 Back View Features... 17 Back Panel Connectors 18 Software Features 20 Solving Problems 22 Network Problems 22 Power Problems 23 Memory Problems 24 Lockups and Software Problems 25 Using Support Tools 28 Dell Support Center 28 System...
Setup Guide
Page 7
... 10.2 cm (4 inches) at the back of the computer and a minimum of 5.1 cm (2 inches) on . 5 Restricting airflow around your Studio Slim 540s may cause it is powered on all other sides. Setting Up Your Studio Slim 540s This section provides information about setting up your computer in an enclosed space, such as a cabinet or drawer when it...
... 10.2 cm (4 inches) at the back of the computer and a minimum of 5.1 cm (2 inches) on . 5 Restricting airflow around your Studio Slim 540s may cause it is powered on all other sides. Setting Up Your Studio Slim 540s This section provides information about setting up your computer in an enclosed space, such as a cabinet or drawer when it...
Setup Guide
Page 12
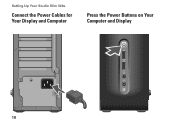
Setting Up Your Studio Slim 540s Connect the Power Cables for Your Display and Computer Press the Power Buttons on Your Computer and Display 10
Setting Up Your Studio Slim 540s Connect the Power Cables for Your Display and Computer Press the Power Buttons on Your Computer and Display 10
Setup Guide
Page 17
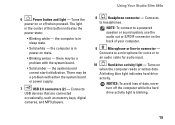
... cannot start initialization. Connects to an audio cable for voice or to headphones. A blinking blue light indicates hard drive activity. NOTE: To connect to a powered speaker or sound system, use the audio out or S/PDIF connector on state. • Blinking amber - NOTICE: To avoid loss of data, never turn... such as memory keys, digital cameras, and MP3 players. 8 Headphone connector - Connects to a microphone for audio input. 10 Hard drive activity light - Using Your Studio Slim 540s 6 Power button and light - there may be a problem with either the system board or...
... cannot start initialization. Connects to an audio cable for voice or to headphones. A blinking blue light indicates hard drive activity. NOTE: To connect to a powered speaker or sound system, use the audio out or S/PDIF connector on state. • Blinking amber - NOTICE: To avoid loss of data, never turn... such as memory keys, digital cameras, and MP3 players. 8 Headphone connector - Connects to a microphone for audio input. 10 Hard drive activity light - Using Your Studio Slim 540s 6 Power button and light - there may be a problem with either the system board or...
Setup Guide
Page 19
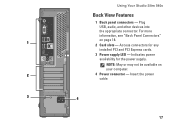
Indicates power availability for any installed PCI and PCI Express cards. 3 Power supply LED - NOTE: May or may not be available on page 18. 1 2 Card slots - Access connectors for the power supply. Using Your Studio Slim 540s Back View Features 1 Back panel connectors - Plug USB, audio, and other devices into the appropriate connector. For more information, see "Back Panel Connectors" on your computer. 2 4 Power connector - Insert the power cable. 3 4 17
Indicates power availability for any installed PCI and PCI Express cards. 3 Power supply LED - NOTE: May or may not be available on page 18. 1 2 Card slots - Access connectors for the power supply. Using Your Studio Slim 540s Back View Features 1 Back panel connectors - Plug USB, audio, and other devices into the appropriate connector. For more information, see "Back Panel Connectors" on your computer. 2 4 Power connector - Insert the power cable. 3 4 17

Setup Guide
Page 23
... → Control Panel→ System and Maintenance→ Welcome Center→ Transfer files and settings. 2. Using Your Studio Slim 540s Customizing Your Energy Settings You can use the power options in the Back up computer. 3. This power option offers full performance when you periodically back up files: 1. Microsoft® Windows Vista® provides three default...
... → Control Panel→ System and Maintenance→ Welcome Center→ Transfer files and settings. 2. Using Your Studio Slim 540s Customizing Your Energy Settings You can use the power options in the Back up computer. 3. This power option offers full performance when you periodically back up files: 1. Microsoft® Windows Vista® provides three default...


