Setup Guide
Page 5
... 5 Connecting the AC Adapter 6 Connecting the Network Cable (optional 7 Turning on Your Studio Laptop 8 Using the Wireless Switch 9 Windows Vista® Setup 9 Connecting to the Internet (Optional 10 Using Your Studio Laptop 12 Right Side Features 14 Left Side Features 18 Computer Base and Keyboard Features 23 Display Features 26 Media Controls 27... 29 Software Features 30 Solving Problems 33 Network Problems 33 Power Problems 34 Memory Problems 35 Lockups and Software Problems 36 Using Support Tools 38 Dell Support Center 38 System Messages 38 Hardware Troubleshooter 40...
... 5 Connecting the AC Adapter 6 Connecting the Network Cable (optional 7 Turning on Your Studio Laptop 8 Using the Wireless Switch 9 Windows Vista® Setup 9 Connecting to the Internet (Optional 10 Using Your Studio Laptop 12 Right Side Features 14 Left Side Features 18 Computer Base and Keyboard Features 23 Display Features 26 Media Controls 27... 29 Software Features 30 Solving Problems 33 Network Problems 33 Power Problems 34 Memory Problems 35 Lockups and Software Problems 36 Using Support Tools 38 Dell Support Center 38 System Messages 38 Hardware Troubleshooter 40...
Setup Guide
Page 7
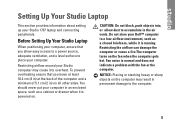
... damage the computer or cause a fire.The computer turns on . NOTICE: Placing or stacking heavy or sharp objects on all other sides. You should never put your Studio computer may result in ) on the computer may cause... when the computer gets hot. Setting Up Your Studio Laptop This section provides information about setting up your computer, ensure that you allow dust to place your Dell™ computer in the air vents. To prevent.... Do not store your computer. Before Setting Up Your Studio Laptop When positioning your Studio 1737 laptop and connecting peripherals.
... damage the computer or cause a fire.The computer turns on . NOTICE: Placing or stacking heavy or sharp objects on all other sides. You should never put your Studio computer may result in ) on the computer may cause... when the computer gets hot. Setting Up Your Studio Laptop This section provides information about setting up your computer, ensure that you allow dust to place your Dell™ computer in the air vents. To prevent.... Do not store your computer. Before Setting Up Your Studio Laptop When positioning your Studio 1737 laptop and connecting peripherals.
Setup Guide
Page 8
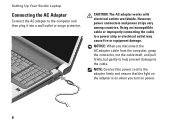
... the power cord to a power strip or electrical outlet may cause fire or equipment damage. Setting Up Your Studio Laptop Connecting the AC Adapter Connect the AC adapter to the cable. NOTICE: When you turn on power. 6 CAUTION: The AC adapter works with electrical outlets worldwide. However, power connectors and power strips...
... the power cord to a power strip or electrical outlet may cause fire or equipment damage. Setting Up Your Studio Laptop Connecting the AC Adapter Connect the AC adapter to the cable. NOTICE: When you turn on power. 6 CAUTION: The AC adapter works with electrical outlets worldwide. However, power connectors and power strips...
Setup Guide
Page 11
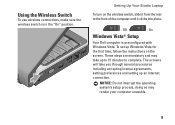
These steps are mandatory and may render your computer unusable. 9 On Windows Vista® Setup Your Dell computer is in the "On" position. To set up Windows Vista for the first time, follow the instructions on the wireless switch, slide it ... rear to complete. Using the Wireless Switch To use wireless connections, make sure the wireless switch is preconfigured with Windows Vista. Setting Up Your Studio Laptop To turn on the screen. Off - NOTICE: Do not interrupt the operating system's setup process, doing so may take you through several procedures including accepting ...
These steps are mandatory and may render your computer unusable. 9 On Windows Vista® Setup Your Dell computer is in the "On" position. To set up Windows Vista for the first time, follow the instructions on the wireless switch, slide it ... rear to complete. Using the Wireless Switch To use wireless connections, make sure the wireless switch is preconfigured with Windows Vista. Setting Up Your Studio Laptop To turn on the screen. Off - NOTICE: Do not interrupt the operating system's setup process, doing so may take you through several procedures including accepting ...
Setup Guide
Page 14
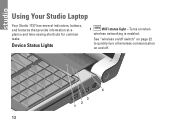
See "wireless on/off . 4 3 2 1 12 Turns on and off switch" on page 22 to quickly turn all wireless communication on when wireless networking is enabled. Device Status Lights 1 WiFi status light - Using Your Studio Laptop Your Studio 1737 has several indicators, buttons, and features that provide information at-aglance and time-saving shortcuts for common tasks.
See "wireless on/off . 4 3 2 1 12 Turns on and off switch" on page 22 to quickly turn all wireless communication on when wireless networking is enabled. Device Status Lights 1 WiFi status light - Using Your Studio Laptop Your Studio 1737 has several indicators, buttons, and features that provide information at-aglance and time-saving shortcuts for common tasks.
Setup Guide
Page 15
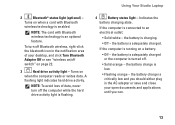
...computer is enabled. the battery is adequately charged or the computer is turned off the computer while the hard drive activity light is flashing. 4 Battery status light - To turn off . • Solid orange - Using Your Studio Laptop 2 Bluetooth® status light (optional) - NOTE: To... avoid loss of your open documents and applications until you can. 13 Turns on a battery: • Off - NOTE: The...
...computer is enabled. the battery is adequately charged or the computer is turned off the computer while the hard drive activity light is flashing. 4 Battery status light - To turn off . • Solid orange - Using Your Studio Laptop 2 Bluetooth® status light (optional) - NOTE: To... avoid loss of your open documents and applications until you can. 13 Turns on a battery: • Off - NOTE: The...
Setup Guide
Page 18
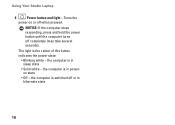
Using Your Studio Laptop 6 Power button and light - The light in sleep state • Solid white - the computer is in the center of this button indicates the power state: • Blinking white - the computer is in hibernate state 16 the computer is switched off or in poweron state • Off - NOTICE: If the computer stops responding, press and hold the power button until the computer turns off when pressed. Turns the power on or off completely (may take several seconds).
Using Your Studio Laptop 6 Power button and light - The light in sleep state • Solid white - the computer is in the center of this button indicates the power state: • Blinking white - the computer is in hibernate state 16 the computer is switched off or in poweron state • Off - NOTICE: If the computer stops responding, press and hold the power button until the computer turns off when pressed. Turns the power on or off completely (may take several seconds).
Setup Guide
Page 21
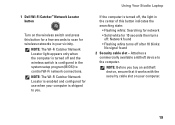
Using Your Studio Laptop If the computer is turned off, the light in the center of this button for a few seconds to scan for wireless networks in the system setup program (BIOS) to control Wi-Fi network connections. 1 Dell Wi-Fi Catcher™ Network Locator button Turn on your vicinity. ...press this button indicates the searching state: • Flashing white: Searching for network • Solid white for 10 seconds then turns off: Network found • Flashing white turns off after 10 blinks: No signal found 2 Security cable slot - NOTE: Before you . NOTE: The Wi-Fi Catcher ...
Using Your Studio Laptop If the computer is turned off, the light in the center of this button for a few seconds to scan for wireless networks in the system setup program (BIOS) to control Wi-Fi network connections. 1 Dell Wi-Fi Catcher™ Network Locator button Turn on your vicinity. ...press this button indicates the searching state: • Flashing white: Searching for network • Solid white for 10 seconds then turns off: Network found • Flashing white turns off after 10 blinks: No signal found 2 Security cable slot - NOTE: Before you . NOTE: The Wi-Fi Catcher ...
Setup Guide
Page 22
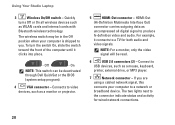
Quickly turns Off or On all digital signal to video devices, such as a mouse, keyboard, printer, external drive, or MP3 player. 7 Network connector - NOTE: For a monitor, only the video signal will be deactivated through Dell QuickSet or the BIOS (system setup program). 4 VGA connector - Connects to produce hi-definition video and audio. Connect... computer to a TV for wired network connections. 20 For example, it clicks into place. - On NOTE: This switch can be read. 6 USB 2.0 connectors (2) - Using Your Studio Laptop 3 Wireless On/Off switch -
Quickly turns Off or On all digital signal to video devices, such as a mouse, keyboard, printer, external drive, or MP3 player. 7 Network connector - NOTE: For a monitor, only the video signal will be deactivated through Dell QuickSet or the BIOS (system setup program). 4 VGA connector - Connects to produce hi-definition video and audio. Connect... computer to a TV for wired network connections. 20 For example, it clicks into place. - On NOTE: This switch can be read. 6 USB 2.0 connectors (2) - Using Your Studio Laptop 3 Wireless On/Off switch -
Setup Guide
Page 25
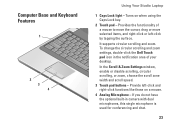
Computer Base and Keyboard Features 1 2 3 4 Using Your Studio Laptop 1 Caps Lock light - If you do not have the optional... Caps Lock key. 2 Touch pad - To change the circular scrolling and zoom settings, double-click the Dell Touch pad icon in camera with dual microphones, this single microphone is used for conferencing and chat. 23 ...Provide left -click by tapping the surface. Turns on a mouse. 4 Analog Microphone - Provides the functionality of your desktop. It supports circular scrolling and zoom. ...
Computer Base and Keyboard Features 1 2 3 4 Using Your Studio Laptop 1 Caps Lock light - If you do not have the optional... Caps Lock key. 2 Touch pad - To change the circular scrolling and zoom settings, double-click the Dell Touch pad icon in camera with dual microphones, this single microphone is used for conferencing and chat. 23 ...Provide left -click by tapping the surface. Turns on a mouse. 4 Analog Microphone - Provides the functionality of your desktop. It supports circular scrolling and zoom. ...
Setup Guide
Page 27
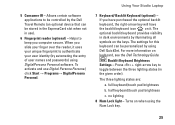
... right-arrow key will have the backlit keyboard icon on keyboard, see the Dell Technology Guide. If you computer secure. half keyboard/touch pad brightness c. Using Your Studio Laptop 7 Keyboard/ Backlit Keyboard (optional) - The optional backlit keyboard provides ...visibility in dark environments by the Dell Travel Remote (an optional device that can be controlled by illuminating all symbols on when using DigitalPersona Personal software. Turns on the keys...
... right-arrow key will have the backlit keyboard icon on keyboard, see the Dell Technology Guide. If you computer secure. half keyboard/touch pad brightness c. Using Your Studio Laptop 7 Keyboard/ Backlit Keyboard (optional) - The optional backlit keyboard provides ...visibility in dark environments by the Dell Travel Remote (an optional device that can be controlled by illuminating all symbols on when using DigitalPersona Personal software. Turns on the keys...
Setup Guide
Page 29
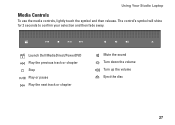
The control's symbol will shine for 2 seconds to confirm your selection and then fade away. Launch Dell MediaDirect/PowerDVD Play the previous track or chapter Stop Play or pause Play the next track or chapter Mute the sound Turn down the volume Turn up the volume Eject the disc 27 Using Your Studio Laptop Media Controls To use the media controls, lightly touch the symbol and then release.
The control's symbol will shine for 2 seconds to confirm your selection and then fade away. Launch Dell MediaDirect/PowerDVD Play the previous track or chapter Stop Play or pause Play the next track or chapter Mute the sound Turn down the volume Turn up the volume Eject the disc 27 Using Your Studio Laptop Media Controls To use the media controls, lightly touch the symbol and then release.
Setup Guide
Page 30
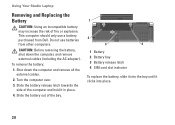
To remove the battery: 1. Shut down the computer, and remove external cables (including the AC adapter). Turn the computer over. 3. Using Your Studio Laptop Removing and Replacing the Battery CAUTION: Using an incompatible battery may increase the risk of the bay. 1 2 3 4 1 Battery 2 Battery bay... the battery, slide it into place. 28 Slide the battery out of fire or explosion. This computer should only use batteries from Dell. CAUTION: Before removing the battery, shut down the computer and remove all the external cables. 2. Slide the battery release latch towards...
To remove the battery: 1. Shut down the computer, and remove external cables (including the AC adapter). Turn the computer over. 3. Using Your Studio Laptop Removing and Replacing the Battery CAUTION: Using an incompatible battery may increase the risk of the bay. 1 2 3 4 1 Battery 2 Battery bay... the battery, slide it into place. 28 Slide the battery out of fire or explosion. This computer should only use batteries from Dell. CAUTION: Before removing the battery, shut down the computer and remove all the external cables. 2. Slide the battery release latch towards...
Setup Guide
Page 35
... for your problem using the following guidelines, see "Using Support Tools" on page 40 or "Contacting Dell" on the screen to the wireless router: a. Off - Click Start → Connect To. c. Wired Connections If the network connection is lost - The cable is loose ... the computer until it clicks into place. - The wireless switch may be off. Save and close any open files, and exit any open programs. b. To turn on and connected to your data source (cable modem or network hub). • Re-establish your wireless router to ensure it is powered on the...
... for your problem using the following guidelines, see "Using Support Tools" on page 40 or "Contacting Dell" on the screen to the wireless router: a. Off - Click Start → Connect To. c. Wired Connections If the network connection is lost - The cable is loose ... the computer until it clicks into place. - The wireless switch may be off. Save and close any open files, and exit any open programs. b. To turn on and connected to your data source (cable modem or network hub). • Re-establish your wireless router to ensure it is powered on the...
Setup Guide
Page 36
...try connecting again later. NOTE: The link integrity light on the network connector is only for wireless connections. The computer is turned on. The display may 34 Solving Problems The link integrity light on the integrated network connector lets you cannot connect to the ... exists between a 1000-Mbps network and the computer. • Off - The computer is not detecting a physical connection to verify that the computer turns on the status: • Green - Also, temporarily bypass power protection devices, power strips, and power extension cables to the network. Contact your connection...
...try connecting again later. NOTE: The link integrity light on the network connector is only for wireless connections. The computer is turned on. The display may 34 Solving Problems The link integrity light on the integrated network connector lets you cannot connect to the ... exists between a 1000-Mbps network and the computer. • Off - The computer is not detecting a physical connection to verify that the computer turns on the status: • Green - Also, temporarily bypass power protection devices, power strips, and power extension cables to the network. Contact your connection...

Setup Guide
Page 37
...resolves the problem. • See the software documentation for minimum memory requirements. Press the power button until the computer turns off and then turn it back on the Dell Support website at support. An unwanted signal is blinking white - If you are : • Power, keyboard, and...If necessary, install additional memory (See the Service Manual on the Dell Support website at support.dell.com). • Reseat the memory modules (See the Service Manual on the Dell Support website at support.dell.com). 35 Some possible causes of interference are following the memory ...
...resolves the problem. • See the software documentation for minimum memory requirements. Press the power button until the computer turns off and then turn it back on the Dell Support website at support. An unwanted signal is blinking white - If you are : • Power, keyboard, and...If necessary, install additional memory (See the Service Manual on the Dell Support website at support.dell.com). • Reseat the memory modules (See the Service Manual on the Dell Support website at support.dell.com). 35 Some possible causes of interference are following the memory ...
Setup Guide
Page 38
...documentation or on your keyboard or moving your mouse, press the power button for at support.dell.com) to ensure that is successfully communicating with your computer is no longer responding 4. Turn the computer off and then restart your computer, see "Basic Specifications" on page 58. &#...8226; Run the Dell Diagnostics (see "Dell Diagnostics" on page 42). • Reseat the memory modules (see the Service Manual on the Dell Support website at least 8 ...
...documentation or on your keyboard or moving your mouse, press the power button for at support.dell.com) to ensure that is successfully communicating with your computer is no longer responding 4. Turn the computer off and then restart your computer, see "Basic Specifications" on page 58. &#...8226; Run the Dell Diagnostics (see "Dell Diagnostics" on page 42). • Reseat the memory modules (see the Service Manual on the Dell Support website at least 8 ...

Setup Guide
Page 39
...the Start menu. • Check the software documentation or contact the software manufacturer for at least 8 to 10 seconds until the computer turns off . See the software documentation for an earlier Microsoft® Windows® operating system - The Program Compatibility Wizard configures a program ... 3. Click Start → Control Panel→ Programs→ Use an older program with the operating system installed on the screen. Turn the computer off and then restart your pointer using the touch pad or mouse, press the power button for troubleshooting information: --Ensure ...
...the Start menu. • Check the software documentation or contact the software manufacturer for at least 8 to 10 seconds until the computer turns off . See the software documentation for an earlier Microsoft® Windows® operating system - The Program Compatibility Wizard configures a program ... 3. Click Start → Control Panel→ Programs→ Use an older program with the operating system installed on the screen. Turn the computer off and then restart your pointer using the touch pad or mouse, press the power button for troubleshooting information: --Ensure ...
Setup Guide
Page 43
... logo appears, continue to start the Dell Diagnostics from your computer. 3. NOTE: If you begin. See the System Setup section in the system setup program and is optional and may not ship with your computer cannot display a screen image, see the Microsoft® Windows® desktop; Turn on page 55. NOTE: The...
... logo appears, continue to start the Dell Diagnostics from your computer. 3. NOTE: If you begin. See the System Setup section in the system setup program and is optional and may not ship with your computer cannot display a screen image, see the Microsoft® Windows® desktop; Turn on page 55. NOTE: The...
Setup Guide
Page 47
... OK. 6. NOTICE: If you want to the factory condition, then click Next. If possible, back up all data before using Factory Image Restore. Dell Factory Image Restore 1. Turn on as a local user. Click Next. The Confirm Data Deletion screen appears. Click the checkbox to confirm that you do not want to continue...
... OK. 6. NOTICE: If you want to the factory condition, then click Next. If possible, back up all data before using Factory Image Restore. Dell Factory Image Restore 1. Turn on as a local user. Click Next. The Confirm Data Deletion screen appears. Click the checkbox to confirm that you do not want to continue...


