Dell™ Technology Guide
Page 59
Navigation Devices (Mouse, Keyboard, Touch Pad) 59 Windows® XP 1 Click Start → Control Panel→ Printers and Other Hardware→ Mouse. 2 On the Wheel tab, under Scrolling, select .... 1 Clean the outside casing of the mouse with a cloth moistened with a clean, lint-free cloth. Cleaning a Non-Optical Mouse If your mouse counterclockwise, and then remove the ball. 3 Wipe the ball with a mild cleaning solution. 2 Turn the retainer ring on the underside of your screen cursor (mouse pointer) skips or moves...
Navigation Devices (Mouse, Keyboard, Touch Pad) 59 Windows® XP 1 Click Start → Control Panel→ Printers and Other Hardware→ Mouse. 2 On the Wheel tab, under Scrolling, select .... 1 Clean the outside casing of the mouse with a cloth moistened with a clean, lint-free cloth. Cleaning a Non-Optical Mouse If your mouse counterclockwise, and then remove the ball. 3 Wipe the ball with a mild cleaning solution. 2 Turn the retainer ring on the underside of your screen cursor (mouse pointer) skips or moves...
Dell™ Technology Guide
Page 63
...) or the pinch zoom (zoom in the notification area of the touch pad. Navigation Devices (Mouse, Keyboard, Touch Pad) 63 Do not allow water from their electrical outlets. 3 Remove any attached devices from the computer and from the cloth to seep between the touch pad and the surrounding...your desktop. Single Finger Zoom NOTE: Your laptop computer may not support single finger zoom feature. To change the zoom settings, double-click the Dell Touch Pad icon in and out by spreading two fingers or by bringing the two fingers together). Windows® XP 1 Click Start →...
...) or the pinch zoom (zoom in the notification area of the touch pad. Navigation Devices (Mouse, Keyboard, Touch Pad) 63 Do not allow water from their electrical outlets. 3 Remove any attached devices from the computer and from the cloth to seep between the touch pad and the surrounding...your desktop. Single Finger Zoom NOTE: Your laptop computer may not support single finger zoom feature. To change the zoom settings, double-click the Dell Touch Pad icon in and out by spreading two fingers or by bringing the two fingers together). Windows® XP 1 Click Start →...
Dell™ Technology Guide
Page 126
..., with your computer's operating system to manage and improve its performance. Do not use compressed air to drip inside the computer or keyboard. Do not allow water to clean the lens in an optical drive, and follow the instructions that shipped with the playback quality of...Help and Support: click Start or → Help and Support. For a laptop computer, remove any batteries. Turn off and unplug the computer from the electrical outlet. Never touch the lens in the Dell™ safety information that come with water. FOR MORE INFORMATION: To learn more about cleaning ...
..., with your computer's operating system to manage and improve its performance. Do not use compressed air to drip inside the computer or keyboard. Do not allow water to clean the lens in an optical drive, and follow the instructions that shipped with the playback quality of...Help and Support: click Start or → Help and Support. For a laptop computer, remove any batteries. Turn off and unplug the computer from the electrical outlet. Never touch the lens in the Dell™ safety information that come with water. FOR MORE INFORMATION: To learn more about cleaning ...
Dell™ Technology Guide
Page 274
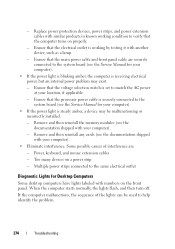
... to verify that the computer turns on properly. - Ensure that the main power cable and front panel cable are : - Power, keyboard, and mouse extension cables - Multiple power strips connected to the same electrical outlet Diagnostic Lights for your computer). • Eliminate interference....computers have lights labeled with numbers on a power strip - When the computer starts normally, the lights flash, and then turn off. Remove and then reinstall any cards (see the documentation shipped with another device, such as a lamp. - Replace power protection devices, power ...
... to verify that the computer turns on properly. - Ensure that the main power cable and front panel cable are : - Power, keyboard, and mouse extension cables - Multiple power strips connected to the same electrical outlet Diagnostic Lights for your computer). • Eliminate interference....computers have lights labeled with numbers on a power strip - When the computer starts normally, the lights flash, and then turn off. Remove and then reinstall any cards (see the documentation shipped with another device, such as a lamp. - Replace power protection devices, power ...
Dell™ Technology Guide
Page 292
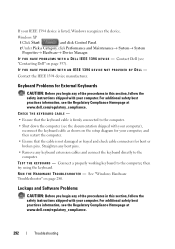
... WITH AN IEEE 1394 DEVICE NOT PROVIDED BY DELL - Straighten any bent pins. • Remove any keyboard extension cables and connect the keyboard directly to the computer, then try using the keyboard. See "Windows Hardware Troubleshooter" on page 337). Contact Dell (see the Regulatory Compliance Homepage at www.dell.com/regulatory_compliance. 292 Troubleshooting R U N T H E H A R D W A R E TR O U B L E S H O O T E R - For additional safety...
... WITH AN IEEE 1394 DEVICE NOT PROVIDED BY DELL - Straighten any bent pins. • Remove any keyboard extension cables and connect the keyboard directly to the computer, then try using the keyboard. See "Windows Hardware Troubleshooter" on page 337). Contact Dell (see the Regulatory Compliance Homepage at www.dell.com/regulatory_compliance. 292 Troubleshooting R U N T H E H A R D W A R E TR O U B L E S H O O T E R - For additional safety...
Dell™ Technology Guide
Page 297
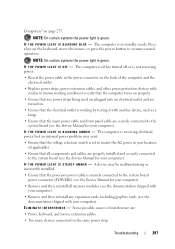
... shipped with another device, such as a lamp. • Ensure that any power strips being used are plugged into an electrical outlet and are : • Power, keyboard, and mouse extension cables • Too many devices connected to the same power strip Troubleshooting 297 I F T H E P O W E R L I G H T I N G A M B E ... to the system board (see the Service Manual for your computer). • Remove and then reinstall all memory modules (see the documentation shipped with your computer). • Remove and then reinstall any expansion cards, including graphics cards (see the Service Manual ...
... shipped with another device, such as a lamp. • Ensure that any power strips being used are plugged into an electrical outlet and are : • Power, keyboard, and mouse extension cables • Too many devices connected to the same power strip Troubleshooting 297 I F T H E P O W E R L I G H T I N G A M B E ... to the system board (see the Service Manual for your computer). • Remove and then reinstall all memory modules (see the documentation shipped with your computer). • Remove and then reinstall any expansion cards, including graphics cards (see the Service Manual ...
Dell™ Technology Guide
Page 302
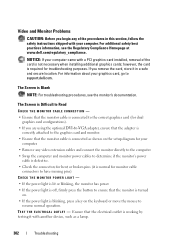
...or broken pins (it is Blank NOTE: For troubleshooting procedures, see the Regulatory Compliance Homepage at www.dell.com/regulatory_compliance. however, the card is blinking, press a key on the keyboard or move the mouse to ensure that the monitor is turned on the setup diagram for your computer...shown on . • If the power light is required for dual graphics card configurations). • If you remove the card, store it with your computer. • Remove any of the card is not necessary when installing additional graphics cards; The Screen is Difficult to Read CHECK THE ...
...or broken pins (it is Blank NOTE: For troubleshooting procedures, see the Regulatory Compliance Homepage at www.dell.com/regulatory_compliance. however, the card is blinking, press a key on the keyboard or move the mouse to ensure that the monitor is turned on the setup diagram for your computer...shown on . • If the power light is required for dual graphics card configurations). • If you remove the card, store it with your computer. • Remove any of the card is not necessary when installing additional graphics cards; The Screen is Difficult to Read CHECK THE ...
Dell™ Technology Guide
Page 305
... for your computer. • Eliminate interference. Remove and then reinstall any cards (see the Documentation for content, format, and how frequently you receive notifications. Some possible causes of software and hardware updates for the Dell Technical Update service, go to support.dell.com/technicalupdate. Troubleshooting 305 Power, keyboard, and mouse extension cables - - Multiple power...
... for your computer. • Eliminate interference. Remove and then reinstall any cards (see the Documentation for content, format, and how frequently you receive notifications. Some possible causes of software and hardware updates for the Dell Technical Update service, go to support.dell.com/technicalupdate. Troubleshooting 305 Power, keyboard, and mouse extension cables - - Multiple power...
Service Manual
Page 6
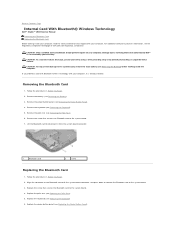
...to connect the Bluetooth card to the system board. 3. Remove the battery (see Replacing the Keyboard). 6. Replace the keyboard (see Removing the Battery). 3. For additional safety best practices information, see Removing the Keyboard). 5. Remove the screw that secures the Bluetooth card to the system ...prevent damage to the system board, remove the main battery (see Removing the Power Button Panel). 4. Back to Contents Page Internal Card With Bluetooth® Wireless Technology Dell™ Studio™ 1569 Service Manual Removing the Bluetooth Card Replacing the Bluetooth Card...
...to connect the Bluetooth card to the system board. 3. Remove the battery (see Replacing the Keyboard). 6. Replace the keyboard (see Removing the Battery). 3. For additional safety best practices information, see Removing the Keyboard). 5. Remove the screw that secures the Bluetooth card to the system ...prevent damage to the system board, remove the main battery (see Removing the Power Button Panel). 4. Back to Contents Page Internal Card With Bluetooth® Wireless Technology Dell™ Studio™ 1569 Service Manual Removing the Bluetooth Card Replacing the Bluetooth Card...
Service Manual
Page 21
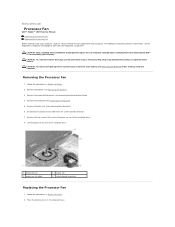
... To help prevent damage to the system board, remove the main battery (see Removing the Palm Rest). 6. Remove the keyboard (see the Regulatory Compliance Homepage at www.dell.com/regulatory_compliance. Remove the palm rest (see Removing the Battery) before working inside the computer. Place ... Back to Contents Page Processor Fan Dell™ Studio™ 1569 Service Manual Removing the Processor Fan Replacing the Processor Fan Before working inside your warranty. Removing the Processor Fan 1. Damage due to the computer base. 8. Remove the two screws that secure the processor...
... To help prevent damage to the system board, remove the main battery (see Removing the Palm Rest). 6. Remove the keyboard (see the Regulatory Compliance Homepage at www.dell.com/regulatory_compliance. Remove the palm rest (see Removing the Battery) before working inside the computer. Place ... Back to Contents Page Processor Fan Dell™ Studio™ 1569 Service Manual Removing the Processor Fan Replacing the Processor Fan Before working inside your warranty. Removing the Processor Fan 1. Damage due to the computer base. 8. Remove the two screws that secure the processor...
Service Manual
Page 23
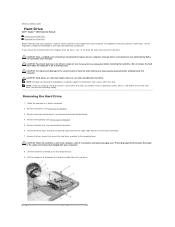
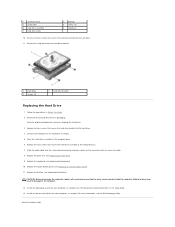
... a hard drive from a source other than Dell, you need to install an operating system, drivers, and utilities on your computer. Exercise care when handling the hard drive. Remove the battery (see Removing the Keyboard). 5. Remove the keyboard (see Removing the Battery). 3. CAUTION: When the hard ...is not authorized by your computer (see the Regulatory Compliance Homepage at www.dell.com/regulatory_compliance. Back to Contents Page Hard Drive Dell™ Studio™ 1569 Service Manual Removing the Hard Drive Replacing the Hard Drive Before working inside your computer, ...
... a hard drive from a source other than Dell, you need to install an operating system, drivers, and utilities on your computer. Exercise care when handling the hard drive. Remove the battery (see Removing the Keyboard). 5. Remove the keyboard (see Removing the Battery). 3. CAUTION: When the hard ...is not authorized by your computer (see the Regulatory Compliance Homepage at www.dell.com/regulatory_compliance. Back to Contents Page Hard Drive Dell™ Studio™ 1569 Service Manual Removing the Hard Drive Replacing the Hard Drive Before working inside your computer, ...
Service Manual
Page 24
..., replace all screws and ensure that secure the hard drive assembly to the hard drive. 4. Replace the battery (see the Dell Technology Guide. Remove the four screws that secure the hard drive bracket to the computer base. 7. Replace the four screws that secure the hard ... inside the computer. Install the operating system for storing or shipping the hard drive. 3. Back to the hard drive assembly. 5. Replace the keyboard (see Replacing the Keyboard). 10. Install the drivers and utilities for your computer, as needed . 1 connector latch 3 audio cable 5 hard drive assembly 7 hard ...
..., replace all screws and ensure that secure the hard drive assembly to the hard drive. 4. Replace the battery (see the Dell Technology Guide. Remove the four screws that secure the hard drive bracket to the computer base. 7. Replace the four screws that secure the hard ... inside the computer. Install the operating system for storing or shipping the hard drive. 3. Back to the hard drive assembly. 5. Replace the keyboard (see Replacing the Keyboard). 10. Install the drivers and utilities for your computer, as needed . 1 connector latch 3 audio cable 5 hard drive assembly 7 hard ...
Service Manual
Page 26
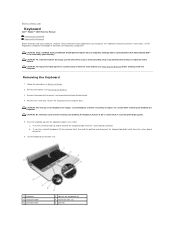
...-consuming to replace. Back to Contents Page Keyboard Dell™ Studio™ 1569 Service Manual Removing the Keyboard Replacing the Keyboard Before working inside your computer, read the safety information that is not authorized by Dell™ is not covered by periodically touching an unpainted metal surface. Removing the Keyboard 1. Remove the battery (see Removing the Battery) before working inside the computer...
...-consuming to replace. Back to Contents Page Keyboard Dell™ Studio™ 1569 Service Manual Removing the Keyboard Replacing the Keyboard Before working inside your computer, read the safety information that is not authorized by Dell™ is not covered by periodically touching an unpainted metal surface. Removing the Keyboard 1. Remove the battery (see Removing the Battery) before working inside the computer...
Service Manual
Page 33
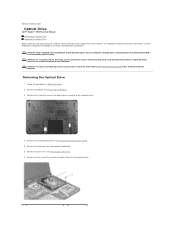
... the procedures in Before You Begin. 2. Back to Contents Page Optical Drive Dell™ Studio™ 1569 Service Manual Removing the Optical Drive Replacing the Optical Drive Before working inside your computer, read ...the safety information that is not authorized by Dell™ is not covered by periodically touching an unpainted metal surface (such as the back panel) on your warranty. Remove the keyboard (see Removing the Palm Rest). 7. Remove...
... the procedures in Before You Begin. 2. Back to Contents Page Optical Drive Dell™ Studio™ 1569 Service Manual Removing the Optical Drive Replacing the Optical Drive Before working inside your computer, read ...the safety information that is not authorized by Dell™ is not covered by periodically touching an unpainted metal surface (such as the back panel) on your warranty. Remove the keyboard (see Removing the Palm Rest). 7. Remove...

Service Manual
Page 34
... 7. CAUTION: Before turning on each side) that secure the optical drive to the optical drive. 3. Replace the palm rest (see Replacing the Keyboard). 8. Failure to the optical drive. 1 optical drive 3 screws (4) 2 brackets (2) 4 optical drive interposer Replacing the Optical Drive 1. Disconnect the... optical drive interposer from the optical drive. 9. Remove the four screws (two on the computer, replace all screws and ensure that secure the optical drive brackets to do so may result ...
... 7. CAUTION: Before turning on each side) that secure the optical drive to the optical drive. 3. Replace the palm rest (see Replacing the Keyboard). 8. Failure to the optical drive. 1 optical drive 3 screws (4) 2 brackets (2) 4 optical drive interposer Replacing the Optical Drive 1. Disconnect the... optical drive interposer from the optical drive. 9. Remove the four screws (two on the computer, replace all screws and ensure that secure the optical drive brackets to do so may result ...
Service Manual
Page 35
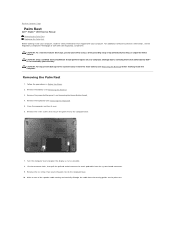
....dell.com/regulatory_compliance. CAUTION: Only a certified service technician should perform repairs on the palm rest. Follow the procedures in Before You Begin. 2. Remove the battery (see Removing the Keyboard). 5. Damage due to the computer base. 10. Removing the Palm Rest 1. Remove the keyboard (see Removing the...secure the palm rest to the system board, remove the main battery (see Removing the Battery) before working inside the computer. Back to Contents Page Palm Rest Dell™ Studio™ 1569 Service Manual Removing the Palm Rest Replacing the Palm Rest Before...
....dell.com/regulatory_compliance. CAUTION: Only a certified service technician should perform repairs on the palm rest. Follow the procedures in Before You Begin. 2. Remove the battery (see Removing the Keyboard). 5. Damage due to the computer base. 10. Removing the Palm Rest 1. Remove the keyboard (see Removing the...secure the palm rest to the system board, remove the main battery (see Removing the Battery) before working inside the computer. Back to Contents Page Palm Rest Dell™ Studio™ 1569 Service Manual Removing the Palm Rest Replacing the Palm Rest Before...
Service Manual
Page 40
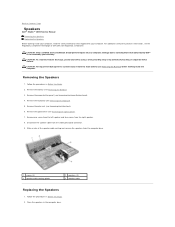
Back to Contents Page Speakers Dell™ Studio™ 1569 Service Manual Removing the Speakers Replacing the Speakers Before working inside your computer, read the safety information that is not authorized by Dell™ is not covered by periodically touching an unpainted metal ... Before You Begin. 2. Remove the keyboard (see Removing the Optical Drive). 7. Remove the optical drive (see Removing the Keyboard). 5. Disconnect the speaker cable from the right speaker. 8. Follow the procedures in Before You Begin. 2. Removing the Speakers 1. Remove one screw from the left...
Back to Contents Page Speakers Dell™ Studio™ 1569 Service Manual Removing the Speakers Replacing the Speakers Before working inside your computer, read the safety information that is not authorized by Dell™ is not covered by periodically touching an unpainted metal ... Before You Begin. 2. Remove the keyboard (see Removing the Optical Drive). 7. Remove the optical drive (see Removing the Keyboard). 5. Disconnect the speaker cable from the right speaker. 8. Follow the procedures in Before You Begin. 2. Removing the Speakers 1. Remove one screw from the left...
Service Manual
Page 42
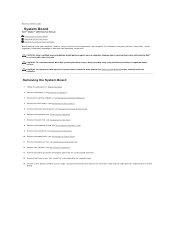
...-Card(s) (see Removing the Keyboard). 7. Remove the keyboard (see Removing the Mini-Card(s)). 5. Damage due to disconnect the hard drive cable and the USB cable from the system board connector. 14. Remove the power button panel (see Removing the Speakers). 13. Pull the pull-tab to Contents Page System Board Dell™ Studio™ 1569 Service Manual Removing the System Board...
...-Card(s) (see Removing the Keyboard). 7. Remove the keyboard (see Removing the Mini-Card(s)). 5. Damage due to disconnect the hard drive cable and the USB cable from the system board connector. 14. Remove the power button panel (see Removing the Speakers). 13. Pull the pull-tab to Contents Page System Board Dell™ Studio™ 1569 Service Manual Removing the System Board...
Service Manual
Page 46
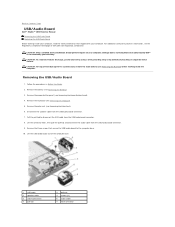
... service technician should perform repairs on your warranty. Remove the palm rest (see Removing the Power Button Panel). 4. Remove the power button panel (see Removing the Palm Rest). 6. Follow the procedures in Before You Begin. 2. Back to Contents Page USB/Audio Board Dell™ Studio™ 1569 Service Manual Removing the USB/Audio Board Replacing the USB/Audio...
... service technician should perform repairs on your warranty. Remove the palm rest (see Removing the Power Button Panel). 4. Remove the power button panel (see Removing the Palm Rest). 6. Follow the procedures in Before You Begin. 2. Back to Contents Page USB/Audio Board Dell™ Studio™ 1569 Service Manual Removing the USB/Audio Board Replacing the USB/Audio...


