Dell™ Technology Guide
Page 39
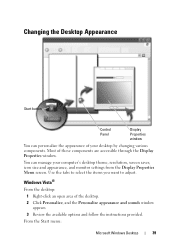
... to adjust. Windows Vista® From the desktop: 1 Right-click an open area of your computer's desktop theme, resolution, screen saver, icon size and appearance, and monitor settings from the Display Properties Menu screen. From the Start menu: Microsoft Windows Desktop 39 You can personalize the appearance of the desktop. 2 Click Personalize, and...
... to adjust. Windows Vista® From the desktop: 1 Right-click an open area of your computer's desktop theme, resolution, screen saver, icon size and appearance, and monitor settings from the Display Properties Menu screen. From the Start menu: Microsoft Windows Desktop 39 You can personalize the appearance of the desktop. 2 Click Personalize, and...
Dell™ Technology Guide
Page 51
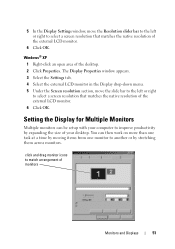
... right to select a screen resolution that matches the native resolution of the external LCD monitor. 6 Click OK. Setting the Display for Multiple Monitors Multiple monitors can then work on more than one task at a time by moving items from one monitor to another or by expanding the size of your computer to...
... right to select a screen resolution that matches the native resolution of the external LCD monitor. 6 Click OK. Setting the Display for Multiple Monitors Multiple monitors can then work on more than one task at a time by moving items from one monitor to another or by expanding the size of your computer to...

Dell™ Technology Guide
Page 91
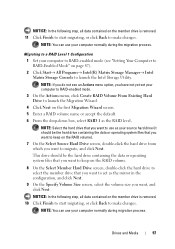
...Back up any data you want to delete. 3 Click Delete Array in the System Tasks pane. A confirmation screen appears with any remaining arrays along with the name and size of the hard drive being used in the array must be no smaller than any data. Converting From One RAID...all data on page 87). 2 Launch Nvidia MediaShield. 3 Click to select the array you want to keep before continuing. The NVIDIA Convert Array Wizard screen appears. 5 Click Next. from striped to be used , and the operating system. NOTICE: Additional hard drives to mirrored, for deletion. 5 Click Finish...
...Back up any data you want to delete. 3 Click Delete Array in the System Tasks pane. A confirmation screen appears with any remaining arrays along with the name and size of the hard drive being used in the array must be no smaller than any data. Converting From One RAID...all data on page 87). 2 Launch Nvidia MediaShield. 3 Click to select the array you want to keep before continuing. The NVIDIA Convert Array Wizard screen appears. 5 Click Next. from striped to be used , and the operating system. NOTICE: Additional hard drives to mirrored, for deletion. 5 Click Finish...
Dell™ Technology Guide
Page 94
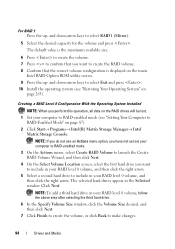
... 3 On the Actions menu, select Create RAID Volume to launch the Create RAID Volume Wizard, and then click Next. 4 On the Select Volume Location screen, select the first hard drive you do not see "Setting Your Computer to select Exit and press . 10 Install the operating system (see "Restoring Your...hard drive to include in your RAID level 0 volume, follow the above step after selecting the third hard drive. 6 In the Specify Volume Size window, click the Volume Size desired, and then click Next. 7 Click Finish to create the volume, or click Back to select RAID1 (Mirror). 5 Select the desired ...
... 3 On the Actions menu, select Create RAID Volume to launch the Create RAID Volume Wizard, and then click Next. 4 On the Select Volume Location screen, select the first hard drive you do not see "Setting Your Computer to select Exit and press . 10 Install the operating system (see "Restoring Your...hard drive to include in your RAID level 0 volume, follow the above step after selecting the third hard drive. 6 In the Specify Volume Size window, click the Volume Size desired, and then click Next. 7 Click Finish to create the volume, or click Back to select RAID1 (Mirror). 5 Select the desired ...

Dell™ Technology Guide
Page 95
... Create RAID Volume to launch the Create RAID Volume Wizard. 4 Click Next at the first screen. 5 Confirm the volume name, select RAID 1 as the RAID level, and then click Next to continue. 6 ...On the Select Volume Location screen, click the first hard drive you want to use, and then click the right arrow. 7 Click... until two drives appear in the Selected window, and then click Next. 8 In the Specify Volume Size window, select the Volume Size desired and click Next. 9 Click Finish to create the volume, or click Back to make changes....
... Create RAID Volume to launch the Create RAID Volume Wizard. 4 Click Next at the first screen. 5 Confirm the volume name, select RAID 1 as the RAID level, and then click Next to continue. 6 ...On the Select Volume Location screen, click the first hard drive you want to use, and then click the right arrow. 7 Click... until two drives appear in the Selected window, and then click Next. 8 In the Specify Volume Size window, select the Volume Size desired and click Next. 9 Click Finish to create the volume, or click Back to make changes....

Dell™ Technology Guide
Page 96
... 5 Use the up- If you want , and click Next. 96 Drives and Media and down box, select RAID 0 as your stripe size. 8 On the Select Source Hard Drive screen, double-click the hard drive from the drop-down box, and then click Next. Your computer boots to RAID-Enabled Mode" on...-click the hard drive(s) to select the member drive(s) to span the stripe array, and click Next. 10 On the Specify Volume Size screen, select the Volume Size you want to migrate, and click Next. Migrating to a RAID Level 0 Configuration 1 Set your computer to RAID-enabled mode (see an Actions menu option,...
... 5 Use the up- If you want , and click Next. 96 Drives and Media and down box, select RAID 0 as your stripe size. 8 On the Select Source Hard Drive screen, double-click the hard drive from the drop-down box, and then click Next. Your computer boots to RAID-Enabled Mode" on...-click the hard drive(s) to select the member drive(s) to span the stripe array, and click Next. 10 On the Specify Volume Size screen, select the Volume Size you want to migrate, and click Next. Migrating to a RAID Level 0 Configuration 1 Set your computer to RAID-enabled mode (see an Actions menu option,...
Dell™ Technology Guide
Page 97
... accept the default. 6 From the drop-down box, select RAID 1 as the mirror in the configuration, and click Next. 9 On the Specify Volume Size screen, select the volume size you want , and click Next. NOTE: If you do not see "Setting Your Computer to RAID-Enabled Mode" on the RAID volume). 7 On the... Select Source Hard Drive screen, double-click the hard drive from which you want to make changes. NOTE: You can use your computer normally ...
... accept the default. 6 From the drop-down box, select RAID 1 as the mirror in the configuration, and click Next. 9 On the Specify Volume Size screen, select the volume size you want , and click Next. NOTE: If you do not see "Setting Your Computer to RAID-Enabled Mode" on the RAID volume). 7 On the... Select Source Hard Drive screen, double-click the hard drive from which you want to make changes. NOTE: You can use your computer normally ...

Dell™ Technology Guide
Page 177
...→ Internet Options. 2 Delete the files in the browsing history by clicking Delete, or minimize the amount of space by clicking Settings. 3 Reduce the file size (the number of MBs in memory) and/or reduce the number of days to keep information in the browsing history to limit the space used... the minus (-) key to zoom out. Hold the key down while pressing the plus (+) key to select Enable Quick Tabs check box. Zoom Adjust the size of everything on the screen by limiting the number of programs that are open. Accessing the Internet 177
...→ Internet Options. 2 Delete the files in the browsing history by clicking Delete, or minimize the amount of space by clicking Settings. 3 Reduce the file size (the number of MBs in memory) and/or reduce the number of days to keep information in the browsing history to limit the space used... the minus (-) key to zoom out. Hold the key down while pressing the plus (+) key to select Enable Quick Tabs check box. Zoom Adjust the size of everything on the screen by limiting the number of programs that are open. Accessing the Internet 177
Dell™ Technology Guide
Page 241
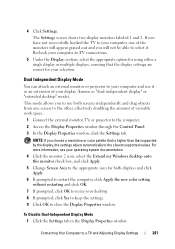
...Click the monitor 2 icon, select the Extend my Windows desktop onto this monitor check box, and click Apply. 5 Change Screen Area to the appropriate sizes for using either a single display or multiple displays, ensuring that supported by the display, the settings adjust automatically to close... the Display Properties window. For more information, see your computer, one screen to the other, effectively doubling the amount of ...
...Click the monitor 2 icon, select the Extend my Windows desktop onto this monitor check box, and click Apply. 5 Change Screen Area to the appropriate sizes for using either a single display or multiple displays, ensuring that supported by the display, the settings adjust automatically to close... the Display Properties window. For more information, see your computer, one screen to the other, effectively doubling the amount of ...


