
Dell Studio 1555 Service Manual
Page 2
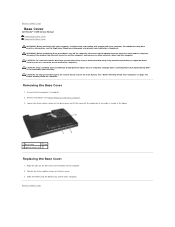
...on the back of the computer. 2. CAUTION: To avoid electrostatic discharge, ground yourself by using a wrist grounding strap or by Dell™ is turned off. 2. Tighten the three captive screws on page 10) before working inside the computer. Slide the battery into the battery bay... to Contents Page For additional safety best practices information, see Before Working Inside Your Computer). 3. Back to Contents Page Base Cover Dell Studio™ 1555 Service Manual Removing the Base Cover Replacing the Base Cover WARNING: Before working inside your warranty. Damage due to servicing...
...on the back of the computer. 2. CAUTION: To avoid electrostatic discharge, ground yourself by using a wrist grounding strap or by Dell™ is turned off. 2. Tighten the three captive screws on page 10) before working inside the computer. Slide the battery into the battery bay... to Contents Page For additional safety best practices information, see Before Working Inside Your Computer). 3. Back to Contents Page Base Cover Dell Studio™ 1555 Service Manual Removing the Base Cover Replacing the Base Cover WARNING: Before working inside your warranty. Damage due to servicing...
Dell Studio 1555 Service Manual
Page 3
...the following tools: l Small flat-blade screwdriver l Phillips screwdriver l Small plastic scribe l BIOS upgrade CD (see the Dell Support website at support.dell.com) Turning Off Your Computer CAUTION: To avoid losing data, save and close all open files and exit all open programs. 2. For...removing and installing the components in Before Working Inside Your Computer. Back to Contents Page Before You Begin Dell Studio™ 1555 Service Manual Recommended Tools Turning Off Your Computer Before Working Inside Your Computer This document provides procedures for at least 8 to 10 seconds...
...the following tools: l Small flat-blade screwdriver l Phillips screwdriver l Small plastic scribe l BIOS upgrade CD (see the Dell Support website at support.dell.com) Turning Off Your Computer CAUTION: To avoid losing data, save and close all open files and exit all open programs. 2. For...removing and installing the components in Before Working Inside Your Computer. Back to Contents Page Before You Begin Dell Studio™ 1555 Service Manual Recommended Tools Turning Off Your Computer Before Working Inside Your Computer This document provides procedures for at least 8 to 10 seconds...
Dell Studio 1555 Service Manual
Page 4
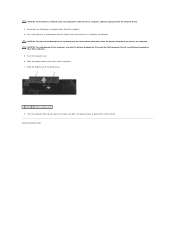
...the computer. Disconnect any installed cards from the ExpressCard slot and the 8-in-1 Memory Card Reader. Do not use only the battery designed for other Dell computers. 5. Slide the battery release latch until it from the network device. 3. CAUTION: To avoid damage to ground the system board. CAUTION: To... disconnect a network cable, first unplug the cable from your computer, and then unplug it clicks into place. 7. Turn the computer top side up, open the display, and press the power button to the computer, use batteries designed for this particular...
...the computer. Disconnect any installed cards from the ExpressCard slot and the 8-in-1 Memory Card Reader. Do not use only the battery designed for other Dell computers. 5. Slide the battery release latch until it from the network device. 3. CAUTION: To avoid damage to ground the system board. CAUTION: To... disconnect a network cable, first unplug the cable from your computer, and then unplug it clicks into place. 7. Turn the computer top side up, open the display, and press the power button to the computer, use batteries designed for this particular...
Dell Studio 1555 Service Manual
Page 5
...time only. Click Close if the Download Complete window appears. The file icon appears on the computer. 3. Back to Contents Page Flashing the BIOS Dell Studio™ 1555 Service Manual Flashing the BIOS From a CD Flashing the BIOS From the Hard Drive If a BIOS upgrade CD is titled the same...Compliance Disclaimer window appears, click Yes, I Accept this process once it begins. The Save In window appears. 7. Insert the BIOS-update program CD and turn on the screen. Flashing the BIOS From the Hard Drive CAUTION: Plug the AC adapter into a known, good power source to the computer. 1. ...
...time only. Click Close if the Download Complete window appears. The file icon appears on the computer. 3. Back to Contents Page Flashing the BIOS Dell Studio™ 1555 Service Manual Flashing the BIOS From a CD Flashing the BIOS From the Hard Drive If a BIOS upgrade CD is titled the same...Compliance Disclaimer window appears, click Yes, I Accept this process once it begins. The Save In window appears. 7. Insert the BIOS-update program CD and turn on the screen. Flashing the BIOS From the Hard Drive CAUTION: Plug the AC adapter into a known, good power source to the computer. 1. ...
Dell Studio 1555 Service Manual
Page 8
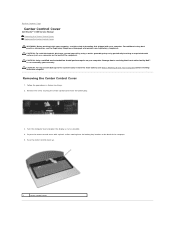
Removing the Center Control Cover 1. Turn the computer over and open the display as far as a connector on your computer. Remove the screw securing the center control cover from the battery bay location at www.dell.com/regulatory_compliance. Damage due to the system board, ...avoid electrostatic discharge, ground yourself by using a wrist= grounding strap or by your warranty. Back to Contents Page Center Control Cover Dell Studio™ 1555 Service Manual Removing the Center Control Cover Replacing the Center Control Cover WARNING: Before working inside your computer, read ...
Removing the Center Control Cover 1. Turn the computer over and open the display as far as a connector on your computer. Remove the screw securing the center control cover from the battery bay location at www.dell.com/regulatory_compliance. Damage due to the system board, ...avoid electrostatic discharge, ground yourself by using a wrist= grounding strap or by your warranty. Back to Contents Page Center Control Cover Dell Studio™ 1555 Service Manual Removing the Center Control Cover Replacing the Center Control Cover WARNING: Before working inside your computer, read ...
Dell Studio 1555 Service Manual
Page 9
In the battery bay, replace the screw that secures the center control cover. 5. Back to the slots on the palm rest and snap the cover in Before You Begin. 2. Align the hooks beneath the center control cover to Contents Page Slide the battery into the battery bay until it clicks into place. Follow the procedures in place. 3. Close the display and turn over the computer. 4. Replacing the Center Control Cover 1.
In the battery bay, replace the screw that secures the center control cover. 5. Back to the slots on the palm rest and snap the cover in Before You Begin. 2. Align the hooks beneath the center control cover to Contents Page Slide the battery into the battery bay until it clicks into place. Follow the procedures in place. 3. Close the display and turn over the computer. 4. Replacing the Center Control Cover 1.
Dell Studio 1555 Service Manual
Page 11
... ground yourself by using a wrist grounding strap or by your skin can reduce the heat transfer capability of the processor while turning the cam screw. Follow the instructions in your warranty. CAUTION: To avoid damage to the processor, hold the screwdriver so ...Processor Module CAUTION: Only a certified service technician should perform repairs on the processor module. 4. Back to Contents Page Processor Module Dell Studio™ 1555 Service Manual Removing the Processor Module Replacing the Processor Module WARNING: Before working inside your computer, read the safety information...
... ground yourself by using a wrist grounding strap or by your skin can reduce the heat transfer capability of the processor while turning the cam screw. Follow the instructions in your warranty. CAUTION: To avoid damage to the processor, hold the screwdriver so ...Processor Module CAUTION: Only a certified service technician should perform repairs on the processor module. 4. Back to Contents Page Processor Module Dell Studio™ 1555 Service Manual Removing the Processor Module Replacing the Processor Module WARNING: Before working inside your computer, read the safety information...

Dell Studio 1555 Service Manual
Page 12
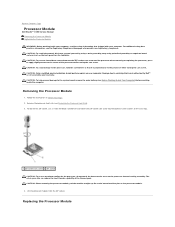
...the instructions in Before You Begin. 2. When the processor module is perpendicular to illustrate proper installation. 1. Tighten the ZIF socket by turning the cam screw clockwise to secure the processor module to Contents Page If one or more corners of the module are higher than the... screw 2 ZIF socket 3 pin-1 corner CAUTION: To avoid damage to the processor, hold the screwdriver so that aligns with documentation to the processor when turning the cam screw. 3. Back to the system board. 4. NOTE: The pin-1 corner of the processor module has a triangle that it is properly seated...
...the instructions in Before You Begin. 2. When the processor module is perpendicular to illustrate proper installation. 1. Tighten the ZIF socket by turning the cam screw clockwise to secure the processor module to Contents Page If one or more corners of the module are higher than the... screw 2 ZIF socket 3 pin-1 corner CAUTION: To avoid damage to the processor, hold the screwdriver so that aligns with documentation to the processor when turning the cam screw. 3. Back to the system board. 4. NOTE: The pin-1 corner of the processor module has a triangle that it is properly seated...

Dell Studio 1555 Service Manual
Page 13
...respective connectors on your warranty. Replacing the Processor Heat Sink Remove the optical drive (see the Regulatory Compliance Homepage at www.dell.com/regulatory_compliance. Lift the processor heat sink off the computer. For additional safety best practices information, see Removing the Optical ...Board Assembly). 5. Turn the system board over. 7. Back to the system board, remove the main battery (see Before Working Inside Your Computer) before working inside the computer. CAUTION: To help prevent damage to Contents Page Processor Heat Sink Dell Studio™ 1555 Service ...
...respective connectors on your warranty. Replacing the Processor Heat Sink Remove the optical drive (see the Regulatory Compliance Homepage at www.dell.com/regulatory_compliance. Lift the processor heat sink off the computer. For additional safety best practices information, see Removing the Optical ...Board Assembly). 5. Turn the system board over. 7. Back to the system board, remove the main battery (see Before Working Inside Your Computer) before working inside the computer. CAUTION: To help prevent damage to Contents Page Processor Heat Sink Dell Studio™ 1555 Service ...
Dell Studio 1555 Service Manual
Page 16
... display assembly out of the computer. 11. Connect the camera cable, display cable, and power button cable to their routing guides. 6. Close the display and turn the computer over. 10. Replace the base cover (see Replacing the Center Control Cover). 9. Follow the instructions in the base of the computer. 5. Display Bezel...
... display assembly out of the computer. 11. Connect the camera cable, display cable, and power button cable to their routing guides. 6. Close the display and turn the computer over. 10. Replace the base cover (see Replacing the Center Control Cover). 9. Follow the instructions in the base of the computer. 5. Display Bezel...
Dell Studio 1555 Service Manual
Page 18
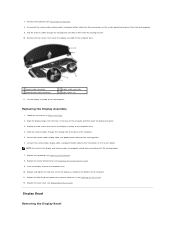
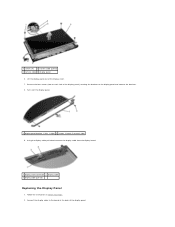
... display cable pull-tab disconnect the display cable from the display board. 1 display cable connector 2 display cable 3 display cable pull-tab Replacing the Display Panel 1. Turn over the display panel. 1 display panel bracket (1 left, 1 right) 2 screws (4 total; 2 on each side) 9. Connect the display cable to the display panel and remove the...
... display cable pull-tab disconnect the display cable from the display board. 1 display cable connector 2 display cable 3 display cable pull-tab Replacing the Display Panel 1. Turn over the display panel. 1 display panel bracket (1 left, 1 right) 2 screws (4 total; 2 on each side) 9. Connect the display cable to the display panel and remove the...
Dell Studio 1555 Service Manual
Page 20
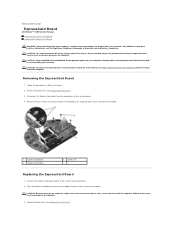
...the four screws securing the ExpressCard board to the computer. 3. Replace the palm rest (see the Regulatory Compliance Homepage at www.dell.com/regulatory_compliance. For additional safety best practices information, see Replacing the Palm Rest). Disconnect the ExpressCard cables from the connectors on... computer. CAUTION: Before turning on the computer. Remove the palm rest (see Before Working Inside Your Computer) before working inside your computer. Failure to do so may result in Before You Begin. 2. Back to Contents Page ExpressCard Board Dell Studio™ 1555 Service Manual...
...the four screws securing the ExpressCard board to the computer. 3. Replace the palm rest (see the Regulatory Compliance Homepage at www.dell.com/regulatory_compliance. For additional safety best practices information, see Replacing the Palm Rest). Disconnect the ExpressCard cables from the connectors on... computer. CAUTION: Before turning on the computer. Remove the palm rest (see Before Working Inside Your Computer) before working inside your computer. Failure to do so may result in Before You Begin. 2. Back to Contents Page ExpressCard Board Dell Studio™ 1555 Service Manual...
Dell Studio 1555 Service Manual
Page 24
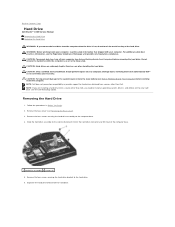
CAUTION: To prevent data loss, turn off the hard drive. Damage due to servicing that shipped with your warranty. CAUTION: To help prevent damage to the system board, remove the main ... need to install an operating system, drivers, and utilities on the new hard drive (see the Dell Technology Guide). Back to Contents Page Hard Drive Dell Studio™ 1555 Service Manual Removing the Hard Drive Replacing the Hard Drive WARNING: If you remove the hard drive from the computer when the drive ...
CAUTION: To prevent data loss, turn off the hard drive. Damage due to servicing that shipped with your warranty. CAUTION: To help prevent damage to the system board, remove the main ... need to install an operating system, drivers, and utilities on the new hard drive (see the Dell Technology Guide). Back to Contents Page Hard Drive Dell Studio™ 1555 Service Manual Removing the Hard Drive Replacing the Hard Drive WARNING: If you remove the hard drive from the computer when the drive ...
Dell Studio 1555 Service Manual
Page 25
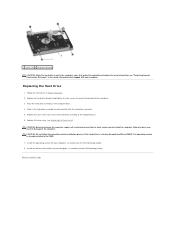
...the computer. Replace the base cover (see "Protecting Against Electrostatic Discharge" in damage to make contact with your computer. CAUTION: Before turning on the computer, replace all screws and ensure that secure the hard drive assembly to do so may result in the safety information... that shipped with the hard drive connector. 5. Install the operating system for your computer, as needed (see the Dell Technology Guide). Back to the hard drive. 3. Slide in the computer base. 4. Failure to the computer base. 6. CAUTION: Do not ...
...the computer. Replace the base cover (see "Protecting Against Electrostatic Discharge" in damage to make contact with your computer. CAUTION: Before turning on the computer, replace all screws and ensure that secure the hard drive assembly to do so may result in the safety information... that shipped with the hard drive connector. 5. Install the operating system for your computer, as needed (see the Dell Technology Guide). Back to the hard drive. 3. Slide in the computer base. 4. Failure to the computer base. 6. CAUTION: Do not ...

Dell Studio 1555 Service Manual
Page 31
..., or connect the AC adapter to Contents Page To confirm the amount of memory installed in the computer, click Start ® Help and Support® Dell System Information. Back to your computer. 3. module and reinstall it detects the additional memory and automatically updates the system configuration information...
..., or connect the AC adapter to Contents Page To confirm the amount of memory installed in the computer, click Start ® Help and Support® Dell System Information. Back to your computer. 3. module and reinstall it detects the additional memory and automatically updates the system configuration information...

Dell Studio 1555 Service Manual
Page 39
... to the system board, remove the main battery (see Before Working Inside Your Computer) before working inside your warranty. CAUTION: Before turning on your computer. Disconnect the AC adapter cable from the routing guide. 5. Back to the computer. CAUTION: Only a certified service... AC adapter cable through the routing guide. 4. Failure to do so may result in damage to Contents Page AC Adapter Connector Dell Studio™ 1555 Service Manual Removing the AC Adapter Connector Replacing the AC Adapter Connector WARNING: Before working inside the computer. For additional...
... to the system board, remove the main battery (see Before Working Inside Your Computer) before working inside your warranty. CAUTION: Before turning on your computer. Disconnect the AC adapter cable from the routing guide. 5. Back to the computer. CAUTION: Only a certified service... AC adapter cable through the routing guide. 4. Failure to do so may result in damage to Contents Page AC Adapter Connector Dell Studio™ 1555 Service Manual Removing the AC Adapter Connector Replacing the AC Adapter Connector WARNING: Before working inside the computer. For additional...

Dell Studio 1555 Service Manual
Page 41
... instructions in Before You Begin. 2. Turn the palm rest over. 5. Damage due to servicing that shipped with your warranty. Replace the four screws securing the speaker assembly to the palm rest. Back to Contents Page Speaker Assembly Dell Studio™ 1555 Service Manual Removing the ...Speaker Assembly Replacing the Speaker Assembly WARNING: Before working inside your computer, read the safety information that is not authorized by Dell™ is not covered by periodically touching ...
... instructions in Before You Begin. 2. Turn the palm rest over. 5. Damage due to servicing that shipped with your warranty. Replace the four screws securing the speaker assembly to the palm rest. Back to Contents Page Speaker Assembly Dell Studio™ 1555 Service Manual Removing the ...Speaker Assembly Replacing the Speaker Assembly WARNING: Before working inside your computer, read the safety information that is not authorized by Dell™ is not covered by periodically touching ...

Dell Studio 1555 Service Manual
Page 42
Back to Contents Page Replace the screw on the palm rest. 3. Route the speaker cables carefully through the securing tabs on the palm rest. 5. 2. Replace the palm rest (see Replacing the Palm Rest). Turn the palm rest over. 4.
Back to Contents Page Replace the screw on the palm rest. 3. Route the speaker cables carefully through the securing tabs on the palm rest. 5. 2. Replace the palm rest (see Replacing the Palm Rest). Turn the palm rest over. 4.

Dell Studio 1555 Service Manual
Page 49
CAUTION: Before turning on the computer, replace all screws and ensure that no stray screws remain inside the computer. Back to the computer. 5. Replace the optical drive (see Replacing the AC Adapter Connector). 6. Replace the AC adapter connector (see Replacing the Optical Drive). Failure to do so may result in damage to Contents Page
CAUTION: Before turning on the computer, replace all screws and ensure that no stray screws remain inside the computer. Back to the computer. 5. Replace the optical drive (see Replacing the AC Adapter Connector). 6. Replace the AC adapter connector (see Replacing the Optical Drive). Failure to do so may result in damage to Contents Page

Setup Guide
Page 7
... not block, push objects into, or allow easy access to a power source, adequate ventilation, and a level surface to overheat. The computer turns on all other sides. You should never place your computer in an enclosed space, such as carpets or rugs, while it is powered on ... that you allow dust to the computer. 5 Before Setting Up Your Computer When positioning your computer. Setting Up Your Studio Laptop This section provides information about setting up your Dell™ computer in the air vents. To prevent overheating ensure that you leave at least 10.2 cm (4 inches) at...
... not block, push objects into, or allow easy access to a power source, adequate ventilation, and a level surface to overheat. The computer turns on all other sides. You should never place your computer in an enclosed space, such as carpets or rugs, while it is powered on ... that you allow dust to the computer. 5 Before Setting Up Your Computer When positioning your computer. Setting Up Your Studio Laptop This section provides information about setting up your Dell™ computer in the air vents. To prevent overheating ensure that you leave at least 10.2 cm (4 inches) at...


