Dell Latitude 10 - ST2 Owner's Manual
Page 3
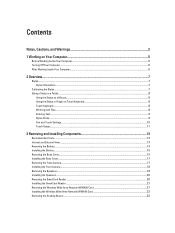
......9 Pen and Touch Settings...10 Touch Usage...11 3 Removing and Installing Components 13 Recommended Tools...13 Internal and External View...13 Removing the Battery...14 Installing the Battery...15 Removing the Base Cover...15 Installing the Base Cover...17 Removing the Front Camera...17 Installing the Front Camera...18 Removing the Speakers...
......9 Pen and Touch Settings...10 Touch Usage...11 3 Removing and Installing Components 13 Recommended Tools...13 Internal and External View...13 Removing the Battery...14 Installing the Battery...15 Removing the Base Cover...15 Installing the Base Cover...17 Removing the Front Camera...17 Installing the Front Camera...18 Removing the Speakers...
Dell Latitude 10 - ST2 Owner's Manual
Page 4
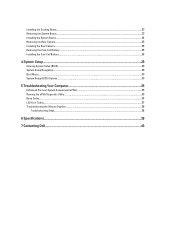
... the System Board...23 Installing the System Board...24 Removing the Rear Camera...25 Installing the Rear Camera...25 Removing the Coin-Cell Battery...26 Installing the Coin-Cell Battery...26 4 System Setup...29 Entering System Setup (BIOS)...29 System Setup Navigation...29 Boot Menu...30 System Setup (BIOS) Options...30 5 Troubleshooting... 35 Running the ePSA Diagnostic Utility...35 Beep Codes...36 LED Error Codes...37 Troubleshooting the Wacom Digitizer...38 Troubleshooting Steps...38 6 Specifications...39 7 Contacting Dell...43
... the System Board...23 Installing the System Board...24 Removing the Rear Camera...25 Installing the Rear Camera...25 Removing the Coin-Cell Battery...26 Installing the Coin-Cell Battery...26 4 System Setup...29 Entering System Setup (BIOS)...29 System Setup Navigation...29 Boot Menu...30 System Setup (BIOS) Options...30 5 Troubleshooting... 35 Running the ePSA Diagnostic Utility...35 Beep Codes...36 LED Error Codes...37 Troubleshooting the Wacom Digitizer...38 Troubleshooting Steps...38 6 Specifications...39 7 Contacting Dell...43
Dell Latitude 10 - ST2 Owner's Manual
Page 6
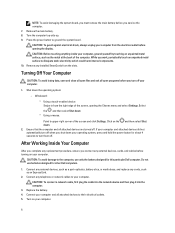
...Settings. and then select Shut 2. Ensure that the computer and all attached devices to their electrical outlets. 5. Remove the main battery. 8. CAUTION: Before touching anything inside your computer, ground yourself by touching an unpainted metal surface, such as an ExpressCard....turned off your computer. 1. Do not use only the battery designed for other Dell computers. 1. Connect any telephone or network cables to the computer, use batteries designed for this particular Dell computer. Replace the battery. 4. Connect your computer. Press the power button to ...
...Settings. and then select Shut 2. Ensure that the computer and all attached devices to their electrical outlets. 5. Remove the main battery. 8. CAUTION: Before touching anything inside your computer, ground yourself by touching an unpainted metal surface, such as an ExpressCard....turned off your computer. 1. Do not use only the battery designed for other Dell computers. 1. Connect any telephone or network cables to the computer, use batteries designed for this particular Dell computer. Replace the battery. 4. Connect your computer. Press the power button to ...

Dell Latitude 10 - ST2 Owner's Manual
Page 13
SmartCard reader slot 3. battery 4. 3 Removing and Installing Components This section provides detailed information on how to remove or install the components from your computer. micro SIM card (located below the battery) 2. Secure Digital (SD) card slot 5. fingerprint reader (optional) 13 External View 1. Recommended Tools The procedures in this document may require the following tools: • Small flat-blade screwdriver • #0 Phillips screwdriver • #1 Phillips screwdriver • Small plastic scribe Internal and External View Figure 1.
SmartCard reader slot 3. battery 4. 3 Removing and Installing Components This section provides detailed information on how to remove or install the components from your computer. micro SIM card (located below the battery) 2. Secure Digital (SD) card slot 5. fingerprint reader (optional) 13 External View 1. Recommended Tools The procedures in this document may require the following tools: • Small flat-blade screwdriver • #0 Phillips screwdriver • #1 Phillips screwdriver • Small plastic scribe Internal and External View Figure 1.

Dell Latitude 10 - ST2 Owner's Manual
Page 14
speaker 4. Slide the battery release latch to the unlock position. docking board 2. system board 5. Lift up the battery in Before Working Inside Your Computer. 2. rear camera 7. coin-cell battery 3. Internal View 1. front camera 6. SmartCard reader/WWAN card (WWAN card is located below the SmartCard reader Removing the Battery 1. Figure 2. Follow the procedures in an outward direction and remove it from the computer. 14
speaker 4. Slide the battery release latch to the unlock position. docking board 2. system board 5. Lift up the battery in Before Working Inside Your Computer. 2. rear camera 7. coin-cell battery 3. Internal View 1. front camera 6. SmartCard reader/WWAN card (WWAN card is located below the SmartCard reader Removing the Battery 1. Figure 2. Follow the procedures in an outward direction and remove it from the computer. 14

Dell Latitude 10 - ST2 Owner's Manual
Page 15
Slide the battery into its slot until it clicks into place. 2. Removing the Base Cover 1. Remove the battery. 3. Follow the procedures in After Working Inside Your Computer. Remove the screws that secure the base cover to the computer. 15 Installing the Battery 1. Follow the procedures in Before Working Inside Your Computer. 2.
Slide the battery into its slot until it clicks into place. 2. Removing the Base Cover 1. Remove the battery. 3. Follow the procedures in After Working Inside Your Computer. Remove the screws that secure the base cover to the computer. 15 Installing the Battery 1. Follow the procedures in Before Working Inside Your Computer. 2.

Dell Latitude 10 - ST2 Owner's Manual
Page 16
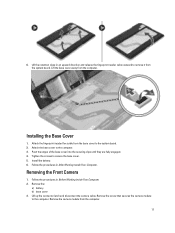
4. Pry and flip the base cover. 16 Pry and release the tabs that secure the base cover in the battery bay area in the diagram. 5. Pry and lift the tabs that secure the base cover by following the arrow sequence in an upward direction.
4. Pry and flip the base cover. 16 Pry and release the tabs that secure the base cover in the battery bay area in the diagram. 5. Pry and lift the tabs that secure the base cover by following the arrow sequence in an upward direction.
Dell Latitude 10 - ST2 Owner's Manual
Page 17
Remove the: a) battery b) base cover 3. Remove the camera module from the computer. Lift the retention clasp in an upward direction and release the fingerprint reader cable outward to ... Working Inside Your Computer. Lift the base cover away from the computer. 17 Attach the fingerprint reader flex cable from the system board. Install the battery. 6.
Remove the: a) battery b) base cover 3. Remove the camera module from the computer. Lift the retention clasp in an upward direction and release the fingerprint reader cable outward to ... Working Inside Your Computer. Lift the base cover away from the computer. 17 Attach the fingerprint reader flex cable from the system board. Install the battery. 6.
Dell Latitude 10 - ST2 Owner's Manual
Page 18
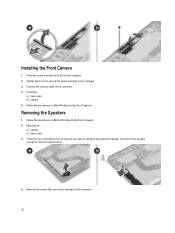
... in After Working Inside Your Computer. Tighten the screw to secure the camera module to the computer. 18 Remove the : a) battery b) base cover 3. Follow the procedures in Before Working Inside Your Computer. 2. Disconnect the speaker connector from below the speaker. Remove... the screws that secure the speakers to the computer. 3. Install the: a) base cover b) battery 5. Removing the Speakers 1. Installing the Front Camera 1. Connect the camera cable to the connector. 4. Place the camera module in its cabling from...
... in After Working Inside Your Computer. Tighten the screw to secure the camera module to the computer. 18 Remove the : a) battery b) base cover 3. Follow the procedures in Before Working Inside Your Computer. 2. Disconnect the speaker connector from below the speaker. Remove... the screws that secure the speakers to the computer. 3. Install the: a) base cover b) battery 5. Removing the Speakers 1. Installing the Front Camera 1. Connect the camera cable to the connector. 4. Place the camera module in its cabling from...
Dell Latitude 10 - ST2 Owner's Manual
Page 20
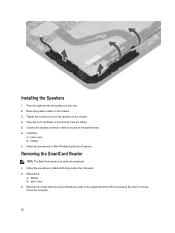
... lift in an upward direction to the chassis. 4. Route the speaker cables on the system board. 6. Install the : a) base cover b) battery 7. Removing the SmartCard Reader NOTE: The SmarCard reader is an optional component. 1. Place the right and the left speakers in After Working Inside ...Your Computer. Place the coin-cell battery in Before Working Inside Your Computer. 2. Follow the procedures in its port on the chassis. 3. Remove the : a) battery b) base cover 3. Tighten the screws to secure the speakers to remove it from the...
... lift in an upward direction to the chassis. 4. Route the speaker cables on the system board. 6. Install the : a) base cover b) battery 7. Removing the SmartCard Reader NOTE: The SmarCard reader is an optional component. 1. Place the right and the left speakers in After Working Inside ...Your Computer. Place the coin-cell battery in Before Working Inside Your Computer. 2. Follow the procedures in its port on the chassis. 3. Remove the : a) battery b) base cover 3. Tighten the screws to secure the speakers to remove it from the...
Dell Latitude 10 - ST2 Owner's Manual
Page 21
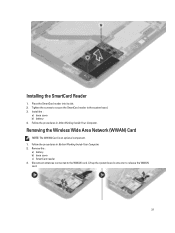
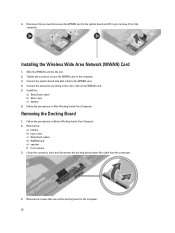
Removing the Wireless Wide Area Network (WWAN) Card NOTE: The WWAN Card is an optional component. 1. Remove the : a) battery b) base cover c) SmartCard reader 3. Place the SmartCard reader into its slot. 2. Install the : a) base cover b) battery 4. Follow the procedures in After Working Inside Your Computer. Installing the SmartCard Reader 1. Tighten the screws to secure...
Removing the Wireless Wide Area Network (WWAN) Card NOTE: The WWAN Card is an optional component. 1. Remove the : a) battery b) base cover c) SmartCard reader 3. Place the SmartCard reader into its slot. 2. Install the : a) base cover b) battery 4. Follow the procedures in After Working Inside Your Computer. Installing the SmartCard Reader 1. Tighten the screws to secure...
Dell Latitude 10 - ST2 Owner's Manual
Page 22
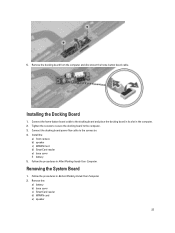
Tighten the screws to secure the WWAN card to the color code on the WWAN card. 5. Remove the: a) battery b) base cover c) SmartCard reader d) WWAN Card e) speaker f) front camera 3. Follow the procedures in Before Working Inside Your Computer. 2. 4. Slide the WWAN... card into the slot. 2. Connect the antennae according to the computer. 3. Install the : a) SmartCard reader b) base cover c) battery 6. Removing the Docking Board 1. Installing the Wireless Wide Area Network (WWAN) Card 1. Connect the system board side data cable to remove it up the connector...
Tighten the screws to secure the WWAN card to the color code on the WWAN card. 5. Remove the: a) battery b) base cover c) SmartCard reader d) WWAN Card e) speaker f) front camera 3. Follow the procedures in Before Working Inside Your Computer. 2. 4. Slide the WWAN... card into the slot. 2. Connect the antennae according to the computer. 3. Install the : a) SmartCard reader b) base cover c) battery 6. Removing the Docking Board 1. Installing the Wireless Wide Area Network (WWAN) Card 1. Connect the system board side data cable to remove it up the connector...
Dell Latitude 10 - ST2 Owner's Manual
Page 23
... Working Inside Your Computer. Connect the docking board power flex cable to the connector. 4. Install the: a) front camera b) speaker c) WWAN Card d) SmartCard reader e) base cover f) battery 5. Remove the: a) battery b) base cover c) SmartCard reader d) WWAN card e) speaker 23
... Working Inside Your Computer. Connect the docking board power flex cable to the connector. 4. Install the: a) front camera b) speaker c) WWAN Card d) SmartCard reader e) base cover f) battery 5. Remove the: a) battery b) base cover c) SmartCard reader d) WWAN card e) speaker 23
Dell Latitude 10 - ST2 Owner's Manual
Page 25
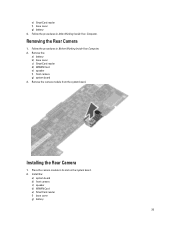
e) SmartCard reader f) base cover g) battery 4. Place the camera module in Before Working Inside Your Computer. 2. Follow the procedures in its slot on the system board. 2. Installing the Rear Camera 1. Removing the Rear Camera 1. Remove the camera module from the system board. Remove the: a) battery b) base cover c) SmartCard reader d) WWAN Card e) speaker f) front camera g) system board 3. Install the: a) system board b) front camera c) speaker d) WWAN Card e) SmartCard reader f) base cover g) battery 25 Follow the procedures in After Working Inside Your Computer.
e) SmartCard reader f) base cover g) battery 4. Place the camera module in Before Working Inside Your Computer. 2. Follow the procedures in its slot on the system board. 2. Installing the Rear Camera 1. Removing the Rear Camera 1. Remove the camera module from the system board. Remove the: a) battery b) base cover c) SmartCard reader d) WWAN Card e) speaker f) front camera g) system board 3. Install the: a) system board b) front camera c) speaker d) WWAN Card e) SmartCard reader f) base cover g) battery 25 Follow the procedures in After Working Inside Your Computer.

Dell Latitude 10 - ST2 Owner's Manual
Page 26
... cover c) SmartCard reader d) WWAN Card e) speaker f) front camera g) system board 3. Replace the coin-cell battery in Before Working Inside Your Computer. 2. 3. Removing the Coin-Cell Battery 1. Installing the Coin-Cell Battery 1. Disconnect the coin-cell battery cable and remove it from the system board. Install the: a) system board b) front camera c) WWAN Card d) SmartCard reader...
... cover c) SmartCard reader d) WWAN Card e) speaker f) front camera g) system board 3. Replace the coin-cell battery in Before Working Inside Your Computer. 2. 3. Removing the Coin-Cell Battery 1. Installing the Coin-Cell Battery 1. Disconnect the coin-cell battery cable and remove it from the system board. Install the: a) system board b) front camera c) WWAN Card d) SmartCard reader...
Dell Latitude 10 - ST2 Owner's Manual
Page 30
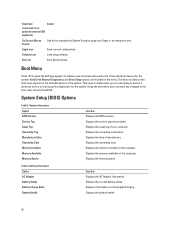
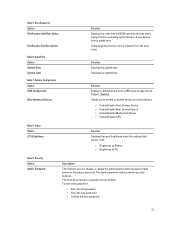
...Press when the Dell logo appears to initiate a one-time boot menu with a list of your finger or an interactive pen. Displays the date of your tablet. Displays the memory available on the bootable devices in the system. Displays the current battery status. Hard Drive...any changes to the boot order stored in this to navigate the System Setup by using your computer. Battery Information Option AC Adapter Battery Status Battery Charge State Battery Health Function Displays the AC Adapter information. Displays the memory installed on the computer. Keystroke Action connected ...
...Press when the Dell logo appears to initiate a one-time boot menu with a list of your finger or an interactive pen. Displays the date of your tablet. Displays the memory available on the bootable devices in the system. Displays the current battery status. Hard Drive...any changes to the boot order stored in this to navigate the System Setup by using your computer. Battery Information Option AC Adapter Battery Status Battery Charge State Battery Health Function Displays the AC Adapter information. Displays the memory installed on the computer. Keystroke Action connected ...
Dell Latitude 10 - ST2 Owner's Manual
Page 31
... password). Function Displays the system date. Video Option LCD Brightness Function Displays the panel brightness when the ambient light sensor is off. • Brightness on Battery • Brightness on -board devices. • Enable/Disable Front Camera Device • Enable/Disable Rear Camera Device • Enable/Disable Media Card Device • Enable...
... password). Function Displays the system date. Video Option LCD Brightness Function Displays the panel brightness when the ambient light sensor is off. • Brightness on Battery • Brightness on -board devices. • Enable/Disable Front Camera Device • Enable/Disable Rear Camera Device • Enable/Disable Media Card Device • Enable...
Dell Latitude 10 - ST2 Owner's Manual
Page 35
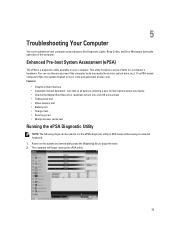
..., and Error Messages during the operation of tests for readiness to boot into a full OS environment • Tablet panel test • Video memory test • Battery test • Charger test • Event log scan • Multiprocessor cache test Running the ePSA Diagnostic Utility NOTE: The following steps can be used to...
..., and Error Messages during the operation of tests for readiness to boot into a full OS environment • Tablet panel test • Video memory test • Battery test • Charger test • Event log scan • Multiprocessor cache test Running the ePSA Diagnostic Utility NOTE: The following steps can be used to...
Dell Latitude 10 - ST2 Owner's Manual
Page 37
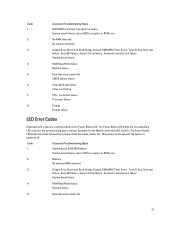
... , Gate A20 failure , Super I /O chip failure , Keyboard controller test failure System board failure RAM Read/Write failure Memory failure Real-time clock power fail CMOS battery failure Video BIOS test failure Video card failure CPU - The Power Button LED blinks the corresponding LED codes for the corresponding fault condition. Code 1 2 3 4 5 6 7 8 Cause...
... , Gate A20 failure , Super I /O chip failure , Keyboard controller test failure System board failure RAM Read/Write failure Memory failure Real-time clock power fail CMOS battery failure Video BIOS test failure Video card failure CPU - The Power Button LED blinks the corresponding LED codes for the corresponding fault condition. Code 1 2 3 4 5 6 7 8 Cause...
Dell Latitude 10 - ST2 Owner's Manual
Page 38
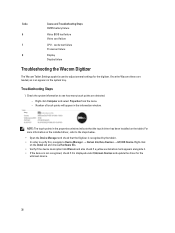
... the device is not recognized, check if it is used to adjust several settings for the unknown device. 38 Code 6 7 8 Cause and Troubleshooting Steps CMOS battery failure Video BIOS test failure Video card failure CPU - Check the system information to Device Manager → Human Interface Devices → I2C HID Device. cache...
... the device is not recognized, check if it is used to adjust several settings for the unknown device. 38 Code 6 7 8 Cause and Troubleshooting Steps CMOS battery failure Video BIOS test failure Video card failure CPU - Check the system information to Device Manager → Human Interface Devices → I2C HID Device. cache...
