
User's Guide
Page 8
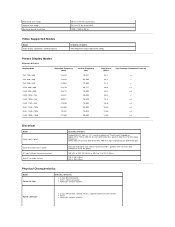
... Polarity (Horizontal/Vertical) Electrical Model Video input signals Synchronization input signals AC input voltage/frequency/current Inrush iso surge current ST2320L/ST2321L Analog RGB, 0.7 Volts +/- 5 %, positive polarity at 75 ohm input impedance Digital DVI-D TMDS, 600 mV for each...120 V: 30 A (Max.) 240 V: 60 A (Max.) Physical Characteristics Model Connector type ST2320L/ST2321L l D-sub: Blue connector l DVI-D: White connector l HDMI (for selective models) Signal cable type l D-sub: Detachable, Analog, 15 pin, shipped attached to the monitor l DVI-D l HDMI (for selective models)
... Polarity (Horizontal/Vertical) Electrical Model Video input signals Synchronization input signals AC input voltage/frequency/current Inrush iso surge current ST2320L/ST2321L Analog RGB, 0.7 Volts +/- 5 %, positive polarity at 75 ohm input impedance Digital DVI-D TMDS, 600 mV for each...120 V: 30 A (Max.) 240 V: 60 A (Max.) Physical Characteristics Model Connector type ST2320L/ST2321L l D-sub: Blue connector l DVI-D: White connector l HDMI (for selective models) Signal cable type l D-sub: Detachable, Analog, 15 pin, shipped attached to the monitor l DVI-D l HDMI (for selective models)
User's Guide
Page 14
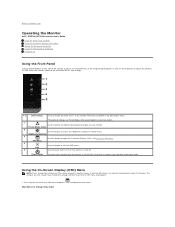
... key to launch the OSD menu and press Main Menu for different display preset modes on your monitor. Back to Contents Page Operating the Monitor Dell™ ST2320L/ST2321L monitor User's Guide Using the Front Panel Controls Using the On-Screen Display (OSD) Menu Setting the Maximum Resolution Using the... (OSD) Menu NOTE: If you change the settings and then either proceed to open the On-Screen Display (OSD). OSD Menu 4 Use this button for Analog (VGA) Input to turn the monitor on and off.
... key to launch the OSD menu and press Main Menu for different display preset modes on your monitor. Back to Contents Page Operating the Monitor Dell™ ST2320L/ST2321L monitor User's Guide Using the Front Panel Controls Using the On-Screen Display (OSD) Menu Setting the Maximum Resolution Using the... (OSD) Menu NOTE: If you change the settings and then either proceed to open the On-Screen Display (OSD). OSD Menu 4 Use this button for Analog (VGA) Input to turn the monitor on and off.

User's Guide
Page 15
...contrast. Press the button once to make your changes. 6. See the table for a complete list of all the options available for non Analog (non VGA) Input NOTE: Auto Adjust is highlighted. As you move between the setting options. Icon Menu and Submenus Brightness/Contrast Description Allows... you are using the analog (VGA) connector. 2. Or Main Menu for the monitor. 3. Press the button to enter the slide bar and then use the and ...
...contrast. Press the button once to make your changes. 6. See the table for a complete list of all the options available for non Analog (non VGA) Input NOTE: Auto Adjust is highlighted. As you move between the setting options. Icon Menu and Submenus Brightness/Contrast Description Allows... you are using the analog (VGA) connector. 2. Or Main Menu for the monitor. 3. Press the button to enter the slide bar and then use the and ...

User's Guide
Page 17
Push to select the DVI input source. DVI-D Select DVI-D input when you are using the analog (VGA) connector. Push to select the VGA input source. Back Push the button to go back to select the HDMI input source. This color setting ...
Push to select the DVI input source. DVI-D Select DVI-D input when you are using the analog (VGA) connector. Push to select the VGA input source. Back Push the button to go back to select the HDMI input source. This color setting ...

User's Guide
Page 28
... video port on the back of the the computer may vary. Connect the HDMI cable, white (digital DVI-D), or blue (analog VGA) display connector cable to complete your computer. To purchase DVI or HDMI cable, please visit Dell.com NOTE: The Graphics are connected to the computer perform the following steps/instructions: 1.
... video port on the back of the the computer may vary. Connect the HDMI cable, white (digital DVI-D), or blue (analog VGA) display connector cable to complete your computer. To purchase DVI or HDMI cable, please visit Dell.com NOTE: The Graphics are connected to the computer perform the following steps/instructions: 1.
User's Guide
Page 30
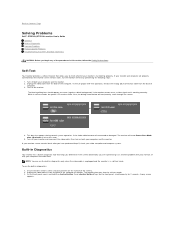
...monitor provides a self-test feature that allows you to Contents Page Solving Problems Dell™ ST2320L/ST2321L monitor User's Guide Self-Test Built-in Diagnostics Common Problems Product-Specific Problems Troubleshooting the Dell™ Soundbar (Optional) CAUTION: Before you begin any of computer. 3. ... monitor cannot sense a video signal and is functioning properly. While in diagnostics: 1. To ensure proper Self-Test operation, remove the Analog (blue connector) cable from the back of the procedures in this state. 5. To run the monitor self-test by performing the following...
...monitor provides a self-test feature that allows you to Contents Page Solving Problems Dell™ ST2320L/ST2321L monitor User's Guide Self-Test Built-in Diagnostics Common Problems Product-Specific Problems Troubleshooting the Dell™ Soundbar (Optional) CAUTION: Before you begin any of computer. 3. ... monitor cannot sense a video signal and is functioning properly. While in diagnostics: 1. To ensure proper Self-Test operation, remove the Analog (blue connector) cable from the back of the procedures in this state. 5. To run the monitor self-test by performing the following...