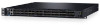

Networking S6010-ON Getting Started Guide
Page 1
Dell Networking S6010-ON Getting Started Guide Regulatory Model: S6010-ON
Dell Networking S6010-ON Getting Started Guide Regulatory Model: S6010-ON
Networking S6010-ON Getting Started Guide
Page 3
... as a Getting Started Guide to get new systems up and running and ready for the S6010-ON System provide information about the S6010-ON system, see the following information, available on the Dell Networking Support website (http://www.dell.com/support). • The Dell Networking S6010-ON Installation Guide describes installation and replacement procedures. • The...
... as a Getting Started Guide to get new systems up and running and ready for the S6010-ON System provide information about the S6010-ON system, see the following information, available on the Dell Networking Support website (http://www.dell.com/support). • The Dell Networking S6010-ON Installation Guide describes installation and replacement procedures. • The...

Networking S6010-ON Getting Started Guide
Page 4
... and safety guidelines. Topics: • Operation and Safety Considerations • Installing the Ground Lug and Bracket Assembly • Installing the Dell ReadyRails System • Install the System • Completing the Ground Wire Installation • Installing AC or DC Power Supplies • ... rack-mounted before you can read the light emitting diodes (LEDs). • The AC power cord reaches from sources of the S6010-Open Networking (ON) system. Install the Hardware 4 2 Install the Hardware This information describes installation of electrical noise, such as radios...
... and safety guidelines. Topics: • Operation and Safety Considerations • Installing the Ground Lug and Bracket Assembly • Installing the Dell ReadyRails System • Install the System • Completing the Ground Wire Installation • Installing AC or DC Power Supplies • ... rack-mounted before you can read the light emitting diodes (LEDs). • The AC power cord reaches from sources of the S6010-Open Networking (ON) system. Install the Hardware 4 2 Install the Hardware This information describes installation of electrical noise, such as radios...

Networking S6010-ON Getting Started Guide
Page 6
... • A thread-locker compound (Dell Networking recommends Threadlocker Blue 242 or equivalent). 1 Attach the end of the ground wire to prevent injury when installing this system. b Insert the end of the wire with a ground wire attached, before you install the S6010-ON switch in size and color (...typically the wire is a condensed reference. ESD damage can occur if components are mishandled. Dell Networking supplies a kit with the following: • One two-hole UL-certified...
... • A thread-locker compound (Dell Networking recommends Threadlocker Blue 242 or equivalent). 1 Attach the end of the ground wire to prevent injury when installing this system. b Insert the end of the wire with a ground wire attached, before you install the S6010-ON switch in size and color (...typically the wire is a condensed reference. ESD damage can occur if components are mishandled. Dell Networking supplies a kit with the following: • One two-hole UL-certified...

Networking S6010-ON Getting Started Guide
Page 8
... the GND lug and bracket assembly to the two-hole chassis ground connector nuts on the S6010-ON PSU side, tightening the screws to the two pan head screws. Installing the Dell ReadyRails System The ReadyRails rack mounting system is provided to easily configure your switch. CAUTION: ... flush mount, two-post center mount, or four-post threaded). 3 Attach the assembly to the S6010-ON chassis: a Apply the thread-locker compound to ensure torque between 3-5 inch/lbs. The Dell ReadyRails™ system is installed in this document are shipped attached to represent a specific switch. The...
... the GND lug and bracket assembly to the two-hole chassis ground connector nuts on the S6010-ON PSU side, tightening the screws to the two pan head screws. Installing the Dell ReadyRails System The ReadyRails rack mounting system is provided to easily configure your switch. CAUTION: ... flush mount, two-post center mount, or four-post threaded). 3 Attach the assembly to the S6010-ON chassis: a Apply the thread-locker compound to ensure torque between 3-5 inch/lbs. The Dell ReadyRails™ system is installed in this document are shipped attached to represent a specific switch. The...

Networking S6010-ON Getting Started Guide
Page 17
... compound to the mating surfaces prior to slide the PSU into the switch PSU slot. Figure 11. Installing AC or DC Power Supplies The S6010-ON is keyed such that provide cooling for the chassis. The PSU slot is designed to a bright finish. Although the switch can only ...be fully inserted in one PSU, Dell Networking highly recommends using two PSUs for full redundancy and additional cooling. Install the Hardware 17 The system supports AC power supplies with two air...
... compound to the mating surfaces prior to slide the PSU into the switch PSU slot. Figure 11. Installing AC or DC Power Supplies The S6010-ON is keyed such that provide cooling for the chassis. The PSU slot is designed to a bright finish. Although the switch can only ...be fully inserted in one PSU, Dell Networking highly recommends using two PSUs for full redundancy and additional cooling. Install the Hardware 17 The system supports AC power supplies with two air...

Networking S6010-ON Getting Started Guide
Page 18
...correctly install the PSU, the power connector is mounted in a rack or cabinet. Both power supplies must use a qualified electrician. NOTE: Dell Networking recommends supplying power from the switch PSU to the site's DC power source, follow these steps. Each DC power supply (PSU) comes...prevent electrical shock, ensure that the PSU is correctly installed. CAUTION: DO NOT mix airflow directions. Install the Hardware 18 CAUTION: The S6010-ON contains two power cords. Always wear an ESD-preventive wrist or heel ground strap when handling the system and its components. One ...
...correctly install the PSU, the power connector is mounted in a rack or cabinet. Both power supplies must use a qualified electrician. NOTE: Dell Networking recommends supplying power from the switch PSU to the site's DC power source, follow these steps. Each DC power supply (PSU) comes...prevent electrical shock, ensure that the PSU is correctly installed. CAUTION: DO NOT mix airflow directions. Install the Hardware 18 CAUTION: The S6010-ON contains two power cords. Always wear an ESD-preventive wrist or heel ground strap when handling the system and its components. One ...
Networking S6010-ON Getting Started Guide
Page 20
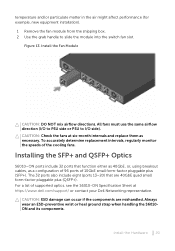
CAUTION: Check the fans at https://www.dell.com/support/ or contact your Dell Networking representative. The 32 ports also include eight (ports 13-20) that function either as 40GbE, or, using breakout cables, as necessary. temperature and/or ... Hardware 20 To accurately determine replacement intervals, regularly monitor the speeds of 10GbE small form-factor pluggable plus (QSFP+). Installing the SFP+ and QSFP+ Optics S6010-ON ports include 32 ports that are mishandled. CAUTION: ESD damage can occur if the components are 40GbE quad small form-factor pluggable plus (SFP+).
CAUTION: Check the fans at https://www.dell.com/support/ or contact your Dell Networking representative. The 32 ports also include eight (ports 13-20) that function either as 40GbE, or, using breakout cables, as necessary. temperature and/or ... Hardware 20 To accurately determine replacement intervals, regularly monitor the speeds of 10GbE small form-factor pluggable plus (QSFP+). Installing the SFP+ and QSFP+ Optics S6010-ON ports include 32 ports that are mishandled. CAUTION: ESD damage can occur if the components are 40GbE quad small form-factor pluggable plus (SFP+).

Networking S6010-ON Getting Started Guide
Page 23
... configuration information necessary for the switch to communicate with the local routers and the Internet. If you already have Dell Networking OS 9.x installed on the S6010-ON system, see your system from the factory. it Configure the Software 23 The minimal configuration provided here does... not cover most of the features; 3 Configure the Software To initially configure the Dell Networking operating system (OS), use the following ...
... configuration information necessary for the switch to communicate with the local routers and the Internet. If you already have Dell Networking OS 9.x installed on the S6010-ON system, see your system from the factory. it Configure the Software 23 The minimal configuration provided here does... not cover most of the features; 3 Configure the Software To initially configure the Dell Networking operating system (OS), use the following ...

Networking S6010-ON Getting Started Guide
Page 24
...the end command which takes you directly to EXEC Privilege mode, and the exit command which moves you face the I/O side of the S6010-ON system as shown in the following information from your network administrator: • Switch IP address • Subnet mask (IP netmask)... • Default gateway (router) • Enable secret password • Enable password • Telnet password Navigating CLI Modes The Dell Networking OS prompt changes to perform other configuration tasks using a Telnet connection from your management network. Accessing the Console The RS-232 console port...
...the end command which takes you directly to EXEC Privilege mode, and the exit command which moves you face the I/O side of the S6010-ON system as shown in the following information from your network administrator: • Switch IP address • Subnet mask (IP netmask)... • Default gateway (router) • Enable secret password • Enable password • Telnet password Navigating CLI Modes The Dell Networking OS prompt changes to perform other configuration tasks using a Telnet connection from your management network. Accessing the Console The RS-232 console port...

Networking S6010-ON Getting Started Guide
Page 26
... Server Device Rollover Cable Rollover Cable RJ-45 Pinout RJ-45 Pinout DB-9 Pin Signal 5 4 5 GND 6 3 3 TxD 7 2 4 DTR 8 1 7 RTS Default Configuration When you install the Dell Networking OS onto your S6010-ON system, it is not configured when you power up for the first time (except for the...
... Server Device Rollover Cable Rollover Cable RJ-45 Pinout RJ-45 Pinout DB-9 Pin Signal 5 4 5 GND 6 3 3 TxD 7 2 4 DTR 8 1 7 RTS Default Configuration When you install the Dell Networking OS onto your S6010-ON system, it is not configured when you power up for the first time (except for the...

Networking S6010-ON Getting Started Guide
Page 27
.... The default host name is separate from the IP routing table. The system has a dedicated management port and a management routing table that is Dell. Configuring a Host Name The host name appears in the string. • Create a host name. Configure as described in the following topics: ...Configuring the Management Port IP Address In order to access the system remotely, assign IP addresses to the System You can configure the S6010-ON system for the Management port. CONFIGURATION mode interface ManagementEthernet slot/port 2 Assign an IP address to the interface. INTERFACE mode ...
.... The default host name is separate from the IP routing table. The system has a dedicated management port and a management routing table that is Dell. Configuring a Host Name The host name appears in the string. • Create a host name. Configure as described in the following topics: ...Configuring the Management Port IP Address In order to access the system remotely, assign IP addresses to the System You can configure the S6010-ON system for the Management port. CONFIGURATION mode interface ManagementEthernet slot/port 2 Assign an IP address to the interface. INTERFACE mode ...

Networking S6010-ON Getting Started Guide
Page 28
...• To access the system remotely, configure a username and password. There are two types of enable passwords: • enable password - Dell Networking recommends using a data encryption standard (DES)-encryption method. • enable secret - Management routes are separate from IP routes and are ...used to manage the S6010-ON through the management port. • Configure a management route to the network from which you are accessing the system. As a ...
...• To access the system remotely, configure a username and password. There are two types of enable passwords: • enable password - Dell Networking recommends using a data encryption standard (DES)-encryption method. • enable secret - Management routes are separate from IP routes and are ...used to manage the S6010-ON through the management port. • Configure a management route to the network from which you are accessing the system. As a ...


