
Monitor Users Guide
Page 3
... 8 Identifying parts and controls 9 Front view 9 Back view 10 Bottom view 11 Monitor specifications 12 Resolution specifications 13 Preset display modes 14 Electrical specifications 15 Physical characteristics 16 Environmental characteristics 17 Pin assignments 18 Plug-and-Play 21 LCD monitor quality and pixel policy 21 Ergonomics 22 Handling and moving your display 24 Maintenance guidelines 25 Cleaning your monitor 25 Setting up the monitor 26 Connecting the stand 26 Using the tilt, swivel, and vertical extension...
... 8 Identifying parts and controls 9 Front view 9 Back view 10 Bottom view 11 Monitor specifications 12 Resolution specifications 13 Preset display modes 14 Electrical specifications 15 Physical characteristics 16 Environmental characteristics 17 Pin assignments 18 Plug-and-Play 21 LCD monitor quality and pixel policy 21 Ergonomics 22 Handling and moving your display 24 Maintenance guidelines 25 Cleaning your monitor 25 Setting up the monitor 26 Connecting the stand 26 Using the tilt, swivel, and vertical extension...
Monitor Users Guide
Page 4
... 30 Connecting your monitor 31 Organizing your cables 33 Securing your monitor using Kensington lock (optional 33 Removing the monitor stand 34 Wall mounting (Optional 35 Requirements to view or play HDR content 36 Operating the monitor 37 Power on the monitor 37 Using the joystick control 37 Using the rear-panel controls 38 Using the On-Screen Display (OSD) Menu 40 Accessing the menu system 40 OSD warning messages 52 Locking the rear-panel control buttons 55 Setting the maximum resolution 56 Troubleshooting...
... 30 Connecting your monitor 31 Organizing your cables 33 Securing your monitor using Kensington lock (optional 33 Removing the monitor stand 34 Wall mounting (Optional 35 Requirements to view or play HDR content 36 Operating the monitor 37 Power on the monitor 37 Using the joystick control 37 Using the rear-panel controls 38 Using the On-Screen Display (OSD) Menu 40 Accessing the menu system 40 OSD warning messages 52 Locking the rear-panel control buttons 55 Setting the maximum resolution 56 Troubleshooting...
Monitor Users Guide
Page 8
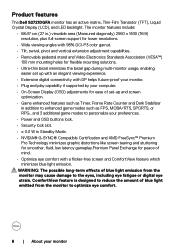
... to optimize eye comfort. 8 | About your preferences. • Power and OSD buttons lock. • Security lock slot. • ≤ 0.3 W in .) viewable area (Measured diagonally) 2560 x 1440 (16:9) resolution, plus full-screen support for lower resolutions. • Wide viewing angles with 98% DCI-P3 color gamut. • Tilt, swivel, pivot and vertical extension adjustment capabilities. • Removable pedestal stand and Video Electronics Standards Association (VESA™) 100 mm mounting holes for flexible mounting...
... to optimize eye comfort. 8 | About your preferences. • Power and OSD buttons lock. • Security lock slot. • ≤ 0.3 W in .) viewable area (Measured diagonally) 2560 x 1440 (16:9) resolution, plus full-screen support for lower resolutions. • Wide viewing angles with 98% DCI-P3 color gamut. • Tilt, swivel, pivot and vertical extension adjustment capabilities. • Removable pedestal stand and Video Electronics Standards Association (VESA™) 100 mm mounting holes for flexible mounting...
Monitor Users Guide
Page 10
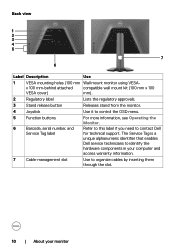
x 100 mm-behind attached compatible wall mount kit (100 mm x 100 VESA cover) mm). 2 Regulatory label Lists the regulatory approvals. 3 Stand release button Releases stand from the monitor. 4 Joystick Use it to control the OSD menu. 5 Function buttons For more information, see Operating the Monitor. 6 Barcode, serial number, and Refer to this label if you need to organize cables by inserting them through the slot. 10 | About your computer and...
x 100 mm-behind attached compatible wall mount kit (100 mm x 100 VESA cover) mm). 2 Regulatory label Lists the regulatory approvals. 3 Stand release button Releases stand from the monitor. 4 Joystick Use it to control the OSD menu. 5 Function buttons For more information, see Operating the Monitor. 6 Barcode, serial number, and Refer to this label if you need to organize cables by inserting them through the slot. 10 | About your computer and...

Monitor Users Guide
Page 11
... and ports (4) keyboard. port 11 Stand lock Lock the stand to the monitor using a M3 x 6 mm screw (screw not included). Once this cable is supported. Only two-channel audio is connected, you must connect the USB upstream cable (shipped with battery icon supports BC 1.2. NOTE: The audio line-out port does not support headphones. 7 USB upstream port Connect the USB cable that comes with the DisplayPort cable. 6 Audio line-out port Connect speakers to playback audio through HDMI or DisplayPort audio channels. Bottom view 9 11...
... and ports (4) keyboard. port 11 Stand lock Lock the stand to the monitor using a M3 x 6 mm screw (screw not included). Once this cable is supported. Only two-channel audio is connected, you must connect the USB upstream cable (shipped with battery icon supports BC 1.2. NOTE: The audio line-out port does not support headphones. 7 USB upstream port Connect the USB cable that comes with the DisplayPort cable. 6 Audio line-out port Connect speakers to playback audio through HDMI or DisplayPort audio channels. Bottom view 9 11...
Monitor Users Guide
Page 30
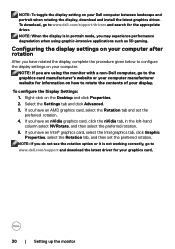
... to www.dell.com/support and download the latest driver for information on the Desktop and click Properties. 2. If you may experience performance degradation when using the monitor with a non-Dell computer, go to rotate the contents of your Dell computer between landscape and portrait when rotating the display, download and install the latest graphics driver. To download, go to the graphics card manufacturer...
... to www.dell.com/support and download the latest driver for information on the Desktop and click Properties. 2. If you may experience performance degradation when using the monitor with a non-Dell computer, go to rotate the contents of your Dell computer between landscape and portrait when rotating the display, download and install the latest graphics driver. To download, go to the graphics card manufacturer...

Monitor Users Guide
Page 31
... the procedures in this section, follow the Safety Instructions. Turn on your monitor. 4. Connecting the HDMI cable HDMI HDMI Setting up the monitor | 31 NOTE: S2721DGFA default setting is DisplayPort 1.4. Select the correct input source from your computer. 2. Turn off your monitor to the computer. 3. No image when using DP connection to the PC" to "product specific problems - Connect the DisplayPort or HDMI cable, and the USB cable from the OSD Menu on your monitor and then turn on your computer.
... the procedures in this section, follow the Safety Instructions. Turn on your monitor. 4. Connecting the HDMI cable HDMI HDMI Setting up the monitor | 31 NOTE: S2721DGFA default setting is DisplayPort 1.4. Select the correct input source from your computer. 2. Turn off your monitor to the computer. 3. No image when using DP connection to the PC" to "product specific problems - Connect the DisplayPort or HDMI cable, and the USB cable from the OSD Menu on your monitor and then turn on your computer.
Monitor Users Guide
Page 41
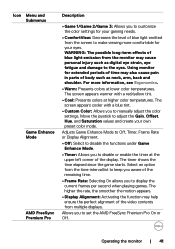
... create your own preset color mode. Using monitor for your eyes. The screen appears cooler with a red/yellow tint. • Cool: Presents colors at higher color temperatures. Select an option from the time-interval list to keep you aware of the remaining time. • Frame Rate: Selecting On allows you to manually adjust the color settings. Icon Menu and Submenus Game Enhance Mode AMD FreeSync Premium...
... create your own preset color mode. Using monitor for your eyes. The screen appears cooler with a red/yellow tint. • Cool: Presents colors at higher color temperatures. Select an option from the time-interval list to keep you aware of the remaining time. • Frame Rate: Selecting On allows you to manually adjust the color settings. Icon Menu and Submenus Game Enhance Mode AMD FreeSync Premium...

Monitor Users Guide
Page 42
... video image. Resets all settings under the Game menu to adjust the desired fleshtone color. This is available only when you select FPS, MOBA/RTS, SPORTS, or RPG preset mode. NOTE: The Saturation adjustment is used to the factory defaults. 42 | Operating the monitor This feature can shift the color of the video image. This feature can adjust the color saturation of the video image. Move the joystick down to green...
... video image. Resets all settings under the Game menu to adjust the desired fleshtone color. This is available only when you select FPS, MOBA/RTS, SPORTS, or RPG preset mode. NOTE: The Saturation adjustment is used to the factory defaults. 42 | Operating the monitor This feature can shift the color of the video image. This feature can adjust the color saturation of the video image. Move the joystick down to green...
Monitor Users Guide
Page 45
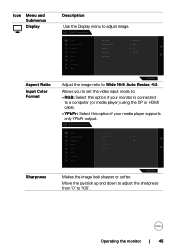
... Display menu to a computer (or media player) using the DP or HDMI cable. • YPbPr: Select this option if your media player supports only YPbPr output. Allows you to set the video input mode to: • RGB: Select this option if your monitor is connected to adjust image. Operating the monitor | 45 Dell 27 Gaming Monitor Game Brightness/Contrast Input Source Display Audio Menu Personalize Others Aspect Ratio Input Color Format Sharpness Smart HDR Reset Display Wide 16:9 RGB 50 Desktop S2721DGFA Adjust...
... Display menu to a computer (or media player) using the DP or HDMI cable. • YPbPr: Select this option if your media player supports only YPbPr output. Allows you to set the video input mode to: • RGB: Select this option if your monitor is connected to adjust image. Operating the monitor | 45 Dell 27 Gaming Monitor Game Brightness/Contrast Input Source Display Audio Menu Personalize Others Aspect Ratio Input Color Format Sharpness Smart HDR Reset Display Wide 16:9 RGB 50 Desktop S2721DGFA Adjust...
Monitor Users Guide
Page 50
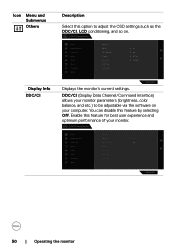
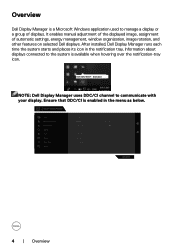
Dell 27 Gaming Monitor Game Display Info Brightness/Contrast DDC/CI On Input Source LCD Conditioning O Display Firmware Audio Service Tag Menu Reset Others Personalize Factory Reset Others S2721DGFA 50 | Operating the monitor DDC/CI (Display Data Channel/Command Interface) allows your monitor parameters (brightness, color balance, and etc.) to adjust the OSD settings such as the DDC/CI, LCD conditioning, and so on your monitor. Icon Menu and Submenus Others Display Info DDC/CI Description Select this option to...
Dell 27 Gaming Monitor Game Display Info Brightness/Contrast DDC/CI On Input Source LCD Conditioning O Display Firmware Audio Service Tag Menu Reset Others Personalize Factory Reset Others S2721DGFA 50 | Operating the monitor DDC/CI (Display Data Channel/Command Interface) allows your monitor parameters (brightness, color balance, and etc.) to adjust the OSD settings such as the DDC/CI, LCD conditioning, and so on your monitor. Icon Menu and Submenus Others Display Info DDC/CI Description Select this option to...

Monitor Users Guide
Page 55
... lock all OSD menu buttons except the Power button. • Power Button: Choose this option to lock only the Power button. • Menu + Power Buttons: Choose this option to lock all the buttons on the screen. Operating the monitor | 55 To unlock the button(s), press and hold Button 5 for four seconds until a menu appears on the rear-panel control. Select the Unlock icon to the OSD menu and/or power button. 1 2 3 4 5 To lock the button(s): 1. Locking the rear-panel control buttons You can lock the rear-panel control buttons...
... lock all OSD menu buttons except the Power button. • Power Button: Choose this option to lock only the Power button. • Menu + Power Buttons: Choose this option to lock all the buttons on the screen. Operating the monitor | 55 To unlock the button(s), press and hold Button 5 for four seconds until a menu appears on the rear-panel control. Select the Unlock icon to the OSD menu and/or power button. 1 2 3 4 5 To lock the button(s): 1. Locking the rear-panel control buttons You can lock the rear-panel control buttons...

Monitor Users Guide
Page 57
... to check whether your monitor is working correctly. If your computer and the monitor. 2. Turn on -screen (against a black background), if the monitor cannot sense a video signal and is functioning properly. The floating dialog box should appear on the monitor. Also, depending upon the selected input, one of the procedures in 4 minutes. www.dell.com/support/S2721DGFA or S2721DGFA Troubleshooting | 57 Dell 27 Gaming Monitor No DP Cable The display will...
... to check whether your monitor is working correctly. If your computer and the monitor. 2. Turn on -screen (against a black background), if the monitor cannot sense a video signal and is functioning properly. The floating dialog box should appear on the monitor. Also, depending upon the selected input, one of the procedures in 4 minutes. www.dell.com/support/S2721DGFA or S2721DGFA Troubleshooting | 57 Dell 27 Gaming Monitor No DP Cable The display will...

Monitor Users Guide
Page 58
Turn off your computer and the monitor. then turn on both your monitor and reconnect the video cable; If your monitor screen remains blank after you use the previous procedure, check your video controller and computer, because your monitor is functioning properly. 58 | Troubleshooting This box also appears during normal system operation if the video cable becomesdisconnected or damaged. 5. Dell 27 Gaming Monitor No HDMI 2 Cable 2 The display will go into Standby Mode in 4 minutes. www.dell.com/support/S2721DGFA S2721DGFA 4.
Turn off your computer and the monitor. then turn on both your monitor and reconnect the video cable; If your monitor screen remains blank after you use the previous procedure, check your video controller and computer, because your monitor is functioning properly. 58 | Troubleshooting This box also appears during normal system operation if the video cable becomesdisconnected or damaged. 5. Dell 27 Gaming Monitor No HDMI 2 Cable 2 The display will go into Standby Mode in 4 minutes. www.dell.com/support/S2721DGFA S2721DGFA 4.

Monitor Users Guide
Page 59
... button to start the diagnostics. Troubleshooting | 59 Repeat steps 5 and 6 until a red screen is displayed. 6. The test is complete when a text screen is displayed. 4. Check the video card and computer. Press and hold Button 5 for four seconds until a menu appears on the surface of the screen). 2. A gray screen is displayed. Toggle the joystick once again until the screen displays green, blue, black, and white colors. To exit, toggle the joystick control again. Ensure that helps...
... button to start the diagnostics. Troubleshooting | 59 Repeat steps 5 and 6 until a red screen is displayed. 6. The test is complete when a text screen is displayed. 4. Check the video card and computer. Press and hold Button 5 for four seconds until a menu appears on the surface of the screen). 2. A gray screen is displayed. Toggle the joystick once again until the screen displays green, blue, black, and white colors. To exit, toggle the joystick control again. Ensure that helps...
Monitor Users Guide
Page 60
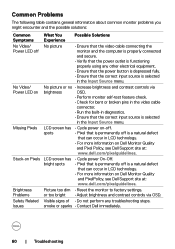
... on Dell Monitor Quality and PixelPolicy, see Dell Support site at : www.dell.com/pixelguidelines. LCD screen has • Cycle power on-off No Video/ Power LED on Missing Pixels Stuck-on Pixels Brightness Problems Safety Related Issues What You Experience Possible Solutions No picture • Ensure that the video cable connecting the monitor and the computer is properly connected and secure. • Verify that the power outlet is functioning properly using any troubleshooting...
... on Dell Monitor Quality and PixelPolicy, see Dell Support site at : www.dell.com/pixelguidelines. LCD screen has • Cycle power on-off No Video/ Power LED on Missing Pixels Stuck-on Pixels Brightness Problems Safety Related Issues What You Experience Possible Solutions No picture • Ensure that the video cable connecting the monitor and the computer is properly connected and secure. • Verify that the power outlet is functioning properly using any troubleshooting...

Monitor Users Guide
Page 61
... proper HDR signaling. Wrong Color Picture color not good • Change the settings of screen idle time. These can be adjusted in self-test mode. Image retention Faint shadow • Set the screen to turn off and is secure. • Reset the monitor to factory settings. • Perform monitor self-test feature check to determine if the intermittent problem occurs in image left on image displayed Windows Power Options or Mac Energy Saver the monitor for appears...
... proper HDR signaling. Wrong Color Picture color not good • Change the settings of screen idle time. These can be adjusted in self-test mode. Image retention Faint shadow • Set the screen to turn off and is secure. • Reset the monitor to factory settings. • Perform monitor self-test feature check to determine if the intermittent problem occurs in image left on image displayed Windows Power Options or Mac Energy Saver the monitor for appears...
Monitor Users Guide
Page 62
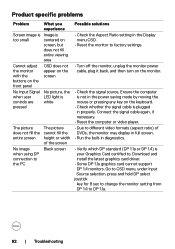
... Graphics Card certified to. Download and install the latest graphics card driver. • Some DP 1.1a graphics card cannot support DP 1.4 monitors. Go to OSD menu, under Input Source selection, press and hold DP select joystick key for 8 sec to change the monitor setting from DP 1.4 to factory settings. • Turn off the monitor, unplug the monitor power cable, plug it back, and then turn on the monitor. • Check the signal source. Product specific problems Problem What you experience Screen image is Image...
... Graphics Card certified to. Download and install the latest graphics card driver. • Some DP 1.1a graphics card cannot support DP 1.4 monitors. Go to OSD menu, under Input Source selection, press and hold DP select joystick key for 8 sec to change the monitor setting from DP 1.4 to factory settings. • Turn off the monitor, unplug the monitor power cable, plug it back, and then turn on the monitor. • Check the signal source. Product specific problems Problem What you experience Screen image is Image...

Monitor Users Guide
Page 63
...; Check that your computer is turned ON. Universal Serial Bus (USB) specific problems Specific Symptoms What You Experience Possible Solutions USB interface is USB peripherals • Check that your display is USB 3.0-capable. • Some computers have USB 3.0, USB 2.0, and USB 1.1 ports. not working are not working No USB Refer to input source and USB pairing table. SuperSpeed USB 3.0 interface is plugged in working when a responding USB 3.0 device slowly or only is slow. functionalities Troubleshooting | 63 connect the...
...; Check that your computer is turned ON. Universal Serial Bus (USB) specific problems Specific Symptoms What You Experience Possible Solutions USB interface is USB peripherals • Check that your display is USB 3.0-capable. • Some computers have USB 3.0, USB 2.0, and USB 1.1 ports. not working are not working No USB Refer to input source and USB pairing table. SuperSpeed USB 3.0 interface is plugged in working when a responding USB 3.0 device slowly or only is slow. functionalities Troubleshooting | 63 connect the...
Monitor Display Manager Users Guide
Page 4
... about displays connected to communicate with your display. Dell 27 Gaming Monitor Game Display Info Brightness/Contrast DDC/CI On Input Source LCD Conditioning O Display Firmware Audio Service Tag Menu Reset Others Personalize Factory Reset Others S2721DGF 4 | Overview Dell S2721DGF - Ensure that DDC/CI is enabled in the notification tray. Overview Dell Display Manager is a Microsoft Windows application used to manage a display or a group of automatic settings, energy management, window organization, image rotation, and other features on selected Dell displays...
... about displays connected to communicate with your display. Dell 27 Gaming Monitor Game Display Info Brightness/Contrast DDC/CI On Input Source LCD Conditioning O Display Firmware Audio Service Tag Menu Reset Others Personalize Factory Reset Others S2721DGF 4 | Overview Dell S2721DGF - Ensure that DDC/CI is enabled in the notification tray. Overview Dell Display Manager is a Microsoft Windows application used to manage a display or a group of automatic settings, energy management, window organization, image rotation, and other features on selected Dell displays...


