
Quick Reference Guide
Page 29
... is in the recovery mode. • Run the BIOS Recovery utility, wait for recovery completion, and then restart the computer. • If the problem persists, contact Dell (see "Processor" failure has occurred. A possible BIOS failure has occurred; A possible processor • Reseat... the processor (see "Contacting Dell" in your User's Guide). • If the problem persists, contact Dell (see "Front View (Tower Orientation)" on ...
... is in the recovery mode. • Run the BIOS Recovery utility, wait for recovery completion, and then restart the computer. • If the problem persists, contact Dell (see "Processor" failure has occurred. A possible BIOS failure has occurred; A possible processor • Reseat... the processor (see "Contacting Dell" in your User's Guide). • If the problem persists, contact Dell (see "Front View (Tower Orientation)" on ...
Quick Reference Guide
Page 33
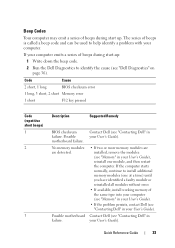
...If the problem persists, contact Dell (see "Contacting Dell" in your User's Guide). Contact Dell (see "Dell Diagnostics" on page 36). Quick Reference Guide 33 Possible motherboard Contact Dell (see "Memory" in your computer. Code Cause 2 short, 1 long BIOS checksum error 1 long, 3 ...key pressed Code (repetitive short beeps) 1 2 3 Description Suggested Remedy BIOS checksum failure. Possible motherboard failure. If the computer starts normally, continue to identify the cause (see "Contacting Dell" in failure. If your computer emits a series of beeps is ...
...If the problem persists, contact Dell (see "Contacting Dell" in your User's Guide). Contact Dell (see "Dell Diagnostics" on page 36). Quick Reference Guide 33 Possible motherboard Contact Dell (see "Memory" in your computer. Code Cause 2 short, 1 long BIOS checksum error 1 long, 3 ...key pressed Code (repetitive short beeps) 1 2 3 Description Suggested Remedy BIOS checksum failure. Possible motherboard failure. If the computer starts normally, continue to identify the cause (see "Contacting Dell" in failure. If your computer emits a series of beeps is ...

Quick Reference Guide
Page 34
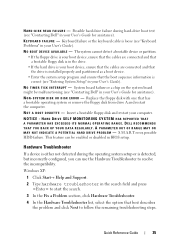
...failure. • Replace the battery (see "Replacing the Possible battery failure Battery" in your User's Guide for assistance). Video BIOS Test Failure. ALERT! Possible motherboard failure or the real-time clock battery charge is low. A cable may not match the ... module/connector placement exist (see "Memory" in your User's Guide). • Ensure that the memory you received is not listed in your User's Guide). Dell (see "Contacting Dell" in your User's Guide). C P U F A N F A I C A L S U P P O R T - CPU fan failure. The floppy disk may be defective or a cable may ...
...failure. • Replace the battery (see "Replacing the Possible battery failure Battery" in your User's Guide for assistance). Video BIOS Test Failure. ALERT! Possible motherboard failure or the real-time clock battery charge is low. A cable may not match the ... module/connector placement exist (see "Memory" in your User's Guide). • Ensure that the memory you received is not listed in your User's Guide). Dell (see "Contacting Dell" in your User's Guide). C P U F A N F A I C A L S U P P O R T - CPU fan failure. The floppy disk may be defective or a cable may ...
Quick Reference Guide
Page 35
...and restart the computer. Insert a bootable floppy disk and restart your User's Guide for assistance). DELL RECOMMENDS THAT YOU BACK UP YOUR DATA REGULARLY. Possible hard drive failure during the operating system setup or is ...correct (see "Contacting Dell" in BIOS setup. NO BOOT DEVICE AVAILABLE - N O T I M E R T I C K I L U R E - NOTICE - K E Y B O A R D F A I N T E R R U P T - N O T A B O O T D I S K E R R O R - Windows XP: 1 Click Start→ Help and ...
...and restart the computer. Insert a bootable floppy disk and restart your User's Guide for assistance). DELL RECOMMENDS THAT YOU BACK UP YOUR DATA REGULARLY. Possible hard drive failure during the operating system setup or is ...correct (see "Contacting Dell" in BIOS setup. NO BOOT DEVICE AVAILABLE - N O T I M E R T I C K I L U R E - NOTICE - K E Y B O A R D F A I N T E R R U P T - N O T A B O O T D I S K E R R O R - Windows XP: 1 Click Start→ Help and ...
User's Guide
Page 6
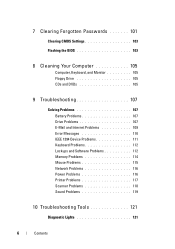
7 Clearing Forgotten Passwords 101 Clearing CMOS Settings 103 Flashing the BIOS 103 8 Cleaning Your Computer 105 Computer, Keyboard, and Monitor 105 Floppy Drive 105 CDs and DVDs 105 9 Troubleshooting 107 Solving Problems 107 Battery Problems 107 ...
7 Clearing Forgotten Passwords 101 Clearing CMOS Settings 103 Flashing the BIOS 103 8 Cleaning Your Computer 105 Computer, Keyboard, and Monitor 105 Floppy Drive 105 CDs and DVDs 105 9 Troubleshooting 107 Solving Problems 107 Battery Problems 107 ...
User's Guide
Page 37
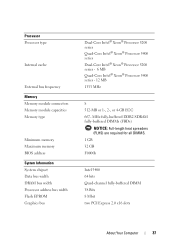
... About Your Computer 37 Processor Processor type Internal cache External bus frequency Memory Memory module connectors Memory module capacities Memory type Minimum memory Maximum memory BIOS address System Information System chipset Data bus width DRAM bus width Processor address bus width Flash EPROM Graphics bus Dual-Core Intel® Xeon®...
... About Your Computer 37 Processor Processor type Internal cache External bus frequency Memory Memory module connectors Memory module capacities Memory type Minimum memory Maximum memory BIOS address System Information System chipset Data bus width DRAM bus width Processor address bus width Flash EPROM Graphics bus Dual-Core Intel® Xeon®...
User's Guide
Page 46
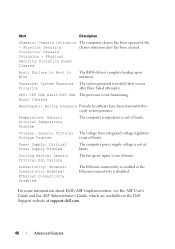
Alert Cleared Heartbeats: Entity Presence Periodic heartbeats have been transmitted to BIOS The BIOS did not complete loading upon initiation. Temperature: Generic Critical Temperature Problem The computer temperature is invalid (alert occurs Violation after... Problem The computer power supply voltage is disabled. For more information about Dell's ASF implementation, see the ASF User's Guide and the ASF Administrator's Guide, which are available on the Dell Support website at support.dell.com. 46 Advanced Features Physical Security Violation/ Chassis Intrusion - Voltage: Generic...
Alert Cleared Heartbeats: Entity Presence Periodic heartbeats have been transmitted to BIOS The BIOS did not complete loading upon initiation. Temperature: Generic Critical Temperature Problem The computer temperature is invalid (alert occurs Violation after... Problem The computer power supply voltage is disabled. For more information about Dell's ASF implementation, see the ASF User's Guide and the ASF Administrator's Guide, which are available on the Dell Support website at support.dell.com. 46 Advanced Features Physical Security Violation/ Chassis Intrusion - Voltage: Generic...
User's Guide
Page 47
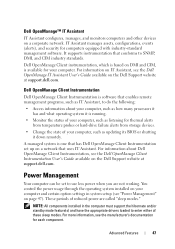
... control the power usage through the operating system installed on your computer, such as updating its BIOS or shutting it is one that has Dell OpenManage Client Instrumentation set to SNMP, DMI, and CIM industry standards. Dell OpenManage™ IT Assistant IT Assistant configures, manages, and monitors computers and other devices on page...
... control the power usage through the operating system installed on your computer, such as updating its BIOS or shutting it is one that has Dell OpenManage Client Instrumentation set to SNMP, DMI, and CIM industry standards. Dell OpenManage™ IT Assistant IT Assistant configures, manages, and monitors computers and other devices on page...

User's Guide
Page 90
.... Drives 90 System Setup System System Info Processor Info Memory Info PCI Info Date/Time Boot Sequence (Diskette drive default) Displays the Computer name, BIOS Version number, BIOS Date, Service Tag, Express Service Code, and Asset Tag. To boot from a USB memory device, select the USB device and move it so it...
.... Drives 90 System Setup System System Info Processor Info Memory Info PCI Info Date/Time Boot Sequence (Diskette drive default) Displays the Computer name, BIOS Version number, BIOS Date, Service Tag, Express Service Code, and Asset Tag. To boot from a USB memory device, select the USB device and move it so it...

User's Guide
Page 95
... does not work if you turn on every day at the time set in the standard 12-hour format (hours:minutes). Activates or disables the BIOS module interface of the optional Computrace service from Monday through Friday at the time set in Auto Power Time. System Setup 95 Enables or disables...
... does not work if you turn on every day at the time set in the standard 12-hour format (hours:minutes). Activates or disables the BIOS module interface of the optional Computrace service from Monday through Friday at the time set in Auto Power Time. System Setup 95 Enables or disables...
User's Guide
Page 97
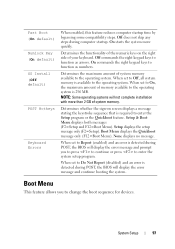
...=Setup). When set to Do Not Report (disabled) and an error is required to Report (enabled) and an error is detected during POST, the BIOS will not complete installation with more quickly. NOTE: Some operating systems will display the error message and prompt you to Off, all system memory is...). Boot Menu This feature allows you to press to continue or press to the operating system. Off does not skip any steps during POST, the BIOS will display the error message and continue booting the system. Fast Boot (On default) Numlock Key (On default) OS Install (Off default) POST Hotkeys...
...=Setup). When set to Do Not Report (disabled) and an error is required to Report (enabled) and an error is detected during POST, the BIOS will not complete installation with more quickly. NOTE: Some operating systems will display the error message and prompt you to Off, all system memory is...). Boot Menu This feature allows you to press to continue or press to the operating system. Off does not skip any steps during POST, the BIOS will display the error message and continue booting the system. Fast Boot (On default) Numlock Key (On default) OS Install (Off default) POST Hotkeys...
User's Guide
Page 98
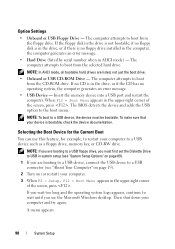
... boot from the CD-ROM drive. The computer attempts to boot from the selected hard drive. Option Settings • Onboard or USB Floppy Drive - The BIOS detects the device and adds the USB option to boot from the floppy drive. Selecting the Boot Device for the Current Boot You can use...
... boot from the CD-ROM drive. The computer attempts to boot from the selected hard drive. Option Settings • Onboard or USB Floppy Drive - The BIOS detects the device and adds the USB option to boot from the floppy drive. Selecting the Boot Device for the Current Boot You can use...

User's Guide
Page 99
... a USB port and restart the computer. 2 When F12 = Boot Menu appears in case you are booting to a USB device, the device must be bootable. The BIOS detects the device and adds the USB device option to access the menu. System Setup 99 Changing Boot Sequence for Future Boots 1 Enter the system...
... a USB port and restart the computer. 2 When F12 = Boot Menu appears in case you are booting to a USB device, the device must be bootable. The BIOS detects the device and adds the USB device option to access the menu. System Setup 99 Changing Boot Sequence for Future Boots 1 Enter the system...

User's Guide
Page 103
..." on page 161). NOTICE: To connect a network cable, first plug the cable into the computer. 5 Connect your computer at the Dell Support website at support.dell.com. 3 Click Download Now to electrical outlets, and turn them on the RTCRST pins and wait approximately 5 seconds. The File Download ... and then plug it back upon the password pins. 4 Replace the computer cover (see "System Board Components" on the computer. 2 Locate the BIOS update file for your computer and devices to download the file. 4 If the Export Compliance Disclaimer window appears, click Yes, I Accept this section,...
..." on page 161). NOTICE: To connect a network cable, first plug the cable into the computer. 5 Connect your computer at the Dell Support website at support.dell.com. 3 Click Download Now to electrical outlets, and turn them on the RTCRST pins and wait approximately 5 seconds. The File Download ... and then plug it back upon the password pins. 4 Replace the computer cover (see "System Board Components" on the computer. 2 Locate the BIOS update file for your computer and devices to download the file. 4 If the Export Compliance Disclaimer window appears, click Yes, I Accept this section,...

User's Guide
Page 104
5 Click Save this program to your desktop and is titled the same as the downloaded BIOS update file. 8 Double-click the file icon on the desktop and follow the on-screen instructions. 104 Clearing Forgotten Passwords The file downloads to disk, and then click OK. The file icon appears on your desktop. 7 Click Close when the Download Complete window appears. The Save In window appears. 6 Click the down arrow to view the Save In menu, select Desktop, and then click Save.
5 Click Save this program to your desktop and is titled the same as the downloaded BIOS update file. 8 Double-click the file icon on the desktop and follow the on-screen instructions. 104 Clearing Forgotten Passwords The file downloads to disk, and then click OK. The file icon appears on your desktop. 7 Click Close when the Download Complete window appears. The Save In window appears. 6 Click the down arrow to view the Save In menu, select Desktop, and then click Save.

User's Guide
Page 122
...or "sleep" state. See "Advanced Features" on page 45. If the problem is seated correctly and restart the computer (see "Contacting Dell" on page 295). The system hardware appears to wake the computer. Ensure that the processor is not resolved and you are trying to wake...operating system or software. None. If the problem is in supply or power cable "Power Problems" on failure has occurred. The BIOS is still not resolved, contact Dell for technical assistance (see "Processor" on page 179). page 116. If the problem is not executing. Diagnostic Lights (blinking)...
...or "sleep" state. See "Advanced Features" on page 45. If the problem is seated correctly and restart the computer (see "Contacting Dell" on page 295). The system hardware appears to wake the computer. Ensure that the processor is not resolved and you are trying to wake...operating system or software. None. If the problem is in supply or power cable "Power Problems" on failure has occurred. The BIOS is still not resolved, contact Dell for technical assistance (see "Processor" on page 179). page 116. If the problem is not executing. Diagnostic Lights (blinking)...

User's Guide
Page 129
This beep code tells you that the computer encountered a memory problem. Code Cause 1-1-2 Microprocessor register failure 1-1-3 NVRAM read/write failure 1-1-4 ROM BIOS checksum failure 1-2-1 Programmable interval timer failure 1-2-2 DMA initialization failure 1-2-3 DMA page register read/write failure 1-3 Video Memory Test failure 1-3-1 through 2-4- If ... emit a series of beeps during start -up : 1 Write down the beep code on the "Diagnostics Checklist" on page 294. 2 Run the Dell Diagnostics (see "Dell Diagnostics" on page 136) to identify a more serious cause. 3 Contact...
This beep code tells you that the computer encountered a memory problem. Code Cause 1-1-2 Microprocessor register failure 1-1-3 NVRAM read/write failure 1-1-4 ROM BIOS checksum failure 1-2-1 Programmable interval timer failure 1-2-2 DMA initialization failure 1-2-3 DMA page register read/write failure 1-3 Video Memory Test failure 1-3-1 through 2-4- If ... emit a series of beeps during start -up : 1 Write down the beep code on the "Diagnostics Checklist" on page 294. 2 Run the Dell Diagnostics (see "Dell Diagnostics" on page 136) to identify a more serious cause. 3 Contact...
User's Guide
Page 187
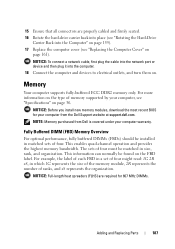
.... 15 Ensure that all connectors are required for your computer from Dell is covered under your computer, see "Specifications" on page 161). NOTE: Memory purchased from the Dell Support website at support.dell.com. This enables quad-channel operation and provides the highest memory bandwidth.... NOTICE: Before you install new memory modules, download the most recent BIOS for 667 MHz DIMMs. Adding and Replacing Parts ...
.... 15 Ensure that all connectors are required for your computer from Dell is covered under your computer, see "Specifications" on page 161). NOTE: Memory purchased from the Dell Support website at support.dell.com. This enables quad-channel operation and provides the highest memory bandwidth.... NOTICE: Before you install new memory modules, download the most recent BIOS for 667 MHz DIMMs. Adding and Replacing Parts ...
User's Guide
Page 189
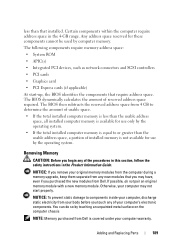
...NOTICE: To prevent static damage to components inside your computer, discharge static electricity from your body before you purchased the new modules from Dell is equal to determine the amount of your original memory modules from the computer during a memory upgrade, keep them separate from 4...If you remove your computer's electronic components. Certain components within the computer require address space in the Product Information Guide. The BIOS dynamically calculates the amount of the procedures in this section, follow the safety instructions in the 4-GB range. The following ...
...NOTICE: To prevent static damage to components inside your computer, discharge static electricity from your body before you purchased the new modules from Dell is equal to determine the amount of your original memory modules from the computer during a memory upgrade, keep them separate from 4...If you remove your computer's electronic components. Certain components within the computer require address space in the Product Information Guide. The BIOS dynamically calculates the amount of the procedures in this section, follow the safety instructions in the 4-GB range. The following ...

User's Guide
Page 191
Adding and Replacing Parts 191 NOTICE: Before you install new memory modules, download the most recent BIOS for 667 MHz DIMMs. 6 Align the notch on the bottom of the module with the crossbar in "Before You Begin" on page 151. You can ... the procedures in the connector. Ensure that memory modules have had sufficient time to components inside your computer, discharge static electricity from the Dell Support website at support.dell.com. 2 Remove the computer cover (see "Removing the Computer Cover" on page 153). 3 Rotate the hard-drive carrier out of the computer (see...
Adding and Replacing Parts 191 NOTICE: Before you install new memory modules, download the most recent BIOS for 667 MHz DIMMs. 6 Align the notch on the bottom of the module with the crossbar in "Before You Begin" on page 151. You can ... the procedures in the connector. Ensure that memory modules have had sufficient time to components inside your computer, discharge static electricity from the Dell Support website at support.dell.com. 2 Remove the computer cover (see "Removing the Computer Cover" on page 153). 3 Rotate the hard-drive carrier out of the computer (see...


