User Manual
Page 27
.... 2 Right-click and select Properties. 3 Select different tabs to change the properties. To modify the properties of an existing share: 1 Select the share from a Windows- Review Settings and Create Share allows you to revise the share settings before you want to enable as an SMB share and run the wizard. 4 Select...; File Services Share and Storage Management. 2 On the right pane, select Provision Share. 3 Browse and select the volume that you actually create it. 6 After reviewing the share settings, click Create to individual users and groups.
.... 2 Right-click and select Properties. 3 Select different tabs to change the properties. To modify the properties of an existing share: 1 Select the share from a Windows- Review Settings and Create Share allows you to revise the share settings before you want to enable as an SMB share and run the wizard. 4 Select...; File Services Share and Storage Management. 2 On the right pane, select Provision Share. 3 Browse and select the volume that you actually create it. 6 After reviewing the share settings, click Create to individual users and groups.
User Manual
Page 32
...click Next. Click Add Required Features to continue, and then click Next. 5 On the Active Directory Lightweight Services window, review the summary information, and then click Next. 6 On the Confirm Installation Selections window, read any informational messages, and then click Install.... 7 Review the Installation Results window to verify that the installation succeeded. 8 Click Close to the Active Directory Lightweight Directory Services Setup Wizard window...
...click Next. Click Add Required Features to continue, and then click Next. 5 On the Active Directory Lightweight Services window, review the summary information, and then click Next. 6 On the Confirm Installation Selections window, read any informational messages, and then click Install.... 7 Review the Installation Results window to verify that the installation succeeded. 8 Click Close to the Active Directory Lightweight Directory Services Setup Wizard window...

User Manual
Page 33
NOTE: MS-InetOrgPerson.LDF and MS-User.LDF are required. 14 On the Ready to Install window, under Selections, review the listed selections, and then click Next. 15 Click Finish to import, and then click Next. Each AD LDS instance is not a member of a domain, a ...
NOTE: MS-InetOrgPerson.LDF and MS-User.LDF are required. 14 On the Ready to Install window, under Selections, review the listed selections, and then click Next. 15 Click Finish to import, and then click Next. Each AD LDS instance is not a member of a domain, a ...
User Manual
Page 40
... NFS share is displayed as the share protocol. NOTE: Only the UNIX user (who was added in the next screens. The folder name is created, Review settings and Create Share allows you to revise the share settings before you have access to NFS client and perform an NFS mount. After completing...
... NFS share is displayed as the share protocol. NOTE: Only the UNIX user (who was added in the next screens. The folder name is created, Review settings and Create Share allows you to revise the share settings before you have access to NFS client and perform an NFS mount. After completing...

User Manual
Page 41
... 41 The newly-created quota is displayed. 2 Select the Apply Quota check box and select an option for Derive properties from this file screen template. Review settings and Create Share lists the Quota Policy and File Screen Policy details. 5 To make changes, click the Previous button otherwise click Create. Option 1: Share...
... 41 The newly-created quota is displayed. 2 Select the Apply Quota check box and select an option for Derive properties from this file screen template. Review settings and Create Share lists the Quota Policy and File Screen Policy details. 5 To make changes, click the Previous button otherwise click Create. Option 1: Share...

Getting Started Guide
Page 5
Getting Started With Your System 3 Assemble the rails and install the system in the rack following procedure, review the safety instructions that came with your system and identify each item. Unpacking the System Unpack your system. Installation and Configuration WARNING: Before performing the following the safety instructions and the rack installation instructions provided with the system.
Getting Started With Your System 3 Assemble the rails and install the system in the rack following procedure, review the safety instructions that came with your system and identify each item. Unpacking the System Unpack your system. Installation and Configuration WARNING: Before performing the following the safety instructions and the rack installation instructions provided with the system.
Setting Up Your Dell PowerVault NAS Solution
Page 1
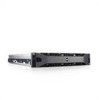
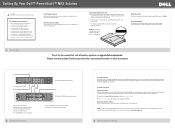
...DVD, or diskette set of Dell installed software as BACKUP copies of the software installed on your network, your Dell PowerVault system, review the safety instructions that all documentation and accessories. Setting Up Your Dell™ PowerVault™ NAS Solution WARNING: ...For customers in the Remote Desktop Connection window, type D where is initializing. Install the System in other documents. 1 Dell PowerVault NX3100 storage system 4 2 5 3 6 Dell PowerVault MD12xx storage array (optional) 1. Port 0 on the system. For example, in the United States, call the customer...
...DVD, or diskette set of Dell installed software as BACKUP copies of the software installed on your network, your Dell PowerVault system, review the safety instructions that all documentation and accessories. Setting Up Your Dell™ PowerVault™ NAS Solution WARNING: ...For customers in the Remote Desktop Connection window, type D where is initializing. Install the System in other documents. 1 Dell PowerVault NX3100 storage system 4 2 5 3 6 Dell PowerVault MD12xx storage array (optional) 1. Port 0 on the system. For example, in the United States, call the customer...

Hardware Owner's Manual
Page 28
... that the memory modules are securely attached to correct connectors. Defective mouse or keyboard. Gate A20 failure. page 157. Run the System Setup program and review the current settings. Reseat the mouse or keyboard cable. See "Troubleshooting a USB Device" on faulty system board. Invalid configuration information please run SETUP program. See...
... that the memory modules are securely attached to correct connectors. Defective mouse or keyboard. Gate A20 failure. page 157. Run the System Setup program and review the current settings. Reseat the mouse or keyboard cable. See "Troubleshooting a USB Device" on faulty system board. Invalid configuration information please run SETUP program. See...
