
Setting Up Your Dell PowerVault Storage Enclosure
Page 1
... cable your enclosure in either unified mode or split mode before the enclosure is managed by the second controller . Enclosure Dell PowerVault MD1200 Dell PowerVault MD1220 EMM 0 Drives 6 to 11 Drives 12 to 23 EMM 1 Drives 0 to 5 Drives 0 to 11 NOTE:... Server(s)" below lists the drives that are found on the front of the enclosure. • The Service Tag is also located at support.dell.com/manuals. 2 Selecting the Operating Mode Front-Panel Features Dell PowerVault MD1200 3 2 4 1 Dell PowerVault MD1220 3 4 5 5 2 1 8 Back-Panel Features 1 2 3 6 8 7 6 7 4 5 6 7 8 9 10 11...
... cable your enclosure in either unified mode or split mode before the enclosure is managed by the second controller . Enclosure Dell PowerVault MD1200 Dell PowerVault MD1220 EMM 0 Drives 6 to 11 Drives 12 to 23 EMM 1 Drives 0 to 5 Drives 0 to 11 NOTE:... Server(s)" below lists the drives that are found on the front of the enclosure. • The Service Tag is also located at support.dell.com/manuals. 2 Selecting the Operating Mode Front-Panel Features Dell PowerVault MD1200 3 2 4 1 Dell PowerVault MD1220 3 4 5 5 2 1 8 Back-Panel Features 1 2 3 6 8 7 6 7 4 5 6 7 8 9 10 11...

Setting Up Your Dell PowerVault Storage Enclosure
Page 2
.... Host server(s) 6 Turning on components in the following order: 1. Reproduction of these materials in any manner whatsoever without notice. © 2009 Dell Inc. Dell Inc. Setting Up Your Dell™ PowerVault™ Storage Enclosure (continued) Unified Mode host controller Unified Mode (Redundant Path) host controller host controller in server1 Two-Host Configuration (split mode...
.... Host server(s) 6 Turning on components in the following order: 1. Reproduction of these materials in any manner whatsoever without notice. © 2009 Dell Inc. Dell Inc. Setting Up Your Dell™ PowerVault™ Storage Enclosure (continued) Unified Mode host controller Unified Mode (Redundant Path) host controller host controller in server1 Two-Host Configuration (split mode...
Interoperability Guide
Page 1
... four PowerVault MD1200 or PowerVault MD1220 systems can be powered up first before the server. A maximum of PowerVault MD1200 and PowerVault MD1220 on each RAID controller port, for the Dell PowerVault MD1200 and MD1220: Table 1. Dell™ PowerVault™ MD1200 and PowerVault™ MD1220 Interoperability Guide This document provides information about the supported hardware and software versions for PowerVault MD1200 and PowerVault MD1220. Dell PowerVault MD1200 and PowerVault MD1220 Rules...
... four PowerVault MD1200 or PowerVault MD1220 systems can be powered up first before the server. A maximum of PowerVault MD1200 and PowerVault MD1220 on each RAID controller port, for the Dell PowerVault MD1200 and MD1220: Table 1. Dell™ PowerVault™ MD1200 and PowerVault™ MD1220 Interoperability Guide This document provides information about the supported hardware and software versions for PowerVault MD1200 and PowerVault MD1220. Dell PowerVault MD1200 and PowerVault MD1220 Rules...
Interoperability Guide
Page 2
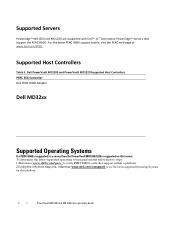
...the PERC web page at www.dell.com/PERC. Supported Servers PowerEdge™ MD1200 and MD1220 are supported with Dell™ 11th Generation PowerEdge™ Servers that platform. 2 ׀ PowerVault MD1200 and MD1220 Interoperability Guide To determine the latest ...step one, reference www.dell.com/ossupport to see the latest supported Operating Systems for that support the PERC H800. Supported Host Controllers Table 3. Dell PowerVault MD1200 and PowerVault MD1220 Supported Host Controllers PERC ESG Controller Dell PERC H800 Adapter Dell MD32xx Supported Operating Systems ...
...the PERC web page at www.dell.com/PERC. Supported Servers PowerEdge™ MD1200 and MD1220 are supported with Dell™ 11th Generation PowerEdge™ Servers that platform. 2 ׀ PowerVault MD1200 and MD1220 Interoperability Guide To determine the latest ...step one, reference www.dell.com/ossupport to see the latest supported Operating Systems for that support the PERC H800. Supported Host Controllers Table 3. Dell PowerVault MD1200 and PowerVault MD1220 Supported Host Controllers PERC ESG Controller Dell PERC H800 Adapter Dell MD32xx Supported Operating Systems ...

Interoperability Guide
Page 3
... 3.5" 3.5" 3.5" 3.5" 3.5" 3.5" 3.5" 2.5" 2.5" 2.5" 2.5" 2.5" 2.5" 2.5" 2.5" 2.5" 2.5" 2.5" 2.5" 2.5" 2.5" 2.5" 2.5" Dell P/N U717K U738K R755K X163K T873K X164K W350K F617N X150K R749K T875K W347K R734K R744K U733K W335K R727K R730K W345K X143K T855K X160K...Seagate Seagate Fujitsu Hitachi Seagate Fujitsu Hitachi Seagate Fujitsu Hitachi Seagate Hitachi Seagate Pliant PowerVault MD1200 and MD1220 Interoperability Guide l 3 NOTE: Only Dell provided physical drives are supported. Please visit support.dell.com for an updated list of initial launch. Supported Physical Drives Table 4 ...
... 3.5" 3.5" 3.5" 3.5" 3.5" 3.5" 3.5" 2.5" 2.5" 2.5" 2.5" 2.5" 2.5" 2.5" 2.5" 2.5" 2.5" 2.5" 2.5" 2.5" 2.5" 2.5" 2.5" Dell P/N U717K U738K R755K X163K T873K X164K W350K F617N X150K R749K T875K W347K R734K R744K U733K W335K R727K R730K W345K X143K T855K X160K...Seagate Seagate Fujitsu Hitachi Seagate Fujitsu Hitachi Seagate Fujitsu Hitachi Seagate Hitachi Seagate Pliant PowerVault MD1200 and MD1220 Interoperability Guide l 3 NOTE: Only Dell provided physical drives are supported. Please visit support.dell.com for an updated list of initial launch. Supported Physical Drives Table 4 ...
Interoperability Guide
Page 4
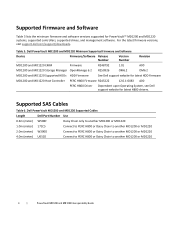
... PERC H800 Driver Dependent upon Operating System, see Dell support website for PowerVault™ MD1200 and MD1220 systems, supported controllers, supported drives, and management software. For the latest firmware versions, visit support.dell.com/support/downloads. Supported SAS Cables Table 6. Table 5. Dell PowerVault MD1200 and MD1220 Supported Cables Length Dell Part Number Use 0.6m (meter) 1.0m (meter) 2.0m...
... PERC H800 Driver Dependent upon Operating System, see Dell support website for PowerVault™ MD1200 and MD1220 systems, supported controllers, supported drives, and management software. For the latest firmware versions, visit support.dell.com/support/downloads. Supported SAS Cables Table 6. Table 5. Dell PowerVault MD1200 and MD1220 Supported Cables Length Dell Part Number Use 0.6m (meter) 1.0m (meter) 2.0m...
Interoperability Guide
Page 5
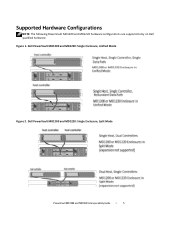
Supported Hardware Configurations NOTE: The following PowerVault MD1200 and MD1220 hardware configurations are supported only on Dell qualified hardware. Dell PowerVault MD1200 and MD1220: Single Enclosure, Unified Mode Figure 2. Figure 1. Dell PowerVault MD1200 and MD1220: Single Enclosure, Split Mode PowerVault MD1200 and MD1220 Interoperability Guide l 5
Supported Hardware Configurations NOTE: The following PowerVault MD1200 and MD1220 hardware configurations are supported only on Dell qualified hardware. Dell PowerVault MD1200 and MD1220: Single Enclosure, Unified Mode Figure 2. Figure 1. Dell PowerVault MD1200 and MD1220: Single Enclosure, Split Mode PowerVault MD1200 and MD1220 Interoperability Guide l 5

Interoperability Guide
Page 6
... Linux are trademarks of Red Hat, Inc. Citrix and XenServer are registered trademarks of Citrix Systems, Inc. Dell PowerVault MD1200 and MD1220: Maximum Configuration with Enclosure Daisy Chain Expansion Information in this document to refer to change without the written permission... strictly forbidden. Other trademarks and trade names may be used in this text: Dell, the DELL logo, PowerEdge, PowerVault, and OpenManage are either the entities claiming the marks and names or their products. A01 6 ׀ PowerVault MD1200 and MD1220 Interoperability Guide
... Linux are trademarks of Red Hat, Inc. Citrix and XenServer are registered trademarks of Citrix Systems, Inc. Dell PowerVault MD1200 and MD1220: Maximum Configuration with Enclosure Daisy Chain Expansion Information in this document to refer to change without the written permission... strictly forbidden. Other trademarks and trade names may be used in this text: Dell, the DELL logo, PowerEdge, PowerVault, and OpenManage are either the entities claiming the marks and names or their products. A01 6 ׀ PowerVault MD1200 and MD1220 Interoperability Guide

Getting Started Guide
Page 4
... document is strictly forbidden. is subject to either the entities claiming the marks and names or their products. Trademarks used in this text: Dell, the DELL logo, OpenManage, PowerEdge, and PowerVault are not followed. Other trademarks and trade names may be used in trademarks and trade names other than its own. Notes, Cautions...
... document is strictly forbidden. is subject to either the entities claiming the marks and names or their products. Trademarks used in this text: Dell, the DELL logo, OpenManage, PowerEdge, and PowerVault are not followed. Other trademarks and trade names may be used in trademarks and trade names other than its own. Notes, Cautions...

Hardware Owner's Manual
Page 1
Dell™ PowerVault™ MD1200 and MD1220 Storage Enclosures Hardware Owner's Manual Regulatory Model: E03J Series and E04J Series Regulatory Type: E03J001 and E04J001
Dell™ PowerVault™ MD1200 and MD1220 Storage Enclosures Hardware Owner's Manual Regulatory Model: E03J Series and E04J Series Regulatory Type: E03J001 and E04J001

Hardware Owner's Manual
Page 2
...without the written permission of your computer. WARNING: A WARNING indicates a potential for property damage, personal injury, or death. Dell Inc. Regulatory Model: E03J Series and E04J Series Regulatory Type: E03J001 and E04J001 October 2009 Rev. Other trademarks and trade ...disclaims any manner whatsoever without notice. © 2009 Dell Inc. is subject to either the entities claiming the marks and names or their products. A00 Information in this text: Dell, the DELL logo, OpenManage, PowerEdge, and PowerVault are not followed. All rights reserved. Notes, Cautions,...
...without the written permission of your computer. WARNING: A WARNING indicates a potential for property damage, personal injury, or death. Dell Inc. Regulatory Model: E03J Series and E04J Series Regulatory Type: E03J001 and E04J001 October 2009 Rev. Other trademarks and trade ...disclaims any manner whatsoever without notice. © 2009 Dell Inc. is subject to either the entities claiming the marks and names or their products. A00 Information in this text: Dell, the DELL logo, OpenManage, PowerEdge, and PowerVault are not followed. All rights reserved. Notes, Cautions,...

Hardware Owner's Manual
Page 9
Item Indicator, Button, or Icon Connector 5 Hard drives 6 Enclosure mode switch Description PowerVault MD1200-Up to 24 2.5-inch SAS hot-swappable hard drives. When set in the bottom position, the enclosure is configured in split mode. When set in the top position, the enclosure is configured in unified mode. Front-Bezel Features and Indicators 1 2 3 About Your Enclosure 9 PowerVault MD1220-Up to 12 3.5-inch SAS hot-swappable hard drives. Front-Bezel Features and Indicators Figure 1-3.
Item Indicator, Button, or Icon Connector 5 Hard drives 6 Enclosure mode switch Description PowerVault MD1200-Up to 24 2.5-inch SAS hot-swappable hard drives. When set in the bottom position, the enclosure is configured in split mode. When set in the top position, the enclosure is configured in unified mode. Front-Bezel Features and Indicators 1 2 3 About Your Enclosure 9 PowerVault MD1220-Up to 12 3.5-inch SAS hot-swappable hard drives. Front-Bezel Features and Indicators Figure 1-3.

Hardware Owner's Manual
Page 20
...must be set to release the cable from the connector on the EMM and the host system. Split-Mode Configuration Enclosure EMM 0 Dell PowerVault MD1200 Drives 6 to 11 Dell PowerVault MD1220 Drives 12 to 23 EMM 1 Drives 0 to 5 Drives 0 to the RAID controller on both ends of the cable to the... the EMM SAS connector on the storage enclosure and to 11 NOTE: Clustering is installed. The operating mode is turned on PowerVault MD1200 and PowerVault M1220 enclosures. You can connect either unified mode or split mode before the enclosure is selected using the enclosure mode switch on...
...must be set to release the cable from the connector on the EMM and the host system. Split-Mode Configuration Enclosure EMM 0 Dell PowerVault MD1200 Drives 6 to 11 Dell PowerVault MD1220 Drives 12 to 23 EMM 1 Drives 0 to 5 Drives 0 to the RAID controller on both ends of the cable to the... the EMM SAS connector on the storage enclosure and to 11 NOTE: Clustering is installed. The operating mode is turned on PowerVault MD1200 and PowerVault M1220 enclosures. You can connect either unified mode or split mode before the enclosure is selected using the enclosure mode switch on...
Hardware Owner's Manual
Page 29
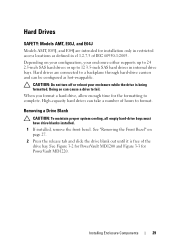
... system cooling, all empty hard-drive bays must have drive blanks installed. 1 If installed, remove the front bezel. See Figure 3-2 for PowerVault MD1200 and Figure 3-3 for installation only in restricted access locations as hot-swappable. Doing so can take a number of hours to format. ... page 27. 2 Press the release tab and slide the drive blank out until it is being formatted. Hard drives are intended for PowerVault MD1220. Installing Enclosure Components 29 See "Removing the Front Bezel" on your configuration, your enclosure while the drive is free of IEC 60950...
... system cooling, all empty hard-drive bays must have drive blanks installed. 1 If installed, remove the front bezel. See Figure 3-2 for PowerVault MD1200 and Figure 3-3 for installation only in restricted access locations as hot-swappable. Doing so can take a number of hours to format. ... page 27. 2 Press the release tab and slide the drive blank out until it is being formatted. Hard drives are intended for PowerVault MD1220. Installing Enclosure Components 29 See "Removing the Front Bezel" on your configuration, your enclosure while the drive is free of IEC 60950...

Hardware Owner's Manual
Page 33
Removing and Installing a Hard Drive Into a 3.5-Inch Drive Carrier 4 1 3 2 Installing Enclosure Components 33 4 Insert the hard-drive carrier into the drive bay until the carrier contacts the backplane. 5 Close the handle to lock the drive in place. See Figure 3-5 for PowerVault MD1200 and Figure 3-6 for PowerVault MD1220. Removing a Hard Drive From a Hard-Drive Carrier Remove the screws from the slide rails on the hard-drive carrier and separate the hard drive from the carrier. Figure 3-5.
Removing and Installing a Hard Drive Into a 3.5-Inch Drive Carrier 4 1 3 2 Installing Enclosure Components 33 4 Insert the hard-drive carrier into the drive bay until the carrier contacts the backplane. 5 Close the handle to lock the drive in place. See Figure 3-5 for PowerVault MD1200 and Figure 3-6 for PowerVault MD1220. Removing a Hard Drive From a Hard-Drive Carrier Remove the screws from the slide rails on the hard-drive carrier and separate the hard drive from the carrier. Figure 3-5.
Hardware Owner's Manual
Page 42
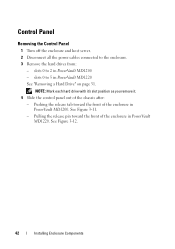
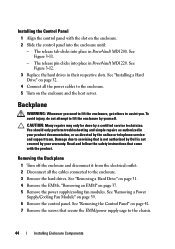
... each hard drive with it's slot position as you remove it. 4 Slide the control panel out of the enclosure in PowerVault MD1220. Pulling the release pin toward the front of the enclosure in PowerVault MD1200. Pushing the release tab toward the front of the chassis after: - slots 0 to the enclosure. 3 Remove the hard.... 42 Installing Enclosure Components Control Panel Removing the Control Panel 1 Turn off the enclosure and host server. 2 Disconnect all the power cables connected to 5 in PowerVault MD1220 See "Removing a Hard Drive" on page 31. slots 0 to 2 in...
... each hard drive with it's slot position as you remove it. 4 Slide the control panel out of the enclosure in PowerVault MD1220. Pulling the release pin toward the front of the enclosure in PowerVault MD1200. Pushing the release tab toward the front of the chassis after: - slots 0 to the enclosure. 3 Remove the hard.... 42 Installing Enclosure Components Control Panel Removing the Control Panel 1 Turn off the enclosure and host server. 2 Disconnect all the power cables connected to 5 in PowerVault MD1220 See "Removing a Hard Drive" on page 31. slots 0 to 2 in...
Hardware Owner's Manual
Page 43
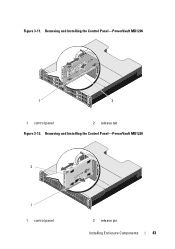
Figure 3-11. Removing and Installing the Control Panel-PowerVault MD1220 2 1 1 control panel 2 release pin Installing Enclosure Components 43 Removing and Installing the Control Panel-PowerVault MD1200 1 2 1 control panel 2 release tab Figure 3-12.
Figure 3-11. Removing and Installing the Control Panel-PowerVault MD1220 2 1 1 control panel 2 release pin Installing Enclosure Components 43 Removing and Installing the Control Panel-PowerVault MD1200 1 2 1 control panel 2 release tab Figure 3-12.
Hardware Owner's Manual
Page 44
...their respective slots. Installing the Control Panel 1 Align the control panel with the product. See Figure 3-12. 3 Replace the hard drives in PowerVault MD1220. CAUTION: Many repairs may only be done by yourself. See "Removing a Power Supply/Cooling Fan Module" on the enclosure and the host... To avoid injury, do not attempt to the chassis. 44 Installing Enclosure Components Read and follow the safety instructions that is not authorized by Dell is not covered by the online or telephone service and support team. See Figure 3-11. - See "Installing a Hard Drive" on page...
...their respective slots. Installing the Control Panel 1 Align the control panel with the product. See Figure 3-12. 3 Replace the hard drives in PowerVault MD1220. CAUTION: Many repairs may only be done by yourself. See "Removing a Power Supply/Cooling Fan Module" on the enclosure and the host... To avoid injury, do not attempt to the chassis. 44 Installing Enclosure Components Read and follow the safety instructions that is not authorized by Dell is not covered by the online or telephone service and support team. See Figure 3-11. - See "Installing a Hard Drive" on page...
Hardware Owner's Manual
Page 45
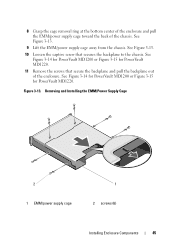
See Figure 3-13. 9 Lift the EMM/power supply cage away from the chassis. See Figure 3-14 for PowerVault MD1200 or Figure 3-15 for PowerVault MD1220. 11 Remove the screws that secures the backplane to the chassis. Removing and Installing the EMM/Power Supply Cage 2 1 EMM/power supply ...cage 1 2 screws (6) Installing Enclosure Components 45 See Figure 3-14 for PowerVault MD1200 or Figure 3-15 for PowerVault MD1220. 8 Grasp the cage removal ring at the bottom center of the enclosure and pull the EMM/power supply cage toward the back...
See Figure 3-13. 9 Lift the EMM/power supply cage away from the chassis. See Figure 3-14 for PowerVault MD1200 or Figure 3-15 for PowerVault MD1220. 11 Remove the screws that secures the backplane to the chassis. Removing and Installing the EMM/Power Supply Cage 2 1 EMM/power supply ...cage 1 2 screws (6) Installing Enclosure Components 45 See Figure 3-14 for PowerVault MD1200 or Figure 3-15 for PowerVault MD1220. 8 Grasp the cage removal ring at the bottom center of the enclosure and pull the EMM/power supply cage toward the back...
Hardware Owner's Manual
Page 46
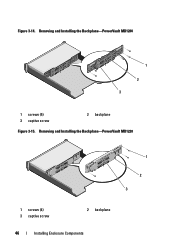
Removing and Installing the Backplane-PowerVault MD1220 1 2 3 1 screws (4) 3 captive screw 2 backplane 46 Installing Enclosure Components Figure 3-14. Removing and Installing the Backplane-PowerVault MD1200 1 2 3 1 screws (5) 3 captive screw 2 backplane Figure 3-15.
Removing and Installing the Backplane-PowerVault MD1220 1 2 3 1 screws (4) 3 captive screw 2 backplane 46 Installing Enclosure Components Figure 3-14. Removing and Installing the Backplane-PowerVault MD1200 1 2 3 1 screws (5) 3 captive screw 2 backplane Figure 3-15.


