
Dell DR Series System Administrator's Guide
Page 20
... Release 1.1, the DR Series system software supports the use the Computer Manager tool on a Windows client to connect to modify an ACL as Domain administrator and add any network resource. To add additional domain groups to the BUILTIN \Administrators group, you control access to a program running on remote computers. This capability allows users other than the Network File System (NFS) protocol on systems that define specific permissions on a per-user or per-group basis. Access Control List Support...
... Release 1.1, the DR Series system software supports the use the Computer Manager tool on a Windows client to connect to modify an ACL as Domain administrator and add any network resource. To add additional domain groups to the BUILTIN \Administrators group, you control access to a program running on remote computers. This capability allows users other than the Network File System (NFS) protocol on systems that define specific permissions on a per-user or per-group basis. Access Control List Support...

Dell DR Series System Administrator's Guide
Page 34
... primary DNS server IP address (and a secondary DNS server IP address, if you choose to configure one). • Replication ports: the replication service in the DR Series system requires that enabled fixed ports be performed across firewalls (TCP ports 9904, 9911, 9915, and 9916). NIC connection bonding can start using the system (contact your system network settings using a local console KVM (keyboard-video monitor) connection or an iDRAC connection. Ensure that the data source system...
... primary DNS server IP address (and a secondary DNS server IP address, if you choose to configure one). • Replication ports: the replication service in the DR Series system requires that enabled fixed ports be performed across firewalls (TCP ports 9904, 9911, 9915, and 9916). NIC connection bonding can start using the system (contact your system network settings using a local console KVM (keyboard-video monitor) connection or an iDRAC connection. Ensure that the data source system...

Dell DR Series System Administrator's Guide
Page 37
... expansion card slots (3) 6 Hard drives (2) Connects USB devices to perform initialization using the two 10-GbE ports, these are configured using console redirection and the iDRAC6/7 web interface. For more information, see item 7 in a supported browser. The login values you can use for the iDRAC7 Enterprise card (port is available only if an iDRAC7 Enterprise license is using the DR Series system CLI login process. DR4100 System Rear Chassis Port Locations Item Indicator, Button...
... expansion card slots (3) 6 Hard drives (2) Connects USB devices to perform initialization using the two 10-GbE ports, these are configured using console redirection and the iDRAC6/7 web interface. For more information, see item 7 in a supported browser. The login values you can use for the iDRAC7 Enterprise card (port is available only if an iDRAC7 Enterprise license is using the DR Series system CLI login process. DR4100 System Rear Chassis Port Locations Item Indicator, Button...
Dell DR Series System Administrator's Guide
Page 66
... Series system NOTE: To change CIFS login credentials, you can use the DR Series system CLI command, authenticate -set -user . Once in a powered Off state, you to the system default value, which the system software is joined to an Active Directory Services (ADS) domain. The NTP time mode is disabled when the DR Series system is installed. For more information, see the Dell DR Series System Command Line Reference Guide. Click Reset Password in your login password to display the Reboot...
... Series system NOTE: To change CIFS login credentials, you can use the DR Series system CLI command, authenticate -set -user . Once in a powered Off state, you to the system default value, which the system software is joined to an Active Directory Services (ADS) domain. The NTP time mode is disabled when the DR Series system is installed. For more information, see the Dell DR Series System Command Line Reference Guide. Click Reset Password in your login password to display the Reboot...
Dell DR Series System Administrator's Guide
Page 119
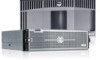
... Dell DR Series Drivers & Downloads page, click Find Drivers & Downloads. Click Download File, click For Single File Download via Browser, and click Download Now. Using the DR Series system GUI, select Support, and click the Software Upgrade link (or select Support → Software Upgrade). Select the software upgrade file, and click Open. 9. Verify the currently installed DR Series system software version listed as shown in the Select the upgrade file from the Software Upgrade page. 1. In the navigation panel, select Support and click Software Upgrade (or select Support...
... Dell DR Series Drivers & Downloads page, click Find Drivers & Downloads. Click Download File, click For Single File Download via Browser, and click Download Now. Using the DR Series system GUI, select Support, and click the Software Upgrade link (or select Support → Software Upgrade). Select the software upgrade file, and click Open. 9. Verify the currently installed DR Series system software version listed as shown in the Select the upgrade file from the Software Upgrade page. 1. In the navigation panel, select Support and click Software Upgrade (or select Support...

Dell DR Series System Administrator's Guide
Page 121
...: • Support using the .img file format • Support using a direct block-to-block device copy to ensure that the USB key is reported by the operating system (for example, /dev/sdc4). 3. For more information, see Configuring and Using Virtual Media in the Integrated Dell Remote Access Controller 6 (iDRAC6) User Guide at this on a Linux or Unix system, perform the following RM filename format, "DR4000- Navigate to the DR Series system download page...
...: • Support using the .img file format • Support using a direct block-to-block device copy to ensure that the USB key is reported by the operating system (for example, /dev/sdc4). 3. For more information, see Configuring and Using Virtual Media in the Integrated Dell Remote Access Controller 6 (iDRAC6) User Guide at this on a Linux or Unix system, perform the following RM filename format, "DR4000- Navigate to the DR Series system download page...

Dell DR Series System Administrator's Guide
Page 131
... replicated on a supported Linux or Windows media server platform is a process that no additional Dell licensing is available at support.dell.com/manuals. The Create New Container dialog is triggered by using OpenStorage Technology (OST) operations with the DR Series system. • OST and non-OST containers can configure a logical storage unit (LSU) as both OST and non-OST containers on the same DR Series system. In Connection Type, set...
... replicated on a supported Linux or Windows media server platform is a process that no additional Dell licensing is available at support.dell.com/manuals. The Create New Container dialog is triggered by using OpenStorage Technology (OST) operations with the DR Series system. • OST and non-OST containers can configure a logical storage unit (LSU) as both OST and non-OST containers on the same DR Series system. In Connection Type, set...

Dell DR Series System Command Line Reference Guide
Page 34
... an ADS domain. --update Updates ADS configuration. --add Creates local workgroup user for CIFS authentication or adds login group. --delete Deletes local workgroup user from CIFS authentication or deletes login group. --set Sets password for a local workgroup user. --guestmode Configures all CIFS shares for guest only access. --server_signing Configures server signing for a specific network host 34 For command-specific help, please type authenticate --help For example: authenticate --help authenticate can be one of DR Series system CLI commands lets you perform the...
... an ADS domain. --update Updates ADS configuration. --add Creates local workgroup user for CIFS authentication or adds login group. --delete Deletes local workgroup user from CIFS authentication or deletes login group. --set Sets password for a local workgroup user. --guestmode Configures all CIFS shares for guest only access. --server_signing Configures server signing for a specific network host 34 For command-specific help, please type authenticate --help For example: authenticate --help authenticate can be one of DR Series system CLI commands lets you perform the...

Dell DR Series System Command Line Reference Guide
Page 66
... DR Series system hardware status for the system hardware components. Service Tag : IVQXSS2 Product Name : Dell DR4000 BIOS Version : 1.11.0 Version : 2.0.0.0.47757 Build : 47757 Telnet State : Disabled Compression Level : fast Time Zone : US/Pacific Data Check : Enabled - Syntax system --show --hardware Result Component Storage Controller Storage Controller Type PERC H700 PERC H800 Signature Health PD_Count HDB ST00 optimal 14 HDB ST01 optimal 48 Component Signature Virtual Disk HDB VD00 Virtual Disk 0 Virtual Disk HDB VD01 DATAVol State ready...
... DR Series system hardware status for the system hardware components. Service Tag : IVQXSS2 Product Name : Dell DR4000 BIOS Version : 1.11.0 Version : 2.0.0.0.47757 Build : 47757 Telnet State : Disabled Compression Level : fast Time Zone : US/Pacific Data Check : Enabled - Syntax system --show --hardware Result Component Storage Controller Storage Controller Type PERC H700 PERC H800 Signature Health PD_Count HDB ST00 optimal 14 HDB ST01 optimal 48 Component Signature Virtual Disk HDB VD00 Virtual Disk 0 Virtual Disk HDB VD01 DATAVol State ready...

Dell DR Series System Release Notes For Release 2.0.1.0
Page 15
... an error associated with inflight write data is not removed after OS installation has completed. The USB key used during file upload. Accept the Configuration. 4. Do not run the configuration utility (as this time. Power on the BIOS console or contact Dell Support for the uploading of the USB key, when the Operating System Installation was active inflight data in the PERC controller cache, the DR Series system remains in the dialog list box...
... an error associated with inflight write data is not removed after OS installation has completed. The USB key used during file upload. Accept the Configuration. 4. Do not run the configuration utility (as this time. Power on the BIOS console or contact Dell Support for the uploading of the USB key, when the Operating System Installation was active inflight data in the PERC controller cache, the DR Series system remains in the dialog list box...

Owner's Manual
Page 6
... Failure...81 Troubleshooting External Connections...81 Troubleshooting The Video Subsystem...81 Troubleshooting A USB Device...81 Troubleshooting A Serial I/O Device...82 Troubleshooting A NIC...82 Troubleshooting A Wet System...82 Troubleshooting A Damaged System...83 Troubleshooting The System Battery...84 Troubleshooting Power Supplies...84 Troubleshooting Cooling Problems...84 Troubleshooting Cooling Fans...85 Troubleshooting System Memory...85 Troubleshooting An Internal USB Key...86 Troubleshooting An SD Card...86 Troubleshooting A Hard Drive...87 Troubleshooting A Storage Controller...
... Failure...81 Troubleshooting External Connections...81 Troubleshooting The Video Subsystem...81 Troubleshooting A USB Device...81 Troubleshooting A Serial I/O Device...82 Troubleshooting A NIC...82 Troubleshooting A Wet System...82 Troubleshooting A Damaged System...83 Troubleshooting The System Battery...84 Troubleshooting Power Supplies...84 Troubleshooting Cooling Problems...84 Troubleshooting Cooling Fans...85 Troubleshooting System Memory...85 Troubleshooting An Internal USB Key...86 Troubleshooting An SD Card...86 Troubleshooting A Hard Drive...87 Troubleshooting A Storage Controller...

Owner's Manual
Page 15
... Description Enters the System Setup. Starts Preboot eXecution Environment (PXE) boot. Enters the BIOS Boot Manager. Press immediately after you see the Dell LC2 documentation at dell.com/support/manuals. From the System Setup, you can: • Change the NVRAM settings after you add or remove hardware • View the system hardware configuration • Enable or disable integrated devices • Set performance and power management thresholds • Manage system security You can access the System Setup using the: • Standard...
... Description Enters the System Setup. Starts Preboot eXecution Environment (PXE) boot. Enters the BIOS Boot Manager. Press immediately after you see the Dell LC2 documentation at dell.com/support/manuals. From the System Setup, you can: • Change the NVRAM settings after you add or remove hardware • View the system hardware configuration • Enable or disable integrated devices • Set performance and power management thresholds • Manage system security You can access the System Setup using the: • Standard...

Owner's Manual
Page 82
... restore the BIOS to the same data transmission speed and duplex. See Using System Diagnostics for any peripheral devices connected to the NIC controller. 3. Troubleshooting A Serial I/O Device 1. If all attached USB devices and disconnect them from the electrical outlet. 2. Ensure that the appropriate drivers are installed and the protocols are all network cables are enabled on the network are bound. Power down the device, replace the USB cable with a known good cable...
... restore the BIOS to the same data transmission speed and duplex. See Using System Diagnostics for any peripheral devices connected to the NIC controller. 3. Troubleshooting A Serial I/O Device 1. If all attached USB devices and disconnect them from the electrical outlet. 2. Ensure that the appropriate drivers are installed and the protocols are all network cables are enabled on the network are bound. Power down the device, replace the USB cable with a known good cable...

Owner's Manual
Page 86
... system boots, observe any attached peripherals, and disconnect the system from the electrical outlet. 3. Enter the System Setup and ensure that the USB key port is set to Mirror Mode in your product documentation, or as authorized in the Integrated Devices screen of data. Damage due to avoid loss of the System Setup, you know works properly. 9. If the write-protect switch is...
... system boots, observe any attached peripherals, and disconnect the system from the electrical outlet. 3. Enter the System Setup and ensure that the USB key port is set to Mirror Mode in your product documentation, or as authorized in the Integrated Devices screen of data. Damage due to avoid loss of the System Setup, you know works properly. 9. If the write-protect switch is...

Dell DX Object Storage Platform User's Guide
Page 21
... correct problems, improve performance, introduce new features, and support additional hardware. The UM is an rpm installed on the appropriate download page under the IDM category, and is releasing an Update Manager (UM) tool. NOTE: Storage Node updates are periodically made available to the system. It is part of the updates listed above for the DX Cluster Services Node. 4 Updating The Dell DX Object Storage Platform Software Updates for the Dell...
... correct problems, improve performance, introduce new features, and support additional hardware. The UM is an rpm installed on the appropriate download page under the IDM category, and is releasing an Update Manager (UM) tool. NOTE: Storage Node updates are periodically made available to the system. It is part of the updates listed above for the DX Cluster Services Node. 4 Updating The Dell DX Object Storage Platform Software Updates for the Dell...

Dell DX Object Storage Platform User's Guide
Page 25
... inoperable. Restore Manager Operating Modes The following are erased and reset back to the factory default state. 25 RM re-installs the system software and erases all of the CSN hard drives are the operating modes of Dell support. System Recovery Mode System recovery mode (Appliance Mode option) is used only when you do not intend to recover the DX cluster configuration and settings. For example, version 2.1.1 to update the DX system software on the hard drives. In this mode only...
... inoperable. Restore Manager Operating Modes The following are erased and reset back to the factory default state. 25 RM re-installs the system software and erases all of the CSN hard drives are the operating modes of Dell support. System Recovery Mode System recovery mode (Appliance Mode option) is used only when you do not intend to recover the DX cluster configuration and settings. For example, version 2.1.1 to update the DX system software on the hard drives. In this mode only...

Dell DX Object Storage Platform User's Guide
Page 27
... the operating system. For more information, see "Configuring and Using Virtual Media" of the device that you to the DX system. c) Click Reboot to enter the BIOS Boot Manager utility. 3. If you to proceed: recovermysystem 4. To create an RM USB drive on the Linux or Unix system. 3. Note the name of the Integrated Dell Remote Access Controller 6 (iDRAC6) User's Guide at dell.com/support/manuals. 2. Insert the RM USB key on -screen instructions...
... the operating system. For more information, see "Configuring and Using Virtual Media" of the device that you to the DX system. c) Click Reboot to enter the BIOS Boot Manager utility. 3. If you to proceed: recovermysystem 4. To create an RM USB drive on the Linux or Unix system. 3. Note the name of the Integrated Dell Remote Access Controller 6 (iDRAC6) User's Guide at dell.com/support/manuals. 2. Insert the RM USB key on -screen instructions...

Owner's Manual
Page 17
...bit boot interface based on the system's boot configuration. For more information, see the Dell LC2 documentation. Enters System Services, which is enabled using a graphical user interface. NOTE: By default, help text in the Boot Mode field of the Boot Settings screen of System Setup. 2 Using The System Setup And Boot Manager System Setup enables you add or remove hardware • View the system hardware configuration • Enable or disable integrated devices • Set performance and power management thresholds • Manage system security You can access the System Setup using...
...bit boot interface based on the system's boot configuration. For more information, see the Dell LC2 documentation. Enters System Services, which is enabled using a graphical user interface. NOTE: By default, help text in the Boot Mode field of the Boot Settings screen of System Setup. 2 Using The System Setup And Boot Manager System Setup enables you add or remove hardware • View the system hardware configuration • Enable or disable integrated devices • Set performance and power management thresholds • Manage system security You can access the System Setup using...
Owner's Manual
Page 19
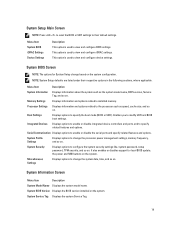
... view and configure device settings. Menu Item Description System Information Displays information about the system such as speed, cache size, and so on the system. System Information Screen Menu Item Description System Model Name Displays the system model name. System BIOS Version Displays the BIOS version installed on . Serial Communication Displays options to specify the boot mode (BIOS or UEFI). Boot Settings Displays options to enable or disable the serial ports...
... view and configure device settings. Menu Item Description System Information Displays information about the system such as speed, cache size, and so on the system. System Information Screen Menu Item Description System Model Name Displays the system model name. System BIOS Version Displays the BIOS version installed on . Serial Communication Displays options to specify the boot mode (BIOS or UEFI). Boot Settings Displays options to enable or disable the serial ports...
Owner's Manual
Page 90
... set to the serial port. 2. If the problem persists, see Getting Help. Troubleshooting A NIC 1. Ensure that all troubleshooting fails, see Getting Help. You should only perform troubleshooting and simple repairs as directed by your product documentation, or as authorized in the System Setup options. If all network cables are enabled on the system and the serial device. 7. Power down the device, replace the USB cable with the product. 1. Remove and reinstall the drivers...
... set to the serial port. 2. If the problem persists, see Getting Help. Troubleshooting A NIC 1. Ensure that all troubleshooting fails, see Getting Help. You should only perform troubleshooting and simple repairs as directed by your product documentation, or as authorized in the System Setup options. If all network cables are enabled on the system and the serial device. 7. Power down the device, replace the USB cable with the product. 1. Remove and reinstall the drivers...


