Getting Started Guide
Page 3
Dell™ PowerVault™ 600 Systems Getting Started With Your System Model MVT01
Dell™ PowerVault™ 600 Systems Getting Started With Your System Model MVT01
Getting Started Guide
Page 4
.... Reproduction in any proprietary interest in this text: Dell, the DELL logo, and PowerVault, are registered trademarks of Dell Inc. disclaims any manner whatsoever without notice. © 2007 Dell Inc. Trademarks used in this document to refer to either potential damage to hardware or loss of data and tells you make better use of Dell Inc.; Intel Core and Core 2 Duo are...
.... Reproduction in any proprietary interest in this text: Dell, the DELL logo, and PowerVault, are registered trademarks of Dell Inc. disclaims any manner whatsoever without notice. © 2007 Dell Inc. Trademarks used in this document to refer to either potential damage to hardware or loss of data and tells you make better use of Dell Inc.; Intel Core and Core 2 Duo are...
Getting Started Guide
Page 5
Contents System Features 5 Supported Operating Systems 7 Other Information You May Need 7 Obtaining Technical Assistance 7 Installation and Configuration 8 Unpacking the System 8 Installing the Rails and System in a Rack 9 Connecting the Keyboard, Mouse, and Monitor . . 10 Connecting the Power 10 Installing the Power Cord Retention Bracket . . . 11 Turning on the System 11 Installing the Bezel 12 Complete the 0perating System Setup 12 Technical Specifications 12 Index 17 Contents 3
Contents System Features 5 Supported Operating Systems 7 Other Information You May Need 7 Obtaining Technical Assistance 7 Installation and Configuration 8 Unpacking the System 8 Installing the Rails and System in a Rack 9 Connecting the Keyboard, Mouse, and Monitor . . 10 Connecting the Power 10 Installing the Power Cord Retention Bracket . . . 11 Turning on the System 11 Installing the Bezel 12 Complete the 0perating System Setup 12 Technical Specifications 12 Index 17 Contents 3
Getting Started Guide
Page 7
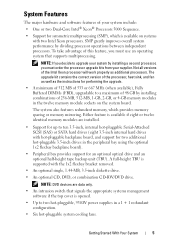
...: DVD devices are installed. • Support for up to a maximum of 48 GB by dividing processor operations between independent processors. System Features The major hardware and software features of your supplier. Not all versions of the Intel Xeon processor will work properly as the instructions for performing the upgrade. • A minimum of 512 MB of the processor, heat sink, and fan as well...
...: DVD devices are installed. • Support for up to a maximum of 48 GB by dividing processor operations between independent processors. System Features The major hardware and software features of your supplier. Not all versions of the Intel Xeon processor will work properly as the instructions for performing the upgrade. • A minimum of 512 MB of the processor, heat sink, and fan as well...
Getting Started Guide
Page 8
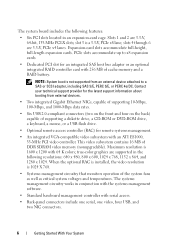
... flash drive. • Optional remote access controller (RAC) for an integrated SAS host bus adapter or an optional integrated RAID controller card with serial access. • Back-panel connectors include one serial, one video, four USB, and two NIC connectors. 6 Getting Started With Your System true-color graphics are supported in conjunction with the systems management software. • Standard baseboard management controller with 256 MB of the system fans as...
... flash drive. • Optional remote access controller (RAC) for an integrated SAS host bus adapter or an optional integrated RAID controller card with serial access. • Back-panel connectors include one serial, one video, four USB, and two NIC connectors. 6 Getting Started With Your System true-color graphics are supported in conjunction with the systems management software. • Standard baseboard management controller with 256 MB of the system fans as...

Getting Started Guide
Page 9
...; Front-panel 1x5 LCD for experienced users or technicians. Obtaining Technical Assistance If you do not understand a procedure in this document or as expected, see "Technical Specifications" on page 12. Supported Operating Systems • Microsoft® Windows Storage Server™ 2003 R2 Express Edition (x64) • Microsoft Windows Storage Server 2003 R2 Workgroup Edition (x64) Other Information You May Need CAUTION: The Product Information Guide provides...
...; Front-panel 1x5 LCD for experienced users or technicians. Obtaining Technical Assistance If you do not understand a procedure in this document or as expected, see "Technical Specifications" on page 12. Supported Operating Systems • Microsoft® Windows Storage Server™ 2003 R2 Express Edition (x64) • Microsoft Windows Storage Server 2003 R2 Workgroup Edition (x64) Other Information You May Need CAUTION: The Product Information Guide provides...

Getting Started Guide
Page 10
.... To avoid injury, do not attempt to set up your system. Keep all shipping materials in large part to assist you need them later. 8 Getting Started With Your System Installation and Configuration CAUTION: Before performing the following procedure, read and follow show a rack-mounted system, but the installation procedure applies in case you . CAUTION: Installing the feet on your system for the...
.... To avoid injury, do not attempt to set up your system. Keep all shipping materials in large part to assist you need them later. 8 Getting Started With Your System Installation and Configuration CAUTION: Before performing the following procedure, read and follow show a rack-mounted system, but the installation procedure applies in case you . CAUTION: Installing the feet on your system for the...
Getting Started Guide
Page 11
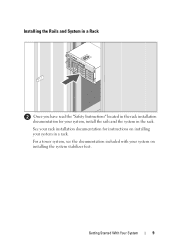
Getting Started With Your System 9 Installing the Rails and System in a Rack Once you have read the "Safety Instructions" located in the rack installation documentation for instructions on installing the system stabilizer feet. For a tower system, see the documentation included with your system, install the rails and the system in a rack. See your rack installation documentation for your system on installing your system in the rack.
Getting Started With Your System 9 Installing the Rails and System in a Rack Once you have read the "Safety Instructions" located in the rack installation documentation for instructions on installing the system stabilizer feet. For a tower system, see the documentation included with your system, install the rails and the system in a rack. See your rack installation documentation for your system on installing your system in the rack.
Getting Started Guide
Page 12
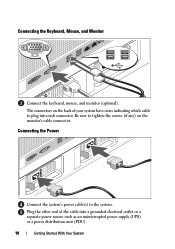
The connectors on the monitor's cable connector. Connecting the Power Connect the system's power cable(s) to plug into a grounded electrical outlet or a separate power source such as an uninterrupted power supply (UPS) or a power distribution unit (PDU). 10 Getting Started With Your System Connecting the Keyboard, Mouse, and Monitor Connect the keyboard, mouse, and monitor (optional). Be sure to tighten the screws (if any) on the back of the cable into each connector. Plug the other end of your system have icons indicating which cable to the system.
The connectors on the monitor's cable connector. Connecting the Power Connect the system's power cable(s) to plug into a grounded electrical outlet or a separate power source such as an uninterrupted power supply (UPS) or a power distribution unit (PDU). 10 Getting Started With Your System Connecting the Keyboard, Mouse, and Monitor Connect the keyboard, mouse, and monitor (optional). Be sure to tighten the screws (if any) on the back of the cable into each connector. Plug the other end of your system have icons indicating which cable to the system.

Getting Started Guide
Page 13
Press the power button on the right bend of the power supply handle. Installing the Power Cord Retention Bracket Attach the power cord retention bracket on the system and the monitor. Bend the system power cable into a loop as shown in the illustration and attach to the bracket's cable clasp. The power indicators should light. Getting Started With Your System 11 Turning on the System Turn on the system and monitor (optional). Adjust the monitor's controls until the displayed image is satisfactory. Repeat the procedure for the second power supply.
Press the power button on the right bend of the power supply handle. Installing the Power Cord Retention Bracket Attach the power cord retention bracket on the system and the monitor. Bend the system power cable into a loop as shown in the illustration and attach to the bracket's cable clasp. The power indicators should light. Getting Started With Your System 11 Turning on the System Turn on the system and monitor (optional). Adjust the monitor's controls until the displayed image is satisfactory. Repeat the procedure for the second power supply.
Getting Started Guide
Page 14
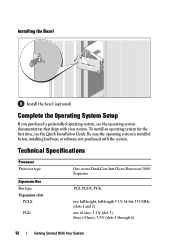
... lanes, 3.3-V (slots 4 through 6) 12 Getting Started With Your System Be sure the operating system is installed before installing hardware or software not purchased with your system. To install an operating system for the first time, see the operating system documentation that ships with the system. Installing the Bezel Install the bezel (optional). Complete the 0perating System Setup If you purchased a preinstalled operating system, see the Quick Installation Guide.
... lanes, 3.3-V (slots 4 through 6) 12 Getting Started With Your System Be sure the operating system is installed before installing hardware or software not purchased with your system. To install an operating system for the first time, see the operating system documentation that ships with the system. Installing the Bezel Install the bezel (optional). Complete the 0perating System Setup If you purchased a preinstalled operating system, see the Quick Installation Guide.
Getting Started Guide
Page 15
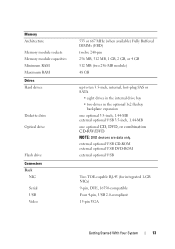
...module sockets Memory module capacities Minimum RAM Maximum RAM Drives Hard drives Diskette drive Optical drive Flash drive Connectors Back NIC Serial USB Video 533 or 667 MHz (when available) Fully Buffered DIMMs (FBD) twelve 240-pin 256 MB, 512 MB, 1 GB, 2 GB, or 4 GB 512 MB (two 256-MB module) 48 GB up to ten 3.5-inch, internal, hot-plug SAS... DVD devices are data only. external optional USB CD-ROM external optional USB DVD-ROM external optional USB Two TOE-capable RJ-45 (for integrated 1-GB NICs) 9-pin, DTE, 16550-compatible Four 4-pin, USB 2.0-compliant 15-pin VGA Getting Started With ...
...module sockets Memory module capacities Minimum RAM Maximum RAM Drives Hard drives Diskette drive Optical drive Flash drive Connectors Back NIC Serial USB Video 533 or 667 MHz (when available) Fully Buffered DIMMs (FBD) twelve 240-pin 256 MB, 512 MB, 1 GB, 2 GB, or 4 GB 512 MB (two 256-MB module) 48 GB up to ten 3.5-inch, internal, hot-plug SAS... DVD devices are data only. external optional USB CD-ROM external optional USB DVD-ROM external optional USB Two TOE-capable RJ-45 (for integrated 1-GB NICs) 9-pin, DTE, 16550-compatible Four 4-pin, USB 2.0-compliant 15-pin VGA Getting Started With ...
Getting Started Guide
Page 16
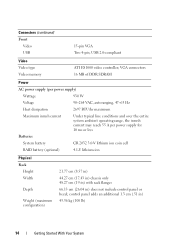
...BTU/hr maximum Maximum inrush current Under typical line conditions and over the entire system ambient operating range, the inrush current may reach 55 A per power supply for 10 ms or less Batteries System battery CR 2032 3.0-V lithium ion coin cell RAID battery (optional) 4.1-V lithium ion Physical Rack Height Width Depth Weight (maximum configuration...with rack flanges 66.13 cm (26.04 in ) 45.36 kg (100 lb) 14 Getting Started With Your System Connectors (continued) Front Video USB 15-pin VGA Two 4-pin, USB 2.0-compliant Video Video type Video memory ATI ES1000 video controller;
...BTU/hr maximum Maximum inrush current Under typical line conditions and over the entire system ambient operating range, the inrush current may reach 55 A per power supply for 10 ms or less Batteries System battery CR 2032 3.0-V lithium ion coin cell RAID battery (optional) 4.1-V lithium ion Physical Rack Height Width Depth Weight (maximum configuration...with rack flanges 66.13 cm (26.04 in ) 45.36 kg (100 lb) 14 Getting Started With Your System Connectors (continued) Front Video USB 15-pin VGA Two 4-pin, USB 2.0-compliant Video Video type Video memory ATI ES1000 video controller;
Getting Started Guide
Page 17
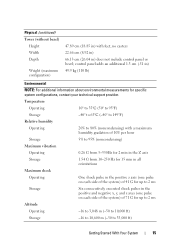
control panel adds an additional 1.3 cm (.51 in) 49.9 kg (110 lb) Environmental NOTE: For additional information about environmental measurements for up to 2 ms Storage Six consecutively executed shock pulses in the positive and negative x, y, and z axes (one pulse on each side of the system) of 71 G for specific system configurations, contact your technical support provider. Temperature Operating 10°...
control panel adds an additional 1.3 cm (.51 in) 49.9 kg (110 lb) Environmental NOTE: For additional information about environmental measurements for up to 2 ms Storage Six consecutively executed shock pulses in the positive and negative x, y, and z axes (one pulse on each side of the system) of 71 G for specific system configurations, contact your technical support provider. Temperature Operating 10°...

Getting Started Guide
Page 18
16 Getting Started With Your System
16 Getting Started With Your System
Getting Started Guide
Page 19
Index C combination CD-RW/DVD, 5 P processors, 5 E expansion-card cage, 6 I installation and configuration, 8 integrated RAID controller, 6 M memory, 5 interleaving, 5 N NICs, 6 R remote access controller remote systems management, 6 remote access controller card, 6 remote systems management remote access controller card, 6 S supported Operating Systems, 7 symmetric multiprocessing (SMP), 5 system features, 5 CD drive, 5 diskette drive, 5 DVD drive, 5 memory, 5 NICs, 6 power supply, 5 processors, 5 Index 17
Index C combination CD-RW/DVD, 5 P processors, 5 E expansion-card cage, 6 I installation and configuration, 8 integrated RAID controller, 6 M memory, 5 interleaving, 5 N NICs, 6 R remote access controller remote systems management, 6 remote access controller card, 6 remote systems management remote access controller card, 6 S supported Operating Systems, 7 symmetric multiprocessing (SMP), 5 system features, 5 CD drive, 5 diskette drive, 5 DVD drive, 5 memory, 5 NICs, 6 power supply, 5 processors, 5 Index 17


