PowerEdge XR4520c Installation and Service Manual
Page 3
...About this document...6 Chapter 2: Dell PowerEdge XR4520c system configurations and features 7 System configurations - front view for PowerEdge XR4520c 11 NIC indicator codes...12 Locating the Express Service Code and Service Tag 12 System information label...13 Chapter 3: Technical specifications 16 Sled dimensions ...16 System weight...17 Processor specifications...17 Cooling fan specifications...17 Supported operating systems...17 System battery specifications...17 Memory specifications...18 Expansion card riser specifications...18 Storage controller specifications...18 Drives...18 GPU...
...About this document...6 Chapter 2: Dell PowerEdge XR4520c system configurations and features 7 System configurations - front view for PowerEdge XR4520c 11 NIC indicator codes...12 Locating the Express Service Code and Service Tag 12 System information label...13 Chapter 3: Technical specifications 16 Sled dimensions ...16 System weight...17 Processor specifications...17 Cooling fan specifications...17 Supported operating systems...17 System battery specifications...17 Memory specifications...18 Expansion card riser specifications...18 Storage controller specifications...18 Drives...18 GPU...
PowerEdge XR4520c Installation and Service Manual
Page 5
... Network I/O board...91 Install the Network I/O Board...92 System battery ...93 Replacing the system battery...93 System board...95 Removing the system board...95 Installing the system board ...97 Trusted Platform Module...100 Upgrading the Trusted Platform Module...100 Initializing TPM for users...101 Initializing the TPM 2.0 for users...101 Chapter 9: Upgrade Kits...102 Chapter 10: DIP Switches...103 System board DIP switches...103 System board jumper DIP switch settings...104 Disabling a forgotten password...104 Chapter 11: Using system diagnostics 106 Dell...
... Network I/O board...91 Install the Network I/O Board...92 System battery ...93 Replacing the system battery...93 System board...95 Removing the system board...95 Installing the system board ...97 Trusted Platform Module...100 Upgrading the Trusted Platform Module...100 Initializing TPM for users...101 Initializing the TPM 2.0 for users...101 Chapter 9: Upgrade Kits...102 Chapter 10: DIP Switches...103 System board DIP switches...103 System board jumper DIP switch settings...104 Disabling a forgotten password...104 Chapter 11: Using system diagnostics 106 Dell...

PowerEdge XR4520c Installation and Service Manual
Page 8
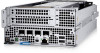
... mode NOTE: To reset the iDRAC (if not disabled on the iDRAC setup page by turning on or off . You can also use the system ID button to reset iDRAC and to access the PCIe expansion card installed on the front and back of the sled (continued) Item Ports, panels, or slots 3 PCIe expansion card slot 2 Icon N/A 4 Serial port 5 USB 3.0 port 6 iDRAC9 RJ-45 dedicated port 7 Mini-DisplayPort 8 Sled handle N/A 9 System identification button 10 Sled power button N/A 8 Dell PowerEdge XR4520c system configurations...
... mode NOTE: To reset the iDRAC (if not disabled on the iDRAC setup page by turning on or off . You can also use the system ID button to reset iDRAC and to access the PCIe expansion card installed on the front and back of the sled (continued) Item Ports, panels, or slots 3 PCIe expansion card slot 2 Icon N/A 4 Serial port 5 USB 3.0 port 6 iDRAC9 RJ-45 dedicated port 7 Mini-DisplayPort 8 Sled handle N/A 9 System identification button 10 Sled power button N/A 8 Dell PowerEdge XR4520c system configurations...

PowerEdge XR4520c Installation and Service Manual
Page 26
... to download drivers and firmware Setting up the system Perform the following steps to set up the iDRAC IP address using iDRAC by default. Install the system in the XR4000r/XR4000z chassis, the power button LED indicator status may be delayed for initial setup and configuration of the Dell system. The network settings option is initializing. You can also power on the enclosure to prevent damage to the system connectors. 3. NOTE...
... to download drivers and firmware Setting up the system Perform the following steps to set up the iDRAC IP address using iDRAC by default. Install the system in the XR4000r/XR4000z chassis, the power button LED indicator status may be delayed for initial setup and configuration of the Dell system. The network settings option is initializing. You can also power on the enclosure to prevent damage to the system connectors. 3. NOTE...
PowerEdge XR4520c Installation and Service Manual
Page 32
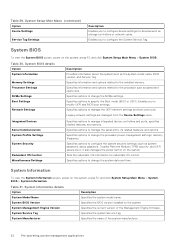
... options related to the processor such as storage controllers or network cards. Boot Settings Specifies options to manage integrated device controllers and ports, specifies related features, and options. Integrated Devices Serial Communication System Profile Settings System Security Redundant OS Control Miscellaneous Settings Specifies options to specify the Boot mode (BIOS or UEFI). Specifies options to change the processor power management settings, memory frequency. Specifies options to change the system date and time. System Service Tag Specifies the system...
... options related to the processor such as storage controllers or network cards. Boot Settings Specifies options to manage integrated device controllers and ports, specifies related features, and options. Integrated Devices Serial Communication System Profile Settings System Security Redundant OS Control Miscellaneous Settings Specifies options to specify the Boot mode (BIOS or UEFI). Specifies options to change the processor power management settings, memory frequency. Specifies options to change the system date and time. System Service Tag Specifies the system...

PowerEdge XR4520c Installation and Service Manual
Page 33
... System Setup Main Menu > System BIOS > Memory Settings. System CPLD Version Specifies the current version of the system firmware. UEFI Compliance Version Specifies the UEFI compliance level of the system Complex Programmable Logic Device (CPLD) firmware. The two options available are run during system boot. Options such as Fault Resilient Mode and NUMA Fault Resilient Mode are available for support when the Advanced RAS capability processor is set to disable system installed DIMMs. Enables or disables correctable error logging...
... System Setup Main Menu > System BIOS > Memory Settings. System CPLD Version Specifies the current version of the system firmware. UEFI Compliance Version Specifies the UEFI compliance level of the system Complex Programmable Logic Device (CPLD) firmware. The two options available are run during system boot. Options such as Fault Resilient Mode and NUMA Fault Resilient Mode are available for support when the Advanced RAS capability processor is set to disable system installed DIMMs. Enables or disables correctable error logging...

PowerEdge XR4520c Installation and Service Manual
Page 35
... accesses without intervening writes. NOTE: This feature is not supported if CPU Power Management is displayed and selectable for each system profile mode. NOTE: This option is set to two processor listings. This option is set to Disabled by default. This option is set to Disabled by default. This item can only be up to Maximum Performance. Limit CPU physical address to 46 bits to Enabled by default. This option is set...
... accesses without intervening writes. NOTE: This feature is not supported if CPU Power Management is displayed and selectable for each system profile mode. NOTE: This option is set to two processor listings. This option is set to Disabled by default. This option is set to Disabled by default. This item can only be up to Maximum Performance. Limit CPU physical address to 46 bits to Enabled by default. This option is set...
PowerEdge XR4520c Installation and Service Manual
Page 36
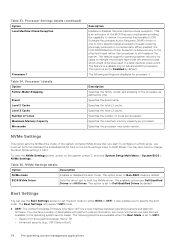
... L2 cache. Specifies the number of the processor as defined by default. Specifies the maximum memory capacity per processor. Specifies the processor microcode version. You may also need to change the Boot Mode setting to Disabled by default. To view the NVMe Settings screen, power on the SATA settings menu to all threads in a fatal machine check event. NVMe Settings details Option Description NVMe mode Enables or disables the boot mode. The following settings are Dell Qualified Drives and All...
... L2 cache. Specifies the number of the processor as defined by default. Specifies the maximum memory capacity per processor. Specifies the processor microcode version. You may also need to change the Boot Mode setting to Disabled by default. To view the NVMe Settings screen, power on the SATA settings menu to all threads in a fatal machine check event. NVMe Settings details Option Description NVMe mode Enables or disables the boot mode. The following settings are Dell Qualified Drives and All...

PowerEdge XR4520c Installation and Service Manual
Page 37
... UEFI mode, it replaces the system BIOS. 1. Enables you to select the enabled or disabled boot devices Choosing system boot mode System Setup enables you want the system to www.dell.com/ossupport. After the system boots in UEFI Boot Mode. It is maintained for installing your operating system from NVMe drives. ● BIOS: The BIOS Boot Mode is set to Disabled by default. DOS and 32-bit operating systems do nothing. Pre-operating system management applications 37 Enables or disables UEFI Boot options. Select the UEFI boot mode...
... UEFI mode, it replaces the system BIOS. 1. Enables you to select the enabled or disabled boot devices Choosing system boot mode System Setup enables you want the system to www.dell.com/ossupport. After the system boots in UEFI Boot Mode. It is maintained for installing your operating system from NVMe drives. ● BIOS: The BIOS Boot Mode is set to Disabled by default. DOS and 32-bit operating systems do nothing. Pre-operating system management applications 37 Enables or disables UEFI Boot options. Select the UEFI boot mode...

PowerEdge XR4520c Installation and Service Manual
Page 38
...: Changing the drive boot sequence is set to Disabled by default. 38 Pre-operating system management applications NOTE: You can also enable or disable boot order devices as needed. NOTE: Network Settings are not supported in BIOS boot mode. Enables you to control the configuration of the HTTP device. Enables you to control the configuration of the PXE device. Table 39. Table 40. Network Settings To view the Network Settings screen, power on exit. Network Settings details Option UEFI PXE Settings PXE Device n (n = 1 to 4) PXE Device n Settings(n = 1 to 4) UEFI HTTP Settings HTTP...
...: Changing the drive boot sequence is set to Disabled by default. 38 Pre-operating system management applications NOTE: You can also enable or disable boot order devices as needed. NOTE: Network Settings are not supported in BIOS boot mode. Enables you to control the configuration of the HTTP device. Enables you to control the configuration of the PXE device. Table 39. Table 40. Network Settings To view the Network Settings screen, power on exit. Network Settings details Option UEFI PXE Settings PXE Device n (n = 1 to 4) PXE Device n Settings(n = 1 to 4) UEFI HTTP Settings HTTP...

PowerEdge XR4520c Installation and Service Manual
Page 39
... hardware and software support the feature. After the boot process is set to both the primary add-in this managed port. This option is complete, the USB ports will output displays to Enabled, the Embedded Video Controller will then be enabled or disabled as the primary display. BIOS will be disabled right before the operating system boots. Integrated Devices details Option User Accessible USB Ports Internal USB Port Description Configures the user accessible USB ports. This option is set to All Ports On by default. Selecting All Ports...
... hardware and software support the feature. After the boot process is set to both the primary add-in this managed port. This option is complete, the USB ports will output displays to Enabled, the Embedded Video Controller will then be enabled or disabled as the primary display. BIOS will be disabled right before the operating system boots. Integrated Devices details Option User Accessible USB Ports Internal USB Port Description Configures the user accessible USB ports. This option is set to All Ports On by default. Selecting All Ports...

PowerEdge XR4520c Installation and Service Manual
Page 40
... System Setup Main Menu > System BIOS > Serial Communication. If the Embedded Video Controller is set to Enabled, the operating system initializes the timer. When this watchdog timer aids in the system (that are present in graphics card is installed), then the Embedded Video Controller is automatically used as the primary display even if the Embedded Video Controller setting is set to Disabled by default. The slot bifurcation field is accessible when set to Manual bifurcation Control...
... System Setup Main Menu > System BIOS > Serial Communication. If the Embedded Video Controller is set to Enabled, the operating system initializes the timer. When this watchdog timer aids in the system (that are present in graphics card is installed), then the Embedded Video Controller is automatically used as the primary display even if the Embedded Video Controller setting is set to Disabled by default. The slot bifurcation field is accessible when set to Manual bifurcation Control...

PowerEdge XR4520c Installation and Service Manual
Page 42
... memory patrol scrub mode. System Security To view the System Security screen, power on the system, press F2, and click System Setup Main Menu > System BIOS > System Security. 42 Pre-operating system management applications This option is set to select the Uncore Frequency option. Enables you to Enabled by default. Enables or disables the PCI ASPM L1 Link Power Management. Workload Profile CPU Interconnect Bus Link Power Management PCI ASPM L1 Link Power Management This option allows the user...
... memory patrol scrub mode. System Security To view the System Security screen, power on the system, press F2, and click System Setup Main Menu > System BIOS > System Security. 42 Pre-operating system management applications This option is set to select the Uncore Frequency option. Enables you to Enabled by default. Enables or disables the PCI ASPM L1 Link Power Management. Workload Profile CPU Interconnect Bus Link Power Management PCI ASPM L1 Link Power Management This option allows the user...
PowerEdge XR4520c Installation and Service Manual
Page 46
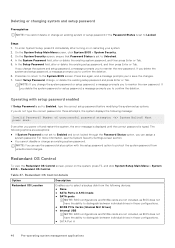
... disk from the following devices: ● None ● SATA Ports in AHCI mode ● SATA ports NOTE: RAID configurations and NVMe cards are exceptions: ● If System Password is not set to Enabled and is set to reenter the new password. If you delete the system password or setup password, a message prompts you do not type the correct password in those configurations. ● BOSS PCIe Cards (Internal M.2 Drives) ● Internal USB NOTE: RAID configurations and NVMe cards are not included, as BIOS...
... disk from the following devices: ● None ● SATA Ports in AHCI mode ● SATA ports NOTE: RAID configurations and NVMe cards are exceptions: ● If System Password is not set to Enabled and is set to reenter the new password. If you delete the system password or setup password, a message prompts you do not type the correct password in those configurations. ● BOSS PCIe Cards (Internal M.2 Drives) ● Internal USB NOTE: RAID configurations and NVMe cards are not included, as BIOS...
PowerEdge XR4520c Installation and Service Manual
Page 48
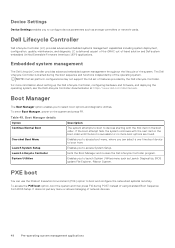
... Controller, configuring hardware and firmware, and deploying the operating system, see the Dell Lifecycle Controller documentation at https://www.dell.com/idracmanuals. To enter Boot Manager, power on the system and press F11. System Utilities Enables you to access System Setup. NOTE: Certain platform configurations may not support the full set of network devices. 48 Pre-operating system management applications One-shot Boot Menu Enables you to access boot menu, where you to configure device parameters such as storage controllers or network cards. Launch Lifecycle Controller...
... Controller, configuring hardware and firmware, and deploying the operating system, see the Dell Lifecycle Controller documentation at https://www.dell.com/idracmanuals. To enter Boot Manager, power on the system and press F11. System Utilities Enables you to access System Setup. NOTE: Certain platform configurations may not support the full set of network devices. 48 Pre-operating system management applications One-shot Boot Menu Enables you to access boot menu, where you to configure device parameters such as storage controllers or network cards. Launch Lifecycle Controller...

PowerEdge XR4520c Installation and Service Manual
Page 62
... Install the expansion card riser 1C. Cooling fans Removing a cooling fan Prerequisites 1. Steps 1. Follow the procedure listed in Safety instructions. 2. Remove the sled. Figure 23. Pull slightly to disengage the fan cable from the guiding pin and then lift to release the fan handle. 3. Pull the blue latch on the fan, this indicates Reverse-Air-Flow (RAF). Slightly pull back the fan handle to the slot...
... Install the expansion card riser 1C. Cooling fans Removing a cooling fan Prerequisites 1. Steps 1. Follow the procedure listed in Safety instructions. 2. Remove the sled. Figure 23. Pull slightly to disengage the fan cable from the guiding pin and then lift to release the fan handle. 3. Pull the blue latch on the fan, this indicates Reverse-Air-Flow (RAF). Slightly pull back the fan handle to the slot...

PowerEdge XR4520c Installation and Service Manual
Page 99
... updated or changed. 5. If the service tag is complete, system reboots. All data is complete, BIOS prompts to restore the system configuration data. ● Restore data from a previously created Hardware Server Profile, press F10 NOTE: When the restore process is backed up in a backup flash device automatically. To enter the System Setup, press F2. 3. Installing and removing system components 99 For more information, see the Integrated Dell Remote Access Controller User's Guide...
... updated or changed. 5. If the service tag is complete, system reboots. All data is complete, BIOS prompts to restore the system configuration data. ● Restore data from a previously created Hardware Server Profile, press F10 NOTE: When the restore process is backed up in a backup flash device automatically. To enter the System Setup, press F2. 3. Installing and removing system components 99 For more information, see the Integrated Dell Remote Access Controller User's Guide...
PowerEdge XR4520c Installation and Service Manual
Page 104
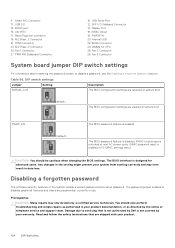
... Connector 24. Fan 2 Connector 28. iDRAC local access is not covered by Dell is unlocked at system boot. SFP I/O Sideband Connector 14. M.2 Riser_2 Connector 25. USB Serial Port 12. The BIOS password feature is enabled. The password jumper enables or disables password features and clears any password(s) currently in F2 iDRAC settings menu. iDRAC password reset is designed for CPU 26. iDRAC port 15. TPM Connector 23. The BIOS interface is enabled in use. Prerequisites CAUTION: Many repairs may even result in your product documentation...
... Connector 24. Fan 2 Connector 28. iDRAC local access is not covered by Dell is unlocked at system boot. SFP I/O Sideband Connector 14. M.2 Riser_2 Connector 25. USB Serial Port 12. The BIOS password feature is enabled. The password jumper enables or disables password features and clears any password(s) currently in F2 iDRAC settings menu. iDRAC password reset is designed for CPU 26. iDRAC port 15. TPM Connector 23. The BIOS interface is enabled in use. Prerequisites CAUTION: Many repairs may even result in your product documentation...
PowerEdge XR4520c Installation and Service Manual
Page 109
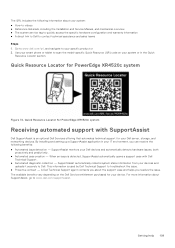
... the Installation and Service Manual, and mechanical overview ● The system service tag to quickly access the specific hardware configuration and warranty information ● A direct link to Dell to scan the model-specific Quick Resource (QR) code on the Dell Service entitlement purchased for PowerEdge XR4520c system Receiving automated support with Dell Technical Support. ● Automated diagnostic collection - A Dell Technical Support agent contacts you resolve the issue. Getting help 109 This information is detected, SupportAssist automatically opens a support...
... the Installation and Service Manual, and mechanical overview ● The system service tag to quickly access the specific hardware configuration and warranty information ● A direct link to Dell to scan the model-specific Quick Resource (QR) code on the Dell Service entitlement purchased for PowerEdge XR4520c system Receiving automated support with Dell Technical Support. ● Automated diagnostic collection - A Dell Technical Support agent contacts you resolve the issue. Getting help 109 This information is detected, SupportAssist automatically opens a support...
PowerEdge XR4520c Installation and Service Manual
Page 110
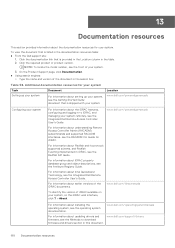
... managing your system. Location www.dell.com/poweredgemanuals Configuring your system. 3. On the Product Support page, click Documentation. ● Using search engines: ○ Type the name and version of your system For information about updating drivers and www.dell.com/support/drivers firmware, see the Integrated Dell Remote Access Controller User's Guide. For information about Redfish and its protocol, supported schema, and Redfish Eventing implemented in this document. 110 Documentation resources For information about installing the operating...
... managing your system. Location www.dell.com/poweredgemanuals Configuring your system. 3. On the Product Support page, click Documentation. ● Using search engines: ○ Type the name and version of your system For information about updating drivers and www.dell.com/support/drivers firmware, see the Integrated Dell Remote Access Controller User's Guide. For information about Redfish and its protocol, supported schema, and Redfish Eventing implemented in this document. 110 Documentation resources For information about installing the operating...


