Getting Started Guide
Page 11
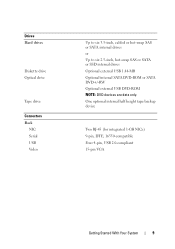
One optional internal half height tape backup device Two RJ-45 (for integrated 1-GB NICs) 9-pin, DTE, 16550-compatible Four 4-pin, USB 2.0-compliant 15-pin VGA Getting Started With Your System 9 Drives Hard drives Diskette drive Optical drive Tape drive Connectors Back NIC Serial USB Video Up to six 3.5-inch, cabled or hot-swap SAS or SATA internal drives or Up to six 2.5-inch, hot-swap SAS or SATA or SSD internal drives Optional external USB 1.44-MB Optional internal SATA DVD-ROM or SATA DVD+/-RW Optional external USB DVD-ROM NOTE: DVD devices are data only.
One optional internal half height tape backup device Two RJ-45 (for integrated 1-GB NICs) 9-pin, DTE, 16550-compatible Four 4-pin, USB 2.0-compliant 15-pin VGA Getting Started With Your System 9 Drives Hard drives Diskette drive Optical drive Tape drive Connectors Back NIC Serial USB Video Up to six 3.5-inch, cabled or hot-swap SAS or SATA internal drives or Up to six 2.5-inch, hot-swap SAS or SATA or SSD internal drives Optional external USB 1.44-MB Optional internal SATA DVD-ROM or SATA DVD+/-RW Optional external USB DVD-ROM NOTE: DVD devices are data only.
Hardware Owner's Manual
Page 6
... Installing the Cooling Shroud 93 Hard Drives 94 Removing a Drive Blank From the Front Bay 94 Installing a Drive Blank in the Front Bay 94 Removing a Hot-Swap Hard Drive 94 Installing a Hot-Swap Hard Drive 96 Removing a Cabled Hard Drive 98 Installing a Cabled Hard Drive 100 Optical and Tape Drives 102 Removing an Optical or a Tape Drive 102 Installing an Optical or Tape Drive 103 System Memory 106 General...
... Installing the Cooling Shroud 93 Hard Drives 94 Removing a Drive Blank From the Front Bay 94 Installing a Drive Blank in the Front Bay 94 Removing a Hot-Swap Hard Drive 94 Installing a Hot-Swap Hard Drive 96 Removing a Cabled Hard Drive 98 Installing a Cabled Hard Drive 100 Optical and Tape Drives 102 Removing an Optical or a Tape Drive 102 Installing an Optical or Tape Drive 103 System Memory 106 General...

Hardware Owner's Manual
Page 90
... need to lift the system, get others to remove the system cover. Opening and Closing the System WARNING: Only trained service technicians are removing a hot-swap component such as a hard drive or a power supply, turn off the system and attached peripherals. See Figure 3-5. 3 Turn the lock on the cover release latch counterclockwise to lift...
... need to lift the system, get others to remove the system cover. Opening and Closing the System WARNING: Only trained service technicians are removing a hot-swap component such as a hard drive or a power supply, turn off the system and attached peripherals. See Figure 3-5. 3 Turn the lock on the cover release latch counterclockwise to lift...
Hardware Owner's Manual
Page 94
... the handle to release the blank. 3 Slide the drive blank out until the hard-drive indicators on the drive carrier signal that your controller documentation for removal. Installing a Drive Blank in place. Removing a Hot-Swap Hard Drive CAUTION: To prevent data loss, ensure that the drive can be removed safely. If the drive has been online, the green activity/fault indicator...
... the handle to release the blank. 3 Slide the drive blank out until the hard-drive indicators on the drive carrier signal that your controller documentation for removal. Installing a Drive Blank in place. Removing a Hot-Swap Hard Drive CAUTION: To prevent data loss, ensure that the drive can be removed safely. If the drive has been online, the green activity/fault indicator...

Hardware Owner's Manual
Page 95
... a Hot-Swap Hard Drive 1 2 1 release button 2 hard drive carrier handle Installing System Components 95 CAUTION: To maintain proper system cooling, all empty hard-drive bays must have drive blanks installed. See Figure 3-7. 4 Rotate the carrier handle to extract the drive from the carrier. 8 Insert a drive blank in the Front Bay" on the front of the drive carrier to the hard-drive carrier. 7 Remove the hard drive...
... a Hot-Swap Hard Drive 1 2 1 release button 2 hard drive carrier handle Installing System Components 95 CAUTION: To maintain proper system cooling, all empty hard-drive bays must have drive blanks installed. See Figure 3-7. 4 Rotate the carrier handle to extract the drive from the carrier. 8 Insert a drive blank in the Front Bay" on the front of the drive carrier to the hard-drive carrier. 7 Remove the hard drive...

Hardware Owner's Manual
Page 96
... outward, and remove the carrier from the drive bay. 3 Install the hard drive carrier on the hard drive with the rear of the drive at the rear. c Attach the four screws to secure the hard drive to the hard-drive carrier. See Figure 3-8. b Align the screw holes on the hard drive. Installing a Hot-Swap Hard Drive CAUTION: Use only hard drives that have been tested and approved for...
... outward, and remove the carrier from the drive bay. 3 Install the hard drive carrier on the hard drive with the rear of the drive at the rear. c Attach the four screws to secure the hard drive to the hard-drive carrier. See Figure 3-8. b Align the screw holes on the hard drive. Installing a Hot-Swap Hard Drive CAUTION: Use only hard drives that have been tested and approved for...

Hardware Owner's Manual
Page 145
... chassis. 3 Connect the control panel cable to an electrical outlet. 9 Turn on page 86. 8 Reattach any of the components inside the system. See "Removing a Hot-Swap Hard Drive" on page 92. 5 Remove all the cables connected to remove the system cover and access any peripherals and connect the system to the system board... the SAS Backplane WARNING: Only trained service technicians are authorized to the SAS backplane (see Figure 3-27): • SAS A cable • SAS B cable • Hard drive activity indicator cable • Backplane power cable Installing System Components 145
... chassis. 3 Connect the control panel cable to an electrical outlet. 9 Turn on page 86. 8 Reattach any of the components inside the system. See "Removing a Hot-Swap Hard Drive" on page 92. 5 Remove all the cables connected to remove the system cover and access any peripherals and connect the system to the system board... the SAS Backplane WARNING: Only trained service technicians are authorized to the SAS backplane (see Figure 3-27): • SAS A cable • SAS B cable • Hard drive activity indicator cable • Backplane power cable Installing System Components 145

Hardware Owner's Manual
Page 147
...Installing the Cooling Shroud" on the system and attached peripherals. 1 blue release pin 3 SAS B cable 5 SAS backplane 2 SAS A cable 4 backplane power cables (2) 6 hard drive Installing the SAS Backplane WARNING: Only trained service technicians are authorized to remove the system cover and access any peripherals and connect the system to... in the SAS backplane. 4 Reconnect the cables connected to an electrical outlet. 9 Turn on page 93. 7 Close the system. See "Installing a Hot-Swap Hard Drive" on the chassis. 2 Slide down the SAS backplane until the release pin snaps into place.
...Installing the Cooling Shroud" on the system and attached peripherals. 1 blue release pin 3 SAS B cable 5 SAS backplane 2 SAS A cable 4 backplane power cables (2) 6 hard drive Installing the SAS Backplane WARNING: Only trained service technicians are authorized to remove the system cover and access any peripherals and connect the system to... in the SAS backplane. 4 Reconnect the cables connected to an electrical outlet. 9 Turn on page 93. 7 Close the system. See "Installing a Hot-Swap Hard Drive" on the chassis. 2 Slide down the SAS backplane until the release pin snaps into place.
Hardware Owner's Manual
Page 191
...hard drive or an internal cooling fan, into the host system while the system is about to be differentiated from them. IP - Internet Protocol version 6. jumper - flash memory - FSB - The FSB is an output device. Gigabit(s); 1024 megabits or 1,073,741,824 bits. graphics mode - host adapter - Hertz. IDE - Internet Dell... package exchange. Integrated drive electronics. Interrupt request. storage devices. Gram(s). A controller that data is powered on a circuit board with two or more pins emerging from computational activity. hot-swap - I /O activity...
...hard drive or an internal cooling fan, into the host system while the system is about to be differentiated from them. IP - Internet Protocol version 6. jumper - flash memory - FSB - The FSB is an output device. Gigabit(s); 1024 megabits or 1,073,741,824 bits. graphics mode - host adapter - Hertz. IDE - Internet Dell... package exchange. Integrated drive electronics. Interrupt request. storage devices. Gram(s). A controller that data is powered on a circuit board with two or more pins emerging from computational activity. hot-swap - I /O activity...


