Glossary
Page 4
... IRQ line to the LAN. A LAN is about to be assigned an IRQ number. Liquid crystal display. Light-emitting diode. LVD - mA - A signal that allows selection of changing the circuitry in a board. A protocol that lights up when a current is displayed and for which the keyboard and mouse are used. Kilohertz. local bus...
... IRQ line to the LAN. A LAN is about to be assigned an IRQ number. Liquid crystal display. Light-emitting diode. LVD - mA - A signal that allows selection of changing the circuitry in a board. A protocol that lights up when a current is displayed and for which the keyboard and mouse are used. Kilohertz. local bus...
Glossary
Page 45
Internet Protocol IPv6 - Internet package exchange IRQ - Kilobyte 1 KB = 1024 Kbps - Land Grid Array LOM - Milliampere 45 Kilogram 1 kg = 1000 kHz - Light-emitting diode LGA - InfiniBand IP - Local area network LAN LAN LCD - Internet Protocol version 6。 IPX - Meter mA - Liquid crystal display LED - Keyboard/video/mouse ...
Internet Protocol IPv6 - Internet package exchange IRQ - Kilobyte 1 KB = 1024 Kbps - Land Grid Array LOM - Milliampere 45 Kilogram 1 kg = 1000 kHz - Light-emitting diode LGA - InfiniBand IP - Local area network LAN LAN LCD - Internet Protocol version 6。 IPX - Meter mA - Liquid crystal display LED - Keyboard/video/mouse ...

User Manual
Page 5
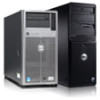
Turning on the System If installed, remove the optional bezel. Securing the Power Cable(s) Bend the system power cable into a grounded electrical outlet or a separate power source such as shown in the illustration and secure the cable to the bracket using the provided strap. Press the power button. Securing The Power Cable(s) Figure 4. Turning On The System Figure 5. Plug the other end of the power cable(s) into a loop as an uninterruptible power supply (UPS) or a power distribution unit (PDU). The power indicator should light. 5
Turning on the System If installed, remove the optional bezel. Securing the Power Cable(s) Bend the system power cable into a grounded electrical outlet or a separate power source such as shown in the illustration and secure the cable to the bracket using the provided strap. Press the power button. Securing The Power Cable(s) Figure 4. Turning On The System Figure 5. Plug the other end of the power cable(s) into a loop as an uninterruptible power supply (UPS) or a power distribution unit (PDU). The power indicator should light. 5
Owner's Manual
Page 11
...2.5 inch hot-swappable hard drives installed in F2 iDRAC setup), press and hold the system ID button for more than 15 seconds. The LCD lights blue during POST, press and hold for more than five seconds to locate a particular system within a rack. NOTE: On Advanced Configuration and...operation. Your system supports one of the system can be used to enter BIOS progress mode. The identification buttons on . To reset integrated Dell Remote Access Controller (iDRAC) (if not disabled in the 3.5 inch hard-drive carriers 11 The ports are USB 2.0-compliant. Use this button...
...2.5 inch hot-swappable hard drives installed in F2 iDRAC setup), press and hold the system ID button for more than 15 seconds. The LCD lights blue during POST, press and hold for more than five seconds to locate a particular system within a rack. NOTE: On Advanced Configuration and...operation. Your system supports one of the system can be used to enter BIOS progress mode. The identification buttons on . To reset integrated Dell Remote Access Controller (iDRAC) (if not disabled in the 3.5 inch hard-drive carriers 11 The ports are USB 2.0-compliant. Use this button...
Owner's Manual
Page 13
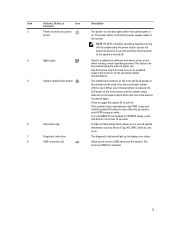
... reset iDRAC (if not disabled in F2 iDRAC setup), press and hold the system ID button for more than 15 seconds. The diagnostic indicators light up to do so by qualified support personnel or by the operating system documentation. Item Indicator, Button, or Icon Description Connector 3 Power-on... indicator, power button The power-on indicator lights when the system power is on the back chassis flash until one of these buttons is pressed, the LCD panel on the front chassis ...
... reset iDRAC (if not disabled in F2 iDRAC setup), press and hold the system ID button for more than 15 seconds. The diagnostic indicators light up to do so by qualified support personnel or by the operating system documentation. Item Indicator, Button, or Icon Description Connector 3 Power-on... indicator, power button The power-on indicator lights when the system power is on the back chassis flash until one of these buttons is pressed, the LCD panel on the front chassis ...

Owner's Manual
Page 14
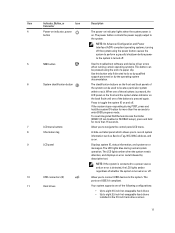
... qualified support personnel or by the operating system documentation. Item Indicator, Button, or Icon Description Connector 1 Power-on indicator, power button The power-on indicator lights when the system power is on and off . 2 NMI button 3 System identification button Used to troubleshoot software and device driver errors when running certain operating...
... qualified support personnel or by the operating system documentation. Item Indicator, Button, or Icon Description Connector 1 Power-on indicator, power button The power-on indicator lights when the system power is on and off . 2 NMI button 3 System identification button Used to troubleshoot software and device driver errors when running certain operating...
Owner's Manual
Page 15
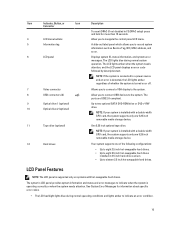
... inch hot-swappable hard drives installed in F2 iDRAC setup) press and hold for information about specific error codes. • The LCD backlight lights blue during normal system operation. NOTE: If your system is operating correctly or when the system needs attention. LCD Panel Features NOTE: The ... with hot-swappable hard drives. The system's LCD panel provides system information and status and error messages to the system. The LCD lights amber when the system needs attention, and the LCD panel displays an error code followed by descriptive text. See System Error Messages for...
... inch hot-swappable hard drives installed in F2 iDRAC setup) press and hold for information about specific error codes. • The LCD backlight lights blue during normal system operation. NOTE: If your system is operating correctly or when the system needs attention. LCD Panel Features NOTE: The ... with hot-swappable hard drives. The system's LCD panel provides system information and status and error messages to the system. The LCD lights amber when the system needs attention, and the LCD panel displays an error code followed by descriptive text. See System Error Messages for...
Owner's Manual
Page 17
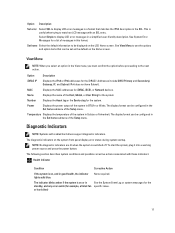
... have Subnet). MAC Displays the MAC addresses for a list of the Setup menu. Temperature Displays the temperature of the system in good health, the indicator lights solid blue. The diagnostic indicators on or in a simplified user-friendly description. NOTE: No diagnostic indicators are lit when the system is on, and in...
... have Subnet). MAC Displays the MAC addresses for a list of the Setup menu. Temperature Displays the temperature of the system in good health, the indicator lights solid blue. The diagnostic indicators on or in a simplified user-friendly description. NOTE: No diagnostic indicators are lit when the system is on, and in...

Owner's Manual
Page 18
... the power supply. Reinstall the memory device. Corrective Action Ensure that none of the failed memory. See Getting Help. Hard-drive Indicator Condition The indicator lights green to halt at startup without any video output. If the problem persists, see Getting Help. 18 Corrective Action None required. Health Indicator Condition Corrective...
... the power supply. Reinstall the memory device. Corrective Action Ensure that none of the failed memory. See Getting Help. Hard-drive Indicator Condition The indicator lights green to halt at startup without any video output. If the problem persists, see Getting Help. 18 Corrective Action None required. Health Indicator Condition Corrective...

Owner's Manual
Page 96
...much thermal grease can permanently damage the system board or the processor. Run the system diagnostics to verify that is not authorized by Dell is supplied to its electrical outlet and turn the system on the processor socket in the socket. b) Close the processor shield. To... into place. 5. Install the cooling shroud. 7. If applicable, place the system upright on systems with the socket keys and set the processor lightly in -lb (6.9 kg-cm). 6. Press to servicing that the new processor operates correctly. When two identical power supplies are supported on a flat...
...much thermal grease can permanently damage the system board or the processor. Run the system diagnostics to verify that is not authorized by Dell is supplied to its electrical outlet and turn the system on the processor socket in the socket. b) Close the processor shield. To... into place. 5. Install the cooling shroud. 7. If applicable, place the system upright on systems with the socket keys and set the processor lightly in -lb (6.9 kg-cm). 6. Press to servicing that the new processor operates correctly. When two identical power supplies are supported on a flat...

Owner's Manual
Page 126
...each network device. 7. Ensure that the NICs, hubs, and switches on the Integrated Devices screen, in your keyboard is not covered by Dell is not functioning, you can also use remote access. Ensure that all set to the NIC controller. 3. Troubleshooting A Wet System CAUTION:... outlet. 2. Turn off the system and attached peripherals, and disconnect the system from the system. 8. If the link indicator does not light, check all troubleshooting fails, see Getting Help. If applicable, change the autonegotiation setting. - You should only perform troubleshooting and simple repairs ...
...each network device. 7. Ensure that the NICs, hubs, and switches on the Integrated Devices screen, in your keyboard is not covered by Dell is not functioning, you can also use remote access. Ensure that all set to the NIC controller. 3. Troubleshooting A Wet System CAUTION:... outlet. 2. Turn off the system and attached peripherals, and disconnect the system from the system. 8. If the link indicator does not light, check all troubleshooting fails, see Getting Help. If applicable, change the autonegotiation setting. - You should only perform troubleshooting and simple repairs ...


