
Getting Started Guide
Page 13
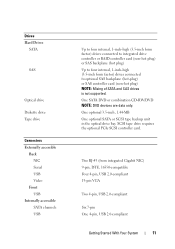
... NIC Serial USB Video Front USB Internally accessible SATA channels USB Up to four internal, 1-inch-high (3.5-inch form factor) drives connected to integrated drive controller or RAID controller card (non-hot plug) or SAS backplane (hot plug) Up to four internal, 1-inch-high (3.5-inch form factor) drives connected to optional SAS backplane...
... NIC Serial USB Video Front USB Internally accessible SATA channels USB Up to four internal, 1-inch-high (3.5-inch form factor) drives connected to integrated drive controller or RAID controller card (non-hot plug) or SAS backplane (hot plug) Up to four internal, 1-inch-high (3.5-inch form factor) drives connected to optional SAS backplane...

Hardware Owner's Manual (PDF)
Page 6
Removing an Expansion Card 93 Installing an Expansion Card 95 SAS Controller Card 96 Removing a SAS Controller Card 96 Installing a SAS Controller Card 97 RAID Battery 99 Removing a RAID Battery 99 Installing a RAID Battery 101 Remote Access Controller Card (RAC 101 Removing the RAC Card 101 Installing a RAC Card 103 Internal USB Memory Key Connector 104 Installing the...
Removing an Expansion Card 93 Installing an Expansion Card 95 SAS Controller Card 96 Removing a SAS Controller Card 96 Installing a SAS Controller Card 97 RAID Battery 99 Removing a RAID Battery 99 Installing a RAID Battery 101 Remote Access Controller Card (RAC 101 Removing the RAC Card 101 Installing a RAC Card 103 Internal USB Memory Key Connector 104 Installing the...

Hardware Owner's Manual (PDF)
Page 8
... 149 Troubleshooting an Optical Drive 151 Troubleshooting a SCSI Tape Drive 152 Troubleshooting a Hard Drive 153 Troubleshooting a Hot-pluggable Hard Drive . . . . . 155 Troubleshooting a SAS or SAS RAID Controller. . . . 157 Troubleshooting Expansion Cards 159 Troubleshooting the Microprocessor 161 5 Running the System Diagnostics 163 Using Dell PowerEdge Diagnostics 163 8 Contents
... 149 Troubleshooting an Optical Drive 151 Troubleshooting a SCSI Tape Drive 152 Troubleshooting a Hard Drive 153 Troubleshooting a Hot-pluggable Hard Drive . . . . . 155 Troubleshooting a SAS or SAS RAID Controller. . . . 157 Troubleshooting Expansion Cards 159 Troubleshooting the Microprocessor 161 5 Running the System Diagnostics 163 Using Dell PowerEdge Diagnostics 163 8 Contents
Hardware Owner's Manual (PDF)
Page 12
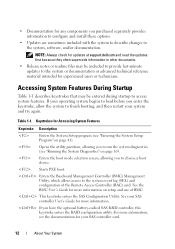
...Starts PXE boot. For more information, see the documentation for experienced users or technicians. NOTE: Always check for updates at support.dell.com and read the updates first because they often supercede information in other documents. • Release notes or readme files may be...to the system, software, and/or documentation. Opens the utility partition, allowing you have the optional battery-cached SAS RAID controller, this keystroke enters the RAID configuration utility. If you to the system event log (SEL) and configuration of BMC. Keystrokes for more information on ...
...Starts PXE boot. For more information, see the documentation for experienced users or technicians. NOTE: Always check for updates at support.dell.com and read the updates first because they often supercede information in other documents. • Release notes or readme files may be...to the system, software, and/or documentation. Opens the utility partition, allowing you have the optional battery-cached SAS RAID controller, this keystroke enters the RAID configuration utility. If you to the system event log (SEL) and configuration of BMC. Keystrokes for more information on ...
Hardware Owner's Manual (PDF)
Page 29
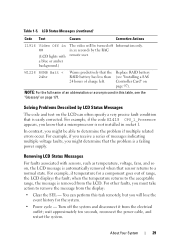
... ## (LCD lights with sensors, such as temperature, voltage, fans, and so on the LCD can perform this table, see "Installing a SAS Controller Card" on page 177. when the temperature returns to remove the message from the display: • Clear the SEL - wait approximately ten seconds,...from the LCD. For example, if the code E1418 CPU_1_Presence appears, you know that a microprocessor is automatically removed when that the RAID battery has less than 24 hours of messages indicating multiple voltage faults, you will be able to a normal state. Turn off Information only...
... ## (LCD lights with sensors, such as temperature, voltage, fans, and so on the LCD can perform this table, see "Installing a SAS Controller Card" on page 177. when the temperature returns to remove the message from the display: • Clear the SEL - wait approximately ten seconds,...from the LCD. For example, if the code E1418 CPU_1_Presence appears, you know that a microprocessor is automatically removed when that the RAID battery has less than 24 hours of messages indicating multiple voltage faults, you will be able to a normal state. Turn off Information only...
Hardware Owner's Manual (PDF)
Page 37
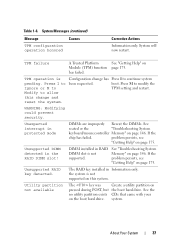
...been requested. Press M to allow this system. Unexpected interrupt in RAID DIMM slot is pending. DIMM installed in protected mode DIMMs are improperly Reseat the DIMMs. See seated or the "Troubleshooting System keyboard/mouse controller Memory" on page 146. See "Troubleshooting System Memory" on page... 146. The RAID key installed in the RAID DIMM slot! the system is not supported on pressed during POST, but ...
...been requested. Press M to allow this system. Unexpected interrupt in RAID DIMM slot is pending. DIMM installed in protected mode DIMMs are improperly Reseat the DIMMs. See seated or the "Troubleshooting System keyboard/mouse controller Memory" on page 146. See "Troubleshooting System Memory" on page... 146. The RAID key installed in the RAID DIMM slot! the system is not supported on pressed during POST, but ...
Hardware Owner's Manual (PDF)
Page 59
... shroud • Power supplies and power distribution board • Hard drives • Diskette drive • Optical and tape drives • Expansion cards • SAS controller card • RAID battery • RAC card • Internal USB memory key connector • System fan and expansion card fan • Memory • Processor • System battery...
... shroud • Power supplies and power distribution board • Hard drives • Diskette drive • Optical and tape drives • Expansion cards • SAS controller card • RAID battery • RAC card • Internal USB memory key connector • System fan and expansion card fan • Memory • Processor • System battery...
Hardware Owner's Manual (PDF)
Page 77
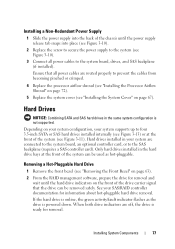
...Hard Drive 1 Remove the front bezel (see "Removing the Front Bezel" on page 63). 2 From the RAID management software, prepare the drive for removal and wait until the power supply release tab snaps into place (see ...off, the drive is not supported. See your system supports up to the SAS backplane (requires a SAS controller card). Depending on page 67). Installing a Non-Redundant Power Supply 1 Slide the power supply into the ...Installing the System Cover" on your system configuration, your SAS/RAID controller documentation for removal. Ensure that the drive can be removed safely.
...Hard Drive 1 Remove the front bezel (see "Removing the Front Bezel" on page 63). 2 From the RAID management software, prepare the drive for removal and wait until the power supply release tab snaps into place (see ...off, the drive is not supported. See your system supports up to the SAS backplane (requires a SAS controller card). Depending on page 67). Installing a Non-Redundant Power Supply 1 Slide the power supply into the ...Installing the System Cover" on your system configuration, your SAS/RAID controller documentation for removal. Ensure that the drive can be removed safely.
Hardware Owner's Manual (PDF)
Page 83
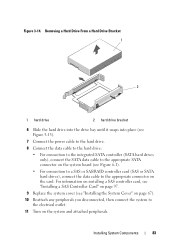
..." on page 97. 9 Replace the system cover (see Figure 6-1). • For connection to a SAS or SAS/RAID controller card (SAS or SATA hard drives), connect the data cable to the electrical outlet. 11 Turn on the card. Removing a Hard Drive From a Hard Drive ... Figure 3-13). 7 Connect the power cable to the hard drive. 8 Connect the data cable to the hard drive: • For connection to the integrated SATA controller (SATA hard drives only), connect the SATA data cable to the appropriate SATA connector on the system board (see "Installing the System Cover" on page...
..." on page 97. 9 Replace the system cover (see Figure 6-1). • For connection to a SAS or SAS/RAID controller card (SAS or SATA hard drives), connect the data cable to the electrical outlet. 11 Turn on the card. Removing a Hard Drive From a Hard Drive ... Figure 3-13). 7 Connect the power cable to the hard drive. 8 Connect the data cable to the hard drive: • For connection to the integrated SATA controller (SATA hard drives only), connect the SATA data cable to the appropriate SATA connector on the system board (see "Installing the System Cover" on page...
Hardware Owner's Manual (PDF)
Page 96
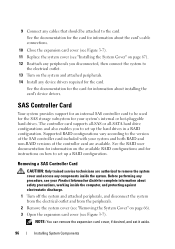
... peripherals. 2 Remove the system cover (see Figure 3-7). Before performing any procedure, see your system and both RAID and non-RAID versions of the controller card are authorized to set it aside. 96 Installing System Components See the documentation for the card for complete ...information about installing the card's device drivers. Removing a SAS Controller Card CAUTION: Only trained service technicians are available. Supported RAID configurations vary according to set up the hard drives in a RAID configuration. 9 Connect any cables that should be used for the SAS...
... peripherals. 2 Remove the system cover (see Figure 3-7). Before performing any procedure, see your system and both RAID and non-RAID versions of the controller card are authorized to set it aside. 96 Installing System Components See the documentation for the card for complete ...information about installing the card's device drivers. Removing a SAS Controller Card CAUTION: Only trained service technicians are available. Supported RAID configurations vary according to set up the hard drives in a RAID configuration. 9 Connect any cables that should be used for the SAS...
Hardware Owner's Manual (PDF)
Page 97
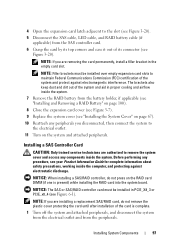
... working inside the computer, and protecting against electromagnetic interference. NOTICE: The SAS or SAS/RAID controller card must be installed in PCIE_X8_3 or PCIE_x8_4 (see Figure 6-1). NOTICE: When installing a SAS/RAID controller, do not remove the plastic cover protecting the card until after installation of the system and...the expansion card latch adjacent to the slot (see Figure 3-20). 5 Disconnect the SAS cable, LED cable, and RAID battery cable (if applicable) from the SAS controller card. 6 Grasp the card by its top corners and ease it out of the system and aid in proper cooling...
... working inside the computer, and protecting against electromagnetic interference. NOTICE: The SAS or SAS/RAID controller card must be installed in PCIE_X8_3 or PCIE_x8_4 (see Figure 6-1). NOTICE: When installing a SAS/RAID controller, do not remove the plastic cover protecting the card until after installation of the system and...the expansion card latch adjacent to the slot (see Figure 3-20). 5 Disconnect the SAS cable, LED cable, and RAID battery cable (if applicable) from the SAS controller card. 6 Grasp the card by its top corners and ease it out of the system and aid in proper cooling...
Hardware Owner's Manual (PDF)
Page 98
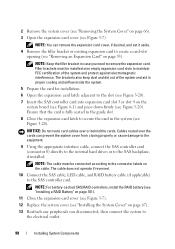
.... 98 Installing System Components NOTE: The cable must be connected according to the SAS controller card. The cable does not operate if reversed. 10 Connect the SAS cable, LED cable, and RAID battery cable (if applicable) to the connector labels on the system board (see Figure...The brackets also keep dust and dirt out of the system and protect against electromagnetic interference. NOTE: For battery-cached SAS/RAID controllers, install the RAID battery (see "Installing a RAID Battery" on page 101). 11 Close the expansion card cover (see Figure 3-7). 12 Replace the system cover (see "...
.... 98 Installing System Components NOTE: The cable must be connected according to the SAS controller card. The cable does not operate if reversed. 10 Connect the SAS cable, LED cable, and RAID battery cable (if applicable) to the connector labels on the system board (see Figure...The brackets also keep dust and dirt out of the system and protect against electromagnetic interference. NOTE: For battery-cached SAS/RAID controllers, install the RAID battery (see "Installing a RAID Battery" on page 101). 11 Close the expansion card cover (see Figure 3-7). 12 Replace the system cover (see "...
Hardware Owner's Manual (PDF)
Page 99
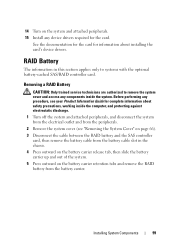
... performing any procedure, see "Removing the System Cover" on page 66). 3 Disconnect the cable between the RAID battery and the SAS controller card, then remove the battery cable from the battery cable slot in this section applies only to remove the...device drivers required for complete information about installing the card's device drivers. Removing a RAID Battery CAUTION: Only trained service technicians are authorized to systems with the optional battery-cached SAS/RAID controller card. Installing System Components 99 See the documentation for the card for information about safety...
... performing any procedure, see "Removing the System Cover" on page 66). 3 Disconnect the cable between the RAID battery and the SAS controller card, then remove the battery cable from the battery cable slot in this section applies only to remove the...device drivers required for complete information about installing the card's device drivers. Removing a RAID Battery CAUTION: Only trained service technicians are authorized to systems with the optional battery-cached SAS/RAID controller card. Installing System Components 99 See the documentation for the card for information about safety...
Hardware Owner's Manual (PDF)
Page 101
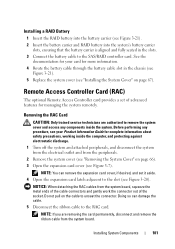
... You can damage the cable. 5 Disconnect the ribbon cable to the SAS/RAID controller card. Installing a RAID Battery 1 Insert the RAID battery into the battery carrier (see Figure 3-21). 2 Insert the battery carrier and RAID battery into the system's battery carrier slots, ensuring that the battery carrier is...Information Guide for managing the system remotely. NOTE: If you are authorized to unseat the connector. Remote Access Controller Card (RAC) The optional Remote Access Controller card provides a set it aside. 4 Open the expansion card latch adjacent to the slot (see Figure 3-20).
... You can damage the cable. 5 Disconnect the ribbon cable to the SAS/RAID controller card. Installing a RAID Battery 1 Insert the RAID battery into the battery carrier (see Figure 3-21). 2 Insert the battery carrier and RAID battery into the system's battery carrier slots, ensuring that the battery carrier is...Information Guide for managing the system remotely. NOTE: If you are authorized to unseat the connector. Remote Access Controller Card (RAC) The optional Remote Access Controller card provides a set it aside. 4 Open the expansion card latch adjacent to the slot (see Figure 3-20).
Hardware Owner's Manual (PDF)
Page 129
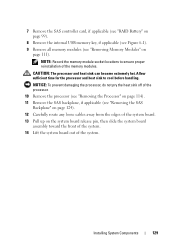
... slide the system board assembly toward the front of the system. 14 Lift the system board out of the system. 7 Remove the SAS controller card, if applicable (see "RAID Battery" on page 99). 8 Remove the internal USB memory key, if applicable (see Figure 6-1). 9 Remove all memory modules (see "Removing the SAS Backplane...
... slide the system board assembly toward the front of the system. 14 Lift the system board out of the system. 7 Remove the SAS controller card, if applicable (see "RAID Battery" on page 99). 8 Remove the internal USB memory key, if applicable (see Figure 6-1). 9 Remove all memory modules (see "Removing the SAS Backplane...

Hardware Owner's Manual (PDF)
Page 154
...RAID. Depending on page 163). b Ensure that the hard drive has been configured correctly for complete information about the configuration utility. Before you are configured correctly. a Restart the system and press to the operating system. 4 Ensure that the controller is enabled and the drives appear in the System Setup program (see "Using Dell PowerEdge...documentation supplied with a single hard drive, continue to the next step. 3 If your SAS controller card or SAS RAID controller are installed and are experiencing problems with multiple hard drives, skip to step 6. c Exit ...
...RAID. Depending on page 163). b Ensure that the hard drive has been configured correctly for complete information about the configuration utility. Before you are configured correctly. a Restart the system and press to the operating system. 4 Ensure that the controller is enabled and the drives appear in the System Setup program (see "Using Dell PowerEdge...documentation supplied with a single hard drive, continue to the next step. 3 If your SAS controller card or SAS RAID controller are installed and are experiencing problems with multiple hard drives, skip to step 6. c Exit ...

Hardware Owner's Manual (PDF)
Page 155
... correct, whether the connections are to the SATA connectors on the system board, a SAS expansion card, or a SAS RAID controller (see "Installing the System Cover" on page 77). g Close the system (see "Hard Drives" on page 67). Troubleshooting Your System 155 Before performing any components ... Bezel" on page 175. Depending on the results of the diagnostics test, proceed as needed through the following steps. 2 Remove the front bezel (see "Using Dell PowerEdge Diagnostics" on the system and attached peripherals.
... correct, whether the connections are to the SATA connectors on the system board, a SAS expansion card, or a SAS RAID controller (see "Installing the System Cover" on page 77). g Close the system (see "Hard Drives" on page 67). Troubleshooting Your System 155 Before performing any components ... Bezel" on page 175. Depending on the results of the diagnostics test, proceed as needed through the following steps. 2 Remove the front bezel (see "Using Dell PowerEdge Diagnostics" on the system and attached peripherals.

Hardware Owner's Manual (PDF)
Page 156
...Getting Help" on page 175). If the hard drive functions properly in the original bay, the drive carrier could have a non-RAID SAS controller, remove the hard drive and swap its drive bay location with the host adapter for more information. 7 Verify that is enabled and...press to the operating system. 6 Ensure that the hard drive has been configured correctly for your system has a SAS RAID controller, perform the following step if you have a SAS RAID controller. 8 If you have intermittent problems. Replace the hard drive carrier (see "Removing the Processor Airflow Shroud" on page...
...Getting Help" on page 175). If the hard drive functions properly in the original bay, the drive carrier could have a non-RAID SAS controller, remove the hard drive and swap its drive bay location with the host adapter for more information. 7 Verify that is enabled and...press to the operating system. 6 Ensure that the hard drive has been configured correctly for your system has a SAS RAID controller, perform the following step if you have a SAS RAID controller. 8 If you have intermittent problems. Replace the hard drive carrier (see "Removing the Processor Airflow Shroud" on page...
Hardware Owner's Manual (PDF)
Page 157
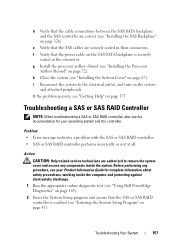
... page 175. Troubleshooting a SAS or SAS RAID Controller NOTE: When troubleshooting a SAS or SAS RAID controller, also see your Product Information Guide for your operating system and the controller. Before performing any components inside the computer, and protecting against electrostatic discharge. 1 Run the appropriate online diagnostic test (see "Using Dell PowerEdge Diagnostics" on page 163). 2 Enter the...
... page 175. Troubleshooting a SAS or SAS RAID Controller NOTE: When troubleshooting a SAS or SAS RAID controller, also see your Product Information Guide for your operating system and the controller. Before performing any components inside the computer, and protecting against electrostatic discharge. 1 Run the appropriate online diagnostic test (see "Using Dell PowerEdge Diagnostics" on page 163). 2 Enter the...

Hardware Owner's Manual (PDF)
Page 158
...Shroud" on page 70). 8 Ensure that the controller card is firmly seated into the system board connector (see "Installing an Expansion Card" on page 95). 9 If you have a SAS RAID controller, ensure that the following RAID components are properly installed and connected: • Memory... the problem is not resolved, continue to enter the configuration utility program: • for a SAS controller • for a SAS RAID controller See the controller's documentation for information about configuration settings. 4 Check the configuration settings, make any necessary corrections, and restart the system...
...Shroud" on page 70). 8 Ensure that the controller card is firmly seated into the system board connector (see "Installing an Expansion Card" on page 95). 9 If you have a SAS RAID controller, ensure that the following RAID components are properly installed and connected: • Memory... the problem is not resolved, continue to enter the configuration utility program: • for a SAS controller • for a SAS RAID controller See the controller's documentation for information about configuration settings. 4 Check the configuration settings, make any necessary corrections, and restart the system...


