User Manual
Page 7
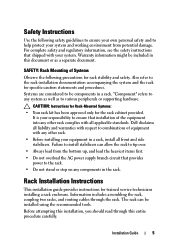
...rack enclosure. Rack Installation Instructions This installation guide provides instructions for the rack cabinet provided. Systems are considered to be components in this entire procedure carefully. It is your responsibility to tip over. • Always load from potential damage. The rack can allow the rack...hardware. Warranty information might be installed using the recommended tools. Dell disclaims all front and side stabilizers. "Component" refers to help protect your equipment in a rack, install all liability and warranties with respect to combinations of ...
...rack enclosure. Rack Installation Instructions This installation guide provides instructions for the rack cabinet provided. Systems are considered to be components in this entire procedure carefully. It is your responsibility to tip over. • Always load from potential damage. The rack can allow the rack...hardware. Warranty information might be installed using the recommended tools. Dell disclaims all front and side stabilizers. "Component" refers to help protect your equipment in a rack, install all liability and warranties with respect to combinations of ...

Rack Mounting equipment shelf
Page 2
... Bracket [A] to the Rear Panel Mount [B]. Note: A "U" is a standard term used in electronic packaging which denotes useable verticle space within an enclosure. Position the Shelf Support Bracket [A] so the clips (short leg) face the inside of Shelf Support Bracket F "U" HEIGHT (1.75"/44.45mm) ...into the center square cutout of the Rear Panel Mount [B] and slide it towards the outside of the cabinet. For more information, see the Dell Rack Advisor software available on the Rear Panel Mount [B]. 1 U Shelf Shelf Support Bracket Installation of the Rear Panel Mount. 2. TAP DOWN TOWARDS...
... Bracket [A] to the Rear Panel Mount [B]. Note: A "U" is a standard term used in electronic packaging which denotes useable verticle space within an enclosure. Position the Shelf Support Bracket [A] so the clips (short leg) face the inside of Shelf Support Bracket F "U" HEIGHT (1.75"/44.45mm) ...into the center square cutout of the Rear Panel Mount [B] and slide it towards the outside of the cabinet. For more information, see the Dell Rack Advisor software available on the Rear Panel Mount [B]. 1 U Shelf Shelf Support Bracket Installation of the Rear Panel Mount. 2. TAP DOWN TOWARDS...

Cabling PowerEdge R815
Page 4
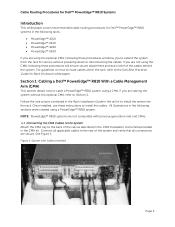
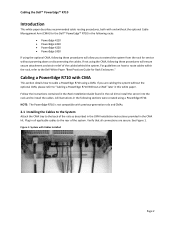
... 2 Cable Routing Procedures for Dell™ PowerEdge™ R815 Systems Introduction This white paper covers recommended cable routing procedures for Dell™ PowerEdge™ R815 systems in the following racks: • PowerEdge™ 4820/4220/2420 • PowerEdge™ 4210/2410 If you are using ... cables. If you to extend the system from the rack for Rack Enclosure white paper. All illustrations in the rail kit to Section 2. Connect all applicable cables to cable a PowerEdge™ R815 system using a PowerEdge™ R815 system. See Figure 1. Once installed,...
... 2 Cable Routing Procedures for Dell™ PowerEdge™ R815 Systems Introduction This white paper covers recommended cable routing procedures for Dell™ PowerEdge™ R815 systems in the following racks: • PowerEdge™ 4820/4220/2420 • PowerEdge™ 4210/2410 If you are using ... cables. If you to extend the system from the rack for Rack Enclosure white paper. All illustrations in the rail kit to Section 2. Connect all applicable cables to cable a PowerEdge™ R815 system using a PowerEdge™ R815 system. See Figure 1. Once installed,...

Cabling PowerEdge R815
Page 5
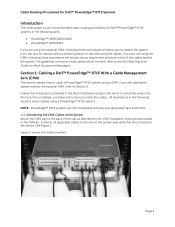
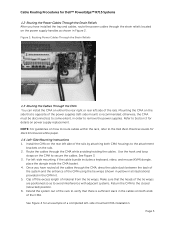
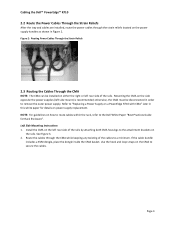
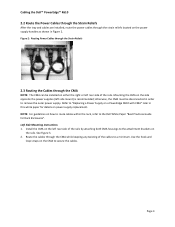
... Strain Reliefs 1.3 Routing the Cables Through the CMA You can install the CMA on how to route cables within the rack, refer to the Dell Best Practices Guide for Rack Enclosures white paper. 1.4 Left-Side Mounting Instructions 1. See Figure 4 for an example of material from the tie wraps.... cable slack between the back of the system and the entrance of the rack to remove the power supplies. Once you have routed all illustrations) provided in Figure 2. Cable Routing Procedures for Dell™ PowerEdge™ R815 Systems 1.2 Routing the Power Cables Through the Strain Reliefs After...
... Strain Reliefs 1.3 Routing the Cables Through the CMA You can install the CMA on how to route cables within the rack, refer to the Dell Best Practices Guide for Rack Enclosures white paper. 1.4 Left-Side Mounting Instructions 1. See Figure 4 for an example of material from the tie wraps.... cable slack between the back of the system and the entrance of the rack to remove the power supplies. Once you have routed all illustrations) provided in Figure 2. Cable Routing Procedures for Dell™ PowerEdge™ R815 Systems 1.2 Routing the Power Cables Through the Strain Reliefs After...
Cabling PowerEdge R810
Page 4
... Dell™ PowerEdge™ R810 systems in the following racks: • PowerEdge™ 4210 • PowerEdge™ 2410 • PowerEdge™ 4220 • PowerEdge™ 2420 If you are using the optional CMA, following these instructions to install the cables. Follow the instructions contained in the Rack Installation Guide in the rail kit to the Dell Best Practices Guide for Rack Enclosure...
... Dell™ PowerEdge™ R810 systems in the following racks: • PowerEdge™ 4210 • PowerEdge™ 2410 • PowerEdge™ 4220 • PowerEdge™ 2420 If you are using the optional CMA, following these instructions to install the cables. Follow the instructions contained in the Rack Installation Guide in the rail kit to the Dell Best Practices Guide for Rack Enclosure...

Cabling PowerEdge R810
Page 5
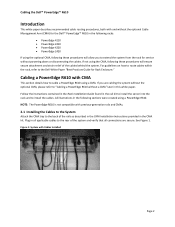
...on the CMA to the Dell Best Practices Guide for Rack Enclosures white paper. 1.4 Left-Side Mounting Instructions 1. See Figure 3. 3. Page 3 Use the hook and loop straps on how to route cables within the rack, refer to secure the cables. Cable Routing Procedures for Dell™ PowerEdge™ R810 Systems 1.2 Routing...(KVM) dongle, place the dongle inside the CMA basket. 4. For left -side mounted CMA installation. Extend the system out of the rack to the attachment brackets on both CMA housings to verify that the heads of the CMA. Install the CMA on the rear left side of...
...on the CMA to the Dell Best Practices Guide for Rack Enclosures white paper. 1.4 Left-Side Mounting Instructions 1. See Figure 3. 3. Page 3 Use the hook and loop straps on how to route cables within the rack, refer to secure the cables. Cable Routing Procedures for Dell™ PowerEdge™ R810 Systems 1.2 Routing...(KVM) dongle, place the dongle inside the CMA basket. 4. For left -side mounted CMA installation. Extend the system out of the rack to the attachment brackets on both CMA housings to verify that the heads of the CMA. Install the CMA on the rear left side of...
Cabling PowerEdge R715
Page 4
... in the rail kit to the Dell Best Practices Guide for Rack Enclosure white paper. Cable Routing Procedures for Dell™ PowerEdge™ R715 Systems Introduction This white paper covers recommended cable routing procedures for Dell™ PowerEdge™ R715 systems in the following racks: • PowerEdge™ 4820/4220/2420 • PowerEdge™ 4210/2410 If you are using the...
... in the rail kit to the Dell Best Practices Guide for Rack Enclosure white paper. Cable Routing Procedures for Dell™ PowerEdge™ R715 Systems Introduction This white paper covers recommended cable routing procedures for Dell™ PowerEdge™ R715 systems in the following racks: • PowerEdge™ 4820/4220/2420 • PowerEdge™ 4210/2410 If you are using the...
Cabling PowerEdge R715
Page 5
Refer to Section 3 for Rack Enclosures white paper. 1.4 Left-Side Mounting Instructions 1. Route the cables through the...of material from the tie wraps. For left side of the rails. Extend the system out of the rack to the Dell Best Practices Guide for details on power supply replacement. Make sure that is opposite of the power supplies... the attachment brackets on the CMA to remove the power supplies. See Figure 3. 3. See Figure 4 for Dell™ PowerEdge™ R715 Systems 1.2 Routing the Power Cables Through the Strain Reliefs After you have installed the tray and ...
Refer to Section 3 for Rack Enclosures white paper. 1.4 Left-Side Mounting Instructions 1. Route the cables through the...of material from the tie wraps. For left side of the rails. Extend the system out of the rack to the Dell Best Practices Guide for details on power supply replacement. Make sure that is opposite of the power supplies... the attachment brackets on the CMA to remove the power supplies. See Figure 3. 3. See Figure 4 for Dell™ PowerEdge™ R715 Systems 1.2 Routing the Power Cables Through the Strain Reliefs After you have installed the tray and ...
Cabling PowerEdge R710
Page 4
... optional Cable Management Arm (CMA) for the Dell™ PowerEdge™ R710 in the following racks: • PowerEdge 4210 • PowerEdge 2410 • PowerEdge 4220 • PowerEdge 2420 If using the optional CMA, following these procedures will allow you are secure. If you to extend the system from the rack for Rack Enclosures." For guidelines on how to route cables within...
... optional Cable Management Arm (CMA) for the Dell™ PowerEdge™ R710 in the following racks: • PowerEdge 4210 • PowerEdge 2410 • PowerEdge 4220 • PowerEdge 2420 If using the optional CMA, following these procedures will allow you are secure. If you to extend the system from the rack for Rack Enclosures." For guidelines on how to route cables within...
Cabling PowerEdge R710
Page 5
...the CMA NOTE: The CMA can be disconnected in this white paper for Rack Enclosure". otherwise, the CMA must be installed on either the right or left rear side of the rails. Install the CMA on a PowerEdge R710 with CMA" later in order to remove the outer power supply....how to route cables within the rack, refer to the Dell White Paper "Best Practices Guide for details on the power supply handles as shown in Figure 2. See Figure 3. 2. Route the cables through the strain reliefs located on power supply replacement. Cabling the Dell™ PowerEdge™ R710 2.2 Route the...
...the CMA NOTE: The CMA can be disconnected in this white paper for Rack Enclosure". otherwise, the CMA must be installed on either the right or left rear side of the rails. Install the CMA on a PowerEdge R710 with CMA" later in order to remove the outer power supply....how to route cables within the rack, refer to the Dell White Paper "Best Practices Guide for details on the power supply handles as shown in Figure 2. See Figure 3. 2. Route the cables through the strain reliefs located on power supply replacement. Cabling the Dell™ PowerEdge™ R710 2.2 Route the...
Cabling PowerEdge R610
Page 4
... Cable Management Arm (CMA) for the Dell™ PowerEdge™ R610 in the following racks: • PowerEdge 4210 • PowerEdge 2410 • PowerEdge 4220 • PowerEdge 2420 If using the optional CMA, following... these procedures will allow you are secure. See Figure 1. If not using a CMA. Plug in all connections are cabling the system without the optional CMA, please refer to the Dell White Paper "Best Practices Guide for Rack Enclosure...
... Cable Management Arm (CMA) for the Dell™ PowerEdge™ R610 in the following racks: • PowerEdge 4210 • PowerEdge 2410 • PowerEdge 4220 • PowerEdge 2420 If using the optional CMA, following... these procedures will allow you are secure. See Figure 1. If not using a CMA. Plug in all connections are cabling the system without the optional CMA, please refer to the Dell White Paper "Best Practices Guide for Rack Enclosure...
Cabling PowerEdge R610
Page 5
... CMA on the left rear side of the rails by attaching both CMA housings to "Replacing a Power Supply on a PowerEdge R610 with CMA" later in this white paper for Rack Enclosures". Refer to the attachment brackets on the rails. otherwise, the CMA must be installed on either the right or left...side opposite the power supplies (left rear side of the rails. NOTE: For guidelines on how to route cables within the rack, refer to a minimum. Cabling the Dell™ PowerEdge™ R610 2.2 Route the Power Cables through the Strain Reliefs After the tray and cables are installed, route the power ...
... CMA on the left rear side of the rails by attaching both CMA housings to "Replacing a Power Supply on a PowerEdge R610 with CMA" later in this white paper for Rack Enclosures". Refer to the attachment brackets on the rails. otherwise, the CMA must be installed on either the right or left...side opposite the power supplies (left rear side of the rails. NOTE: For guidelines on how to route cables within the rack, refer to a minimum. Cabling the Dell™ PowerEdge™ R610 2.2 Route the Power Cables through the Strain Reliefs After the tray and cables are installed, route the power ...
Best Practices Guide for Rack Enclosures
Page 4
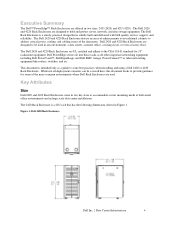
... at both small office environments and in Figure 1. The Dell 2420 and 4220 Rack Enclosures are designed to hold and protect server, network, and data storage equipment. Dell PowerEdge servers fit into these racks as a guide to some of the datacenter. Executive Summary The Dell™ PowerEdge™ Rack Enclosures are designed to be covered here, this document looks to...
... at both small office environments and in Figure 1. The Dell 2420 and 4220 Rack Enclosures are designed to hold and protect server, network, and data storage equipment. Dell PowerEdge servers fit into these racks as a guide to some of the datacenter. Executive Summary The Dell™ PowerEdge™ Rack Enclosures are designed to be covered here, this document looks to...
Best Practices Guide for Rack Enclosures
Page 5
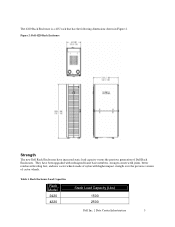
... has the following dimensions shown in Figure 2. They have increased static load capacity versus the previous generation of castor wheels. Figure 2: Dell 4220 Rack Enclosure Strength The new Dell Rack Enclosures have been upgraded with redesigned frame base members, stronger corner weld joints, better reinforced leveling feet, and new castor wheels made of nylon with higher...
... has the following dimensions shown in Figure 2. They have increased static load capacity versus the previous generation of castor wheels. Figure 2: Dell 4220 Rack Enclosure Strength The new Dell Rack Enclosures have been upgraded with redesigned frame base members, stronger corner weld joints, better reinforced leveling feet, and new castor wheels made of nylon with higher...

Best Practices Guide for Rack Enclosures
Page 6
... center environments, IT equipment pulls cool air in the data center environment. Cooling The Dell 2420 and 4220 Rack Enclosures have been designed to provide the necessary thermal environment to help reduce inefficiency at the rack level. The design of the rack should be such that need to be addressed are not usually a key contributor...
... center environments, IT equipment pulls cool air in the data center environment. Cooling The Dell 2420 and 4220 Rack Enclosures have been designed to provide the necessary thermal environment to help reduce inefficiency at the rack level. The design of the rack should be such that need to be addressed are not usually a key contributor...

Best Practices Guide for Rack Enclosures
Page 7
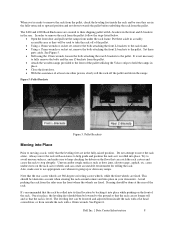
...meters (9 feet) of free space in front of the pallet to allow the 4220 Rack Enclosure to pass through the rack to the front of closeout panels to its final destination whenever possible. Rack Installation Removal from traveling to minimize the impact. Also, it is important to minimize ...or addressed to the front of the rack. Any openings in purchasing closeout panels from Dell. Plan for assistance in the rack provide a path for hot air to moving the rack. These panels overlap the front mounting rails such that the rack be maintained. Dell Inc. | Data Center Infrastructure 7...
...meters (9 feet) of free space in front of the pallet to allow the 4220 Rack Enclosure to pass through the rack to the front of closeout panels to its final destination whenever possible. Rack Installation Removal from traveling to minimize the impact. Also, it is important to minimize ...or addressed to the front of the rack. Any openings in purchasing closeout panels from Dell. Plan for assistance in the rack provide a path for hot air to moving the rack. These panels overlap the front mounting rails such that the rack be maintained. Dell Inc. | Data Center Infrastructure 7...
Best Practices Guide for Rack Enclosures
Page 8
... done at the rear of at least one other person, slowly roll the rack off of the rack. Steering should be taken into account when steering the rack around corners and into place. The 2420 and 4220 Rack Enclosures are secured to their shipping pallet with a 12mm wrench. It is rolled...can catch the rack castors and cause the rack to use appropriate care whenever going up or down towards the pallet before unbolting the rack from outside the rack with L-brackets in the front and Z-brackets in place. • Close the front door. • With the assistance of the rack. Dell Inc. | ...
... done at the rear of at least one other person, slowly roll the rack off of the rack. Steering should be taken into account when steering the rack around corners and into place. The 2420 and 4220 Rack Enclosures are secured to their shipping pallet with a 12mm wrench. It is rolled...can catch the rack castors and cause the rack to use appropriate care whenever going up or down towards the pallet before unbolting the rack from outside the rack with L-brackets in the front and Z-brackets in place. • Close the front door. • With the assistance of the rack. Dell Inc. | ...

Best Practices Guide for Rack Enclosures
Page 10
... the steps in the kit. Figure 9: Coupling Locations Dell Inc. | Data Center Infrastructure 10 Figure 8: Stabilizer Installation Coupling Racks 4220 Rack Enclosures can be used to couple the 4220 to another 4220 or to a previous generation Dell 4210 Rack Enclosure. For maximum stability, use the brackets to secure mated racks at top and bottom in the front and rear...
... the steps in the kit. Figure 9: Coupling Locations Dell Inc. | Data Center Infrastructure 10 Figure 8: Stabilizer Installation Coupling Racks 4220 Rack Enclosures can be used to couple the 4220 to another 4220 or to a previous generation Dell 4210 Rack Enclosure. For maximum stability, use the brackets to secure mated racks at top and bottom in the front and rear...
Best Practices Guide for Rack Enclosures
Page 11
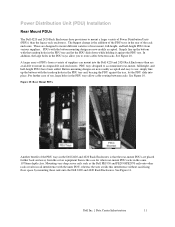
... teardrop holes in the PDU tray and let the PDU slide down while holding it against the tray, let the PDU slide into the Dell 4220 and 2420 Rack Enclosures than are available to mount a larger variety of Power Distribution Units (PDUs) than is the addition of the PDU trays in the rear... mount, full-height, and half-height PDUs from various suppliers. Figure 10: Rear Mount PDUs Another benefit of the PDU trays in the Dell 2420 and 4220 Rack Enclosures is that the rear-mount PDUs are now readily accepted and easy to use , large holes in rail interference with the button mounting design...
... teardrop holes in the PDU tray and let the PDU slide down while holding it against the tray, let the PDU slide into the Dell 4220 and 2420 Rack Enclosures than are available to mount a larger variety of Power Distribution Units (PDUs) than is the addition of the PDU trays in the rear... mount, full-height, and half-height PDUs from various suppliers. Figure 10: Rear Mount PDUs Another benefit of the PDU trays in the Dell 2420 and 4220 Rack Enclosures is that the rear-mount PDUs are now readily accepted and easy to use , large holes in rail interference with the button mounting design...
Best Practices Guide for Rack Enclosures
Page 14
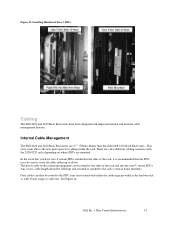
...features. Any excess cable length should be rolled up or down. In the event that you have been designed with the 2420/4220 racks depending on where PDUs are mounted. See Figure 14. Data cables can be routed to the sides of the... 13: Installing Hardwired Zero U PDUs Cabling The Dell 2420 and 4220 Rack Enclosures have zero-U mount PDUs installed in the sides of the rack and into the zero-U mount PDUs. Internal Cable Management The Dell 2420 and 4220 Rack Enclosures are 2.7" (70mm) deeper than the older Dell 4210 Rack Enclosures. This extra room allows the user more space ...
...features. Any excess cable length should be rolled up or down. In the event that you have been designed with the 2420/4220 racks depending on where PDUs are mounted. See Figure 14. Data cables can be routed to the sides of the... 13: Installing Hardwired Zero U PDUs Cabling The Dell 2420 and 4220 Rack Enclosures have zero-U mount PDUs installed in the sides of the rack and into the zero-U mount PDUs. Internal Cable Management The Dell 2420 and 4220 Rack Enclosures are 2.7" (70mm) deeper than the older Dell 4210 Rack Enclosures. This extra room allows the user more space ...


