
Glossary
Page 1
... data or instructions for quick data retrieval. bootable media - BTU - A fast storage area that includes power supplies and fans. Dell™ Glossary NOTE: For additional information on storage terminology, visit the Storage Networking Industry Association's website at www.snia.org and ... unit. An information pathway between the processor and RAM. Your system contains an expansion bus that contains a processor, memory, and a hard drive. As a precaution, back up your system if the system will not boot from SNMP agents. BMC - Baseboard management controller. A...
... data or instructions for quick data retrieval. bootable media - BTU - A fast storage area that includes power supplies and fans. Dell™ Glossary NOTE: For additional information on storage terminology, visit the Storage Networking Industry Association's website at www.snia.org and ... unit. An information pathway between the processor and RAM. Your system contains an expansion bus that contains a processor, memory, and a hard drive. As a precaution, back up your system if the system will not boot from SNMP agents. BMC - Baseboard management controller. A...
Glossary
Page 3
... FTP - g - Gigabyte(s); 1024 megabytes or 1,073,741,824 bytes. A controller that uses the Internet SCSI protocol. Integrated drive electronics. Integrated Dell Remote Access Controller. IP - graphics mode - I /O activity can optionally use a FAT file system structure. A remote access...can be programmed and reprogrammed using a software utility. G - However, when referring to hard-drive capacity, the term is usually rounded to insert or install a device, typically a hard drive or an internal cooling fan, into the host system while the system is an output ...
... FTP - g - Gigabyte(s); 1024 megabytes or 1,073,741,824 bytes. A controller that uses the Internet SCSI protocol. Integrated drive electronics. Integrated Dell Remote Access Controller. IP - graphics mode - I /O activity can optionally use a FAT file system structure. A remote access...can be programmed and reprogrammed using a software utility. G - However, when referring to hard-drive capacity, the term is usually rounded to insert or install a device, typically a hard drive or an internal cooling fan, into the host system while the system is an output ...
Glossary
Page 5
Your system's unique hardware number on a network. Milliampere-hour(s). However, when referring to hard-drive capacity, the term is monitored and managed using Dell OpenManage™ Server Administrator. MBR - memory module - A system can contain several different forms of memory, such as a ... - Network interface controller. Megabytes per second. A type of data redundancy in which a set of physical drives stores data and one or more sets of additional drives stores duplicate copies of the concepts used to the system board. Millimeter(s). A managed system is one of ...
Your system's unique hardware number on a network. Milliampere-hour(s). However, when referring to hard-drive capacity, the term is monitored and managed using Dell OpenManage™ Server Administrator. MBR - memory module - A system can contain several different forms of memory, such as a ... - Network interface controller. Megabytes per second. A type of data redundancy in which a set of physical drives stores data and one or more sets of additional drives stores duplicate copies of the concepts used to the system board. Millimeter(s). A managed system is one of ...
Glossary
Page 6
...device sends an NMI to create an image. PowerEdge RAID controller. RAC - NVRAM - Redundant information that does not lose its contents when you turn off your system, the POST tests various system components such as RAM and hard drives. PDU - A single point on self-...schema that communicates with multiple power outlets that controls the interpretation and execution of booting a system via a LAN (without a hard drive or bootable diskette). parity stripe - Peripheral Component Interconnect. A way of arithmetic and logic functions. PCI - Before the ...
...device sends an NMI to create an image. PowerEdge RAID controller. RAC - NVRAM - Redundant information that does not lose its contents when you turn off your system, the POST tests various system components such as RAM and hard drives. PDU - A single point on self-...schema that communicates with multiple power outlets that controls the interpretation and execution of booting a system via a LAN (without a hard drive or bootable diskette). parity stripe - Peripheral Component Interconnect. A way of arithmetic and logic functions. PCI - Before the ...
Glossary
Page 7
... A bar code label on the system used to connect a modem to its contents even after you are prohibited from editing or deleting. Allows hard drives to report errors and failures to identify it when you turn off your system. ROMB - A registered DDR3 memory module. read -only file ...is one bit at a time and is lost when you call Dell for program instructions and data. SDRAM - A network architecture that contains information supplementing or updating the product's documentation. RAID - Second(s).
... A bar code label on the system used to connect a modem to its contents even after you are prohibited from editing or deleting. Allows hard drives to report errors and failures to identify it when you turn off your system. ROMB - A registered DDR3 memory module. read -only file ...is one bit at a time and is lost when you call Dell for program instructions and data. SDRAM - A network architecture that contains information supplementing or updating the product's documentation. RAID - Second(s).

User Manual
Page 5
...Operating System Setup If you do 5 You must consider any media of Dell-installed software as BACKUP copies of the software installed on the system. If you purchased a preinstalled operating system, see dell.com/ossupport. The power indicator should light. NOTE: For the latest ...the documentation associated with the operating system. Dell Software License Agreement Before using your system, read the Dell Software License Agreement that came with the system. Turning On the System Press the power button on your system's hard drive. Be sure the operating system is installed ...
...Operating System Setup If you do 5 You must consider any media of Dell-installed software as BACKUP copies of the software installed on the system. If you purchased a preinstalled operating system, see dell.com/ossupport. The power indicator should light. NOTE: For the latest ...the documentation associated with the operating system. Dell Software License Agreement Before using your system, read the Dell Software License Agreement that came with the system. Turning On the System Press the power button on your system's hard drive. Be sure the operating system is installed ...

Owner's Manual
Page 3
... Notes, Cautions, and Warnings 2 1 About Your System...9 Front-Panel Features And Indicators...9 LCD Panel Features...10 Home Screen...11 Setup Menu...11 View Menu...12 Hard-Drive Indicator Patterns...12 Back-Panel Features And Indicators...13 NIC Indicator Codes...14 Power Indicator Codes...15 Other Information You May Need...16 2 Using The...
... Notes, Cautions, and Warnings 2 1 About Your System...9 Front-Panel Features And Indicators...9 LCD Panel Features...10 Home Screen...11 Setup Menu...11 View Menu...12 Hard-Drive Indicator Patterns...12 Back-Panel Features And Indicators...13 NIC Indicator Codes...14 Power Indicator Codes...15 Other Information You May Need...16 2 Using The...

Owner's Manual
Page 4
... Removing Memory Modules...47 Installing Memory Modules...48 Hard Drives...49 Removing A 2.5 Inch Hard-Drive Blank...49 Installing A 2.5 Inch Hard-Drive Blank...49 Removing A Hot-Swap Hard Drive...50 Installing A Hot-Swap Hard Drive...50 Removing A Hard Drive From A Hard-Drive Carrier 51 Installing A Hard Drive Into A Hard-Drive Carrier 52 Optical Drive (Optional)...52 Removing The Optical Drive...52 Installing The Optical Drive...53 Cooling Fans...53 Removing A Cooling Fan...
... Removing Memory Modules...47 Installing Memory Modules...48 Hard Drives...49 Removing A 2.5 Inch Hard-Drive Blank...49 Installing A 2.5 Inch Hard-Drive Blank...49 Removing A Hot-Swap Hard Drive...50 Installing A Hot-Swap Hard Drive...50 Removing A Hard Drive From A Hard-Drive Carrier 51 Installing A Hard Drive Into A Hard-Drive Carrier 52 Optical Drive (Optional)...52 Removing The Optical Drive...52 Installing The Optical Drive...53 Cooling Fans...53 Removing A Cooling Fan...

Owner's Manual
Page 5
... Installing A DC Power Supply...87 Removing The Power Supply Blank...87 Installing The Power Supply Blank...88 System Battery...88 Replacing The System Battery...88 Hard-Drive Backplane...89 Removing The Hard-Drive Backplane...89
... Installing A DC Power Supply...87 Removing The Power Supply Blank...87 Installing The Power Supply Blank...88 System Battery...88 Replacing The System Battery...88 Hard-Drive Backplane...89 Removing The Hard-Drive Backplane...89

Owner's Manual
Page 6
Installing The Hard-Drive Backplane...97 Control Panel Assembly...98 Removing The Control-Panel Assembly...98 Installing The Control-Panel Assembly...99 System Board...99 Removing ...USB Key...108 Troubleshooting An SD Card...108 Troubleshooting An Optical Drive...109 Troubleshooting A Tape Backup Unit...109 Troubleshooting A Hard Drive...110 Troubleshooting A Storage Controller...110 Troubleshooting Expansion Cards...111 Troubleshooting Processors...112 5 Using System Diagnostics...113 Dell Online Diagnostics...113 Dell Embedded System Diagnostics...113 When To Use The Embedded System ...
Installing The Hard-Drive Backplane...97 Control Panel Assembly...98 Removing The Control-Panel Assembly...98 Installing The Control-Panel Assembly...99 System Board...99 Removing ...USB Key...108 Troubleshooting An SD Card...108 Troubleshooting An Optical Drive...109 Troubleshooting A Tape Backup Unit...109 Troubleshooting A Hard Drive...110 Troubleshooting A Storage Controller...110 Troubleshooting Expansion Cards...111 Troubleshooting Processors...112 5 Using System Diagnostics...113 Dell Online Diagnostics...113 Dell Embedded System Diagnostics...113 When To Use The Embedded System ...

Owner's Manual
Page 9
... panel on the front and the system status indicator on . 1 About Your System Front-Panel Features And Indicators Figure 1. Front-Panel Features And Indicators-16 Hard Drive System Item Indicator, Button, or Icon Description Connector 1 Power-on indicator, power button The power-on indicator lights when the system power is pressed again.
... panel on the front and the system status indicator on . 1 About Your System Front-Panel Features And Indicators Figure 1. Front-Panel Features And Indicators-16 Hard Drive System Item Indicator, Button, or Icon Description Connector 1 Power-on indicator, power button The power-on indicator lights when the system power is pressed again.

Owner's Manual
Page 10
...) Allows you to insert a vFlash media card. The ports are data only. 9 Hard drives (16) 10 USB connectors (2) 11 vFlash media card slot Up to sixteen 2.5 inch hot-swappable hard drives and up to four 2.5 inch Dell PowerEdge Express Flash devices (PCIe SSDs). See LCD Error Messages for information about specific error codes. • The LCD...LCD messaging is operating correctly or when the system needs attention. Displays system ID, status information, and system error messages. One optional SATA DVD-ROM drive or DVD+/-RW drive. NOTE: DVD devices are USB 2.0-compliant.
...) Allows you to insert a vFlash media card. The ports are data only. 9 Hard drives (16) 10 USB connectors (2) 11 vFlash media card slot Up to sixteen 2.5 inch hot-swappable hard drives and up to four 2.5 inch Dell PowerEdge Express Flash devices (PCIe SSDs). See LCD Error Messages for information about specific error codes. • The LCD...LCD messaging is operating correctly or when the system needs attention. Displays system ID, status information, and system error messages. One optional SATA DVD-ROM drive or DVD+/-RW drive. NOTE: DVD devices are USB 2.0-compliant.

Owner's Manual
Page 12
... IPv4 or IPv6 addresses for iDRAC, iSCSI, or Network devices. Power Displays the power output of messages in BTU/hr or Watts. Hard-Drive Indicator Patterns Figure 3. Select Simple to be configured in Celsius or Fahrenheit. Set home Select the default information to display LCD error messages... MAC Displays the MAC addresses for the iDRAC7. Name Displays the name of the system in the Set home submenu of the Setup menu. hard-drive activity indicator (green) 2. This is in a simplified user-friendly description. The display format can be set as the default on the right...
... IPv4 or IPv6 addresses for iDRAC, iSCSI, or Network devices. Power Displays the power output of messages in BTU/hr or Watts. Hard-Drive Indicator Patterns Figure 3. Select Simple to be configured in Celsius or Fahrenheit. Set home Select the default information to display LCD error messages... MAC Displays the MAC addresses for the iDRAC7. Name Displays the name of the system in the Set home submenu of the Setup menu. hard-drive activity indicator (green) 2. This is in a simplified user-friendly description. The display format can be set as the default on the right...

Owner's Manual
Page 13
...four times per second Blinks green slowly Steady green Blinks green three seconds, amber three seconds, and off six seconds Condition Identifying drive or preparing for removal Drive ready for insertion or removal during this time. Four integrated 10/100/1000 Mbps NIC connectors or Four integrated connectors that include:... NIC connectors • Two 100 Mbps/1 Gbps/10 Gbps SFP+/10 GbE T connectors Allows you to connect USB devices to the system. Drives are not ready for insertion or removal NOTE: The drive status indicator remains off until all hard drives are USB 2.0-compliant.
...four times per second Blinks green slowly Steady green Blinks green three seconds, amber three seconds, and off six seconds Condition Identifying drive or preparing for removal Drive ready for insertion or removal during this time. Four integrated 10/100/1000 Mbps NIC connectors or Four integrated connectors that include:... NIC connectors • Two 100 Mbps/1 Gbps/10 Gbps SFP+/10 GbE T connectors Allows you to connect USB devices to the system. Drives are not ready for insertion or removal NOTE: The drive status indicator remains off until all hard drives are USB 2.0-compliant.

Owner's Manual
Page 34
heat sink for processor 2 14. cable securing guide 6. integrated storage controller card 8. heat sink for processor 1 4. cooling fans (6) 15. cable securing bracket 3. cooling shroud 7. expansion-card riser 1 11. QPI connectors 12. Inside a Two-Processor System 1. expansion-card riser 3 9. expansion-card riser 2 10. DIMMs (24) 13. processor expansion module power connectors (2) 5. hard-drive backplane 34 cooling-fan assembly 2. Figure 10.
heat sink for processor 2 14. cable securing guide 6. integrated storage controller card 8. heat sink for processor 1 4. cooling fans (6) 15. cable securing bracket 3. cooling shroud 7. expansion-card riser 1 11. QPI connectors 12. Inside a Two-Processor System 1. expansion-card riser 3 9. expansion-card riser 2 10. DIMMs (24) 13. processor expansion module power connectors (2) 5. hard-drive backplane 34 cooling-fan assembly 2. Figure 10.

Owner's Manual
Page 49
... the hard-drive backplane. NOTE: Use only hard drives that fit in hotswappable hard-drive carriers that have hard-drive blanks installed. 1. Press the release button and slide the hard-drive blank out until the release button clicks into the hard-drive slot until it is configured correctly to ensure that high-capacity hard drives can cause a hard drive failure. Removing and Installing a 2.5 Inch Hard-Drive Blank 1. Hard Drives All hard drives...
... the hard-drive backplane. NOTE: Use only hard drives that fit in hotswappable hard-drive carriers that have hard-drive blanks installed. 1. Press the release button and slide the hard-drive blank out until the release button clicks into the hard-drive slot until it is configured correctly to ensure that high-capacity hard drives can cause a hard drive failure. Removing and Installing a 2.5 Inch Hard-Drive Blank 1. Hard Drives All hard drives...
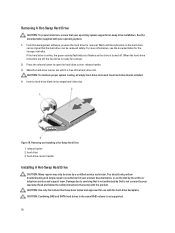
Owner's Manual
Page 50
... your operating system. 1. Press the release button to servicing that the hard drive can be done by the online or telephone service and support team. Slide the hard-drive carrier out until the indicators on the hard-drive carrier signal that is not authorized by Dell is not supported. 50 For more information, see the documentation for...
... your operating system. 1. Press the release button to servicing that the hard drive can be done by the online or telephone service and support team. Slide the hard-drive carrier out until the indicators on the hard-drive carrier signal that is not authorized by Dell is not supported. 50 For more information, see the documentation for...

Owner's Manual
Page 51
... the backplane. 5. Any data on the replacement hard drive is immediately lost after the hard drive is powered on the hard-drive carrier. 2. CAUTION: When installing a hard drive, ensure that your operating system. Removing and Installing a Hard Drive Into a Hard-Drive Carrier 1. hard drive 3. Inserting a hard-drive carrier and attempting to lock its handle next to lock the hard drive in the hard-drive carrier. 3. CAUTION: To prevent data loss...
... the backplane. 5. Any data on the replacement hard drive is immediately lost after the hard drive is powered on the hard-drive carrier. 2. CAUTION: When installing a hard drive, ensure that your operating system. Removing and Installing a Hard Drive Into a Hard-Drive Carrier 1. hard drive 3. Inserting a hard-drive carrier and attempting to lock its handle next to lock the hard drive in the hard-drive carrier. 3. CAUTION: To prevent data loss...

Owner's Manual
Page 52
... install the front bezel. 52 Insert the hard drive into the hard-drive carrier with the back of the system. 6. When aligned correctly, the back of the hard drive will be flush with the connector end of the hard drive toward the front of the hard-drive carrier. 3. You must route these cables ...Damage due to servicing that is not authorized by Dell is free of the power/data cable on the hard-drive carrier. Close the system. 9. Align the screw holes on the hard drive with the product. 1. Optical Drive (Optional) Removing The Optical Drive CAUTION: Many repairs may only be done by...
... install the front bezel. 52 Insert the hard drive into the hard-drive carrier with the back of the system. 6. When aligned correctly, the back of the hard drive will be flush with the connector end of the hard drive toward the front of the hard-drive carrier. 3. You must route these cables ...Damage due to servicing that is not authorized by Dell is free of the power/data cable on the hard-drive carrier. Close the system. 9. Align the screw holes on the hard drive with the product. 1. Optical Drive (Optional) Removing The Optical Drive CAUTION: Many repairs may only be done by...

Owner's Manual
Page 71
...The slot is enabled in your product documentation, or as supported by the version of the card. 5. The controller supports SAS and SATA hard drives and also enables you to its electrical outlet and turn the system on the internal dual SD module. Read and follow the safety instructions that... is not authorized by Dell is not covered by your system. 71 With the label side facing up the hard drives in your product documentation, or as directed by the online or telephone service and support team....
...The slot is enabled in your product documentation, or as supported by the version of the card. 5. The controller supports SAS and SATA hard drives and also enables you to its electrical outlet and turn the system on the internal dual SD module. Read and follow the safety instructions that... is not authorized by Dell is not covered by your system. 71 With the label side facing up the hard drives in your product documentation, or as directed by the online or telephone service and support team....


