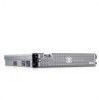

Installation Instructions AMD™ Opteron™ 2000 and 8000 Series Processors
Page 1
..., be performed by trained service technicians. Releasing the lever without control can cause the lever to avoid damaging the pins in the system Hardware Owner's Manual. About Cautions CAUTION: A CAUTION indicates a potential for complete information about safety precautions, working inside the computer, and protecting against electrostatic discharge. For complete installation and...
..., be performed by trained service technicians. Releasing the lever without control can cause the lever to avoid damaging the pins in the system Hardware Owner's Manual. About Cautions CAUTION: A CAUTION indicates a potential for complete information about safety precautions, working inside the computer, and protecting against electrostatic discharge. For complete installation and...
Installation Instructions AMD™ Opteron™ 2000 and 8000 Series Processors
Page 2
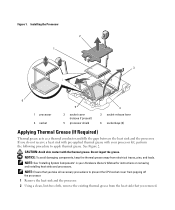
See Figure 2. NOTE: Ensure that you take all necessary precautions to apply thermal grease. CAUTION: Avoid skin contact with your Hardware Owner's Manual for instructions on removing and installing heat sinks and processors. NOTICE: To avoid damaging components, keep the thermal grease away from the heat sink that ...
See Figure 2. NOTE: Ensure that you take all necessary precautions to apply thermal grease. CAUTION: Avoid skin contact with your Hardware Owner's Manual for instructions on removing and installing heat sinks and processors. NOTICE: To avoid damaging components, keep the thermal grease away from the heat sink that ...
Information Update
Page 5
... in the "Using the System Setup Program" chapter of less than four modules per processor). This document provides updated information for your Hardware Owner's Manual. Information Update 3 safeguarding encrypted data • LCD status messages update • System messages update • PCIe slot update • System Setup... key update • SUSE® Linux Enterprise Server 9 (x86_64) update • Hyper-V virtualization update System Memory Update - See support.dell.com for the latest information on memory support on the following topics: • System memory update -
... in the "Using the System Setup Program" chapter of less than four modules per processor). This document provides updated information for your Hardware Owner's Manual. Information Update 3 safeguarding encrypted data • LCD status messages update • System messages update • PCIe slot update • System Setup... key update • SUSE® Linux Enterprise Server 9 (x86_64) update • Hyper-V virtualization update System Memory Update - See support.dell.com for the latest information on memory support on the following topics: • System memory update -

Information Update
Page 6
... Message Causes Corrective Actions Invalid card found in the LOM mezzanine card slot An unsupported LANon-motherboard (LOM) card was detected in the Hardware Owner's Manual do not apply to proceed with a supported LOM card. If you replace the system board, you must supply the recovery key when you restart your...
... Message Causes Corrective Actions Invalid card found in the LOM mezzanine card slot An unsupported LANon-motherboard (LOM) card was detected in the Hardware Owner's Manual do not apply to proceed with a supported LOM card. If you replace the system board, you must supply the recovery key when you restart your...

Information Update
Page 7
... not supported on the riser boards. • Figure 6-5 incorrectly specifies slot 2 as having a x8 lane width. This issue will be fixed in the Hardware Owner's Manual about the PCIe slots on Microsoft Windows Server 2003. Although the physical connector is x8, the actual PCI-e lane width of the System Setup program...
... not supported on the riser boards. • Figure 6-5 incorrectly specifies slot 2 as having a x8 lane width. This issue will be fixed in the Hardware Owner's Manual about the PCIe slots on Microsoft Windows Server 2003. Although the physical connector is x8, the actual PCI-e lane width of the System Setup program...
Information Update
Page 8
...any of the components inside your system and installing or removing these types of memory devices, see the installation procedures in the Hardware Owner's Manual. 2 Turn off the system and attached peripherals, and disconnect the system from an SD card or USB key. Problem • System ... authorized to the next step. 7 Repeat step 2 and step 3. 6 Information Update See "Opening and Closing the System" in the Hardware Owner's Manual. 6 Reconnect the system to download and apply the kernel. See "Using the System Setup Program" in your Red Hat user documentation for instructions on ...
...any of the components inside your system and installing or removing these types of memory devices, see the installation procedures in the Hardware Owner's Manual. 2 Turn off the system and attached peripherals, and disconnect the system from an SD card or USB key. Problem • System ... authorized to the next step. 7 Repeat step 2 and step 3. 6 Information Update See "Opening and Closing the System" in the Hardware Owner's Manual. 6 Reconnect the system to download and apply the kernel. See "Using the System Setup Program" in your Red Hat user documentation for instructions on ...
Information Update
Page 9
...and step 3. 12 Remove the expansion cards from an external USB optical drive. See "Opening and Closing the System" in the Hardware Owner's Manual. 10 Reconnect the system to the electrical outlet, and turn on the system and attached peripherals. Support for a USB memory key problem. See ..."Expansion-Card Risers" in the Hardware Owner's Manual. 14 Reinstall the expansion cards you know works properly. 9 Close the system. If the problem is not resolved, proceed to install the operating...
...and step 3. 12 Remove the expansion cards from an external USB optical drive. See "Opening and Closing the System" in the Hardware Owner's Manual. 10 Reconnect the system to the electrical outlet, and turn on the system and attached peripherals. Support for a USB memory key problem. See ..."Expansion-Card Risers" in the Hardware Owner's Manual. 14 Reinstall the expansion cards you know works properly. 9 Close the system. If the problem is not resolved, proceed to install the operating...

Getting Started Guide
Page 7
... technical reference material intended for experienced users or technicians. NOTE: Always check for updates on supported operating systems, see www.dell.com. Warranty information may be included within this document or as an external USB CD-ROM drive. Getting Started With Your...Rack Installation Instructions included with your rack solution describes how to install your system into a rack. • The Hardware Owner's Manual provides information about system features and describes how to troubleshoot the system and install or replace system components. • CDs included ...
... technical reference material intended for experienced users or technicians. NOTE: Always check for updates on supported operating systems, see www.dell.com. Warranty information may be included within this document or as an external USB CD-ROM drive. Getting Started With Your...Rack Installation Instructions included with your rack solution describes how to install your system into a rack. • The Hardware Owner's Manual provides information about system features and describes how to troubleshoot the system and install or replace system components. • CDs included ...

Getting Started Guide
Page 8
... not understand a procedure in this guide or if the system does not perform as expected, see www.dell.com/ training for the first time. Keep all locations. Dell™ Enterprise Training and Certification is available; This service may be offered in all shipping materials in your... Hardware Owner's Manual. This section describes the steps to set up your system and identify each item. see your Product...
... not understand a procedure in this guide or if the system does not perform as expected, see www.dell.com/ training for the first time. Keep all locations. Dell™ Enterprise Training and Certification is available; This service may be offered in all shipping materials in your... Hardware Owner's Manual. This section describes the steps to set up your system and identify each item. see your Product...

Rack Installation Guide
Page 23
... cable slack as needed at the hinge position and secure the cables with the tie wraps (see your system's Getting Started Guide or Hardware Owner's Manual. Rack Installation Guide 21
... cable slack as needed at the hinge position and secure the cables with the tie wraps (see your system's Getting Started Guide or Hardware Owner's Manual. Rack Installation Guide 21

