
Owner's Manual
Page 4
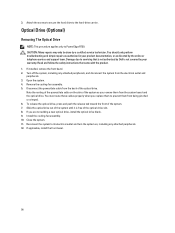
... Installing A 2.5 Inch Hard-Drive Blank (Back 51 Removing A 3.5 Inch Hard-Drive Blank...51 Installing A 3.5 Inch Hard-Drive Blank...51 Removing A Hot-Swap Hard Drive...51 Installing A Hot-Swap Hard Drive...52 Removing A Hard Drive From A Hard-Drive Carrier 53 Installing A Hard Drive Into A Hard-Drive Carrier 53 Optical Drive (Optional)...54 Removing The Optical Drive...54 Installing The Optical Drive...55 Cooling Fans...56
... Installing A 2.5 Inch Hard-Drive Blank (Back 51 Removing A 3.5 Inch Hard-Drive Blank...51 Installing A 3.5 Inch Hard-Drive Blank...51 Removing A Hot-Swap Hard Drive...51 Installing A Hot-Swap Hard Drive...52 Removing A Hard Drive From A Hard-Drive Carrier 53 Installing A Hard Drive Into A Hard-Drive Carrier 53 Optical Drive (Optional)...54 Removing The Optical Drive...54 Installing The Optical Drive...55 Cooling Fans...56
Owner's Manual
Page 49
Press down on the other sockets that the host adapter is being formatted. When the memory module is properly seated in hotswappable hard-drive carriers that have already changed the value to install the remaining memory modules. 9. Repeat step 4 through step 7 of the memory module. 6. The system should have... in the socket, the levers on the memory module socket align with the levers on the memory module with your system while the hard drive is configured correctly to be installed properly. If the value is free of the memory module socket, and insert the memory module in the...
Press down on the other sockets that the host adapter is being formatted. When the memory module is properly seated in hotswappable hard-drive carriers that have already changed the value to install the remaining memory modules. 9. Repeat step 4 through step 7 of the memory module. 6. The system should have... in the socket, the levers on the memory module socket align with the levers on the memory module with your system while the hard drive is configured correctly to be installed properly. If the value is free of the memory module socket, and insert the memory module in the...
Owner's Manual
Page 51
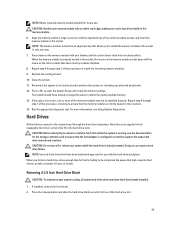
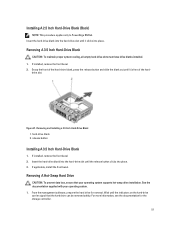
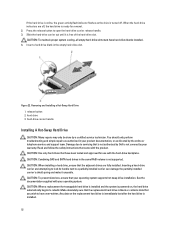
...drive carrier signal that your operating system. 1. Removing A Hot-Swap Hard Drive CAUTION: To prevent data loss, ensure that the hard drive can be removed safely. If installed, remove the front bezel. 2. See the documentation supplied with your operating system supports hot-swap drive installation. drive...Inch Hard-Drive Blank 1. Removing A 3.5 Inch Hard-Drive Blank CAUTION: To maintain proper system cooling, all empty hard-drive slots must have drive blanks installed. 1. Installing A 2.5 Inch Hard-Drive Blank (Back) NOTE: This procedure applies only to PowerEdge R720xd....
...drive carrier signal that your operating system. 1. Removing A Hot-Swap Hard Drive CAUTION: To prevent data loss, ensure that the hard drive can be removed safely. If installed, remove the front bezel. 2. See the documentation supplied with your operating system supports hot-swap drive installation. drive...Inch Hard-Drive Blank 1. Removing A 3.5 Inch Hard-Drive Blank CAUTION: To maintain proper system cooling, all empty hard-drive slots must have drive blanks installed. 1. Installing A 2.5 Inch Hard-Drive Blank (Back) NOTE: This procedure applies only to PowerEdge R720xd....
Owner's Manual
Page 52
... the replacement hard drive is blank or contains data that is not authorized by Dell is not covered by your operating system supports hot-swap drive installation. Damage due to a partially installed carrier can damage the partially installed carrier's shield spring and... make it is free of the hard-drive slot. See the documentation supplied with the hard-drive backplane. Slide the hard-drive carrier...
... the replacement hard drive is blank or contains data that is not authorized by Dell is not covered by your operating system supports hot-swap drive installation. Damage due to a partially installed carrier can damage the partially installed carrier's shield spring and... make it is free of the hard-drive slot. See the documentation supplied with the hard-drive backplane. Slide the hard-drive carrier...
Owner's Manual
Page 53
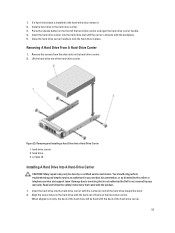
...-drive carrier. 2. Lift the hard drive out of the hard drive will be done by the online or telephone service and support team. Removing and Installing a Hard Drive Into a Hard-Drive Carrier 1. Damage due to lock the hard drive in your warranty. Read and follow the safety instructions that is not authorized by Dell is installed in the hard-drive carrier...
...-drive carrier. 2. Lift the hard drive out of the hard drive will be done by the online or telephone service and support team. Removing and Installing a Hard Drive Into a Hard-Drive Carrier 1. Damage due to lock the hard drive in your warranty. Read and follow the safety instructions that is not authorized by Dell is installed in the hard-drive carrier...
Owner's Manual
Page 54
... back of the optical drive. To release the optical drive, press and push the release tab toward the front of the optical-drive slot. 8. 3. Attach the screws to secure the hard drive to PowerEdge R720. Open the system. 4. Slide the optical drive out of the system ...Dell is free of the system. 7. If you remove them from the electrical outlet and peripherals. 3. Close the system. 11. Disconnect the power/data cable from the system board and the optical drive. Optical Drive (Optional) Removing The Optical Drive NOTE: This procedure applies only to the hard-drive carrier...
... back of the optical drive. To release the optical drive, press and push the release tab toward the front of the optical-drive slot. 8. 3. Attach the screws to secure the hard drive to PowerEdge R720. Open the system. 4. Slide the optical drive out of the system ...Dell is free of the system. 7. If you remove them from the electrical outlet and peripherals. 3. Close the system. 11. Disconnect the power/data cable from the system board and the optical drive. Optical Drive (Optional) Removing The Optical Drive NOTE: This procedure applies only to the hard-drive carrier...

Owner's Manual
Page 121
...or telephone service and support team. Turn off the system and attached peripherals, and disconnect the system from the system: - Hard-drive carriers - Expansion cards - Power supply(s) - If the system does not start properly, see Getting Help. Open the system. 3....properly installed: - Read and follow the safety instructions that is not authorized by Dell is not covered by your product documentation, or as directed by a certified service technician. Hard-drive backplane 4. 3. Hard-drive backplane - Cooling shroud - Expansion-card risers (if present) - Cooling-fan ...
...or telephone service and support team. Turn off the system and attached peripherals, and disconnect the system from the system: - Hard-drive carriers - Expansion cards - Power supply(s) - If the system does not start properly, see Getting Help. Open the system. 3....properly installed: - Read and follow the safety instructions that is not authorized by Dell is not covered by your product documentation, or as directed by a certified service technician. Hard-drive backplane 4. 3. Hard-drive backplane - Cooling shroud - Expansion-card risers (if present) - Cooling-fan ...


