
Dell PowerEdge 2800 Support Question
Dell PowerEdge 2800 Support Question
Find answers below for this question about Dell PowerEdge 2800.Need a Dell PowerEdge 2800 manual? We have 12 online manuals for this item!
Question posted by Anonymous-35377 on August 5th, 2011
Remove Hard Drive
The person who posted this question about this Dell product did not include a detailed explanation. Please use the "Request More Information" button to the right if more details would help you to answer this question.
Current Answers
Answer #1: Posted by kcmjr on August 5th, 2011 12:37 PM
kcmjr

Member since:
May 5th, 2011 Points: 4,254,255

Member since:
May 5th, 2011 Points: 4,254,255
Remove the bezel (face plate) to expose the drive bays.
Power down the system.
Locate the drive to remove. Squeeze the retainer to unlatch it and rotate the handle outward. The drive will begin to slide out. See this image for an example of what the drive carrier looks like with the handle open: http://www.scsi4me.com/images/Dell-Tray.jpg
Slide the drive and drive carrier fully out.
Unscrew the drive and replace it.
Slide the carrier and new drive into the slot. Rotate the handle in until it clicks.
The drive has now been replaced.
Licenses & Certifications: Microsoft, Cisco, VMware, Novell, FCC RF & Amateur Radio licensed.
Related Dell PowerEdge 2800 Manual Pages
Upgrade the BIOS Before
Upgrading Your System (.pdf) - Page 1
... and operating systems.
NOTE: The Dell OpenManage Subscription Service CD Kit includes the Dell PowerEdge Updates CD. This utility is not included with the Dell OpenManage server support kit version 4.3 that your PowerEdge system. The new installation procedure provides faster software installations and smaller package sizes, as well as dependency checking and native...
Upgrade the BIOS Before
Upgrading Your System (.pdf) - Page 2
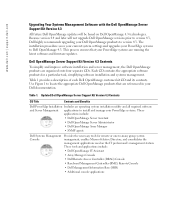
... Installation Includes an operating system installation utility and all required software and Server Management applications to install and manage your PowerEdge systems. These
applications include: • Dell OpenManage Server Assistant • Dell OpenManage Server Administrator • Dell OpenManage Array Manager • SNMP agents
Dell Systems Management Console
Provides the necessary...
Upgrade the BIOS Before
Upgrading Your System (.pdf) - Page 3
...8226; IT Assistant • Other console apps
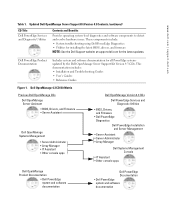
Dell OpenManage Version 4.3 CDs
Dell PowerEdge Services and Diagnostic Utilities
• BIOS, Drivers, • and Firmware • Dell PowerEdge • Diagnostics
Dell PowerEdge Installation and Server Management
• Server Assistant • Server Administrator • Array Manager
Dell Systems Management Console
• IT Assistant •...
Upgrade the BIOS Before
Upgrading Your System (.pdf) - Page 5
...support.dell.com 上的《Dell OpenManage Server Administrator PowerEdge
Dell Server Update Utility 概览
Dell Server Update Utility (SUU PowerEdge 系统。 SUU SUU CD PowerEdge Dell OpenManage 4.3 SUU Dell support.dell.com 上的 《Dell Server Update Utility 1.0 PowerEdge
注 : Dell OpenManage Subscription Service CD Kit...
Upgrade the BIOS Before
Upgrading Your System (.pdf) - Page 17
... Service Pack Dell OpenManage Red Hat と Novell PowerEdge Web support.dell.com Dell OpenManage Server Administrator
Dell Server Update Utility の概要
Dell Server Update Utility (SUU PowerEdge SUU SUU CD PowerEdge Dell OpenManage 4.3 SUU PowerEdge Web support.dell.com Dell Server Update Utility 1.0
Dell OpenManage Subscription Service キ...
Information Update - Page 3
Dell™ PowerEdge™ 2800 Systems
Information Update
www.dell.com | support.dell.com
Information Update - Page 6
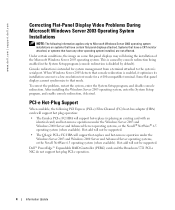
... support hot-replace (replacing an existing card with an identical card) and hot-remove operations under the Windows Server 2003 and Windows 2000 Server and Advanced Server operating systems, or the Novell NetWare 6.5 operating system (when available). After installing the Windows Server 2003 operating system, enter the System Setup program, and enable console redirection, if...
Information Update - Page 11
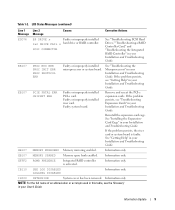
...IB110 SBE LOG DISABLED LOGGING DISABLED
Information only. Faulty or improperly installed riser card. IS000 INTRUSION
System cover has been removed.
Information only.
SCSI CONNECTOR
See "Troubleshooting SCSI Hard Drives," "Troubleshooting a RAID Controller Card," and "Troubleshooting the Integrated RAID Controller" in your Installation and Troubleshooting Guide. Faulty system board...
Information Update - Page 16

...PCI Express (PCI-e FC HBA
• Emulex PCI-e FC HBA 在 Windows Server 2003 和 Windows 2000 Server and Advanced Server Novell® NetWare® 6.5
• QLogic PCI-e FC HBA 在 Windows Server 2003 和 Windows 2000 Server and Advanced Server Novell NetWare 6.5
Dell® PowerEdge RAID 控制器 (PERC) 卡和 Broadcom 5721 PCI-e NIC...
Information Update - Page 50

... Supplies
E0876
PS n PREDICTIVE
Troubleshooting Redundant
Power Supplies
E0876
PS n AC LOST PS n AC RANGE
AC AC AC
E0D76
BP DRIVE n 1x2 DRIVE FAIL n SCSI CONNECTOR
RAID Troubleshooting SCSI Hard
Drives」(SCSI Troubleshooting the Integrated RAID Controller RAID
EB107
PROC BUS ERR PROC INIT ERR PROC PROTOCOL ERR
Troubleshooting the...
Installing the 1 x 2 SCSI Backplane - Page 5

... replacing components. CAUTION: Only trained service technicians are authorized to remove the system cover and access any attached peripherals, and disconnect the system from
the electrical outlet. 3 If your system is installed in a rack, go to two additional 1-inch SCSI hard drives in your system's peripheral bay. Before you install the backplane, update...
Installing the 1 x 2 SCSI Backplane - Page 9

... to the onboard riser card:
a Connect the SCSI connector on the 1 x 2 backplane to SCSI channel A on the riser card. See Figure 1-4. See Figure 1-3.
3 Install the hard drives into cable routing slot 1. See Figure 1-4.
If your 1 x 2 module connects to the optional RAID controller card:
a Connect the SCSI connector on the 1 x 2 backplane to the...
Installing the SCSI Backplane
Daughter Card - Page 5
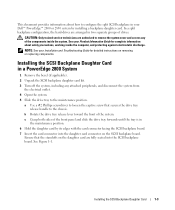
... your Dell™ PowerEdge™ 2800 or 2850 system by its edges with the card connector facing the SCSI backplane board. 7 Insert the card connector into the SCSI backplane board.
This document provides information about safety precautions, working inside the system. In a split backplane configuration, the hard-drives are authorized to remove the system cover...
Activating the Integrated RAID
Controller - Page 5
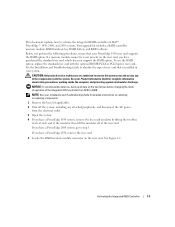
...See Figure 1-1. NOTICE: To avoid possible data loss, back up all data on removing or replacing components.
1 Remove the bezel (if applicable).
2 Turn off of the riser card. Before you ...detailed instructions on the hard drives before changing the mode of operation of the integrated SCSI controller from the electrical outlet.
3 Open the system.
4 If you have a PowerEdge 2800 system, go to step...
Activating the Integrated RAID
Controller - Page 7
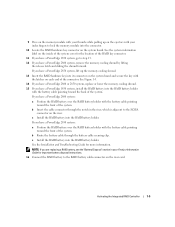
...the riser, which is adjacent to the SCSIA connector on the riser.
If you have a PowerEdge 2800 system:
a Position the RAID battery over the RAID battery holder with the battery cable pointing toward ...of the RAID key connector.
11 If you have a PowerEdge 1850 system, go to step 13. 12 If you have a PowerEdge 2800 system, remove the memory cooling shroud by lifting
the release latch and ...
Activating the Integrated RAID
Controller - Page 8

...for the SCSI controller has
changed to reflect the presence of system operation before you have a PowerEdge 2800 system, go to step 18. See your RAID documentation for 3 to secure the insulator. ...Installing the RAID Key
hardware key
latches (2)
17 If you have a PowerEdge 2850 system, replace the riser card.
18 Close the system. 19 Reconnect the system to its...
Rack-
to-Tower Conversion Guide - Page 14

c While grasping both sides of the system.
f Remove the hard drives, any optical drives, and devices installed in the media bay from the media bay devices. See Figure 1-5. d Label each hard drive, any cables from the system.
12
Tower-to-Rack and Rack-to-Tower Conversion Guide
Removing and Installing the Cover cover
www.dell.com | support.dell...
Rack-
to-Tower Conversion Guide - Page 17

... cable to the SCSI backplane board. 5 Orient the system as shown in Figure 1-5. 6 Reinstall the hard drives, any cables to the rack front panel.
3 Inside the drive tray, latch the control panel assembly cable clamp.
a Using a #2 Phillips screwdriver, remove the screw that secure the LCD board to the tower carrier. j Slide the control panel...
Rack-
to-Tower Conversion Guide - Page 28

... release lever toward the front of the front panel, slide the drive tray forward until the tray is in the chassis. d Label each hard drive, any optical drives, and devices installed in the media bay with their location in the maintenance position. f Remove the hard drives, any cables from the system.
26
Tower-to-Rack and Rack...
Rack-
to-Tower Conversion Guide - Page 31

... control panel assembly cable to the SCSI backplane board. 5 Orient the system as shown in Figure 1-16. 6 Reinstall the hard drives, any cables to the rack carrier.
See Figure 1-18. a Using a #2 Phillips screwdriver, remove the screw that the system is very fragile. Installing the Metal Feet and Bezel
1 Position the system on a flat...
Similar Questions


How To Remove Hard Drives From Dell Poweredge 840 Server?
(Posted by JPSfaik 9 years ago)

How Do I Replace A Hard Drive On Poweredge 2800 Hot
(Posted by karen19rscal 10 years ago)

Bios Cannot Detect Hard Drive Dell Poweredge 1950
(Posted by Damammy6 10 years ago)