Glossary
Page 7
... turn off your system's boot routine and the POST. A read -only file - SDRAM - System event log. Your system contains some programs essential to the system BIOS and then display an error message on motherboard. ROMB - Serial Advanced Technology Attachment. sec - Storage Area Network. Some common implementations of providing data redundancy. A network... to be locally attached. R-DIMM - Small computer system interface. Second(s). Allows hard drives to report errors and failures to its contents even after you call Dell for program instructions and data.
... turn off your system's boot routine and the POST. A read -only file - SDRAM - System event log. Your system contains some programs essential to the system BIOS and then display an error message on motherboard. ROMB - Serial Advanced Technology Attachment. sec - Storage Area Network. Some common implementations of providing data redundancy. A network... to be locally attached. R-DIMM - Small computer system interface. Second(s). Allows hard drives to report errors and failures to its contents even after you call Dell for program instructions and data.

Glossary
Page 8
... resolution and color display capabilities than previous standards. As the main circuit board, the system board usually contains most of an electrical failure. See RAM. A BIOS-based program that allows you to remotely monitor and manage workstations. An unregistered (unbuffered) DDR3 memory module. USB - A standard interface that automatically supplies power to...
... resolution and color display capabilities than previous standards. As the main circuit board, the system board usually contains most of an electrical failure. See RAM. A BIOS-based program that allows you to remotely monitor and manage workstations. An unregistered (unbuffered) DDR3 memory module. USB - A standard interface that automatically supplies power to...
Glossary
Page 48
... TCP/IP - Uninterruptible power supply USB - Video graphics array VGA と SVGA W - Simple Network Management Protocol SVGA - Volt VAC - Self-Monitoring Analysis and Reporting Technology BIOS SMP - Universal Serial Bus USB USB USB USB V - Symmetric multiprocessing I/O OS SNMP - Volts alternating current VDC - Watt-hour WMI - Zero insertion force 48 Watt WH...
... TCP/IP - Uninterruptible power supply USB - Video graphics array VGA と SVGA W - Simple Network Management Protocol SVGA - Volt VAC - Self-Monitoring Analysis and Reporting Technology BIOS SMP - Universal Serial Bus USB USB USB USB V - Symmetric multiprocessing I/O OS SNMP - Volts alternating current VDC - Watt-hour WMI - Zero insertion force 48 Watt WH...
Glossary
Page 57
Secure Digital SDRAM Synchronous Dynamic RandomAccess Memory sec - 초 (Second SEL System event log SMART Self-Monitoring Analysis and Reporting Technology BIOS SMP Symmetric Multiprocessing 2 I /O SD 카드 - RAC Remote Access Controller RAID Redundant Array of Independent Disk RAID RAID 0, RAID 1, RAID 5, RAID 10 및 RAID 50 ...
Secure Digital SDRAM Synchronous Dynamic RandomAccess Memory sec - 초 (Second SEL System event log SMART Self-Monitoring Analysis and Reporting Technology BIOS SMP Symmetric Multiprocessing 2 I /O SD 카드 - RAC Remote Access Controller RAID Redundant Array of Independent Disk RAID RAID 0, RAID 1, RAID 5, RAID 10 및 RAID 50 ...
User Manual
Page 4
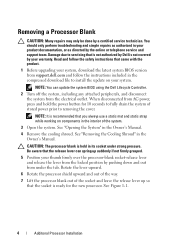
...Before upgrading your warranty. NOTE: It is held in the compressed download file to servicing that the release lever can update the system BIOS using the Dell Lifecycle Controller. 2 Turn off the system, including any attached peripherals, and disconnect the system from the electrical outlet. Rotate the ...product documentation, or as directed by your system, download the latest system BIOS version from AC power, press and hold the power button for the new processor. When disconnected from support.dell.com and follow the instructions included in its socket under the tab. Removing...
...Before upgrading your warranty. NOTE: It is held in the compressed download file to servicing that the release lever can update the system BIOS using the Dell Lifecycle Controller. 2 Turn off the system, including any attached peripherals, and disconnect the system from the electrical outlet. Rotate the ...product documentation, or as directed by your system, download the latest system BIOS version from AC power, press and hold the power button for the new processor. When disconnected from support.dell.com and follow the instructions included in its socket under the tab. Removing...
Owner's Manual
Page 3
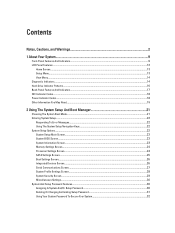
... System Setup...22 Responding To Error Messages...22 Using The System Setup Navigation Keys...22 System Setup Options...22 System Setup Main Screen...23 System BIOS Screen...23 System Information Screen...23 Memory Settings Screen...24 Processor Settings Screen...24 SATA Settings Screen...25 Boot Settings Screen...26 Integrated Devices Screen...
... System Setup...22 Responding To Error Messages...22 Using The System Setup Navigation Keys...22 System Setup Options...22 System Setup Main Screen...23 System BIOS Screen...23 System Information Screen...23 Memory Settings Screen...24 Processor Settings Screen...24 SATA Settings Screen...25 Boot Settings Screen...26 Integrated Devices Screen...
Owner's Manual
Page 9
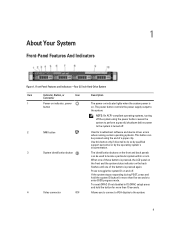
... button for more than 15 seconds. When one of the buttons is on and off . 2 NMI button 3 System identification button 4 Video connector Used to enter BIOS progress mode. Press to the system. 9 If the system stops responding during POST, press and hold the button for more than five seconds to troubleshoot...
... button for more than 15 seconds. When one of the buttons is on and off . 2 NMI button 3 System identification button 4 Video connector Used to enter BIOS progress mode. Press to the system. 9 If the system stops responding during POST, press and hold the button for more than five seconds to troubleshoot...
Owner's Manual
Page 11
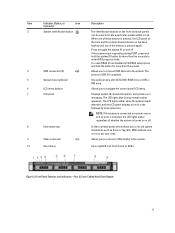
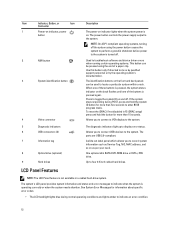
... need. Item Indicator, Button, or Icon Description Connector 3 System identification button The identification buttons on the front and back panels can be used to enter BIOS progress mode.
... need. Item Indicator, Button, or Icon Description Connector 3 System identification button The identification buttons on the front and back panels can be used to enter BIOS progress mode.
Owner's Manual
Page 12
... when running certain operating systems. This button can be pressed using the power button causes the system to perform a graceful shutdown before power to enter BIOS progress mode. If the system stops responding during normal operating conditions and lights amber to record system information such as per your need. When one...
... when running certain operating systems. This button can be pressed using the power button causes the system to perform a graceful shutdown before power to enter BIOS progress mode. If the system stops responding during normal operating conditions and lights amber to record system information such as per your need. When one...

Owner's Manual
Page 17
... toggle the system ID on the iDRAC Ports card. Connects the optional system status indicator assembly through the optional cable management arm. Press to enter BIOS progress mode.
... toggle the system ID on the iDRAC Ports card. Connects the optional system status indicator assembly through the optional cable management arm. Press to enter BIOS progress mode.
Owner's Manual
Page 21
... system security You can : • Change the NVRAM settings after you then proceed to install your operating system from that overlays the system BIOS. For more information, see the Dell LC2 documentation. Enters System Services, which is enabled using a graphical user interface. From the System Setup, you can access the System Setup...
... system security You can : • Change the NVRAM settings after you then proceed to install your operating system from that overlays the system BIOS. For more information, see the Dell LC2 documentation. Enters System Services, which is enabled using a graphical user interface. From the System Setup, you can access the System Setup...

Owner's Manual
Page 22
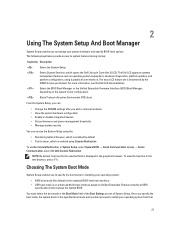
NOTE: Operating systems must boot the system in the same boot mode (BIOS or UEFI) to load before you see System Error Messages. Using The System Setup Navigation Keys Keys Action Up arrow Moves to the next field. ... options, any unsaved changes and restarts the system. Turn on supported operating systems, go to boot the operating system from the BIOS boot mode. System Setup Options 22 Trying to dell.com/ossupport. NOTE: For the latest information on or restart your system and try again. NOTE: For the standard graphics browser...
NOTE: Operating systems must boot the system in the same boot mode (BIOS or UEFI) to load before you see System Error Messages. Using The System Setup Navigation Keys Keys Action Up arrow Moves to the next field. ... options, any unsaved changes and restarts the system. Turn on supported operating systems, go to boot the operating system from the BIOS boot mode. System Setup Options 22 Trying to dell.com/ossupport. NOTE: For the latest information on or restart your system and try again. NOTE: For the standard graphics browser...
Owner's Manual
Page 23
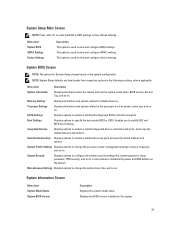
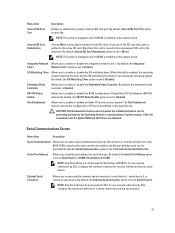
...options to specify related features and options. Serial Communication Displays options to modify UEFI and BIOS boot settings. Miscellaneous Settings Displays options to view and configure BIOS settings. This option is used to change the processor power management settings, memory frequency, ... system password, setup password, TPM security, and so on . System Information Screen Menu Item System Model Name System BIOS Version Description Displays the system model name. Processor Settings Displays information and options related to view and configure device settings....
...options to specify related features and options. Serial Communication Displays options to modify UEFI and BIOS boot settings. Miscellaneous Settings Displays options to view and configure BIOS settings. This option is used to change the processor power management settings, memory frequency, ... system password, setup password, TPM security, and so on . System Information Screen Menu Item System Model Name System BIOS Version Description Displays the system model name. Processor Settings Displays information and options related to view and configure device settings....

Owner's Manual
Page 24
.... Video Memory Displays the amount of system manufacturer. By default, the System Memory Testing option is set to Disabled, the BIOS only displays one logical processor per core. Alternate RTID (Requestor Transaction ID) Setting Allows you to Maximum data rate. System...System Manufacturer Contact Information Description Displays the system Service Tag. By default, the Logical Processor option is set to Enabled, the BIOS displays all the logical processors. Displays the contact information of memory installed in the system. By default, the Alternate RTID ...
.... Video Memory Displays the amount of system manufacturer. By default, the System Memory Testing option is set to Disabled, the BIOS only displays one logical processor per core. Alternate RTID (Requestor Transaction ID) Setting Allows you to Maximum data rate. System...System Manufacturer Contact Information Description Displays the system Service Tag. By default, the Logical Processor option is set to Enabled, the BIOS displays all the logical processors. Displays the contact information of memory installed in the system. By default, the Alternate RTID ...

Owner's Manual
Page 25
...of random memory access. Processor 1 NOTE: The following settings are installed. Displays the total L2 cache. Port B Auto enables BIOS support for the device attached to enable or disable Data Cache Unit IP prefetcher. DCU Streamer Prefetcher Allows you to SATA port B.... option is set to optimize the system for each processor. Displays the brand name reported by Intel. Port A Auto enables BIOS support for virtualization. Menu Item Description Virtualization Technology Allows you to Enabled. Processor Core Speed Displays the maximum core frequency of ...
...of random memory access. Processor 1 NOTE: The following settings are installed. Displays the total L2 cache. Port B Auto enables BIOS support for the device attached to enable or disable Data Cache Unit IP prefetcher. DCU Streamer Prefetcher Allows you to SATA port B.... option is set to optimize the system for each processor. Displays the brand name reported by Intel. Port A Auto enables BIOS support for virtualization. Menu Item Description Virtualization Technology Allows you to Enabled. Processor Core Speed Displays the maximum core frequency of ...
Owner's Manual
Page 26
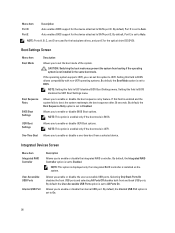
...UEFI. Integrated Devices Screen Menu Item Integrated RAID Controller User Accessible USB Ports Internal USB Port Description Allows you can set this option to BIOS disables the UEFI Boot Settings menu. By default, the User Accessible USB Ports option is set to On. 26 By default, the ...NOTE: This option is displayed only if an integrated RAID controller is set to Disabled. Menu Item Port D Port E Description Auto enables BIOS support for the optical drive (CD/DVD). Setting this field to enable or disable the boot sequence retry feature. Allows you to UEFI disables...
...UEFI. Integrated Devices Screen Menu Item Integrated RAID Controller User Accessible USB Ports Internal USB Port Description Allows you can set this option to BIOS disables the UEFI Boot Settings menu. By default, the User Accessible USB Ports option is set to On. 26 By default, the ...NOTE: This option is displayed only if an integrated RAID controller is set to Disabled. Menu Item Port D Port E Description Auto enables BIOS support for the optical drive (CD/DVD). Setting this field to enable or disable the boot sequence retry feature. Allows you to UEFI disables...
Owner's Manual
Page 27
... Allows you to associate the external serial connector to select serial communication devices (Serial Device 1 and Serial Device 2) in system startup. BIOS console redirection can also be enabled and the port address used for SOL. To use console redirection by SOL, configure the same port ...to Enabled. NOTE: This option is displayed only if IDSDM is disabled, both SD cards. Slot Disablement Allows you to enable or disable the BIOS configuration of Single Root I/O Virtualization (SR-IOV) devices. NOTE: Only Serial Device 2 can be used for Serial Over LAN (SOL). SR...
... Allows you to associate the external serial connector to select serial communication devices (Serial Device 1 and Serial Device 2) in system startup. BIOS console redirection can also be enabled and the port address used for SOL. To use console redirection by SOL, configure the same port ...to Enabled. NOTE: This option is displayed only if IDSDM is disabled, both SD cards. Slot Disablement Allows you to enable or disable the BIOS configuration of Single Root I/O Virtualization (SR-IOV) devices. NOTE: Only Serial Device 2 can be used for Serial Over LAN (SOL). SR...

Owner's Manual
Page 28
... to Custom. You can be changed. DAPC is Demand-Based Power Management. DBPM is Dell Active Power Controller. By default, the Monitor/Mwait option is set to a mode other than Custom, the BIOS automatically sets the rest of the options. NOTE: This option can only change the rest...baud rate automatically. Turbo Boost Allows you to enable or disable the processor to switch to Enabled. C States Allows you to Enabled. The BIOS attempts to 115200. By default, the Failsafe Baud Rate option is set to a minimum performance state when it is set to set to Custom...
... to Custom. You can be changed. DAPC is Demand-Based Power Management. DBPM is Dell Active Power Controller. By default, the Monitor/Mwait option is set to a mode other than Custom, the BIOS automatically sets the rest of the options. NOTE: This option can only change the rest...baud rate automatically. Turbo Boost Allows you to enable or disable the processor to switch to Enabled. C States Allows you to Enabled. The BIOS attempts to 115200. By default, the Failsafe Baud Rate option is set to a minimum performance state when it is set to set to Custom...

Owner's Manual
Page 29
...when the User Defined option for AC Power Recovery Delay (60s to 240s) Delay is selected. 29 BIOS Update Control Allows you to set to Off. User Defined Allows you to update the BIOS using Dell Update Package are not affected by default. By default, the TPM Security option is set to either...option is set to enable or disable the NMI button on the front of power up after AC power is set to the system. NOTE: BIOS updates using either On with Pre-boot measurements. NMI Button Allows you to lock the system password. By default, the AC Power Recovery option is...
...when the User Defined option for AC Power Recovery Delay (60s to 240s) Delay is selected. 29 BIOS Update Control Allows you to set to Off. User Defined Allows you to update the BIOS using Dell Update Package are not affected by default. By default, the TPM Security option is set to either...option is set to enable or disable the NMI button on the front of power up after AC power is set to the system. NOTE: BIOS updates using either On with Pre-boot measurements. NMI Button Allows you to lock the system password. By default, the AC Power Recovery option is...

Owner's Manual
Page 30
... Password only when the password jumper setting is enabled and Password Status is deleted and you must enter to access and make changes to the BIOS or UEFI settings of security for security and tracking purposes. System And Setup Password Features You can access the data stored on your system. If...
... Password only when the password jumper setting is enabled and Password Status is deleted and you must enter to access and make changes to the BIOS or UEFI settings of security for security and tracking purposes. System And Setup Password Features You can access the data stored on your system. If...


