
Information Update
Page 3
The information in the Service Manual supersedes similar information found in the Installation and Troubleshooting Guide. Dell™ PowerEdge™ 8450 Systems Information Update This document provides updated information on the following topics for Dell PowerEdge 8450 systems: • Messages and error codes • WakeUp On LAN • Peripheral Component Interconnect (PCI) expansion cards • Rack installation document •...
The information in the Service Manual supersedes similar information found in the Installation and Troubleshooting Guide. Dell™ PowerEdge™ 8450 Systems Information Update This document provides updated information on the following topics for Dell PowerEdge 8450 systems: • Messages and error codes • WakeUp On LAN • Peripheral Component Interconnect (PCI) expansion cards • Rack installation document •...
Information Update
Page 4
... down , WakeUp On LAN remains active as long as AC power is applied to setup See your system's Installation and Troubleshooting Guide or contact Dell technical support before pressing or . PCI Expansion Cards When installing expansion cards with the DRAC 2, if installed) to activate ...power switch or remotely via the Dell OpenManage™ Remote Assistant Card version 2 (DRAC 2) server management adapter. Multiple PERC2 cards are supported in the PowerEdge 8450 system. However, the EMP remote console feature must be manually turned on the PowerEdge 8450 system. If the system is later...
... down , WakeUp On LAN remains active as long as AC power is applied to setup See your system's Installation and Troubleshooting Guide or contact Dell technical support before pressing or . PCI Expansion Cards When installing expansion cards with the DRAC 2, if installed) to activate ...power switch or remotely via the Dell OpenManage™ Remote Assistant Card version 2 (DRAC 2) server management adapter. Multiple PERC2 cards are supported in the PowerEdge 8450 system. However, the EMP remote console feature must be manually turned on the PowerEdge 8450 system. If the system is later...
Information Update
Page 5
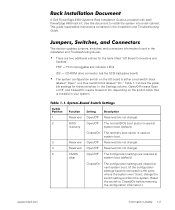
..., and Connectors This section updates jumpers, switches, and connectors information found in the Installation and Troubleshooting Guide. • There are cleared at next system boot. (If the configuration settings become corrupted to...(default). Rack Installation Document A Dell PowerEdge 8450 Systems Rack Installation Guide is installed in your system. This guide supersedes instructions contained in the Installation and Troubleshooting Guide. Use this document to Closed/On before restoring the configuration information.) support.dell.com Information Update 1-3 Table 1-1....
..., and Connectors This section updates jumpers, switches, and connectors information found in the Installation and Troubleshooting Guide. • There are cleared at next system boot. (If the configuration settings become corrupted to...(default). Rack Installation Document A Dell PowerEdge 8450 Systems Rack Installation Guide is installed in your system. This guide supersedes instructions contained in the Installation and Troubleshooting Guide. Use this document to Closed/On before restoring the configuration information.) support.dell.com Information Update 1-3 Table 1-1....
Information Update
Page 7
... are no other issues associated with internal operating frequencies of system log events. support.dell.com Information Update 1-5 Microprocessor Speed The Dell PowerEdge 8450 Systems User's Guide states that microprocessors with changing the system time; See the system information label and ... If the system clock setting within the operating system is rebooted. Upon completion of your system's Installation and Troubleshooting Guide for the fastest microprocessor listed. 6. Microprocessor Replacement Microprocessor latches are supported. Then grasp the microprocessor and heat...
... are no other issues associated with internal operating frequencies of system log events. support.dell.com Information Update 1-5 Microprocessor Speed The Dell PowerEdge 8450 Systems User's Guide states that microprocessors with changing the system time; See the system information label and ... If the system clock setting within the operating system is rebooted. Upon completion of your system's Installation and Troubleshooting Guide for the fastest microprocessor listed. 6. Microprocessor Replacement Microprocessor latches are supported. Then grasp the microprocessor and heat...
Installing 1-GB DIMMs Information Update
Page 4
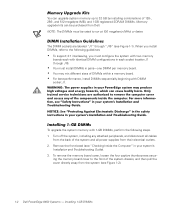
... must be purchased from the system (see "Checking Inside the Computer" in your system's Installation and Troubleshooting Guide). 3. To upgrade the system memory with DIMM socket J1. Installing 1-GB DIMMs Remove the front bezel (see Figure 1-2). 1-2 Dell PowerEdge 8450 Systems - You can upgrade system memory up to 32 GB by installing combinations of the system... configurations in pairs-one DIMM per memory board. You may mix different sizes of the system chassis, and then pull the cover directly away from Dell. The DIMM sockets are labeled "J1" through J16.
... must be purchased from the system (see "Checking Inside the Computer" in your system's Installation and Troubleshooting Guide). 3. To upgrade the system memory with DIMM socket J1. Installing 1-GB DIMMs Remove the front bezel (see Figure 1-2). 1-2 Dell PowerEdge 8450 Systems - You can upgrade system memory up to 32 GB by installing combinations of the system... configurations in pairs-one DIMM per memory board. You may mix different sizes of the system chassis, and then pull the cover directly away from Dell. The DIMM sockets are labeled "J1" through J16.
Installing 1-GB DIMMs Information Update
Page 9
Run the system memory test in the Dell Diagnostics (see "Running the Dell Diagnostics" in your system's Installation and Troubleshooting Guide). This completes the installation of the 1-GB DIMM. NOTE: If memory errors occur after the system is turned on . support.dell.com Dell PowerEdge 8450 Systems - Replace the front bezel. 7. Installing 1-GB DIMMs 1-7 6. Reconnect the computer and peripherals to electrical outlets, and turn them on , make sure that all DIMMs and memory boards are installed correctly. 8.
Run the system memory test in the Dell Diagnostics (see "Running the Dell Diagnostics" in your system's Installation and Troubleshooting Guide). This completes the installation of the 1-GB DIMM. NOTE: If memory errors occur after the system is turned on . support.dell.com Dell PowerEdge 8450 Systems - Replace the front bezel. 7. Installing 1-GB DIMMs 1-7 6. Reconnect the computer and peripherals to electrical outlets, and turn them on , make sure that all DIMMs and memory boards are installed correctly. 8.
Microprocessor Board Upgrade Guide
Page 9
... version A03 or later. For more information, see "Safety First-For You and Your Computer" in your system's Installation and Troubleshooting Guide. tacts on components inside the system, use a wrist grounding strap for ESD protection. 2. Be sure that you begin this ..., you perform this document. Loosen the thumbscrews on either side of your system's Installation and Troubleshooting Guide. 1. Before working on a card. support.dell.com Microprocessor Board Upgrade Guide 1-3 WARNING: Before you must turn off the system, including any attached peripherals, and disconnect the...
... version A03 or later. For more information, see "Safety First-For You and Your Computer" in your system's Installation and Troubleshooting Guide. tacts on components inside the system, use a wrist grounding strap for ESD protection. 2. Be sure that you begin this ..., you perform this document. Loosen the thumbscrews on either side of your system's Installation and Troubleshooting Guide. 1. Before working on a card. support.dell.com Microprocessor Board Upgrade Guide 1-3 WARNING: Before you must turn off the system, including any attached peripherals, and disconnect the...
Microprocessor Board Upgrade Guide
Page 18
... cage firmly in the safety instructions at http://support.dell.com for the microprocessor assembly installed. Ensure that the microprocessor speed jumper is not firmly seated in to your systems's Installation and Troubleshooting Guide. 1. To install a microprocessor board, position the ...board over the large connector on setting the microprocessor speed jumpers. 1-12 Microprocessor Board Upgrade Guide Repeat step 1 to Figure 1-9 for the location...
... cage firmly in the safety instructions at http://support.dell.com for the microprocessor assembly installed. Ensure that the microprocessor speed jumper is not firmly seated in to your systems's Installation and Troubleshooting Guide. 1. To install a microprocessor board, position the ...board over the large connector on setting the microprocessor speed jumpers. 1-12 Microprocessor Board Upgrade Guide Repeat step 1 to Figure 1-9 for the location...

Microprocessor Board Upgrade Guide
Page 19
...Microprocessor Speed Jumpers 5. Slide the computer back into the chassis and secure it with the ten screws. 6. Microprocessor Board Upgrade Guide 1-13 Replace the fans and fan bay cover. 8. Replace the computer cover. 11. Replace the control panel tray into the...computer and peripherals to test the newly installed microprocessor boards and microprocessors. Run the Dell Diagnostics to electrical outlets, and turn them on the Dell Diagnostics, see your system's Installation and Troubleshooting Guide. Install the microprocessor assemblies and terminator cards. 10. support...
...Microprocessor Speed Jumpers 5. Slide the computer back into the chassis and secure it with the ten screws. 6. Microprocessor Board Upgrade Guide 1-13 Replace the fans and fan bay cover. 8. Replace the computer cover. 11. Replace the control panel tray into the...computer and peripherals to test the newly installed microprocessor boards and microprocessors. Run the Dell Diagnostics to electrical outlets, and turn them on the Dell Diagnostics, see your system's Installation and Troubleshooting Guide. Install the microprocessor assemblies and terminator cards. 10. support...


