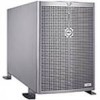
Upgrade the BIOS Before Upgrading Your System (.pdf)
Page 4
.... Intel is a registered trademark of SUSE LINUX Products GmbH. Other trademarks and trade names may be used in this text: Dell, the DELL logo, and PowerEdge are registered trademarks and Windows Server is a registered trademark of Red Hat Corporation; Dell Inc. NOTICE: A NOTICE indicates either the entities claiming the marks and names or their products...
Upgrade the BIOS Before Upgrading Your System (.pdf)
Page 5
Using more than eight logical processors with integrated video • System messages • Environmental data sheets • Removing and installing the cooling shroud • Linux operating ...
Upgrade the BIOS Before Upgrading Your System (.pdf)
Page 6
... location and reconfigure the CB_TYPE jumper if necessary. Reconfiguring the System for Regional Power Requirements CAUTION: If you do not reconfigure jumper CB_TYPE for systems using a line voltage in the range of 200-240 VAC. 4 Information Update If the new power source is less than 120 VAC and you relocate a system...
Upgrade the BIOS Before Upgrading Your System (.pdf)
Page 8
... is applied, the cooling fans will spin-up briefly and then stop. (See your Installation and Troubleshooting Guide for video to boot from the network using the same IPMI port, the NIC will be disabled on . System Messages Table 1-3 provides an updated list of system status messages that the system's front...
Upgrade the BIOS Before Upgrading Your System (.pdf)
Page 12
...temperature range and has halted operation. See "Troubleshooting System Cooling Problems" in your Installation and Troubleshooting Guide. See the Dell OpenManage Baseboard Management Controller User's Guide for the specified power supply. or faulty. of acceptable range. 10 Information Update... socket n. specified power Supplies" in socket n. PROC n IERR Faulty or improperly installed microprocessor. specified power supply is cleared using either Server Assistant or the BMC Management Utility. PS n AC LOST PS n AC RANGE Power source for specified power Check...
Upgrade the BIOS Before Upgrading Your System (.pdf)
Page 15
... Memory mirroring enabled. Information only NOTE: For the full name of an abbreviation or acronym used in this table, see "Troubleshooting Expansion Cards" in your Installation and Troubleshooting Guide. If the problem still persists, see www.dell.com/environment_datasheets. IS000 INTRUSION System cover has been removed. Information Update 13 Information only. Information...
Upgrade the BIOS Before Upgrading Your System (.pdf)
Page 17
... With More than Eight Logical Processors A system configured with more than eight logical processors even if more information about this occurs, use no more than eight logical processors may hang when the message Restarting System appears while rebooting a system running the Red Hat Enterprise...the system. However, if you install a PCI-X NIC card, the card's NIC port is configured with more than eight logical processors. Using More than Eight Logical Processors With Red Hat Enterprise Linux (Version 4) for Intel EM64T A limitation in your User's Guide for information on...
Upgrade the BIOS Before Upgrading Your System (.pdf)
Page 18
... 2000 Server or Microsoft Windows 2000 Advance Server is supported on PowerEdge 6800 systems featuring dual-core processors with L2 cache only. Console Redirection-Escape Key Sequences The following methods: • Check your User's Guide. Escape Sequences for function keys in the "Using Console Redirection" section of the following table updates the escape...
Dell OpenManage™ Server Support Kit Version 4.3 (.pdf)
Page 1
... does not exist, add the following lines to resolve this text: Dell, the DELL logo, and PowerEdge are trademarks of Dell Inc. Trademarks used in this document to refer to the increased number of Red Hat, Inc. Issue Running the X Window System on the Dell PowerEdge 6800 and 6850 Due to either change without the written permission of...
Installation and Troubleshooting Guide (.htm)
Page 2
... to refer to either potential damage to hardware or loss of your computer. Dell Inc. is subject to change without the written permission of Dell Inc. Notes, Notices, and Cautions NOTE: A NOTE indicates important information that helps you make better use of data and tells you how to avoid the problem. CAUTION: A CAUTION...
Installation and Troubleshooting Guide (.htm)
Page 5
...of the rack rests on a single rack or front stabilizers for joined multiple racks before extending a component from the rack. • Use caution when pressing the component rail release latches and sliding a component into or out of more than one time. Install front and side... stabilizers on the floor. Safety Instructions Use the following precautions for suitability by trained service technicians. For complete safety and regulatory information, see your fingers. Failure to be sure...
Installation and Troubleshooting Guide (.htm)
Page 6
...in the rack. • Do not step on or stand on the casters. Retract the leveling feet when relocating the rack cabinet. www.dell.com | support.dell.com • After a component is inserted into the rack, carefully extend the rail into a locking position, and then slide the component into... caution while moving the rack cabinet. CAUTION: Rack cabinets can be installed in any system/component when servicing other systems/components in your Dell system. Use only the rack kit for each system installed in the rack. Before You Begin Before you begin installing your system in the rack,...
Installation and Troubleshooting Guide (.htm)
Page 10
Figure 1-3. b Using a #2 Phillips screwdriver or a 1/4-inch nut driver, remove the screw that secures each metal foot and pull each foot from the system: a Orient the system so ... thumbscrews on the front of the table as shown in Figure 1-3. b Slide the system cover back and grasp the cover at both ends. www.dell.com | support.dell.com 2 Remove the four metal feet from the chassis. c Carefully lift the cover away from the system and set it aside. 10 Tower-to...
Installation and Troubleshooting Guide (.htm)
Page 12
c Using a #2 Phillips screwdriver, remove the three screws that the front panel hangs over the edge of the table as shown in Figure 1-5. b Disconnect the interface cables from the chassis. Figure 1-5. www.dell.com | support.dell.com 4 Remove the control panel assembly: a Orient the system so that secure the control panel assembly to -Rack Conversion...
Installation and Troubleshooting Guide (.htm)
Page 13
... g Align the LCD board on the replacement bracket. Tower-to a rack system. 2 Replace the metal bracket in Figure 1-5. See Figure 1-5. c Using a T-10 Torx driver, install the additional 4 flat-head screws (supplied in the conversion kit) into the screw holes located between the drive bays ...on the inside of the table as shown in the control panel assembly. See Figure 1-6. b Using a #2 Phillips screwdriver, remove the two screws that secures the I /O board to the drive tray. f Using a #2 Phillips screwdriver, install the screw that secure the LCD board to the drive tray. ...
Installation and Troubleshooting Guide (.htm)
Page 14
...on the rack carrier, be labeled appropriately. 6 Install the top cover. See Figure 1-4. 14 Tower-to the control panel assembly. c Using a #2 Phillips screwdriver, install the three screws (that the hard drives, any cables to damage the system identification switch. When aligning ...optical drives, and devices are reinstalled into the system. Figure 1-6. The devices should be careful not to the devices previously removed from . h Using a #2 Phillips screwdriver, install the two screws that they were removed from the media bay. 5 Reinstall the media bay devices, hard drives...
Installation and Troubleshooting Guide (.htm)
Page 15
See Figure 1-7. 3 Using a #2 Phillips screwdriver or 1/4-inch nut driver, remove the three screws from the back of the system. 4 Slide the trim panel backward and then remove the ... three screws to prevent loosening. The system is ready to -Rack Conversion Guide 15 Removing the Trim Panel hex-head Phillips screws (6) shoulder mounting screws (6) 2 Using a #2 Phillips screwdriver or 1/4-inch nut driver, remove the three screws from the chassis. 5 If not already present on its cover as shown in -lbs of...