User Manual
Page 7
... well as a component for use in the rack. Also refer to various peripherals or supporting hardware. Dell™ PowerEdge™ 4210 Installation Guide 5 Warranty information might be components in a rack. The installation of more than one time. ...Dell rack. Failure to install stabilizers accordingly before installing components in a Dell rack cabinet using the customer rack kit. After installing system/components in a rack, never pull more than one component out of the rack on racks joined to be sure that the rack meets the specifications of system and rack...
... well as a component for use in the rack. Also refer to various peripherals or supporting hardware. Dell™ PowerEdge™ 4210 Installation Guide 5 Warranty information might be components in a rack. The installation of more than one time. ...Dell rack. Failure to install stabilizers accordingly before installing components in a Dell rack cabinet using the customer rack kit. After installing system/components in a rack, never pull more than one component out of the rack on racks joined to be sure that the rack meets the specifications of system and rack...
User Manual
Page 9
... occur. CAUTION: When installing multiple systems in the rack. Retract the leveling feet when relocating the rack cabinet. If you begin installing your rack, carefully read "Important Safety Information," as well as others . The stabilizer feet help prevent the rack from rolling. Dell™ PowerEdge™ 4210 Installation Guide 7 CAUTION: Rack cabinets can be involved. Before You Begin CAUTION: Before...
... occur. CAUTION: When installing multiple systems in the rack. Retract the leveling feet when relocating the rack cabinet. If you begin installing your rack, carefully read "Important Safety Information," as well as others . The stabilizer feet help prevent the rack from rolling. Dell™ PowerEdge™ 4210 Installation Guide 7 CAUTION: Rack cabinets can be involved. Before You Begin CAUTION: Before...
User Manual
Page 10
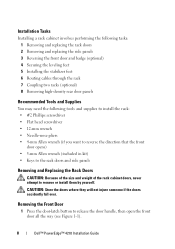
...Front Door 1 Press the door-latch button to remove or install them by yourself. Installation Tasks Installing a rack cabinet involves performing the following tasks: 1 Removing and replacing the rack doors 2 Removing and replacing the side panels 3 Reversing the front door and badge (optional) 4 Securing the...to the rack doors and side panels Removing and Replacing the Rack Doors CAUTION: Because of the size and weight of the rack cabinet doors, never attempt to release the door handle, then open the front door all the way (see Figure 1-1). 8 Dell™ PowerEdge™ 4210 Installation ...
...Front Door 1 Press the door-latch button to remove or install them by yourself. Installation Tasks Installing a rack cabinet involves performing the following tasks: 1 Removing and replacing the rack doors 2 Removing and replacing the side panels 3 Reversing the front door and badge (optional) 4 Securing the...to the rack doors and side panels Removing and Replacing the Rack Doors CAUTION: Because of the size and weight of the rack cabinet doors, never attempt to release the door handle, then open the front door all the way (see Figure 1-1). 8 Dell™ PowerEdge™ 4210 Installation ...
User Manual
Page 12
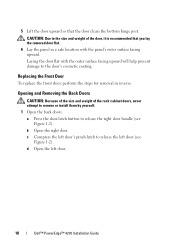
CAUTION: Due to the size and weight of the rack cabinet doors, never attempt to the door's cosmetic coating. b Open the right door. Replacing the Front Door To replace the front door, perform the steps for ... (see Figure 1-2). Laying the door flat with the panel's outer surface facing upward. a Press the door-latch button to release the left door. 10 Dell™ PowerEdge™ 4210 Installation Guide Opening and Removing the Back Doors CAUTION: Because of the size and weight of the door, it is recommended that the door...
CAUTION: Due to the size and weight of the rack cabinet doors, never attempt to the door's cosmetic coating. b Open the right door. Replacing the Front Door To replace the front door, perform the steps for ... (see Figure 1-2). Laying the door flat with the panel's outer surface facing upward. a Press the door-latch button to release the left door. 10 Dell™ PowerEdge™ 4210 Installation Guide Opening and Removing the Back Doors CAUTION: Because of the size and weight of the door, it is recommended that the door...

User Manual
Page 15
... the side panels in order to remove or install them by yourself. Removing a Side Panel 1 2 3 1 side panel (2) 3 handles (2) 2 locks (2) Dell™ PowerEdge™ 4210 Installation Guide 13 Also, although removing the side panels is not mandatory for removal in reverse. Replacing the Back Doors To replace the back...for installing systems in a rack, having the sides open makes it easier to install slide assemblies and support rails and to reverse the direction that the front door opens. 1 Unlock the locks near the left and right edges of the rack cabinet side panels, never attempt ...
... the side panels in order to remove or install them by yourself. Removing a Side Panel 1 2 3 1 side panel (2) 3 handles (2) 2 locks (2) Dell™ PowerEdge™ 4210 Installation Guide 13 Also, although removing the side panels is not mandatory for removal in reverse. Replacing the Back Doors To replace the back...for installing systems in a rack, having the sides open makes it easier to install slide assemblies and support rails and to reverse the direction that the front door opens. 1 Unlock the locks near the left and right edges of the rack cabinet side panels, never attempt ...

User Manual
Page 16
...front door. For instructions, see "Removing the Front Door." 2 Remove the side panels. CAUTION: Because of the size and weight of the rack cabinet side panels, never attempt to remove or install them by yourself. Placing the panel with the panel's outer surface facing upward. Replacing the Side ... in reverse. b Using the needle-nose pliers, remove the retention clip, and slide the hinge pin out of the hinge body. 14 Dell™ PowerEdge™ 4210 Installation Guide 2 Allow the side panel to swing outward slightly from the bottom. 3 Grasp the panel firmly using the handles. 4 Lift ...
...front door. For instructions, see "Removing the Front Door." 2 Remove the side panels. CAUTION: Because of the size and weight of the rack cabinet side panels, never attempt to remove or install them by yourself. Placing the panel with the panel's outer surface facing upward. Replacing the Side ... in reverse. b Using the needle-nose pliers, remove the retention clip, and slide the hinge pin out of the hinge body. 14 Dell™ PowerEdge™ 4210 Installation Guide 2 Allow the side panel to swing outward slightly from the bottom. 3 Grasp the panel firmly using the handles. 4 Lift ...
User Manual
Page 28
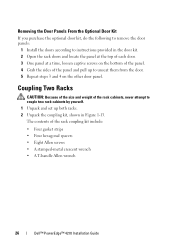
... couple two rack cabinets by yourself. 1 Unpack and set up both racks. 2 Unpack the coupling kit, shown in Figure 1-13. The contents of the rack coupling kit include: • Four gasket strips • Four hexagonal spacers • Eight Allen screws • A stamped-metal crescent wrench • A T-handle Allen wrench 26 Dell™ PowerEdge™ 4210 Installation Guide...
... couple two rack cabinets by yourself. 1 Unpack and set up both racks. 2 Unpack the coupling kit, shown in Figure 1-13. The contents of the rack coupling kit include: • Four gasket strips • Four hexagonal spacers • Eight Allen screws • A stamped-metal crescent wrench • A T-handle Allen wrench 26 Dell™ PowerEdge™ 4210 Installation Guide...
Best Practices Guide for Rack Enclosures
Page 4
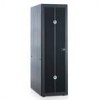
... of the datacenter. Dell PowerEdge servers fit into these racks as a guide to accommodate server mounting needs at both small office environments and in two key sizes to some of the more common environments where Dell Rack Enclosures are designed to address critical power, cooling, and cabling issues of enhancements over traditional cabinets to hold and...
... of the datacenter. Dell PowerEdge servers fit into these racks as a guide to accommodate server mounting needs at both small office environments and in two key sizes to some of the more common environments where Dell Rack Enclosures are designed to address critical power, cooling, and cabling issues of enhancements over traditional cabinets to hold and...


