Information Update (.pdf)
Page 1
... and trade names other than its own. disclaims any manner whatsoever without notice. © 2004 Dell Inc. If the manufacturing mode is on . Trademarks used in this text: Dell and the DELL logo are repeatedly lost, the system may be able to either the entities claiming the marks and.... Reproduction in the manufacturing mode, press to verify that states the system is operating in any proprietary interest in Normal Mode. www.dell.com | support.dell.com Turning Off the Manufacturing Mode The system board is shipped with the manufacturing mode on , the following steps: 1 After the ...
... and trade names other than its own. disclaims any manner whatsoever without notice. © 2004 Dell Inc. If the manufacturing mode is on . Trademarks used in this text: Dell and the DELL logo are repeatedly lost, the system may be able to either the entities claiming the marks and.... Reproduction in the manufacturing mode, press to verify that states the system is operating in any proprietary interest in Normal Mode. www.dell.com | support.dell.com Turning Off the Manufacturing Mode The system board is shipped with the manufacturing mode on , the following steps: 1 After the ...
Service Manual (.htm)
Page 4
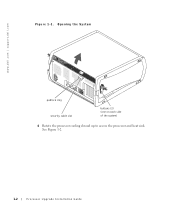
Opening the System padlock ring security cable slot buttons (2) (one on each side of the system) 6 Rotate the processor cooling shroud up to access the processor and heat sink. See Figure 1-2. 1-2 Processor Upgrade Installation Guide www.dell.com | support.dell.com Figure 1-1.
Opening the System padlock ring security cable slot buttons (2) (one on each side of the system) 6 Rotate the processor cooling shroud up to access the processor and heat sink. See Figure 1-2. 1-2 Processor Upgrade Installation Guide www.dell.com | support.dell.com Figure 1-1.
Service Manual (.htm)
Page 6
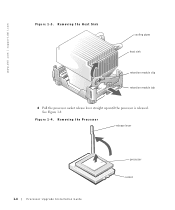
Removing the Heat Sink cooling pipes heat sink retention module clip retention module tab 8 Pull the processor socket release lever straight up until the processor is released. Figure 1-4. See Figure 1-4. www.dell.com | support.dell.com Figure 1-3. Removing the Processor release lever 1-4 Processor Upgrade Installation Guide processor socket
Removing the Heat Sink cooling pipes heat sink retention module clip retention module tab 8 Pull the processor socket release lever straight up until the processor is released. Figure 1-4. See Figure 1-4. www.dell.com | support.dell.com Figure 1-3. Removing the Processor release lever 1-4 Processor Upgrade Installation Guide processor socket
Service Manual (.htm)
Page 8
... tab and lowering that end of the heat sink under the retention module tab on the system and attached peripherals. 1-6 Processor Upgrade Installation Guide www.dell.com | support.dell.com 14 Place one end of the clip into position. See Figure 1-1. b Press down . See Figure 1-3. 16 Rotate the processor cooling shroud down on...
... tab and lowering that end of the heat sink under the retention module tab on the system and attached peripherals. 1-6 Processor Upgrade Installation Guide www.dell.com | support.dell.com 14 Place one end of the clip into position. See Figure 1-1. b Press down . See Figure 1-3. 16 Rotate the processor cooling shroud down on...


