Rack Installation Guide
Page 10
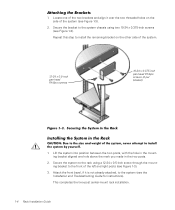
... this step to the system chassis using a 12-24 x 0.5-inch screw through the mount- Secure the system to the system (see Figure 1-3). 2. Attach the front bezel, if it over the two threaded holes on the other side of the two brackets and align it is not already attached, to the rack...
... this step to the system chassis using a 12-24 x 0.5-inch screw through the mount- Secure the system to the system (see Figure 1-3). 2. Attach the front bezel, if it over the two threaded holes on the other side of the two brackets and align it is not already attached, to the rack...
Rack Installation Guide
Page 15
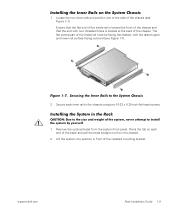
The flat central part of the inside rail is located at the back of the bezel and pull the bezel straight out from the system front panel. Installing the System in front of the chassis and...inner rails and position one to the side of the system, never attempt to install the system by yourself. 1. Figure 1-7. support.dell.com Rack Installation Guide 1-9 Installing the Inner Rails on each inner rail to the chassis using two 10-32 x 0.25-inch ... Lift the system into position in the Rack CAUTION: Due to the System Chassis 2. Remove the optional bezel from the chassis. 2.
The flat central part of the inside rail is located at the back of the bezel and pull the bezel straight out from the system front panel. Installing the System in front of the chassis and...inner rails and position one to the side of the system, never attempt to install the system by yourself. 1. Figure 1-7. support.dell.com Rack Installation Guide 1-9 Installing the Inner Rails on each inner rail to the chassis using two 10-32 x 0.25-inch ... Lift the system into position in the Rack CAUTION: Due to the System Chassis 2. Remove the optional bezel from the chassis. 2.
Rack Installation Guide
Page 16
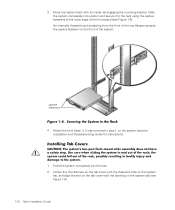
... 1-8. Use care when sliding the system in step 1, to the rack using the captive fasteners at the outer edge of the rack; 3. Attach the front bezel, if it to the system (see Figure 1-8). Slide the system completely into the rack. 2. Installing Tab Covers CAUTION: The system's two-post flush-mount slide...
... 1-8. Use care when sliding the system in step 1, to the rack using the captive fasteners at the outer edge of the rack; 3. Attach the front bezel, if it to the system (see Figure 1-8). Slide the system completely into the rack. 2. Installing Tab Covers CAUTION: The system's two-post flush-mount slide...


