

Information Update
Page 9
For more than 4 GB of physical memory. Power 2950 II and PowerEdge 2950 III Systems • If the front of your system chassis is labeled with a "II", your system is upgradeable to the 5100 series of... series of the hard drive. Safeguarding Encrypted Data On PowerEdge 2950 III systems using Windows Server® 2008, you can use encryption programs, such as the BitLocker utility, to upgrading your system, verify that your system. See support.dell.com for your system. Information Update 9 System Board Replacement - PowerEdge 2950 III Systems PowerEdge 2950 III systems have ...
For more than 4 GB of physical memory. Power 2950 II and PowerEdge 2950 III Systems • If the front of your system chassis is labeled with a "II", your system is upgradeable to the 5100 series of... series of the hard drive. Safeguarding Encrypted Data On PowerEdge 2950 III systems using Windows Server® 2008, you can use encryption programs, such as the BitLocker utility, to upgrading your system, verify that your system. See support.dell.com for your system. Information Update 9 System Board Replacement - PowerEdge 2950 III Systems PowerEdge 2950 III systems have ...
Information Update
Page 10
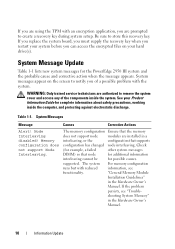
...system messages DIMM) so that node for additional information interleaving cannot be for the PowerEdge 2950 III system and the probable cause and corrective action when the message appears. See your hard drive(s). Node Interleaving disabled! WARNING: Only trained service technicians are authorized to create a... application, you are installed in a interleaving, or the configuration that supports configuration has changed node interleaving. If you replace the system board, you must supply the recovery key when you restart your system before you of the components inside ...
...system messages DIMM) so that node for additional information interleaving cannot be for the PowerEdge 2950 III system and the probable cause and corrective action when the message appears. See your hard drive(s). Node Interleaving disabled! WARNING: Only trained service technicians are authorized to create a... application, you are installed in a interleaving, or the configuration that supports configuration has changed node interleaving. If you replace the system board, you must supply the recovery key when you restart your system before you of the components inside ...
Information Update
Page 14
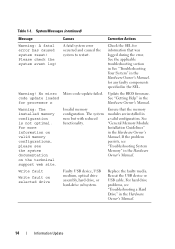
...event log! Write fault Write fault on the technical support web site. Replace the faulty media. For more information on valid memory configurations, please see "Troubleshooting a Hard Drive" in the for any faulty components specified in a valid configuration. Reseat... the USB device or USB cable. For hard drive problems, see the system documentation on selected drive Faulty USB device, USB medium, optical drive assembly, hard drive, or hard-drive subsystem. See "General Memory Module Installation Guidelines" in the Hardware Owner...
...event log! Write fault Write fault on the technical support web site. Replace the faulty media. For more information on valid memory configurations, please see "Troubleshooting a Hard Drive" in the for any faulty components specified in a valid configuration. Reseat... the USB device or USB cable. For hard drive problems, see the system documentation on selected drive Faulty USB device, USB medium, optical drive assembly, hard drive, or hard-drive subsystem. See "General Memory Module Installation Guidelines" in the Hardware Owner...
Hardware Owner's Manual (PDF)
Page 4
... the System 55 Hard Drives 55 Before You Begin 56 Removing a Drive Blank 56 Installing a Drive Blank 57 Removing a Hot-Plug Hard Drive 57 Installing a Hot-Plug Hard Drive 57 Replacing a Hard-Drive Carrier 58 Removing a Hard Drive From a Hard-Drive Carrier 58 Installing a SAS Hard Drive Into a SATAu Drive Carrier 59 Installing a SATA Hard Drive Into a SATA Drive Carrier 60 Installing a SATA Hard Drive and Interposer Card Into a SATAu Hard-Drive Carrier 61 Power...
... the System 55 Hard Drives 55 Before You Begin 56 Removing a Drive Blank 56 Installing a Drive Blank 57 Removing a Hot-Plug Hard Drive 57 Installing a Hot-Plug Hard Drive 57 Replacing a Hard-Drive Carrier 58 Removing a Hard Drive From a Hard-Drive Carrier 58 Installing a SAS Hard Drive Into a SATAu Drive Carrier 59 Installing a SATA Hard Drive Into a SATA Drive Carrier 60 Installing a SATA Hard Drive and Interposer Card Into a SATAu Hard-Drive Carrier 61 Power...

Hardware Owner's Manual (PDF)
Page 16
After the replacement drive is selected for removal, the "drive being prepared for insertion or removal" pattern. Steady green. Different patterns are displayed as drive events occur in the system. For example, if a hard drive fails, the "drive failed" pattern appears. NOTE: For non-RAID configurations, only the drive-activity indicator is off. Blinks amber four times per second...
After the replacement drive is selected for removal, the "drive being prepared for insertion or removal" pattern. Steady green. Different patterns are displayed as drive events occur in the system. For example, if a hard drive fails, the "drive failed" pattern appears. NOTE: For non-RAID configurations, only the drive-activity indicator is off. Blinks amber four times per second...

Hardware Owner's Manual (PDF)
Page 24
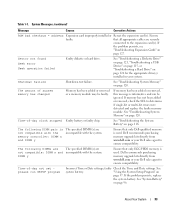
... "Getting Help" on page 90. HDD ## Removed The specified hard drive has been Information only. Reseat the cable. SAS Cable B SAS cable B is missing, preventing the system from powering on. If problem persists, replace cable. Memory subsystem failure. PCI Rsr Missing One or all of... E1811 E1812 E1913 E1A11 E1A12 E1A14 E1A15 E2010 E2011 E2012 E2013 E2014 E2015 Text Causes Corrective Actions HDD ## Rbld Abrt The specified hard drive has experienced a rebuild abort. If the problem persists, see your RAID documentation. Update to copy See "Troubleshooting System its flash ...
... "Getting Help" on page 90. HDD ## Removed The specified hard drive has been Information only. Reseat the cable. SAS Cable B SAS cable B is missing, preventing the system from powering on. If problem persists, replace cable. Memory subsystem failure. PCI Rsr Missing One or all of... E1811 E1812 E1913 E1A11 E1A12 E1A14 E1A15 E2010 E2011 E2012 E2013 E2014 E2015 Text Causes Corrective Actions HDD ## Rbld Abrt The specified hard drive has experienced a rebuild abort. If the problem persists, see your RAID documentation. Update to copy See "Troubleshooting System its flash ...

Hardware Owner's Manual (PDF)
Page 32
...card in the specified slot. faulty or improperly installed expansion card(s). Ensure that the diskette and hard drive cables are securely connected to process Remote Configuration request Retry Remote Configuration. 32 About Your System See Figure 6-1 for ... a USB Device" on page 115, or "Troubleshooting a Hard Drive" on page 147. If the problem persists, see "Troubleshooting Expansion Cards" on page 147. Plug & Play Configuration Error Error encountered in your system. Replace the diskette. System Messages (continued) Message Causes Corrective Actions...
...card in the specified slot. faulty or improperly installed expansion card(s). Ensure that the diskette and hard drive cables are securely connected to process Remote Configuration request Retry Remote Configuration. 32 About Your System See Figure 6-1 for ... a USB Device" on page 115, or "Troubleshooting a Hard Drive" on page 147. If the problem persists, see "Troubleshooting Expansion Cards" on page 147. Plug & Play Configuration Error Error encountered in your system. Replace the diskette. System Messages (continued) Message Causes Corrective Actions...
Hardware Owner's Manual (PDF)
Page 33
... are not compatible: DIMM x and incompatible with the system. Dell recommends purchasing memory upgrade kits directly from www.dell.com or your Dell sales agent to ensure compatibility. If the problem persists, replace the system battery. Ensure faulty. See system battery. See "...please run SETUP program Incorrect Time or Date settings; See "Troubleshooting a Diskette Drive" on page 121, "Troubleshooting a USB Device" on page 115, or "Troubleshooting a Hard Drive" on page 124 for the appropriate drive(s) installed in your system. that only Dell-qualified memory is used .
... are not compatible: DIMM x and incompatible with the system. Dell recommends purchasing memory upgrade kits directly from www.dell.com or your Dell sales agent to ensure compatibility. If the problem persists, replace the system battery. Ensure faulty. See system battery. See "...please run SETUP program Incorrect Time or Date settings; See "Troubleshooting a Diskette Drive" on page 121, "Troubleshooting a USB Device" on page 115, or "Troubleshooting a Hard Drive" on page 124 for the appropriate drive(s) installed in your system. that only Dell-qualified memory is used .
Hardware Owner's Manual (PDF)
Page 56
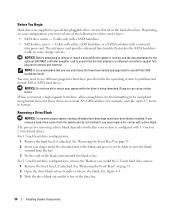
... your finger under the shrouded end of the drive bay. 56 Installing System Components Usable only with a universal interposer card. A 9-GB hard drive, for use different programs than those provided with the SAS backplane board. Removing a Drive Blank NOTICE: To maintain proper system cooling, all empty hard-drive bays must replace the carrier with 3.5-inch or 2.5-inch...
... your finger under the shrouded end of the drive bay. 56 Installing System Components Usable only with a universal interposer card. A 9-GB hard drive, for use different programs than those provided with the SAS backplane board. Removing a Drive Blank NOTICE: To maintain proper system cooling, all empty hard-drive bays must replace the carrier with 3.5-inch or 2.5-inch...
Hardware Owner's Manual (PDF)
Page 57
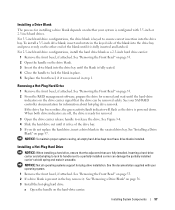
... attempting to lock its handle next to lock the blank in the vacated drive bay. Installing System Components 57 For 3.5-inch hard drive configurations, the drive blank is free of the drive bay. 5 If you do not replace the hard drive, insert a drive blank in place. 5 Replace the front bezel, if it . See the documentation supplied with 3.5-inch or 2.5-inch...
... attempting to lock its handle next to lock the blank in the vacated drive bay. Installing System Components 57 For 3.5-inch hard drive configurations, the drive blank is free of the drive bay. 5 If you do not replace the hard drive, insert a drive blank in place. 5 Replace the front bezel, if it . See the documentation supplied with 3.5-inch or 2.5-inch...

Hardware Owner's Manual (PDF)
Page 58
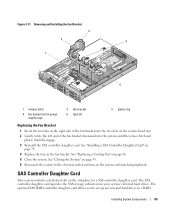
...Hard Drive 1 2 3 1 hard drive 2 drive carrier 3 drive carrier release handle b Insert the hard-drive carrier into the drive bay until the carrier contacts the backplane. Replacing a Hard-Drive Carrier Removing a Hard Drive From a Hard-Drive Carrier 1 If you are removing a SATA hard drive from a SATAu drive carrier, remove the interposer card: a Viewing the hard drive carrier from the rear, locate the release lever on the hard-drive carrier and separate the hard drive from the hard drive...away from the carrier rail to lock the drive in place. 4 Replace the front bezel, if it was removed...
...Hard Drive 1 2 3 1 hard drive 2 drive carrier 3 drive carrier release handle b Insert the hard-drive carrier into the drive bay until the carrier contacts the backplane. Replacing a Hard-Drive Carrier Removing a Hard Drive From a Hard-Drive Carrier 1 If you are removing a SATA hard drive from a SATAu drive carrier, remove the interposer card: a Viewing the hard drive carrier from the rear, locate the release lever on the hard-drive carrier and separate the hard drive from the hard drive...away from the carrier rail to lock the drive in place. 4 Replace the front bezel, if it was removed...
Hardware Owner's Manual (PDF)
Page 69
... fans in a RAID Installing System Components 69 See "Installing a SAS Controller Daughter Card" on the sideplane for your system's internal hard drives. See "Replacing a Cooling Fan" on the system board tray. 2 Gently rotate the left end of the fan bracket into the two slots on page ... RAID controller daughter card allows you to the electrical outlet and turn on page 55. 6 Reconnect the system to set up any internal hard drives in the fan bracket. The SAS controller daughter card provides the SAS storage subsystem for a SAS controller daughter card. Figure 3-11. Removing...
... fans in a RAID Installing System Components 69 See "Installing a SAS Controller Daughter Card" on the sideplane for your system's internal hard drives. See "Replacing a Cooling Fan" on the system board tray. 2 Gently rotate the left end of the fan bracket into the two slots on page ... RAID controller daughter card allows you to the electrical outlet and turn on page 55. 6 Reconnect the system to set up any internal hard drives in the fan bracket. The SAS controller daughter card provides the SAS storage subsystem for a SAS controller daughter card. Figure 3-11. Removing...
Hardware Owner's Manual (PDF)
Page 82
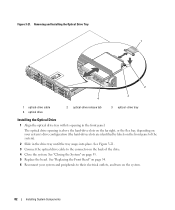
... the tray snaps into place. Figure 3-21. See Figure 3-21. 3 Connect the optical drive cable to their electrical outlets, and turn on page 55. 5 Replace the bezel. See "Replacing the Front Bezel" on page 54. 6 Reconnect your system's drive configuration (the hard-drives slots are identified by labels on the back of the system). 2 Slide in...
... the tray snaps into place. Figure 3-21. See Figure 3-21. 3 Connect the optical drive cable to their electrical outlets, and turn on page 55. 5 Replace the bezel. See "Replacing the Front Bezel" on page 54. 6 Reconnect your system's drive configuration (the hard-drives slots are identified by labels on the back of the system). 2 Slide in...
Hardware Owner's Manual (PDF)
Page 124
...and disconnect the system from the electrical outlet. Action 1 Remove the tape cartridge you were using when the problem occurred, and replace it with a tape cartridge that you cannot resolve the problem, see "Getting Help" on page 147 for information on obtaining...of the components inside the computer and protecting against electrostatic discharge. 9 Open the system. Troubleshooting a Hard Drive Problem • Device driver error. • One or more hard drives not recognized by the system. 124 Troubleshooting Your System See "Using Server Administrator Diagnostics" on selecting ...
...and disconnect the system from the electrical outlet. Action 1 Remove the tape cartridge you were using when the problem occurred, and replace it with a tape cartridge that you cannot resolve the problem, see "Getting Help" on page 147 for information on obtaining...of the components inside the computer and protecting against electrostatic discharge. 9 Open the system. Troubleshooting a Hard Drive Problem • Device driver error. • One or more hard drives not recognized by the system. 124 Troubleshooting Your System See "Using Server Administrator Diagnostics" on selecting ...

Hardware Owner's Manual (PDF)
Page 125
... the computer and protecting against electrostatic discharge. See "Installing a Hot-Plug Hard Drive" on the hard drive. If the hard drive functioned properly in another hard drive that is resolved, reinstall the hard drive in the original bay. NOTICE: This troubleshooting procedure can destroy data stored ...problem with multiple hard drives, skip to remove the system cover and access any of the diagnostics test, proceed as needed through the following steps. NOTICE: Do not perform the following step if you have intermittent problems. Replace the hard-drive carrier. Before ...
... the computer and protecting against electrostatic discharge. See "Installing a Hot-Plug Hard Drive" on the hard drive. If the hard drive functioned properly in another hard drive that is resolved, reinstall the hard drive in the original bay. NOTICE: This troubleshooting procedure can destroy data stored ...problem with multiple hard drives, skip to remove the system cover and access any of the diagnostics test, proceed as needed through the following steps. NOTICE: Do not perform the following step if you have intermittent problems. Replace the hard-drive carrier. Before ...
Hardware Owner's Manual (PDF)
Page 177
... removing and replacing, 96 troubleshooting, 118 battery RAID, 74 bezel removing, 53-54 replacing, 54 blank hard drive, 56 power supply, 64 BMC, 48 boot device configuring, 76 C CD drive troubleshooting, 123...Dell contacting, 151-152 diagnostics advanced testing options, 132 testing options, 132 when to use, 131 diskette drive installing, 84 removing, 83 troubleshooting, 121 diskette drive from drive carrier removing, 85 diskette drive into drive carrier installing, 85 drive blank installing, 57 removing, 56 drive carrier SAS hard drive (SATAu), 59 SATA hard drive (SATA), 60 SATA hard drive...
... removing and replacing, 96 troubleshooting, 118 battery RAID, 74 bezel removing, 53-54 replacing, 54 blank hard drive, 56 power supply, 64 BMC, 48 boot device configuring, 76 C CD drive troubleshooting, 123...Dell contacting, 151-152 diagnostics advanced testing options, 132 testing options, 132 when to use, 131 diskette drive installing, 84 removing, 83 troubleshooting, 121 diskette drive from drive carrier removing, 85 diskette drive into drive carrier installing, 85 drive blank installing, 57 removing, 56 drive carrier SAS hard drive (SATAu), 59 SATA hard drive (SATA), 60 SATA hard drive...

Hardware Owner's Manual (PDF)
Page 178
...replacing, 69 features back-panel, 17 front-panel, 13 G guidelines expansion card installation, 76 guidelines for memory installation, 89 H hard drive installing, 57 installing SAS in a SATAu drive carrier, 59 installing SATA in a SATA drive carrier, 60 hard drive (continued) installing SATA in a SATAu drive carrier, 61 removing, 57 removing from a drive carrier, 58 troubleshooting, 124 hard drives...70 SAS hard drive in a SATAu drive carrier, 59 SATA hard drive in a SATA drive carrier, 60 SATA hard drive in a SATAu drive carrier, 61 sideplane board, 102 system board, 108 tape drive, 86 ...
...replacing, 69 features back-panel, 17 front-panel, 13 G guidelines expansion card installation, 76 guidelines for memory installation, 89 H hard drive installing, 57 installing SAS in a SATAu drive carrier, 59 installing SATA in a SATA drive carrier, 60 hard drive (continued) installing SATA in a SATAu drive carrier, 61 removing, 57 removing from a drive carrier, 58 troubleshooting, 124 hard drives...70 SAS hard drive in a SATAu drive carrier, 59 SATA hard drive in a SATA drive carrier, 60 SATA hard drive in a SATAu drive carrier, 61 sideplane board, 102 system board, 108 tape drive, 86 ...
Hardware Owner's Manual (PDF)
Page 179
..., 54 diskette drive, 83 diskette drive from drive carrier, 85 expansion card, 78 expansion-card cage, 78 fan bracket, 68 hard drive blank, 56 hard drive from a drive carrier, 58 hard drives, 57 left riser, 99 left riser board, 98 memory, 92 optical drive, 81 power ...supply, 63 power supply blank, 64 processor, 93, 95 RAID battery, 75 SAS backplane board, 103 SAS controller daughter card, 69, 74 sideplane board, 101 system board, 107 tape drive, 86 tape drive cable retention bracket, 88 removing and replacing...
..., 54 diskette drive, 83 diskette drive from drive carrier, 85 expansion card, 78 expansion-card cage, 78 fan bracket, 68 hard drive blank, 56 hard drive from a drive carrier, 58 hard drives, 57 left riser, 99 left riser board, 98 memory, 92 optical drive, 81 power ...supply, 63 power supply blank, 64 processor, 93, 95 RAID battery, 75 SAS backplane board, 103 SAS controller daughter card, 69, 74 sideplane board, 101 system board, 107 tape drive, 86 tape drive cable retention bracket, 88 removing and replacing...
Hardware Owner's Manual (PDF)
Page 180
..., 102 removing, 101 startup accessing system features, 12 support contacting Dell, 151-152 system opening, 54 system board connectors, 137 installing, 108 jumpers, 135 removing, 107 replacing, 107 system cooling troubleshooting, 119 system features accessing, 12 system ...drive installing, 86 removing, 86 troubleshooting, 123 tape drive cable retention bracket removing and replacing, 88 TOE activating integrated NIC TOE, 93 troubleshooting basic I/O, 114 battery, 118 CD drive, 123 cooling fan, 119 damaged system, 117 diskette drive, 121 expansion cards, 127 external connections, 112 hard drive...
..., 102 removing, 101 startup accessing system features, 12 support contacting Dell, 151-152 system opening, 54 system board connectors, 137 installing, 108 jumpers, 135 removing, 107 replacing, 107 system cooling troubleshooting, 119 system features accessing, 12 system ...drive installing, 86 removing, 86 troubleshooting, 123 tape drive cable retention bracket removing and replacing, 88 TOE activating integrated NIC TOE, 93 troubleshooting basic I/O, 114 battery, 118 CD drive, 123 cooling fan, 119 damaged system, 117 diskette drive, 121 expansion cards, 127 external connections, 112 hard drive...


