
User Manual
Page 1
Mounting and Cable Routing Procedures for Dell™ Digital KVM's (1082DS, 2162DS, 4322DS) A Dell™ Technical White Paper Dell™ │ Datacenter Infrastructure Engineering By Daniel Whittaker and Jose L. Flores August 2010
Mounting and Cable Routing Procedures for Dell™ Digital KVM's (1082DS, 2162DS, 4322DS) A Dell™ Technical White Paper Dell™ │ Datacenter Infrastructure Engineering By Daniel Whittaker and Jose L. Flores August 2010
User Manual
Page 2
...Reproduction of this material in any manner whatsoever without the express written permission of Dell Inc. For more information, contact Dell. Dell, the DELL logo, the DELL badge, and PowerEdge are trademarks of Dell Inc. All rights reserved. THE CONTENT IS PROVIDED AS IS, WITHOUT EXPRESS... OR IMPLIED WARRANTIES OF ANY KIND. © 2010 Dell Inc. Mounting and Cable Routing Procedures for Dell™ Digital KVM's (...
...Reproduction of this material in any manner whatsoever without the express written permission of Dell Inc. For more information, contact Dell. Dell, the DELL logo, the DELL badge, and PowerEdge are trademarks of Dell Inc. All rights reserved. THE CONTENT IS PROVIDED AS IS, WITHOUT EXPRESS... OR IMPLIED WARRANTIES OF ANY KIND. © 2010 Dell Inc. Mounting and Cable Routing Procedures for Dell™ Digital KVM's (...
User Manual
Page 3
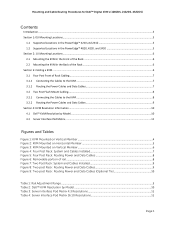
...Dell™ Digital KVM's (1082DS, 2162DS, 4322DS) Contents Introduction ...3 Section 1: 0U Mounting Locations...3 1.1 Supported Locations in the PowerEdge™ 4210 and 2410 3 1.2 Supported Locations in the PowerEdge™ 4820, 4220, and 2420 5 Section 2: 1U Mounting Locations...6 2.1 Mounting the KVM in the Front of the Rack 6 2.2 Mounting the KVM...: Routing Power and Data Cables (Optional Tie 10 Table 1: Rail Adjustment Range ...3 Table 2: Dell™ KVM Resolution by Model ...10 Table 3: Server Interface Pod Matrix 4:3 Resolutions 11 Table 4: Server Interface Pod Matrix 16:10...
...Dell™ Digital KVM's (1082DS, 2162DS, 4322DS) Contents Introduction ...3 Section 1: 0U Mounting Locations...3 1.1 Supported Locations in the PowerEdge™ 4210 and 2410 3 1.2 Supported Locations in the PowerEdge™ 4820, 4220, and 2420 5 Section 2: 1U Mounting Locations...6 2.1 Mounting the KVM in the Front of the Rack 6 2.2 Mounting the KVM...: Routing Power and Data Cables (Optional Tie 10 Table 1: Rail Adjustment Range ...3 Table 2: Dell™ KVM Resolution by Model ...10 Table 3: Server Interface Pod Matrix 4:3 Resolutions 11 Table 4: Server Interface Pod Matrix 16:10...

User Manual
Page 4
Mounting and Cable Routing Procedures for Dell™ Digital KVM's (1082DS, 2162DS, 4322DS) Page 2
Mounting and Cable Routing Procedures for Dell™ Digital KVM's (1082DS, 2162DS, 4322DS) Page 2
User Manual
Page 5
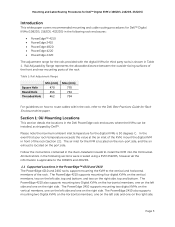
... cable routing procedures for Dell™ Digital KVMs (1082DS, 2162DS, 4322DS) in the following sections were created using a KVM 4322DS, however all the information is applicable to the 1082DS and 2162DS. 1.1 Supported Locations in Table 1. Section 1: 0U Mounting Locations This section details the locations in the Dell PowerEdge rack enclosures where the KVMs can be installed...
... cable routing procedures for Dell™ Digital KVMs (1082DS, 2162DS, 4322DS) in the following sections were created using a KVM 4322DS, however all the information is applicable to the 1082DS and 2162DS. 1.1 Supported Locations in Table 1. Section 1: 0U Mounting Locations This section details the locations in the Dell PowerEdge rack enclosures where the KVMs can be installed...

User Manual
Page 6
See Figures 1 and 2 for Dell™ Digital KVM's (1082DS, 2162DS, 4322DS) Please note that installation of the KVM where the ports face the ground is an unsupported orientation, and can cause damage to mount the Digital KVM in the aforementioned racks. Mounting and Cable Routing Procedures for the supported locations to the KVM. Figure 1: KVM Mounted on Vertical Member PowerEdge 4210 Vertical Top PowerEdge 2410 Vertical Page 4
See Figures 1 and 2 for Dell™ Digital KVM's (1082DS, 2162DS, 4322DS) Please note that installation of the KVM where the ports face the ground is an unsupported orientation, and can cause damage to mount the Digital KVM in the aforementioned racks. Mounting and Cable Routing Procedures for the supported locations to the KVM. Figure 1: KVM Mounted on Vertical Member PowerEdge 4210 Vertical Top PowerEdge 2410 Vertical Page 4

User Manual
Page 7
... on the right side. Please note that installation of the rack. See Figure 3 for Dell™ Digital KVM's (1082DS, 2162DS, 4322DS) Figure 2: KVM Mounted on the right side, top and bottom. The PowerEdge 4820 and 4220 support mounting four digital KVMs on the vertical members, two on the left side and one on the back...
... on the right side. Please note that installation of the rack. See Figure 3 for Dell™ Digital KVM's (1082DS, 2162DS, 4322DS) Figure 2: KVM Mounted on the right side, top and bottom. The PowerEdge 4820 and 4220 support mounting four digital KVMs on the vertical members, two on the left side and one on the back...
User Manual
Page 8
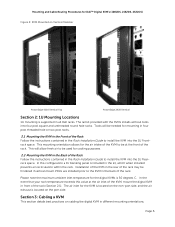
...located on the port side. Section 3: Cabling a KVM This section details best practices on cabling the digital KVM in the back of the KVM, mount the digital KVM in the Rack Installation Guide to install the KVM into four post square and unthreaded round hole racks. ... front of the Rack Follow the instructions contained in all Dell racks. Page 6 Mounting and Cable Routing Procedures for Dell™ Digital KVM's (1082DS, 2162DS, 4322DS) Figure 3: KVM Mounted on Vertical Member PowerEdge 4220 Vertical Top PowerEdge 2420 Vertical Section 2: 1U Mounting Locations 1U mounting is supported...
...located on the port side. Section 3: Cabling a KVM This section details best practices on cabling the digital KVM in the back of the KVM, mount the digital KVM in the Rack Installation Guide to install the KVM into four post square and unthreaded round hole racks. ... front of the Rack Follow the instructions contained in all Dell racks. Page 6 Mounting and Cable Routing Procedures for Dell™ Digital KVM's (1082DS, 2162DS, 4322DS) Figure 3: KVM Mounted on Vertical Member PowerEdge 4220 Vertical Top PowerEdge 2420 Vertical Section 2: 1U Mounting Locations 1U mounting is supported...

User Manual
Page 9
...power cables to one side, using hook and loop straps or tie downs to install the cables. Mounting and Cable Routing Procedures for Dell™ Digital KVM's (1082DS, 2162DS, 4322DS) 3.1 Four Post Front of Rack Cabling Follow the instructions contained in the following sections were created using... or tie downs to hold the cables (user supplied). See Figure 5. Page 7 It is easier to cable the KVM without having other side using the Dell KVM 4322DS. 3.1.1 Connecting the Cables to the KVM Connect all connections are secure. Once installed, use these instructions to hold the cables.
...power cables to one side, using hook and loop straps or tie downs to install the cables. Mounting and Cable Routing Procedures for Dell™ Digital KVM's (1082DS, 2162DS, 4322DS) 3.1 Four Post Front of Rack Cabling Follow the instructions contained in the following sections were created using... or tie downs to hold the cables (user supplied). See Figure 5. Page 7 It is easier to cable the KVM without having other side using the Dell KVM 4322DS. 3.1.1 Connecting the Cables to the KVM Connect all connections are secure. Once installed, use these instructions to hold the cables.
User Manual
Page 10
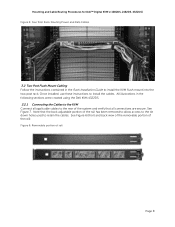
...rail has been removed to allow access to the tie down holes used to retain the cables. Mounting and Cable Routing Procedures for Dell™ Digital KVM's (1082DS, 2162DS, 4322DS) Figure 5: Four Post Rack: Routing Power and Data Cables 3.2 Two Post Flush Mount Cabling Follow ...the instructions contained in the following sections were created using the Dell KVM 4322DS. 3.2.1 Connecting the Cables to the KVM Connect all connections are secure. All illustrations in the Rack Installation Guide to install the cables. Figure 6: Removable portion...
...rail has been removed to allow access to the tie down holes used to retain the cables. Mounting and Cable Routing Procedures for Dell™ Digital KVM's (1082DS, 2162DS, 4322DS) Figure 5: Four Post Rack: Routing Power and Data Cables 3.2 Two Post Flush Mount Cabling Follow ...the instructions contained in the following sections were created using the Dell KVM 4322DS. 3.2.1 Connecting the Cables to the KVM Connect all connections are secure. All illustrations in the Rack Installation Guide to install the cables. Figure 6: Removable portion...
User Manual
Page 11
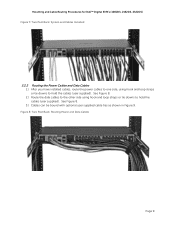
... user supplied cable ties as shown in Figure 9. Figure 8: Two Post Rack: Routing Power and Data Cables Page 9 Mounting and Cable Routing Procedures for Dell™ Digital KVM's (1082DS, 2162DS, 4322DS) Figure 7: Two Post Rack: System and Cables Installed 3.2.2 Routing the Power Cables and Data Cables 1.) After you have installed cables, route...
... user supplied cable ties as shown in Figure 9. Figure 8: Two Post Rack: Routing Power and Data Cables Page 9 Mounting and Cable Routing Procedures for Dell™ Digital KVM's (1082DS, 2162DS, 4322DS) Figure 7: Two Post Rack: System and Cables Installed 3.2.2 Routing the Power Cables and Data Cables 1.) After you have installed cables, route...

User Manual
Page 12
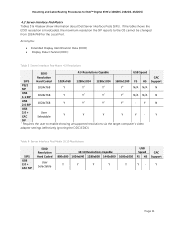
...9: Two Post Rack: Routing Power and Data Cables (Optional Tie) Section 4: KVM Resolution Information 4.1 Dell KVM Resolution by Model Table 2 below shows the resolutions supported by Model Model 180AS 2160AS 2161DS‐2 4161DS 2321DS 1082DS 2162DS 4322DS Local Port Max 4:3 Max 16:10 1600x1200...N N Y Y Y + The digitizer is the video port on the back of the KVM that plugs into a monitor. Acronyms: Virtual Media (VM) Common Access Card (CAC) Table 2: Dell KVM Resolution by Dell KVM model. The local port is capable up to 1024x768 un-scaled (although it can accept up...
...9: Two Post Rack: Routing Power and Data Cables (Optional Tie) Section 4: KVM Resolution Information 4.1 Dell KVM Resolution by Model Table 2 below shows the resolutions supported by Model Model 180AS 2160AS 2161DS‐2 4161DS 2321DS 1082DS 2162DS 4322DS Local Port Max 4:3 Max 16:10 1600x1200...N N Y Y Y + The digitizer is the video port on the back of the KVM that plugs into a monitor. Acronyms: Virtual Media (VM) Common Access Card (CAC) Table 2: Dell KVM Resolution by Dell KVM model. The local port is capable up to 1024x768 un-scaled (although it can accept up...
User Manual
Page 13
...; Y USB 2.0 + CAC User Selectable Y Y Y Y Y ‐ SIP + Requires the user to the OS cannot be changed from 1024x768 for Dell™ Digital KVM's (1082DS, 2162DS, 4322DS) 4.2 Server Interface Pod Matrix Tables 3 & 4 below show information about Dell Server Interface Pods (SIPs). Mounting and Cable Routing Procedures for the Local Port. CAC Support N N N Y Table 4: Server Interface...
...; Y USB 2.0 + CAC User Selectable Y Y Y Y Y ‐ SIP + Requires the user to the OS cannot be changed from 1024x768 for Dell™ Digital KVM's (1082DS, 2162DS, 4322DS) 4.2 Server Interface Pod Matrix Tables 3 & 4 below show information about Dell Server Interface Pods (SIPs). Mounting and Cable Routing Procedures for the Local Port. CAC Support N N N Y Table 4: Server Interface...
Dell 1082DS/2162DS/4322DS Remote Console Switch Software User's Guide
Page 9
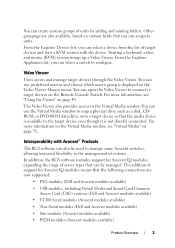
...for Avocent IQ modules, expanding the range of server types that you can create custom groups of target devices and start a KVM session with Avocent® Products The RCS software can open the Video Viewer to connect to the Virtual Media window. Video Viewer... • USB modules, including Virtual Media and Smart Card/Common Access Card (CAC) versions (Dell and Avocent modules available) • VT100 Serial modules (Avocent modules available) • True Serial modules (Dell and Avocent modules available) • Sun modules (Avocent modules available) • PS2M modules (Avocent...
...for Avocent IQ modules, expanding the range of server types that you can create custom groups of target devices and start a KVM session with Avocent® Products The RCS software can open the Video Viewer to connect to the Virtual Media window. Video Viewer... • USB modules, including Virtual Media and Smart Card/Common Access Card (CAC) versions (Dell and Avocent modules available) • VT100 Serial modules (Avocent modules available) • True Serial modules (Dell and Avocent modules available) • Sun modules (Avocent modules available) • PS2M modules (Avocent...

Dell 1082DS/2162DS/4322DS Remote Console Switch Software User's Guide
Page 20
If Java is not installed, download it from http://www.java.com, then associate the JNLP file with Java WebStart. NOTE: To use the Web interface, Java Runtime Environment (JRE) version 1.6.0_11 or higher must be installed on your PC. The KVM Switch will not have to detect Java on your session has exceed the inactivity timeout specified by the administrator. 14 Installation NOTE: Once you have logged in to the web interface, you will attempt to log in again when launching new sessions unless you have logged out or your computer.
If Java is not installed, download it from http://www.java.com, then associate the JNLP file with Java WebStart. NOTE: To use the Web interface, Java Runtime Environment (JRE) version 1.6.0_11 or higher must be installed on your PC. The KVM Switch will not have to detect Java on your session has exceed the inactivity timeout specified by the administrator. 14 Installation NOTE: Once you have logged in to the web interface, you will attempt to log in again when launching new sessions unless you have logged out or your computer.

Dell 1082DS/2162DS/4322DS Remote Console Switch Software User's Guide
Page 77
... allows multiple users to share without having any control over the connection. The image is already being viewed. If another (secondary) user attempts to start a KVM session with the same target device, options for all are a primary user, you may be configured by a dialog box that another user, you may be...
... allows multiple users to share without having any control over the connection. The image is already being viewed. If another (secondary) user attempts to start a KVM session with the same target device, options for all are a primary user, you may be configured by a dialog box that another user, you may be...
Dell 1082DS/2162DS/4322DS Remote Console Switch Software User's Guide
Page 78
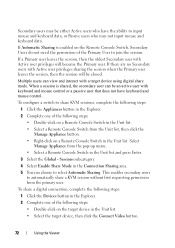
... keyboard data. When a session is enabled on the Remote Console Switch, Secondary Users do not need the permission of the Primary User to share KVM sessions, complete the following steps: 1 Click the Appliances button in the Explorer. 2 Complete one of the following steps: • Double-click ... You can view and interact with keyboard and mouse control or a passive user that does not have the ability to automatically share a KVM session without first requesting permission from the primary user. This enables secondary users to input mouse and keyboard data, or Passive users who may...
... keyboard data. When a session is enabled on the Remote Console Switch, Secondary Users do not need the permission of the Primary User to share KVM sessions, complete the following steps: 1 Click the Appliances button in the Explorer. 2 Complete one of the following steps: • Double-click ... You can view and interact with keyboard and mouse control or a passive user that does not have the ability to automatically share a KVM session without first requesting permission from the primary user. This enables secondary users to input mouse and keyboard data, or Passive users who may...

Dell 1082DS/2162DS/4322DS Remote Console Switch Software User's Guide
Page 79
...connection sharing is enabled on the target device. If the primary user accepts the share request, or if Automatic Sharing is enabled, a KVM session to preempt (or terminate) the session or monitor the session in exclusive mode, you are prompted to become disconnected from the ...available, select Share. 2 Complete one of the primary user) allow digital share mode sessions or it , you can create an exclusive KVM session. However, administrators can terminate the session entirely. Exclusive Mode If session sharing and exclusive connections are enabled, you are warned that the...
...connection sharing is enabled on the target device. If the primary user accepts the share request, or if Automatic Sharing is enabled, a KVM session to preempt (or terminate) the session or monitor the session in exclusive mode, you are prompted to become disconnected from the ...available, select Share. 2 Complete one of the primary user) allow digital share mode sessions or it , you can create an exclusive KVM session. However, administrators can terminate the session entirely. Exclusive Mode If session sharing and exclusive connections are enabled, you are warned that the...

Dell 1082DS/2162DS/4322DS Remote Console Switch Software User's Guide
Page 80
...Explorer. 2 Complete one of the secondary users. • Select No to a target device. 2 Select Tools - Secondary users cannot share the exclusive KVM session. If other users are sharing at the time Exclusive Mode is requested, they are disconnected, regardless of a non-shared session can request an ...the Video Viewer in exclusive mode, complete the following steps: • Select Yes to terminate the sessions of the following steps: 1 Open a KVM session to cancel the exclusive mode action. Exclusive Mode from the pop-up menu. • Select a Remote Console Switch in the Unit list ...
...Explorer. 2 Complete one of the secondary users. • Select No to a target device. 2 Select Tools - Secondary users cannot share the exclusive KVM session. If other users are sharing at the time Exclusive Mode is requested, they are disconnected, regardless of a non-shared session can request an ...the Video Viewer in exclusive mode, complete the following steps: • Select Yes to terminate the sessions of the following steps: 1 Open a KVM session to cancel the exclusive mode action. Exclusive Mode from the pop-up menu. • Select a Remote Console Switch in the Unit list ...

Dell 1082DS/2162DS/4322DS Remote Console Switch Software User's Guide
Page 81
To enable stealth KVM sessions on a switch, complete the following steps: 1 Click the Appliances button in the Explorer. 2 Complete one of the following steps: • Double-click on the ... target device, a message indicates that the target device is available, select Stealth. 4 Complete one of a remote user undetected. If the option is already involved in a KVM session. Select Manage Appliance from the pop- Stealth Connection Administrators can connect to a target device in stealth mode to either share or preempt the existing...
To enable stealth KVM sessions on a switch, complete the following steps: 1 Click the Appliances button in the Explorer. 2 Complete one of the following steps: • Double-click on the ... target device, a message indicates that the target device is available, select Stealth. 4 Complete one of a remote user undetected. If the option is already involved in a KVM session. Select Manage Appliance from the pop- Stealth Connection Administrators can connect to a target device in stealth mode to either share or preempt the existing...


