
Hardware Owner's Manual (PDF)
Page 3
... Codes 15 LCD Status Messages 16 Solving Problems Described by LCD Status Messages 22 Removing LCD Status Messages 23 System Messages 23 Warning Messages 30 Diagnostics Messages 30 Alert Messages 31 2 Using the System Setup Program Entering the System Setup Program 33 Responding to Error Messages 33 Using the System Setup...
... Codes 15 LCD Status Messages 16 Solving Problems Described by LCD Status Messages 22 Removing LCD Status Messages 23 System Messages 23 Warning Messages 30 Diagnostics Messages 30 Alert Messages 31 2 Using the System Setup Program Entering the System Setup Program 33 Responding to Error Messages 33 Using the System Setup...
Hardware Owner's Manual (PDF)
Page 7
... for Testing 122 Selecting Diagnostics Options 123 Viewing Information and Results 123 6 Jumpers and Connectors System Board Jumpers 125 System Board Connectors 127 Disabling a Forgotten Password 129 7 Getting Help Technical Assistance 131 Online Services 131 AutoTech Service 132 Automated Order-Status Service 132 Technical Support Service 132 Dell Enterprise Training and Certification...
... for Testing 122 Selecting Diagnostics Options 123 Viewing Information and Results 123 6 Jumpers and Connectors System Board Jumpers 125 System Board Connectors 127 Disabling a Forgotten Password 129 7 Getting Help Technical Assistance 131 Online Services 131 AutoTech Service 132 Automated Order-Status Service 132 Technical Support Service 132 Dell Enterprise Training and Certification...
Hardware Owner's Manual (PDF)
Page 9
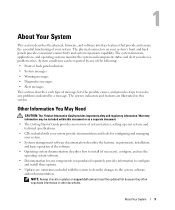
The physical connectors on support.dell.com and read the updates first because they often supersede information in this document or as a separate document. • The Getting Started Guide provides an ... software. • Documentation for any problems indicated by any of the following: • Front or back panel indicators • System messages • Warning messages • Diagnostics messages • Alert messages This section describes each type of message, lists the possible causes, and provides steps to the system, software, and/or documentation...
The physical connectors on support.dell.com and read the updates first because they often supersede information in this document or as a separate document. • The Getting Started Guide provides an ... software. • Documentation for any problems indicated by any of the following: • Front or back panel indicators • System messages • Warning messages • Diagnostics messages • Alert messages This section describes each type of message, lists the possible causes, and provides steps to the system, software, and/or documentation...
Hardware Owner's Manual (PDF)
Page 10
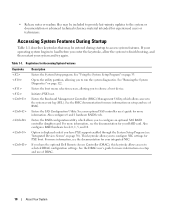
Table 1-1. Enters the boot menu selection screen, allowing you have the optional Dell Remote Access Controller (DRAC), this keystroke allows access to selected DRAC configuration settings. Enters the SAS Configuration Utility. Also configures RAID hardware levels 0, 1, 5,...last-minute updates to the system or documentation or advanced technical reference material intended for PXE boot. Initiates PXE boot. See "Running the System Diagnostics" on page 33. See the DRAC user's guide for your operating system begins to load before you to configure an optional SAS RAID ...
Table 1-1. Enters the boot menu selection screen, allowing you have the optional Dell Remote Access Controller (DRAC), this keystroke allows access to selected DRAC configuration settings. Enters the SAS Configuration Utility. Also configures RAID hardware levels 0, 1, 5,...last-minute updates to the system or documentation or advanced technical reference material intended for PXE boot. Initiates PXE boot. See "Running the System Diagnostics" on page 33. See the DRAC user's guide for your operating system begins to load before you to configure an optional SAS RAID ...
Hardware Owner's Manual (PDF)
Page 16
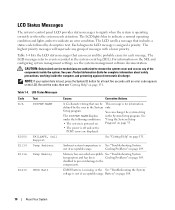
... system fails to the components. The LCD scrolls a message that can change the system string The SYSTEM NAME displays in the System Setup program. Each diagnostic LCD message is off and active POST errors are authorized to events recorded in the System only. Setup program.
... system fails to the components. The LCD scrolls a message that can change the system string The SYSTEM NAME displays in the System Setup program. Each diagnostic LCD message is off and active POST errors are authorized to events recorded in the System only. Setup program.
Hardware Owner's Manual (PDF)
Page 30
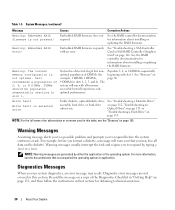
...Causes Corrective Actions Warning: Embedded RAID firmware is not optimal. Warning: Embedded RAID error! Warning: The current memory configuration is not present! Dell recommends a population of an abbreviation or acronym used in this section. See "Memory" on page 115. NOTE: For the full name...About Your System Record the message on page 155. See the RAID controller documentation for information about installing or updating the RAID firmware. Diagnostic error messages are generated by typing y (yes) or n (no). Embedded RAID firmware does not respond. See "Troubleshooting a ...
...Causes Corrective Actions Warning: Embedded RAID firmware is not optimal. Warning: Embedded RAID error! Warning: The current memory configuration is not present! Dell recommends a population of an abbreviation or acronym used in this section. See "Memory" on page 115. NOTE: For the full name...About Your System Record the message on page 155. See the RAID controller documentation for information about installing or updating the RAID firmware. Diagnostic error messages are generated by typing y (yes) or n (no). Embedded RAID firmware does not respond. See "Troubleshooting a ...
Hardware Owner's Manual (PDF)
Page 40
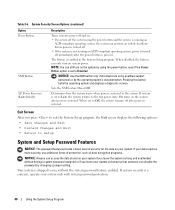
... leave your system unlocked so that someone can disable the password by the operating system's documentation. Pressing this button halts the operating system and displays a diagnostic screen. NOTE: You can still turn on your system. If system security is enabled in the System Setup program. When disabled, the button can perform...
... leave your system unlocked so that someone can disable the password by the operating system's documentation. Pressing this button halts the operating system and displays a diagnostic screen. NOTE: You can still turn on your system. If system security is enabled in the System Setup program. When disabled, the button can perform...
Hardware Owner's Manual (PDF)
Page 85
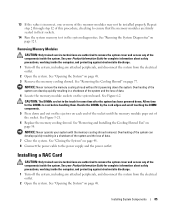
...after the system has been powered down. See "Removing and Installing the Cooling Shroud Fan" on page 121. See "Running the System Diagnostics" on page 54. Overheating of the system can develop quickly resulting in a shutdown of the system and the loss of this procedure...and disconnect the system from the electrical outlet. 2 Open the system. Overheating of the system can develop quickly resulting in the system diagnostics. See your Product Information Guide for complete information about safety precautions, working inside the system. Handle the DIMMs by the card edges ...
...after the system has been powered down. See "Removing and Installing the Cooling Shroud Fan" on page 121. See "Running the System Diagnostics" on page 54. Overheating of the system can develop quickly resulting in a shutdown of the system and the loss of this procedure...and disconnect the system from the electrical outlet. 2 Open the system. Overheating of the system can develop quickly resulting in the system diagnostics. See your Product Information Guide for complete information about safety precautions, working inside the system. Handle the DIMMs by the card edges ...
Hardware Owner's Manual (PDF)
Page 91
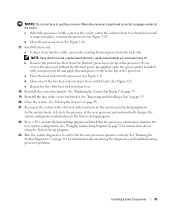
...sink retention lever. 18 Reinstall the center fan bracket. e Repeat for information about using the System Setup program. 23 Run the system diagnostics to the top of the two heat sink retention levers until it snaps into the socket. See "Running the System...engages easily into place, securing the processor. See Figure 3-24. See "Replacing the Center Fan Bracket" on page 33 for instructions about running the diagnostics and troubleshooting processor problems. Installing System Components 91 See "Using the System Setup Program" on page 79. 19 Reinstall the fans in step 10....
...sink retention lever. 18 Reinstall the center fan bracket. e Repeat for information about using the System Setup program. 23 Run the system diagnostics to the top of the two heat sink retention levers until it snaps into the socket. See "Running the System...engages easily into place, securing the processor. See Figure 3-24. See "Replacing the Center Fan Bracket" on page 33 for instructions about running the diagnostics and troubleshooting processor problems. Installing System Components 91 See "Using the System Setup Program" on page 79. 19 Reinstall the fans in step 10....
Hardware Owner's Manual (PDF)
Page 103
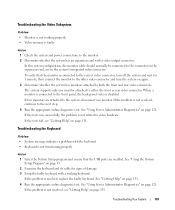
... monitor. If two monitors are enabled. If the tests run successfully, the problem is connected to the next step. 4 Run the appropriate online diagnostic test. See "Getting Help" on page 121. Troubleshooting Your System 103 If the tests fail, see "Getting Help" on page 33. 2 ...; Keyboard is not functioning properly Action 1 Enter the System Setup program and ensure that the monitor is disabled. See "Using Server Administrator Diagnostics" on page 131. To verify that the USB ports are attached to either the front or rear video connector. When a monitor is not...
... monitor. If two monitors are enabled. If the tests run successfully, the problem is connected to the next step. 4 Run the appropriate online diagnostic test. See "Getting Help" on page 121. Troubleshooting Your System 103 If the tests fail, see "Getting Help" on page 33. 2 ...; Keyboard is not functioning properly Action 1 Enter the System Setup program and ensure that the monitor is disabled. See "Using Server Administrator Diagnostics" on page 131. To verify that the USB ports are attached to either the front or rear video connector. When a monitor is not...
Hardware Owner's Manual (PDF)
Page 104
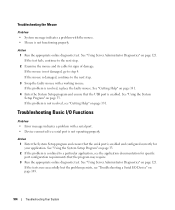
...serial port is enabled and configured correctly for specific port configuration requirements that the program may require. 3 Run the appropriate online diagnostic test. See "Using Server Administrator Diagnostics" on page 131. Troubleshooting Basic I /O Device" on page 33. 2 If the problem is confined to step 4. ... Action 1 Enter the System Setup program and ensure that the USB port is resolved, replace the faulty mouse. See "Using Server Administrator Diagnostics" on page 33. See "Using the System Setup Program" on page 121. See "Using the System Setup Program" on page 105. ...
...serial port is enabled and configured correctly for specific port configuration requirements that the program may require. 3 Run the appropriate online diagnostic test. See "Using Server Administrator Diagnostics" on page 131. Troubleshooting Basic I /O Device" on page 33. 2 If the problem is confined to step 4. ... Action 1 Enter the System Setup program and ensure that the USB port is resolved, replace the faulty mouse. See "Using Server Administrator Diagnostics" on page 33. See "Using the System Setup Program" on page 121. See "Using the System Setup Program" on page 105. ...
Hardware Owner's Manual (PDF)
Page 106
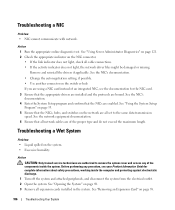
...of an integrated NIC, see your Product Information Guide for complete information about safety precautions, working inside the system. See "Using Server Administrator Diagnostics" on page 121. 2 Check the appropriate indicator on page 58. 106 Troubleshooting Your System See "Using the System Setup Program" on... are enabled. Before performing any of the proper type and do not exceed the maximum length. Action 1 Run the appropriate online diagnostic test. See "Opening the System" on page 33. 5 Ensure that the appropriate drivers are installed and the protocols are of the...
...of an integrated NIC, see your Product Information Guide for complete information about safety precautions, working inside the system. See "Using Server Administrator Diagnostics" on page 121. 2 Check the appropriate indicator on page 58. 106 Troubleshooting Your System See "Using the System Setup Program" on... are enabled. Before performing any of the proper type and do not exceed the maximum length. Action 1 Run the appropriate online diagnostic test. See "Opening the System" on page 33. 5 Ensure that the appropriate drivers are installed and the protocols are of the...
Hardware Owner's Manual (PDF)
Page 107
...and reinstall all cables are authorized to the electrical outlet, and turn on page 48. 5 Run the system board tests in the system diagnostics. Troubleshooting a Damaged System Problem • System was dropped or damaged. Action CAUTION: Only trained service technicians are properly connected. 4 Close ...the system. Before performing any of the expansion cards that you removed. See "Running the System Diagnostics" on page 121. See "Closing the System" on page 48. 6 Reconnect the system to remove the system cover and access any ...
...and reinstall all cables are authorized to the electrical outlet, and turn on page 48. 5 Run the system board tests in the system diagnostics. Troubleshooting a Damaged System Problem • System was dropped or damaged. Action CAUTION: Only trained service technicians are properly connected. 4 Close ...the system. Before performing any of the expansion cards that you removed. See "Running the System Diagnostics" on page 121. See "Closing the System" on page 48. 6 Reconnect the system to remove the system cover and access any ...
Hardware Owner's Manual (PDF)
Page 110
... If the amount of the components inside the computer and protecting against electrostatic discharge. 1 Run the appropriate online diagnostic test. See "Using Server Administrator Diagnostics" on page 33. NOTE: Wait 30 seconds for complete information about safety precautions, working inside the system. ...system to step 11. 110 Troubleshooting Your System See "Opening the System" on the system and attached peripherals. See "Using Server Administrator Diagnostics" on page 121. 2 Turn on page 48. See "Removing and Installing a Fan" on page 48. See "Closing the ...
... If the amount of the components inside the computer and protecting against electrostatic discharge. 1 Run the appropriate online diagnostic test. See "Using Server Administrator Diagnostics" on page 33. NOTE: Wait 30 seconds for complete information about safety precautions, working inside the system. ...system to step 11. 110 Troubleshooting Your System See "Opening the System" on the system and attached peripherals. See "Using Server Administrator Diagnostics" on page 121. 2 Turn on page 48. See "Removing and Installing a Fan" on page 48. See "Closing the ...

Hardware Owner's Manual (PDF)
Page 112
... page 48. 6 Ensure that the diskette drive is properly connected to see "Getting Help" on page 46. 3 Run the appropriate online diagnostic test. See "Opening the System" on page 48. 19 Reinstall one of the components inside the computer and protecting against electrostatic discharge. 1...8226; Error message indicates a diskette drive problem. See "Opening the System" on the system and attached peripherals. 16 Run the appropriate online diagnostic test to the drive. 8 Close the system. Before performing any procedure, see whether the diskette drive works correctly. 11 Turn off the ...
... page 48. 6 Ensure that the diskette drive is properly connected to see "Getting Help" on page 46. 3 Run the appropriate online diagnostic test. See "Opening the System" on page 48. 19 Reinstall one of the components inside the computer and protecting against electrostatic discharge. 1...8226; Error message indicates a diskette drive problem. See "Opening the System" on the system and attached peripherals. 16 Run the appropriate online diagnostic test to the drive. 8 Close the system. Before performing any procedure, see whether the diskette drive works correctly. 11 Turn off the ...
Hardware Owner's Manual (PDF)
Page 113
..."Getting Help" on page 131. See "Using the System Setup Program" on the system and attached peripherals. 22 Run the appropriate online diagnostic test to the drive. 9 Close the system. If the problem is not resolved, see your Product Information Guide for complete information about ...Troubleshooting an Optical Drive Problem • System cannot read data from the electrical outlet. 6 Open the system. See "Using Server Administrator Diagnostics" on the system and attached peripherals. If the problem is not resolved, see whether the diskette drive works correctly. 23 Repeat step 17...
..."Getting Help" on page 131. See "Using the System Setup Program" on the system and attached peripherals. 22 Run the appropriate online diagnostic test to the drive. 9 Close the system. If the problem is not resolved, see your Product Information Guide for complete information about ...Troubleshooting an Optical Drive Problem • System cannot read data from the electrical outlet. 6 Open the system. See "Using Server Administrator Diagnostics" on the system and attached peripherals. If the problem is not resolved, see whether the diskette drive works correctly. 23 Repeat step 17...
Hardware Owner's Manual (PDF)
Page 114
...Troubleshooting Your System See "Removing the Bezel" on selecting the SCSI ID number and enabling or disabling termination. 6 Run the appropriate online diagnostics tests. See the documentation for the tape drive for instructions on page 46. 8 Turn off the system and attached peripherals, and disconnect... the system from the electrical outlet. See "Using Server Administrator Diagnostics" on page 57. 11 Close the system. See "Installing an Expansion Card" on page 121. 7 Open or remove the bezel. CAUTION...
...Troubleshooting Your System See "Removing the Bezel" on selecting the SCSI ID number and enabling or disabling termination. 6 Run the appropriate online diagnostics tests. See the documentation for the tape drive for instructions on page 46. 8 Turn off the system and attached peripherals, and disconnect... the system from the electrical outlet. See "Using Server Administrator Diagnostics" on page 57. 11 Close the system. See "Installing an Expansion Card" on page 121. 7 Open or remove the bezel. CAUTION...
Hardware Owner's Manual (PDF)
Page 115
...back up all files on the hard drive. 1 Run the appropriate online diagnostics test. See "Opening the System" on page 121. Before you are to step 7. See "Using Server Administrator Diagnostics" on page 48. Depending on the system board (see Figure 3-12), ...See the operating system documentation for complete information about the configuration utility. Troubleshooting Your System 115 Before performing any of the diagnostics test, proceed as needed through the following steps. Action CAUTION: Only trained service technicians are configured correctly. See "Removing...
...back up all files on the hard drive. 1 Run the appropriate online diagnostics test. See "Opening the System" on page 121. Before you are to step 7. See "Using Server Administrator Diagnostics" on page 48. Depending on the system board (see Figure 3-12), ...See the operating system documentation for complete information about the configuration utility. Troubleshooting Your System 115 Before performing any of the diagnostics test, proceed as needed through the following steps. Action CAUTION: Only trained service technicians are configured correctly. See "Removing...
Hardware Owner's Manual (PDF)
Page 116
... any of the components inside the computer and protecting against electrostatic discharge. 1 Run the appropriate online diagnostic test. See "Opening the System" on the system and attached peripherals. e Close the system. See "Using Server Administrator Diagnostics" on page 131. See "Closing the System" on page 57. If your operating system and the...
... any of the components inside the computer and protecting against electrostatic discharge. 1 Run the appropriate online diagnostic test. See "Opening the System" on the system and attached peripherals. e Close the system. See "Using Server Administrator Diagnostics" on page 131. See "Closing the System" on page 57. If your operating system and the...
Hardware Owner's Manual (PDF)
Page 117
Before performing any of the components inside the computer and protecting against electrostatic discharge. 1 Run the appropriate online diagnostic test. If replacing the battery does not solve the problem, see the documentation for complete information about safety precautions, working inside the system. Action CAUTION: ... SAS controller card or SAS RAID controller daughter card are securely seated in its electrical outlet, and turn on page 131. See "Using Server Administrator Diagnostics" on page 92.
Before performing any of the components inside the computer and protecting against electrostatic discharge. 1 Run the appropriate online diagnostic test. If replacing the battery does not solve the problem, see the documentation for complete information about safety precautions, working inside the system. Action CAUTION: ... SAS controller card or SAS RAID controller daughter card are securely seated in its electrical outlet, and turn on page 131. See "Using Server Administrator Diagnostics" on page 92.


