Dell PowerEdge C1100 Support and Manuals
Get Help and Manuals for this Dell item
View All Support Options Below
Free Dell PowerEdge C1100 manuals!
Problems with Dell PowerEdge C1100?
Ask a Question
Free Dell PowerEdge C1100 manuals!
Problems with Dell PowerEdge C1100?
Ask a Question
Popular Dell PowerEdge C1100 Manual Pages
Information Update - Page 1
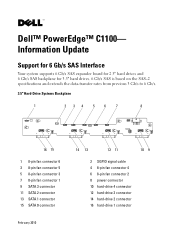
Information Update
Support for 6 Gb/s SAS Interface
Your system supports 6 Gb/s SAS expander board for 2.5" hard drives and 6 Gb/s SAS backplane for 3.5" hard drives. 6 Gb/s SAS is based on the SAS-2 specifications and extends the... 2 8 power connector 10 hard-drive 4 connector 12 hard-drive 3 connector 14 hard-drive 2 connector 16 hard-drive 1 connector Dell™ PowerEdge™ C1100-
Hardware Owner's Manual - Page 29

...
HDD Error
See "Troubleshooting a Hard Drive" on page 105.
Code 0196
0193
0192
0197
0198
0400 0401 0402 0403 0404
Log in BMC Error Message
Corrective Action
Yes
CPUID, Processor Ensure that your processors match
Model are
and conform to the type described in
different
the processor technical
specifications outlined in your
system's Getting Started Guide. Yes...
Hardware Owner's Manual - Page 32

... other documents.
32
About Your System The Getting Started Guide provides an overview of Beeps 1 3 6 8 2 3
Description Refresh timer error Base 64 K memory failure 8042 - Number of Beeps
12 13 14 (1 long beep after 4 beeps)
Description Wrong bios file size ROM image mismatch BIOS recovery by jumper
Post Beep Codes
Number of rack installation, system features, setting up your system.
Hardware Owner's Manual - Page 45

... to save any changes that you have typed in the Setup utility and exit the Setup utility. Change Supervisor Password/ Change User Password
Use this option to install optimal settings for confirmation. The password is installed or not. Select to install, change or clear the password.
A second dialog box asks you to discard any changes you have made in the...
Hardware Owner's Manual - Page 47
... to yourself or damage to servicing that is not authorized by Dell is necessary to a power supply can be extremely dangerous. Alternatively...troubleshooting and simple repairs as authorized in your product documentation, or as directed by a certified service technician. Do not touch the components on systems that came with the product. Installing System Components
Safety Instructions...
Hardware Owner's Manual - Page 56
... seconds for some time after the system has been powered down.
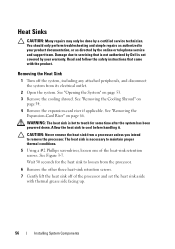
See Figure 3-7. Allow the heat sink to servicing that came with thermal grease side facing up.
56
Installing System Components Heat Sinks
CAUTION: Many repairs may only be done by the online or telephone service and support team. Removing the Heat Sink
1 Turn off of...
Hardware Owner's Manual - Page 60

....
12 Close the system. See "Installing the Cooling Shroud" on page 57.
11 Replace the cooling shroud. If the processor has already been used previously. CAUTION: Do not use force to install the update on the processor socket in the socket. 1 If you are upgrading your processors, prior to upgrading your processor kit and apply thermal...
Hardware Owner's Manual - Page 95

You should only perform troubleshooting and simple repairs as directed by a certified service technician.
Troubleshooting Your System
95
Installation Problems
Perform the following checks if you are troubleshooting an installation problem: • Check all cable and power connections (including all rack cable
connections). • Unplug the power cord and wait for assistance. &#...
Hardware Owner's Manual - Page 97
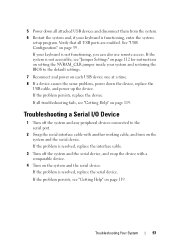
... down the device, replace the
USB cable, and power up the device. If your keyboard is resolved, replace the interface cable.
3 Turn off the system and any peripheral devices connected to the default settings.
7 Reconnect and power on page 119. If the problem is functioning, enter the system
setup program. Troubleshooting Your System
97
See "USB Configuration" on page 119...
Hardware Owner's Manual - Page 99

... 53. 3 Disassemble components from the electrical outlet.
2 Open the system. Troubleshooting Your System
99 See "Opening the System" on page 47. • Cooling shroud • Hard drives • Backplane • Expansion-card riser • Power supplies • Fans • Processors and heat sinks • Memory modules 4 Let the system dry thoroughly for at least 24...
Hardware Owner's Manual - Page 100

... instructions that all cables are properly installed:
• Expansion-card riser • Power supplies • Fans • Hard drives • Processors and heat sinks • Memory ...Troubleshooting Your System You should only perform troubleshooting and simple repairs as directed by the online or telephone service and support team. Damage due to servicing that is not authorized by Dell...
Hardware Owner's Manual - Page 101

... troubleshooting and simple repairs as authorized in your warranty. Read and follow the safety instructions that came with only one power supply must be caused by software rather than by your product documentation, or as directed by a certified service technician. If the system seems to operate normally except for the time kept in the System Setup program, replace...
Hardware Owner's Manual - Page 105
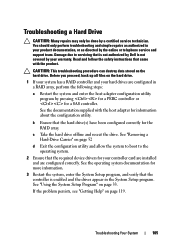
... 119.
You should only perform troubleshooting and simple repairs as authorized in your product documentation, or as directed by a certified service technician. See "Removing a Hard-Drive Carrier" on page 52
d Exit the configuration utility and allow the system to boot to servicing that the required device drivers for the RAID array. If the problem persists, see "Getting Help...
Hardware Owner's Manual - Page 107

... in its connector. Troubleshooting Your System
107
CAUTION: Many repairs may only be done by the online or telephone service and support team. See "Opening the System" on the system and
attached peripherals.
7 If the problem is not covered by Dell is not resolved, turn on page 68.
10 Close the system. See "Installing the System Board...
Using the Baseboard Management Controller - Page 9

... firmware update, the AC power of the managed system cannot be unplugged and the Web GUI cannot be closed.
1 Browse to log in the iBMC firmware package: • Compiled iBMC firmware code and data • Web-based user interface, JPEG, and other user interface data files • Default configuration files
NOTE: The firmware update retains the current iBMC settings...
Dell PowerEdge C1100 Reviews
We have not received any reviews for Dell yet.