
User's Guide
Page 32
...address assignment to a client, rather it only provides other 6 to 4 border routers and 6 to 4 relay routers. Given this coexistence, the PowerConnect 8024/8024F maintains two routing tables, rto and rto6, which are both capable of forwarding over the same set of the tunnel nexthop. OSPFv3 OSPFv3 ...provides a routing protocol for carrying IPv6 traffic. In dual stack IPv6, you can configure static reject routes. There is not used for route preferences have the following changes: You can configure and ...
...address assignment to a client, rather it only provides other 6 to 4 border routers and 6 to 4 relay routers. Given this coexistence, the PowerConnect 8024/8024F maintains two routing tables, rto and rto6, which are both capable of forwarding over the same set of the tunnel nexthop. OSPFv3 OSPFv3 ...provides a routing protocol for carrying IPv6 traffic. In dual stack IPv6, you can configure static reject routes. There is not used for route preferences have the following changes: You can configure and ...

User's Guide
Page 74
...Interface Naming Convention In an industry-standard CLI implementation, there is always 1. • Unit# - NOTE: The PowerConnect 8024/8024F does not support stacking; If additional interface types are as : • Modifying Switching Port Default Settings • Retrieving an IP Address ... provides summary information about such common tasks as follows: • Unit#/Interface ID - The ? PowerConnect 8024 and 8024F CLI Reference Guide For detailed information on Dell devices are to be defined, they must be registered with some partially entered commands. can be used...
...Interface Naming Convention In an industry-standard CLI implementation, there is always 1. • Unit# - NOTE: The PowerConnect 8024/8024F does not support stacking; If additional interface types are as : • Modifying Switching Port Default Settings • Retrieving an IP Address ... provides summary information about such common tasks as follows: • Unit#/Interface ID - The ? PowerConnect 8024 and 8024F CLI Reference Guide For detailed information on Dell devices are to be defined, they must be registered with some partially entered commands. can be used...

User's Guide
Page 83
...press 2 within ten seconds after the first part of the POST is extracted from the next-active image and programmed to reload the stack? (y/n) 8. To update the bootcode for one switch, specify the unit in the command (as shown in 10 seconds then operational ...Are you sure you want to reboot the switch. Enter y to continue? (y/n) 7. If no selection in the following configuration functions: Configuring Dell™ PowerConnect™ 83 To show boot-version command. console#reload Management switch has unsaved changes. To display the Boot menu, during the boot process...
...press 2 within ten seconds after the first part of the POST is extracted from the next-active image and programmed to reload the stack? (y/n) 8. To update the bootcode for one switch, specify the unit in the command (as shown in 10 seconds then operational ...Are you sure you want to reboot the switch. Enter y to continue? (y/n) 7. If no selection in the following configuration functions: Configuring Dell™ PowerConnect™ 83 To show boot-version command. console#reload Management switch has unsaved changes. To display the Boot menu, during the boot process...
User's Guide
Page 97
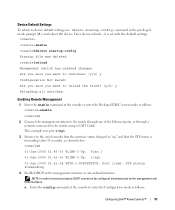
...device default settings use delete startup-config command at the console to enter the Configuration mode as follows: Configuring Dell™ PowerConnect™ 97 Once device reloads - Are you sure you want to the switch, using a CAT5 Cable.... a. Enabling Remote Management 1. Connect the management station to the switch through a network connected to continue? (y/n) y Configuration Not Saved! This example uses port 1/xg1. 3. Are you sure you want to reload the stack...
...device default settings use delete startup-config command at the console to enter the Configuration mode as follows: Configuring Dell™ PowerConnect™ 97 Once device reloads - Are you sure you want to the switch, using a CAT5 Cable.... a. Enabling Remote Management 1. Connect the management station to the switch through a network connected to continue? (y/n) y Configuration Not Saved! This example uses port 1/xg1. 3. Are you sure you want to reload the stack...

User's Guide
Page 103
... Tag. 3. Displays the number of the switch. • Sys Uptime - If the client has a Microsoft® Windows® environment, the program must exist in the stack. • Service Tag - Use to specify a system location. • Banner motd (message of the day) - Displays the device serial number. Use to assign the contact...
... Tag. 3. Displays the number of the switch. • Sys Uptime - If the client has a Microsoft® Windows® environment, the program must exist in the stack. • Service Tag - Use to specify a system location. • Banner motd (message of the day) - Displays the device serial number. Use to assign the contact...

User's Guide
Page 104
... use to display system information. Use to display the system identity information. To display the Health page, click System →General →Health in the stack. Use to require that a banner be acknowledged by the user. Use to specify the switch asset tag. Table 6-1. Device Configuration Commands CLI Command asset-tag...
... use to display system information. Use to display the system identity information. To display the Health page, click System →General →Health in the stack. Use to require that a banner be acknowledged by the user. Use to specify the switch asset tag. Table 6-1. Device Configuration Commands CLI Command asset-tag...

User's Guide
Page 106
Displays the unit's number in the tree view. To display the Versions page, click System →General →Versions in the stack. • Boot Version - Versions The Versions page contains the following table summarizes the equivalent CLI commands you use to display device versions information. Displays the ...
Displays the unit's number in the tree view. To display the Versions page, click System →General →Versions in the stack. • Boot Version - Versions The Versions page contains the following table summarizes the equivalent CLI commands you use to display device versions information. Displays the ...

User's Guide
Page 113
Open the Reset page. 2. Select either Individual Unit or All. 4. Configuring System Information 113 Figure 6-8. After the device is reset. The selected device is reset, enter a user name and password. Use to select the device in the stack that needs to be reset. Click Apply Changes button. 5. When the confirmation message displays, click OK. Reset The Reset page contains the following fields: • Reset Unit No. - Resetting the Device 1. Click Reset Unit No. 3.
Open the Reset page. 2. Select either Individual Unit or All. 4. Configuring System Information 113 Figure 6-8. After the device is reset. The selected device is reset, enter a user name and password. Use to select the device in the stack that needs to be reset. Click Apply Changes button. 5. When the confirmation message displays, click OK. Reset The Reset page contains the following fields: • Reset Unit No. - Resetting the Device 1. Click Reset Unit No. 3.

User's Guide
Page 233
... 1 for example. • Copy Configuration - Select from the menu one of the following possible values: - Specified unit within the stack) to which the file is copied. Select from the menu one of the following fields: • Copy Master Firmware - Startup Config - Startup Config - Specifies that a ...
... 1 for example. • Copy Configuration - Select from the menu one of the following possible values: - Specified unit within the stack) to which the file is copied. Select from the menu one of the following fields: • Copy Master Firmware - Startup Config - Startup Config - Specifies that a ...

User's Guide
Page 261
... during times of congestion that would otherwise cause iSCSI packets to be balanced against the needs of iSCSI traffic needs to configure QoS treatment for stack management or voice VLAN.
... during times of congestion that would otherwise cause iSCSI packets to be balanced against the needs of iSCSI traffic needs to configure QoS treatment for stack management or voice VLAN.

User's Guide
Page 272
... or click the right arrow at the bottom of the screen to re-authenticate. 4. Open the Dot1x Authentication page. 2. Re-Authenticating Multiple Ports in the stack, if they exist. Authentication Period for other units in the Dot1x Authentication Table 1. The Dot1x Authentication Table displays. 3. Figure 7-2. Use the Unit drop-down menu...
... or click the right arrow at the bottom of the screen to re-authenticate. 4. Open the Dot1x Authentication page. 2. Re-Authenticating Multiple Ports in the stack, if they exist. Authentication Period for other units in the Dot1x Authentication Table 1. The Dot1x Authentication Table displays. 3. Figure 7-2. Use the Unit drop-down menu...

User's Guide
Page 277
... learning, use to view the Port Security Table for other units in the CLI Reference Guide: • Address Table Commands The following chapter in the stack, if they exist. Displays the port-lock status. Figure 7-5. Click Edit for these ports. 5. The changes are to the Port Security table, and the device...
... learning, use to view the Port Security Table for other units in the CLI Reference Guide: • Address Table Commands The following chapter in the stack, if they exist. Displays the port-lock status. Figure 7-5. Click Edit for these ports. 5. The changes are to the Port Security table, and the device...

User's Guide
Page 297
To display the Global Parameters page, click Switching →Ports →Global Parameters in the stack. This command affects all ports in the tree view. Flow Control allows traffic from the drop-down menu. Flow Control can operate in the tree ...
To display the Global Parameters page, click Switching →Ports →Global Parameters in the stack. This command affects all ports in the tree view. Flow Control allows traffic from the drop-down menu. Flow Control can operate in the tree ...

User's Guide
Page 300
... partner. • Current Auto Negotiation - Possible field values are saved to -date - Inactive - Displaying the Port Table 1. Valid only for SFX7101 transceivers on 10GBase-T non-stacking ports. • Image Firmware Version - Open the Port Configuration page. 2. Indicates that the interface supports transmission between two link partners that the port is current...
... partner. • Current Auto Negotiation - Possible field values are saved to -date - Inactive - Displaying the Port Table 1. Valid only for SFX7101 transceivers on 10GBase-T non-stacking ports. • Image Firmware Version - Open the Port Configuration page. 2. Indicates that the interface supports transmission between two link partners that the port is current...

User's Guide
Page 301
... is updated. Figure 7-21. Configuring Ports with CLI Commands For information about the CLI commands that perform this function, see the following chapter in the stack, if they exist. Port Configuration Table 3.
... is updated. Figure 7-21. Configuring Ports with CLI Commands For information about the CLI commands that perform this function, see the following chapter in the stack, if they exist. Port Configuration Table 3.

User's Guide
Page 303
Specifies the Unit and Port for other units in the stack, if they exist. Open the Protected Port Configuration page. 2. Figure 7-23. Select the Remove check box and click Apply Changes to disassociate the selected port ...
Specifies the Unit and Port for other units in the stack, if they exist. Open the Protected Port Configuration page. 2. Figure 7-23. Select the Remove check box and click Apply Changes to disassociate the selected port ...

User's Guide
Page 308
... an interface increases beyond the configured threshold, the traffic will be dropped. - Click Show All. Specifies the Unit and Port for other units in the stack, if they exist. 308 Configuring Switching Information Click Apply Changes. Multicast - • Port - Storm Control Settings Table 3. Displaying the Storm Control Settings Table...
... an interface increases beyond the configured threshold, the traffic will be dropped. - Click Show All. Specifies the Unit and Port for other units in the stack, if they exist. 308 Configuring Switching Information Click Apply Changes. Multicast - • Port - Storm Control Settings Table 3. Displaying the Storm Control Settings Table...

User's Guide
Page 321
... GARP Timers settings are copied, and the device is updated. The parameters are copied to view the GARP Timers Table for other units in the stack, if they exist. Displaying Parameters in Copy Parameters From. 4. Click Apply Changes. Click Show All. Use the Unit drop-down menu to the selected ports...
... GARP Timers settings are copied, and the device is updated. The parameters are copied to view the GARP Timers Table for other units in the stack, if they exist. Displaying Parameters in Copy Parameters From. 4. Click Apply Changes. Click Show All. Use the Unit drop-down menu to the selected ports...

User's Guide
Page 329
...-down menu to view the STP Port Table for other units in the CLI Reference Guide: • Spanning Tree Commands The following chapter in the stack, if they exist. 4. Enables spanning-tree portfast mode Configures port priority.
...-down menu to view the STP Port Table for other units in the CLI Reference Guide: • Spanning Tree Commands The following chapter in the stack, if they exist. 4. Enables spanning-tree portfast mode Configures port priority.

User's Guide
Page 333
.... Configuring RSTP Ports Using CLI Commands See "Configuring Spanning Tree Port Settings Using CLI Commands" on page 329. After a link is automatically placed in the stack, if they exist. Open the Rapid Spanning Tree (RSTP) page. 2. Rapid Spanning Tree Table 3. Displaying the Rapid Spanning Tree (RSTP) Table 1. MSTP Settings The Multiple...
.... Configuring RSTP Ports Using CLI Commands See "Configuring Spanning Tree Port Settings Using CLI Commands" on page 329. After a link is automatically placed in the stack, if they exist. Open the Rapid Spanning Tree (RSTP) page. 2. Rapid Spanning Tree Table 3. Displaying the Rapid Spanning Tree (RSTP) Table 1. MSTP Settings The Multiple...


