Command Line Interface Guide
Page 180
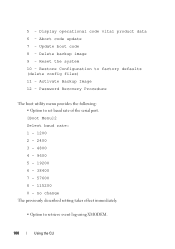
Restore Configuration to set baud rate of the serial port. [Boot Menu]2 Select baud rate: 1 - 1200 2 - 2400 3 - 4800 4 - 9600 5 - 19200 6 - 38400 7 - 57600 8 - 115200 0 - Password Recovery Procedure The boot utility menu provides the following: • Option to factory defaults (delete config files) 11 - no change The previously described setting takes ...to retrieve event log using XMODEM. 180 Using the CLI Update boot code 8 - Abort code update 7 - Display operational code vital product data 6 - Delete backup image 9 - Reset the system 10 - Activate Backup Image 12 - 5 -
Restore Configuration to set baud rate of the serial port. [Boot Menu]2 Select baud rate: 1 - 1200 2 - 2400 3 - 4800 4 - 9600 5 - 19200 6 - 38400 7 - 57600 8 - 115200 0 - Password Recovery Procedure The boot utility menu provides the following: • Option to factory defaults (delete config files) 11 - no change The previously described setting takes ...to retrieve event log using XMODEM. 180 Using the CLI Update boot code 8 - Abort code update 7 - Display operational code vital product data 6 - Delete backup image 9 - Reset the system 10 - Activate Backup Image 12 - 5 -
User's Guide
Page 6
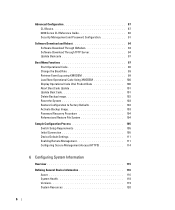
Advanced Configuration 87 CLI Basics 87 6200 Series CLI Reference Guide 88 Security Management and Password Configuration 91 Software Download and Reboot 94 Software Download Through XModem 94 Software Download Through TFTP Server 94 Update Bootcode 97 Boot ... Vital Product Data 100 Abort Boot Code Update 101 Update Boot Code 101 Delete Backup Image 102 Reset the System 103 Restore Configuration to Factory Defaults 103 Activate Backup Image 103 Password Recovery Procedure 104 Reformat and Restore File System 104 Sample Configuration Process 105 Switch Setup Requirements 105 ...
Advanced Configuration 87 CLI Basics 87 6200 Series CLI Reference Guide 88 Security Management and Password Configuration 91 Software Download and Reboot 94 Software Download Through XModem 94 Software Download Through TFTP Server 94 Update Bootcode 97 Boot ... Vital Product Data 100 Abort Boot Code Update 101 Update Boot Code 101 Delete Backup Image 102 Reset the System 103 Restore Configuration to Factory Defaults 103 Activate Backup Image 103 Password Recovery Procedure 104 Reformat and Restore File System 104 Sample Configuration Process 105 Switch Setup Requirements 105 ...
User's Guide
Page 7
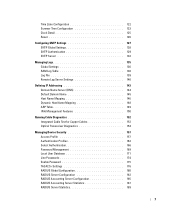
Time Zone Configuration 122 Summer Time Configuration 123 Clock Detail 125 Reset 126 Configuring SNTP Settings 127 SNTP Global Settings 128 SNTP Authentication 129 SNTP Server 132 Managing Logs 135 Global Settings... 152 Optical Transceiver Diagnostics 154 Managing Device Security 157 Access Profile 157 Authentication Profiles 162 Select Authentication 166 Password Management 169 Local User Database 171 Line Passwords 174 Enable Password 175 TACACS+ Settings 176 RADIUS Global Configuration 180 RADIUS Server Configuration 182 RADIUS Accounting Server Configuration 185 RADIUS...
Time Zone Configuration 122 Summer Time Configuration 123 Clock Detail 125 Reset 126 Configuring SNTP Settings 127 SNTP Global Settings 128 SNTP Authentication 129 SNTP Server 132 Managing Logs 135 Global Settings... 152 Optical Transceiver Diagnostics 154 Managing Device Security 157 Access Profile 157 Authentication Profiles 162 Select Authentication 166 Password Management 169 Local User Database 171 Line Passwords 174 Enable Password 175 TACACS+ Settings 176 RADIUS Global Configuration 180 RADIUS Server Configuration 182 RADIUS Accounting Server Configuration 185 RADIUS...
User's Guide
Page 77
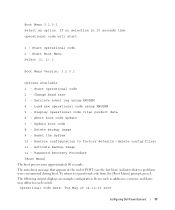
...operational code using XMODEM 4 - Abort boot code update 7 - Update boot code 8 - Reset the system 10 - Restore configuration to operational code from the [Boot Menu] prompt, press... operational code will start. 1 - Boot Menu 3.2.0.1 Select an option. Start operational code 2 - Retrieve event log using XMODEM 5 - Password Recovery Procedure [Boot Menu] The boot process runs approximately 60 seconds. Change baud rate 3 - Activate Backup Image 12 - Start operational code...11 - Operational Code Date: Tue May 26 14:12:20 2009 Configuring Dell PowerConnect 77
...operational code using XMODEM 4 - Abort boot code update 7 - Update boot code 8 - Reset the system 10 - Restore configuration to operational code from the [Boot Menu] prompt, press... operational code will start. 1 - Boot Menu 3.2.0.1 Select an option. Start operational code 2 - Retrieve event log using XMODEM 5 - Password Recovery Procedure [Boot Menu] The boot process runs approximately 60 seconds. Change baud rate 3 - Activate Backup Image 12 - Start operational code...11 - Operational Code Date: Tue May 26 14:12:20 2009 Configuring Dell PowerConnect 77
User's Guide
Page 98
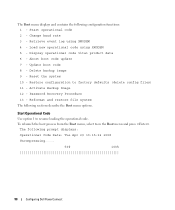
...options. Start operational code 2 - Load new operational code using XMODEM 4 - Delete backup image 9 - Activate Backup Image 12 - Reset the system 10 - Reformat and restore file system The following configuration functions: 1 - Retrieve event log using XMODEM 5 - Display ...loading the operational code. Change baud rate 3 - Password Recovery Procedure 13 - The following prompt displays: Operational Code Date: Tue Apr 29 10:15:36 2008 Uncompressing..... 50% 100% 98 Configuring Dell PowerConnect Start Operational Code Use option 1 to factory defaults (...
...options. Start operational code 2 - Load new operational code using XMODEM 4 - Delete backup image 9 - Activate Backup Image 12 - Reset the system 10 - Reformat and restore file system The following configuration functions: 1 - Retrieve event log using XMODEM 5 - Display ...loading the operational code. Change baud rate 3 - Password Recovery Procedure 13 - The following prompt displays: Operational Code Date: Tue Apr 29 10:15:36 2008 Uncompressing..... 50% 100% 98 Configuring Dell PowerConnect Start Operational Code Use option 1 to factory defaults (...
User's Guide
Page 126
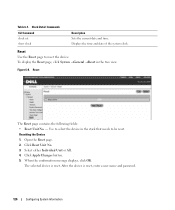
... Apply Changes button. 5. Displays the time and date of the system clock. Reset The Reset page contains the following fields: • Reset Unit No. - Click Reset Unit No. 3. Table 6-7. Figure 6-8. Resetting the Device 1. The selected device is reset, enter a user name and password. 126 Configuring System Information Select either Individual Unit or All. 4. Clock Detail Commands CLI...
... Apply Changes button. 5. Displays the time and date of the system clock. Reset The Reset page contains the following fields: • Reset Unit No. - Click Reset Unit No. 3. Table 6-7. Figure 6-8. Resetting the Device 1. The selected device is reset, enter a user name and password. 126 Configuring System Information Select either Individual Unit or All. 4. Clock Detail Commands CLI...
User's Guide
Page 203
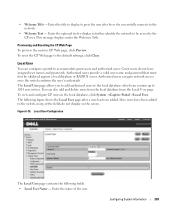
Previewing and Resetting the CP Web Page To preview the custom CP Web page, click Preview. Authorized users can configure a portal to the network. • Welcome Text - If no users have assigned user names and passwords. Configuring System Information 203 This message displays under the Welcome Title. ... the name of the fields do not display on the screen. • Welcome Title - Authorized users provide a valid user name and password that must first be access by the CP user. Enter the optional text to display to further identify the network to the local database...
Previewing and Resetting the CP Web Page To preview the custom CP Web page, click Preview. Authorized users can configure a portal to the network. • Welcome Text - If no users have assigned user names and passwords. Configuring System Information 203 This message displays under the Welcome Title. ... the name of the fields do not display on the screen. • Welcome Title - Authorized users provide a valid user name and password that must first be access by the CP user. Enter the optional text to display to further identify the network to the local database...


