
Users Guide
Page 3
... parts and controls 9 Front view 9 Back view 10 Bottom view 11 Monitor specifications 12 Resolution specifications 14 Supported video modes 14 Preset display modes 14 Electrical specifications 15 Physical characteristics 16 Environmental characteristics 18 Pin assignments 19 Plug and play capability 21 Universal Serial Bus (USB) interface 21 SuperSpeed USB 5 Gbps (USB 3.2 Gen1 21 USB 2.0 21 USB Type-C 21 USB 3.2 Gen1 (5 Gbps) upstream connector 22 USB 3.2 Gen1 (5 Gbps) downstream connector 22 USB 2.0 downstream connector 23 USB Type-C connector 23 USB ports 24 LCD monitor...
... parts and controls 9 Front view 9 Back view 10 Bottom view 11 Monitor specifications 12 Resolution specifications 14 Supported video modes 14 Preset display modes 14 Electrical specifications 15 Physical characteristics 16 Environmental characteristics 18 Pin assignments 19 Plug and play capability 21 Universal Serial Bus (USB) interface 21 SuperSpeed USB 5 Gbps (USB 3.2 Gen1 21 USB 2.0 21 USB Type-C 21 USB 3.2 Gen1 (5 Gbps) upstream connector 22 USB 3.2 Gen1 (5 Gbps) downstream connector 22 USB 2.0 downstream connector 23 USB Type-C connector 23 USB ports 24 LCD monitor...

Users Guide
Page 4
...) cable. . 29 Connecting the HDMI cable 30 Connecting the USB Type-C cable 31 Connecting the USB 3.2 Gen1 (5 Gbps) cable 31 Organizing your cables 33 Removing the monitor stand 33 VESA wall mounting (optional 34 Operating the monitor 35 Power on the monitor 35 Using the joystick control 35 Using the On-Screen Display (OSD) menu 36 Accessing the Menu Launcher 36 Using the navigation keys 37 Accessing the menu system 38 OSD warning message 55 Setting the maximum resolution 59 Setting the KVM switch 60 Setting...
...) cable. . 29 Connecting the HDMI cable 30 Connecting the USB Type-C cable 31 Connecting the USB 3.2 Gen1 (5 Gbps) cable 31 Organizing your cables 33 Removing the monitor stand 33 VESA wall mounting (optional 34 Operating the monitor 35 Power on the monitor 35 Using the joystick control 35 Using the On-Screen Display (OSD) menu 36 Accessing the Menu Launcher 36 Using the navigation keys 37 Accessing the menu system 38 OSD warning message 55 Setting the maximum resolution 59 Setting the KVM switch 60 Setting...
Users Guide
Page 8
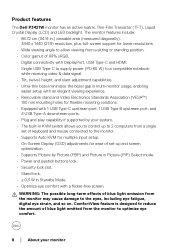
... Dell P3421W monitor has an active matrix, Thin-Film Transistor (TFT), Liquid Crystal Display (LCD) and LED backlight. WARNING: The possible long-term effects of blue light emitted from the monitor to optimize eye comfort. 8 │ About your system. • The built-in KVM switch allows you to control up to 2 computers from the monitor may cause damage to a compatible notebook while receiving video & data signal. • Tilt, swivel, height...
... Dell P3421W monitor has an active matrix, Thin-Film Transistor (TFT), Liquid Crystal Display (LCD) and LED backlight. WARNING: The possible long-term effects of blue light emitted from the monitor to optimize eye comfort. 8 │ About your system. • The built-in KVM switch allows you to control up to 2 computers from the monitor may cause damage to a compatible notebook while receiving video & data signal. • Tilt, swivel, height...
Users Guide
Page 10
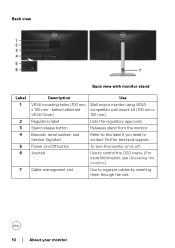
...; About your monitor Releases stand from the monitor. To turn the monitor on or off. Use to control the OSD menu. (For more Information, see Operating the monitor) Use to contact Dell for technical support. Back view Back view with monitor stand Label 1 2 3 4 5 6 7 Description VESA mounting holes (100 mm x 100 mm - behind attached VESA Cover) Regulatory label Stand release button Barcode, serial number, and Service Tag label Power On/Off button Joystick Cable-management slot Use Wall mount monitor using VESAcompatible wall mount kit (100 mm...
...; About your monitor Releases stand from the monitor. To turn the monitor on or off. Use to control the OSD menu. (For more Information, see Operating the monitor) Use to contact Dell for technical support. Back view Back view with monitor stand Label 1 2 3 4 5 6 7 Description VESA mounting holes (100 mm x 100 mm - behind attached VESA Cover) Regulatory label Stand release button Barcode, serial number, and Service Tag label Power On/Off button Joystick Cable-management slot Use Wall mount monitor using VESAcompatible wall mount kit (100 mm...

Users Guide
Page 12
... your computer. 1 Pending USB-IF compliance certification. 2 To avoid signal interference, when a wireless USB device has been connected to a USB downstream port, it is NOT recommended to connect any other USB devices to the computer. Monitor specifications Model Screen type Panel technology Aspect ratio Viewable image Diagonal Width (active area) Height (active area) Total area Pixel pitch Pixel per inch (PPI) P3421W Active matrix - TFT LCD In-Plane Switching Technology 21:9 867...
... your computer. 1 Pending USB-IF compliance certification. 2 To avoid signal interference, when a wireless USB device has been connected to a USB downstream port, it is NOT recommended to connect any other USB devices to the computer. Monitor specifications Model Screen type Panel technology Aspect ratio Viewable image Diagonal Width (active area) Height (active area) Total area Pixel pitch Pixel per inch (PPI) P3421W Active matrix - TFT LCD In-Plane Switching Technology 21:9 867...
Users Guide
Page 14
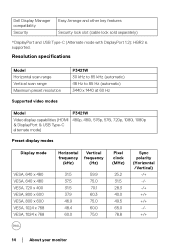
Resolution specifications Model Horizontal scan range Vertical scan range Maximum preset resolution Supported video modes P3421W 30 kHz to 85 kHz (automatic) 48 Hz to 85 Hz (automatic) 3440 x 1440 at 60 Hz Model P3421W Video display capabilities (HDMI 480p, 480i, 576p, 576i, 720p, 1080i, 1080p & DisplayPort & USB Type-C alternate mode) Preset display modes Display mode VESA, 640 x 480 VESA, 640 x 480 VESA, 720 x 400 VESA, 800 x 600 VESA, 800 x 600 VESA, 1024 x 768 VESA, 1024 x 768 Horizontal frequency (kHz) Vertical frequency (Hz) 31.5 59...
Resolution specifications Model Horizontal scan range Vertical scan range Maximum preset resolution Supported video modes P3421W 30 kHz to 85 kHz (automatic) 48 Hz to 85 Hz (automatic) 3440 x 1440 at 60 Hz Model P3421W Video display capabilities (HDMI 480p, 480i, 576p, 576i, 720p, 1080i, 1080p & DisplayPort & USB Type-C alternate mode) Preset display modes Display mode VESA, 640 x 480 VESA, 640 x 480 VESA, 720 x 400 VESA, 800 x 600 VESA, 800 x 600 VESA, 1024 x 768 VESA, 1024 x 768 Horizontal frequency (kHz) Vertical frequency (Hz) 31.5 59...
Users Guide
Page 16
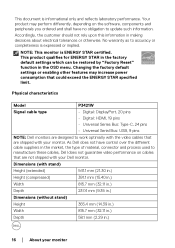
.... Physical characteristics Model P3421W Signal cable type • Digital: DisplayPort, 20 pins • Digital: HDMI, 19 pins • Universal Series Bus: Type-C, 24 pins • Universal Serial Bus: USB, 9 pins NOTE: Dell monitors are designed to manufacture these cables, Dell does not guarantee video performance on the software, components and peripherals you ordered and shall have control over the different cable suppliers in the OSD menu. Changing the factory default settings or enabling other...
.... Physical characteristics Model P3421W Signal cable type • Digital: DisplayPort, 20 pins • Digital: HDMI, 19 pins • Universal Series Bus: Type-C, 24 pins • Universal Serial Bus: USB, 9 pins NOTE: Dell monitors are designed to manufacture these cables, Dell does not guarantee video performance on the software, components and peripherals you ordered and shall have control over the different cable suppliers in the OSD menu. Changing the factory default settings or enabling other...
Users Guide
Page 25
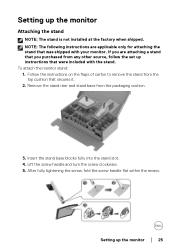
... screw, fold the screw handle flat within the recess. Remove the stand riser and stand base from any other source, follow the set up instructions that was shipped with the stand. Lift the screw handle and turn the screw clockwise. 5. Insert the stand base blocks fully into the stand slot. 4. NOTE: The following instructions are attaching a stand that secures it. 2. To attach the monitor stand: 1. Setting up the monitor │ 25 Follow the instructions...
... screw, fold the screw handle flat within the recess. Remove the stand riser and stand base from any other source, follow the set up instructions that was shipped with the stand. Lift the screw handle and turn the screw clockwise. 5. Insert the stand base blocks fully into the stand slot. 4. NOTE: The following instructions are attaching a stand that secures it. 2. To attach the monitor stand: 1. Setting up the monitor │ 25 Follow the instructions...

Users Guide
Page 26
Lift the cover, as shown, to the groove on the upper part of the stand to access the VESA area for stand assembly. 7. a. Fit the two tabs on the back of the display. 6. Press the stand down till it snaps into place. 26 │ Setting up the monitor b. Attach the stand assembly to the display.
Lift the cover, as shown, to the groove on the upper part of the stand to access the VESA area for stand assembly. 7. a. Fit the two tabs on the back of the display. 6. Press the stand down till it snaps into place. 26 │ Setting up the monitor b. Attach the stand assembly to the display.

Users Guide
Page 32
Connect two computers *When connecting two computers to the monitor, configure the USB settings from the OSD menu to share a single set of keyboard and mouse connected to the monitor between two computers. 3. Connect one computer b. If your computer(s) and monitor into a nearby outlet. Plug the power cables for details. 4. See USB and Setting the KVM switch for your monitor displays an image, installation is complete. Turn On the monitor and the computer(s). a. If it does not display an image, see Common problems. 32 │ Setting up the monitor
Connect two computers *When connecting two computers to the monitor, configure the USB settings from the OSD menu to share a single set of keyboard and mouse connected to the monitor between two computers. 3. Connect one computer b. If your computer(s) and monitor into a nearby outlet. Plug the power cables for details. 4. See USB and Setting the KVM switch for your monitor displays an image, installation is complete. Turn On the monitor and the computer(s). a. If it does not display an image, see Common problems. 32 │ Setting up the monitor

Users Guide
Page 37
... the monitor │ 37 After you change the settings, press the joystick to save the changes before you proceed to another menu or exit the OSD menu. Press the joystick to enter its submenu. • Input Source: To choose an input source from the list of preset modes. • Brightness/Contrast: To access the adjustment sliders of video signals that may be highlighted and shifted to the center position...
... the monitor │ 37 After you change the settings, press the joystick to save the changes before you proceed to another menu or exit the OSD menu. Press the joystick to enter its submenu. • Input Source: To choose an input source from the list of preset modes. • Brightness/Contrast: To access the adjustment sliders of video signals that may be highlighted and shifted to the center position...
Users Guide
Page 42
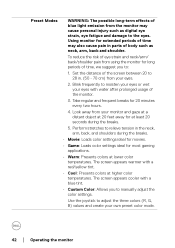
... preset color mode. 42 │ Operating the monitor The screen appears warmer with a red/yellow tint. • Cool: Presents colors at least 20 seconds during the breaks. • Movie: Loads color settings ideal for movies. • Game: Loads color settings ideal for most gaming applications. • Warm: Presents colors at lower color temperatures. Preset Modes WARNING: The possible long-term effects of blue light emission...
... preset color mode. 42 │ Operating the monitor The screen appears warmer with a red/yellow tint. • Cool: Presents colors at least 20 seconds during the breaks. • Movie: Loads color settings ideal for movies. • Game: Loads color settings ideal for most gaming applications. • Warm: Presents colors at lower color temperatures. Preset Modes WARNING: The possible long-term effects of blue light emission...

Users Guide
Page 50
... -side setup. The default setting is locked and not accessible by the user. • Menu + Power Buttons: Both the joystick & Power button are locked and not accessible by the user. • Power Button: Only the Power button is Disable. Alternative Lock Method: You can prevent people from accessing the controls. It also prevents accidental activation in multiple monitors side-by the user. Resets all OSD settings to confirm the configuration. Lock With the control buttons on the monitor locked...
... -side setup. The default setting is locked and not accessible by the user. • Menu + Power Buttons: Both the joystick & Power button are locked and not accessible by the user. • Power Button: Only the Power button is Disable. Alternative Lock Method: You can prevent people from accessing the controls. It also prevents accidental activation in multiple monitors side-by the user. Resets all OSD settings to confirm the configuration. Lock With the control buttons on the monitor locked...

Users Guide
Page 53
LCD Conditioning Helps reduce minor cases of your monitor. Firmware Displays the firmware version of image retention. Operating the monitor │ 53 You can enable this feature by selecting On. You can disable this feature by selecting Off. Depending on your monitor. Enable this feature for best user experience and optimum performance of image retention, the program may take some time to adjust the monitor settings using software on the degree of your computer. DDC/CI DDC/CI (Display Data Channel/Command Interface) allows you to run.
LCD Conditioning Helps reduce minor cases of your monitor. Firmware Displays the firmware version of image retention. Operating the monitor │ 53 You can enable this feature by selecting On. You can disable this feature by selecting Off. Depending on your monitor. Enable this feature for best user experience and optimum performance of image retention, the program may take some time to adjust the monitor settings using software on the degree of your computer. DDC/CI DDC/CI (Display Data Channel/Command Interface) allows you to run.
Users Guide
Page 54
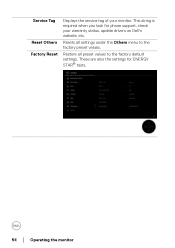
These are also the settings for phone support, check your monitor. Resets all preset values to the factory preset values. Restore all settings under the Others menu to the factory default settings. This string is required when you look for ENERGY STAR® tests. 54 │ Operating the monitor Service Tag Reset Others Factory Reset Displays the service tag of your warranty status, update drivers on Dell's website, etc.
These are also the settings for phone support, check your monitor. Resets all preset values to the factory preset values. Restore all settings under the Others menu to the factory default settings. This string is required when you look for ENERGY STAR® tests. 54 │ Operating the monitor Service Tag Reset Others Factory Reset Displays the service tag of your warranty status, update drivers on Dell's website, etc.
Users Guide
Page 59
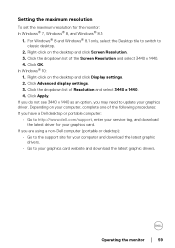
... click Display settings. 2. Click Advanced display settings. 3. If you are using a non-Dell computer (portable or desktop): • Go to the support site for your graphics card website and download the latest graphic drivers. Click OK. Click the dropdown list of the Screen Resolution and select 3440 x 1440. 4. Click the dropdown list of Resolution and select 3440 x 1440. 4. In Windows® 10: 1. Operating the monitor...
... click Display settings. 2. Click Advanced display settings. 3. If you are using a non-Dell computer (portable or desktop): • Go to the support site for your graphics card website and download the latest graphic drivers. Click OK. Click the dropdown list of the Screen Resolution and select 3440 x 1440. 4. Click the dropdown list of Resolution and select 3440 x 1440. 4. In Windows® 10: 1. Operating the monitor...

Users Guide
Page 66
...-test mode, the power LED remains white. 4. If your monitor and computer are properly connected but the monitor screen remains dark, run the monitor self-test by performing the following message will appear: NOTE: The message may be slightly different according to check whether your monitor and reconnect the video cable; Turn off both your computer and the monitor. Turn on the monitor. Troubleshooting WARNING: Before you use the...
...-test mode, the power LED remains white. 4. If your monitor and computer are properly connected but the monitor screen remains dark, run the monitor self-test by performing the following message will appear: NOTE: The message may be slightly different according to check whether your monitor and reconnect the video cable; Turn off both your computer and the monitor. Turn on the monitor. Troubleshooting WARNING: Before you use the...

Users Guide
Page 71
.... • Reset the monitor to factory settings. • Perform monitor self-test feature check to determine if the scrambled screen appears in self-test mode. • Check for bent or broken pins in the video cable connector. Picture color not good • Change the settings of • Do not perform any troubleshooting smoke or sparks steps. • Contact Dell immediately. Picture missing color • Perform monitor self-test feature check. • Ensure...
.... • Reset the monitor to factory settings. • Perform monitor self-test feature check to determine if the scrambled screen appears in self-test mode. • Check for bent or broken pins in the video cable connector. Picture color not good • Change the settings of • Do not perform any troubleshooting smoke or sparks steps. • Contact Dell immediately. Picture missing color • Perform monitor self-test feature check. • Ensure...
Users Guide
Page 72
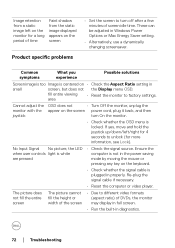
... Input Signal No picture, the LED when user controls light is locked. Cannot adjust the OSD does not • Turn Off the monitor, unplug the monitor with the appear on • Check the Aspect Ratio setting in diagnostics. 72 │ Troubleshooting Ensure the computer is not in the power saving mode by moving the mouse or pressing any key on the keyboard. • Check whether the signal cable is centered on the screen power cord, plug...
... Input Signal No picture, the LED when user controls light is locked. Cannot adjust the OSD does not • Turn Off the monitor, unplug the monitor with the appear on • Check the Aspect Ratio setting in diagnostics. 72 │ Troubleshooting Ensure the computer is not in the power saving mode by moving the mouse or pressing any key on the keyboard. • Check whether the signal cable is centered on the screen power cord, plug...

Users Guide
Page 73
... at HDMI/ When connected to • Unplug the HDMI/DisplayPort/USB DisplayPort/USB some dongle/ Type-C cable from the notebook Universal Serial Bus (USB) specific problems Common symptoms USB interface is not working USB Type-C port does not supply power What you use the USB Type-C cable shipped with the USB-C specification. No video at device, then plug the docking HDMI/ the port, there is no DisplayPort/USB Type-C cable to the video when notebook. The USB Type-C port supports USB 3.2 Gen1...
... at HDMI/ When connected to • Unplug the HDMI/DisplayPort/USB DisplayPort/USB some dongle/ Type-C cable from the notebook Universal Serial Bus (USB) specific problems Common symptoms USB interface is not working USB Type-C port does not supply power What you use the USB Type-C cable shipped with the USB-C specification. No video at device, then plug the docking HDMI/ the port, there is no DisplayPort/USB Type-C cable to the video when notebook. The USB Type-C port supports USB 3.2 Gen1...


