
Monitor Users Guide
Page 3
... contents 7 Product features 9 Identifying parts and controls 10 Front view 10 Back view 11 Side view 12 Bottom view 12 Monitor specifications 14 Resolution specifications 15 Supported video modes 15 Preset display modes 16 Electrical specifications 17 Physical characteristics 18 Environmental characteristics 20 Pin ... interface 25 SuperSpeed USB 5 Gbps (USB 3.2 Gen1 25 USB 3.2 Gen1 (5 Gbps) upstream connector 25 USB 3.2 Gen1 (5 Gbps) downstream connector 26 USB ports 26 LCD monitor quality and pixel policy 27 Ergonomics 27 Handling and moving your display 29 │3
... contents 7 Product features 9 Identifying parts and controls 10 Front view 10 Back view 11 Side view 12 Bottom view 12 Monitor specifications 14 Resolution specifications 15 Supported video modes 15 Preset display modes 16 Electrical specifications 17 Physical characteristics 18 Environmental characteristics 20 Pin ... interface 25 SuperSpeed USB 5 Gbps (USB 3.2 Gen1 25 USB 3.2 Gen1 (5 Gbps) upstream connector 25 USB 3.2 Gen1 (5 Gbps) downstream connector 26 USB ports 26 LCD monitor quality and pixel policy 27 Ergonomics 27 Handling and moving your display 29 │3

Monitor Users Guide
Page 4
...Connecting the USB 3.2 Gen1 (5 Gbps) cable 37 Organizing your cables 37 Securing your monitor using Kensington lock (optional). 38 Removing the monitor stand 39 VESA wall mounting (optional 40 Operating the monitor 41 Power on the monitor 41 Using the joystick control 41 Using the On-Screen Display (OSD) menu 42 ...56 Setting the maximum resolution 60 Using the tilt, swivel, and vertical extension 61 Tilt, swivel 61 Vertical extension 61 Rotating the monitor 62 Rotate clockwise 62 Rotate counterclockwise 63 Adjusting the rotation display settings of your system . . 64 4│
...Connecting the USB 3.2 Gen1 (5 Gbps) cable 37 Organizing your cables 37 Securing your monitor using Kensington lock (optional). 38 Removing the monitor stand 39 VESA wall mounting (optional 40 Operating the monitor 41 Power on the monitor 41 Using the joystick control 41 Using the On-Screen Display (OSD) menu 42 ...56 Setting the maximum resolution 60 Using the tilt, swivel, and vertical extension 61 Tilt, swivel 61 Vertical extension 61 Rotating the monitor 62 Rotate clockwise 62 Rotate counterclockwise 63 Adjusting the rotation display settings of your system . . 64 4│

Monitor Users Guide
Page 6
.... • Always be left unused for an extended period of time. • To avoid electric shock, do not place the monitor inside of the monitor. For example, do not attempt to severe vibration or high impact conditions. For information on the liquid crystal of the display. •...; Do not subject the monitor to remove any cover or touch the inside a car trunk. • Unplug the monitor when it carefully. Safety instructions WARNING: Use of controls, adjustments, or procedures other than those ...
.... • Always be left unused for an extended period of time. • To avoid electric shock, do not place the monitor inside of the monitor. For example, do not attempt to severe vibration or high impact conditions. For information on the liquid crystal of the display. •...; Do not subject the monitor to remove any cover or touch the inside a car trunk. • Unplug the monitor when it carefully. Safety instructions WARNING: Use of controls, adjustments, or procedures other than those ...

Monitor Users Guide
Page 7
Some features may not be optional and may be available in the table below. Display Stand riser Stand base Power cable (varies by country) About your monitor. About your monitor Package contents Your monitor ships with the components shown in certain countries. For more information, see Contact Dell. NOTE: Some items may not ship with the stand. NOTE: If you are attaching a stand that you purchased from any component is missing, contact Dell technical support. If any other source, follow the setup instructions available with your monitor │ 7
Some features may not be optional and may be available in the table below. Display Stand riser Stand base Power cable (varies by country) About your monitor. About your monitor Package contents Your monitor ships with the components shown in certain countries. For more information, see Contact Dell. NOTE: Some items may not ship with the stand. NOTE: If you are attaching a stand that you purchased from any component is missing, contact Dell technical support. If any other source, follow the setup instructions available with your monitor │ 7

Monitor Users Guide
Page 8
DisplayPort 1.2 cable (DisplayPort to DisplayPort, 1.80 meters) VGA cable (Japan only, 1.80 meters) USB 3.2 Gen1 (5 Gbps) upstream cable (enables the USB ports on the monitor, 1.80 meters) • Quick Setup Guide • Safety, Environmental, and Regulatory Information 8 │ About your monitor
DisplayPort 1.2 cable (DisplayPort to DisplayPort, 1.80 meters) VGA cable (Japan only, 1.80 meters) USB 3.2 Gen1 (5 Gbps) upstream cable (enables the USB ports on the monitor, 1.80 meters) • Quick Setup Guide • Safety, Environmental, and Regulatory Information 8 │ About your monitor
Monitor Users Guide
Page 9
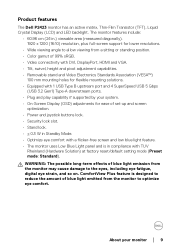
Product features The Dell P2423 monitor has an active matrix, Thin-Film Transistor (TFT), Liquid Crystal Display (LCD) and LED backlight. The monitor features include: • 60.96 cm (24 in.) viewable area (measured diagonally). 1920 x 1200 (16:10) resolution, plus full-screen support...capabilities. • Removable stand and Video Electronics Standards Association (VESA™) 100 mm mounting holes for ease of blue light emitted from the monitor may cause damage to reduce the amount of set-up and screen optimization. • Power and joystick buttons lock. • Security lock ...
Product features The Dell P2423 monitor has an active matrix, Thin-Film Transistor (TFT), Liquid Crystal Display (LCD) and LED backlight. The monitor features include: • 60.96 cm (24 in.) viewable area (measured diagonally). 1920 x 1200 (16:10) resolution, plus full-screen support...capabilities. • Removable stand and Video Electronics Standards Association (VESA™) 100 mm mounting holes for ease of blue light emitted from the monitor may cause damage to reduce the amount of set-up and screen optimization. • Power and joystick buttons lock. • Security lock ...

Monitor Users Guide
Page 10
Blinking white light indicates that the monitor is in Standby Mode. 10 │ About your monitor Identifying parts and controls Front view Label 1 Description Power LED indicator Solid white light indicates that the monitor is turned on and functioning normally.
Blinking white light indicates that the monitor is in Standby Mode. 10 │ About your monitor Identifying parts and controls Front view Label 1 Description Power LED indicator Solid white light indicates that the monitor is turned on and functioning normally.
Monitor Users Guide
Page 11
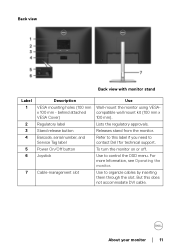
...not accommodate DVI cable. Use to contact Dell for technical support. About your monitor │ 11 Use to organize cables by inserting them through the slot. But this label if you need to control the OSD menu. To turn the monitor on or off. behind attached VESA Cover...serial number, and Service Tag label Power On/Off button Joystick Cable-management slot Use Wall-mount the monitor using VESAcompatible wall mount kit (100 mm x 100 mm). Releases stand from the monitor. Back view Back view with monitor stand Label 1 2 3 4 5 6 7 Description VESA mounting holes (100 mm x 100 mm...
...not accommodate DVI cable. Use to contact Dell for technical support. About your monitor │ 11 Use to organize cables by inserting them through the slot. But this label if you need to control the OSD menu. To turn the monitor on or off. behind attached VESA Cover...serial number, and Service Tag label Power On/Off button Joystick Cable-management slot Use Wall-mount the monitor using VESAcompatible wall mount kit (100 mm x 100 mm). Releases stand from the monitor. Back view Back view with monitor stand Label 1 2 3 4 5 6 7 Description VESA mounting holes (100 mm x 100 mm...

Monitor Users Guide
Page 12
Connect the power cable (shipped with a security lock (security lock not included). Side view Bottom view Bottom view without monitor stand Label 1 2 3 Description Security lock slot (based on Kensington Security Slot™) Power connector DisplayPort Use Secures the monitor with your monitor Connect your computer with the DisplayPort cable (shipped with your monitor). 12 │ About your monitor).
Connect the power cable (shipped with a security lock (security lock not included). Side view Bottom view Bottom view without monitor stand Label 1 2 3 Description Security lock slot (based on Kensington Security Slot™) Power connector DisplayPort Use Secures the monitor with your monitor Connect your computer with the DisplayPort cable (shipped with your monitor). 12 │ About your monitor).

Monitor Users Guide
Page 13
... 7 VGA connector Connect your computer with the VGA cable (shipped with your monitor, for Japan only). 8 SuperSpeed USB Connect the USB cable that came with your monitor) to the USB-upstream port on the monitor and to your computer. *To avoid signal interference, when a wireless USB ...device has been connected to a USB downstream port, it is upstream port connected, you can use the USB connectors on the monitor. 9 SuperSpeed USB Connect your USB 3.2 Gen1 (5 Gbps) device.* 5 Gbps (USB 3.2 Gen1) NOTE: To use these ports, you must connect downstream ...
... 7 VGA connector Connect your computer with the VGA cable (shipped with your monitor, for Japan only). 8 SuperSpeed USB Connect the USB cable that came with your monitor) to the USB-upstream port on the monitor and to your computer. *To avoid signal interference, when a wireless USB ...device has been connected to a USB downstream port, it is upstream port connected, you can use the USB connectors on the monitor. 9 SuperSpeed USB Connect your USB 3.2 Gen1 (5 Gbps) device.* 5 Gbps (USB 3.2 Gen1) NOTE: To use these ports, you must connect downstream ...

Monitor Users Guide
Page 14
Monitor specifications Model Screen type Panel technology Aspect ratio Viewable image Diagonal Width (active area) Height (active area) Total area Pixel pitch Pixel per inch (PPI) Viewing angle Luminance output Contrast ratio Faceplate coating Backlight Response time Color depth Color gamut P2423 Active matrix - TFT LCD In-Plane Switching Technology 16:10 609... the polarizer (Haze 25%, 3H) White LED edgelight system 8 ms (Normal mode) 5 ms (Fast mode) 16.7 million colors sRGB 99% (typical) 14 │ About your monitor
Monitor specifications Model Screen type Panel technology Aspect ratio Viewable image Diagonal Width (active area) Height (active area) Total area Pixel pitch Pixel per inch (PPI) Viewing angle Luminance output Contrast ratio Faceplate coating Backlight Response time Color depth Color gamut P2423 Active matrix - TFT LCD In-Plane Switching Technology 16:10 609... the polarizer (Haze 25%, 3H) White LED edgelight system 8 ms (Normal mode) 5 ms (Fast mode) 16.7 million colors sRGB 99% (typical) 14 │ About your monitor

Monitor Users Guide
Page 15
...port • 4 x SuperSpeed USB 5 Gbps (USB 3.2 Gen1) downstream port Border width (edge of 6.30 mm (Top) monitor to active area) 6.30 mm (Left/Right) 17.80 mm (Bottom) Adjustability Height adjustable stand 150 mm Til t -5°...; Swivel -45° to 45° Pivot -90° to 90° Dell Display Manager Easy Arrange and other key features compatibility Security Security lock slot (cable lock ...range Maximum preset resolution Supported video modes P2423 30 kHz to 83 kHz (automatic) 56 Hz to 76 Hz (automatic) 1920 x 1200 at 60 Hz Model P2423 Video display capabilities (VGA & DVI...
...port • 4 x SuperSpeed USB 5 Gbps (USB 3.2 Gen1) downstream port Border width (edge of 6.30 mm (Top) monitor to active area) 6.30 mm (Left/Right) 17.80 mm (Bottom) Adjustability Height adjustable stand 150 mm Til t -5°...; Swivel -45° to 45° Pivot -90° to 90° Dell Display Manager Easy Arrange and other key features compatibility Security Security lock slot (cable lock ...range Maximum preset resolution Supported video modes P2423 30 kHz to 83 kHz (automatic) 56 Hz to 76 Hz (automatic) 1920 x 1200 at 60 Hz Model P2423 Video display capabilities (VGA & DVI...
Monitor Users Guide
Page 17
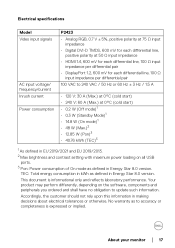
This document is expressed or implied. About your monitor │ 17 Electrical specifications Model Video input signals AC input voltage/ frequency/current Inrush current Power consumption P2423 • Analog RGB, 0.7 V ± 5%, positive polarity at 75 Ω input impedance • Digital DVI-D TMDS, 600 mV for each differential line, positive polarity at 50 &#...
This document is expressed or implied. About your monitor │ 17 Electrical specifications Model Video input signals AC input voltage/ frequency/current Inrush current Power consumption P2423 • Analog RGB, 0.7 V ± 5%, positive polarity at 75 Ω input impedance • Digital DVI-D TMDS, 600 mV for each differential line, positive polarity at 50 &#...
Monitor Users Guide
Page 18
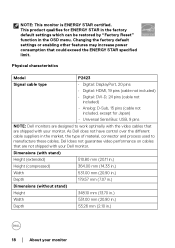
...531.00 mm (20.90 in.) Depth 53.26 mm (2.10 in the OSD menu. Dimensions (with your Dell monitor. NOTE: This monitor is ENERGY STAR certified. As Dell does not have control over the different cable suppliers in the market, the type of material, connector and process ...used to work optimally with the video cables that are shipped with your monitor Physical characteristics Model P2423 Signal cable type • Digital: DisplayPort, ...
...531.00 mm (20.90 in.) Depth 53.26 mm (2.10 in the OSD menu. Dimensions (with your Dell monitor. NOTE: This monitor is ENERGY STAR certified. As Dell does not have control over the different cable suppliers in the market, the type of material, connector and process ...used to work optimally with the video cables that are shipped with your monitor Physical characteristics Model P2423 Signal cable type • Digital: DisplayPort, ...

Monitor Users Guide
Page 19
no cables) Weight of stand assembly Front frame gloss 410.80 mm (16.17 in.) 364.00 mm (14.33 in.) 245.00 mm (9.65 in.) 179.57 mm (7.07 in.) 245.00 mm x 173.00 mm (9.65 in .) 7.71 kg (17.00 lb) 5.56 kg (12.26 lb) 3.52 kg (7.76 lb) 1.71 kg (3.77 lb) Black frame 2-4 gloss units About your monitor │ 19 Stand dimensions Height (extended) Height (compressed) Width Depth Base Weight Weight with packaging Weight with stand assembly and cables Weight without stand assembly (For wall mount or VESA mount considerations - x 6.81 in .
no cables) Weight of stand assembly Front frame gloss 410.80 mm (16.17 in.) 364.00 mm (14.33 in.) 245.00 mm (9.65 in.) 179.57 mm (7.07 in.) 245.00 mm x 173.00 mm (9.65 in .) 7.71 kg (17.00 lb) 5.56 kg (12.26 lb) 3.52 kg (7.76 lb) 1.71 kg (3.77 lb) Black frame 2-4 gloss units About your monitor │ 19 Stand dimensions Height (extended) Height (compressed) Width Depth Base Weight Weight with packaging Weight with stand assembly and cables Weight without stand assembly (For wall mount or VESA mount considerations - x 6.81 in .

Monitor Users Guide
Page 20
... • 163.78 BTU/hour (maximum) • 54.59 BTU/hour (typical) 20 │ About your monitor EPEAT registration varies by country. • RoHS-compliant • TCO Certified & TCO Certified Edge • BFR/PVC Free monitor (excluding external cables) • Arsenic-free glass and Mercury-free for registration status by country. Environmental...
... • 163.78 BTU/hour (maximum) • 54.59 BTU/hour (typical) 20 │ About your monitor EPEAT registration varies by country. • RoHS-compliant • TCO Certified & TCO Certified Edge • BFR/PVC Free monitor (excluding external cables) • Arsenic-free glass and Mercury-free for registration status by country. Environmental...

Monitor Users Guide
Page 21
Pin assignments DisplayPort connector Pin number 1 2 3 4 5 6 7 8 9 10 11 12 13 14 15 16 17 18 19 20 20-pin side of the connected signal cable ML3 (n) GND ML3 (p) ML2 (n) GND ML2 (p) ML1 (n) GND ML1 (p) ML0 (n) GND ML0 (p) GND GND AUX (p) GND AUX (n) Hot Plug Detect Re-PWR +3.3 V DP_PWR About your monitor │ 21
Pin assignments DisplayPort connector Pin number 1 2 3 4 5 6 7 8 9 10 11 12 13 14 15 16 17 18 19 20 20-pin side of the connected signal cable ML3 (n) GND ML3 (p) ML2 (n) GND ML2 (p) ML1 (n) GND ML1 (p) ML0 (n) GND ML0 (p) GND GND AUX (p) GND AUX (n) Hot Plug Detect Re-PWR +3.3 V DP_PWR About your monitor │ 21

Monitor Users Guide
Page 22
HDMI connector Pin number 1 2 3 4 5 6 7 8 9 10 11 12 13 14 15 16 17 18 19 19-pin side of the connected signal cable TMDS DATA 2+ TMDS DATA 2 SHIELD TMDS DATA 2TMDS DATA 1+ TMDS DATA 1 SHIELD TMDS DATA 1TMDS DATA 0+ TMDS DATA 0 SHIELD TMDS DATA 0TMDS CLOCK+ TMDS CLOCK SHIELD TMDS CLOCKCEC Reserved (N.C. on device) DDC CLOCK (SCL) DDC DATA (SDA) DDC/CEC Ground +5 V POWER HOT PLUG DETECT 22 │ About your monitor
HDMI connector Pin number 1 2 3 4 5 6 7 8 9 10 11 12 13 14 15 16 17 18 19 19-pin side of the connected signal cable TMDS DATA 2+ TMDS DATA 2 SHIELD TMDS DATA 2TMDS DATA 1+ TMDS DATA 1 SHIELD TMDS DATA 1TMDS DATA 0+ TMDS DATA 0 SHIELD TMDS DATA 0TMDS CLOCK+ TMDS CLOCK SHIELD TMDS CLOCKCEC Reserved (N.C. on device) DDC CLOCK (SCL) DDC DATA (SDA) DDC/CEC Ground +5 V POWER HOT PLUG DETECT 22 │ About your monitor

Monitor Users Guide
Page 23
About your monitor │ 23 DVI connector Pin number 1 2 3 4 5 6 7 8 9 10 11 12 13 14 15 16 17 18 19 20 21 22 23 24 24-pin side of the connected signal cable TMDS RX2TMDS RX2+ TMDS Ground Floating Floating DDC Clock DDC Data Floating TMDS RX1TMDS RX1+ TMDS Ground Floating Floating +5 V/+3.3 V power Self test Hot Plug Detect TMDS RX0TMDS RX0+ TMDS Ground Floating Floating TMDS Ground TMDS Clock+ TMDS Clock-
About your monitor │ 23 DVI connector Pin number 1 2 3 4 5 6 7 8 9 10 11 12 13 14 15 16 17 18 19 20 21 22 23 24 24-pin side of the connected signal cable TMDS RX2TMDS RX2+ TMDS Ground Floating Floating DDC Clock DDC Data Floating TMDS RX1TMDS RX1+ TMDS Ground Floating Floating +5 V/+3.3 V power Self test Hot Plug Detect TMDS RX0TMDS RX0+ TMDS Ground Floating Floating TMDS Ground TMDS Clock+ TMDS Clock-

Monitor Users Guide
Page 24
you can configure itself and optimize the monitor settings. For more information about changing the monitor settings, see Operating the monitor. 24 │ About your monitor The monitor automatically provides the computer system with its Extended Display Identification Data (EDID) using Display Data Channel (DDC) protocols so that the system can select different ...-Blue GND Se l f-test GND-R GND-G GND-B Computer 5 V/3.3 V GND-sync GND DDC data H-sync V-sync DDC clock Plug and play capability You can install the monitor in any Plug and Play-compatible system. Most...
you can configure itself and optimize the monitor settings. For more information about changing the monitor settings, see Operating the monitor. 24 │ About your monitor The monitor automatically provides the computer system with its Extended Display Identification Data (EDID) using Display Data Channel (DDC) protocols so that the system can select different ...-Blue GND Se l f-test GND-R GND-G GND-B Computer 5 V/3.3 V GND-sync GND DDC data H-sync V-sync DDC clock Plug and play capability You can install the monitor in any Plug and Play-compatible system. Most...


