
Monitor Users Guide
Page 3
... Safety instructions 6 About your monitor 7 Package contents 7 Product features 9 Identifying parts and controls 10 Front view 10 Back view 11 Side view 12 Bottom view 12 Monitor specifications 14 Resolution specifications 15 Supported video modes 15 Preset display modes 16 Electrical specifications 17 Physical characteristics 18 Environmental characteristics 20 Pin assignments 21 Plug and play capability 24 Universal Serial Bus (USB) interface 25 SuperSpeed USB 5 Gbps (USB 3.2 Gen1 25 USB 3.2 Gen1 (5 Gbps) upstream connector 25 USB...
... Safety instructions 6 About your monitor 7 Package contents 7 Product features 9 Identifying parts and controls 10 Front view 10 Back view 11 Side view 12 Bottom view 12 Monitor specifications 14 Resolution specifications 15 Supported video modes 15 Preset display modes 16 Electrical specifications 17 Physical characteristics 18 Environmental characteristics 20 Pin assignments 21 Plug and play capability 24 Universal Serial Bus (USB) interface 25 SuperSpeed USB 5 Gbps (USB 3.2 Gen1 25 USB 3.2 Gen1 (5 Gbps) upstream connector 25 USB...

Monitor Users Guide
Page 4
... stand 32 Connecting your monitor 35 Connecting the DisplayPort (DisplayPort to DisplayPort) cable. . 35 Connecting the HDMI cable (optional 36 Connecting the VGA cable (optional 36 Connecting the DVI cable (optional 36 Connecting the USB 3.2 Gen1 (5 Gbps) cable 37 Organizing your cables 37 Securing your monitor using Kensington lock (optional). 38 Removing the monitor stand 39 VESA wall mounting (optional 40 Operating the monitor 41 Power on the monitor 41 Using the joystick control 41 Using the On-Screen Display (OSD) menu 42 Accessing the Menu Launcher 42 Using...
... stand 32 Connecting your monitor 35 Connecting the DisplayPort (DisplayPort to DisplayPort) cable. . 35 Connecting the HDMI cable (optional 36 Connecting the VGA cable (optional 36 Connecting the DVI cable (optional 36 Connecting the USB 3.2 Gen1 (5 Gbps) cable 37 Organizing your cables 37 Securing your monitor using Kensington lock (optional). 38 Removing the monitor stand 39 VESA wall mounting (optional 40 Operating the monitor 41 Power on the monitor 41 Using the joystick control 41 Using the On-Screen Display (OSD) menu 42 Accessing the Menu Launcher 42 Using...
Monitor Users Guide
Page 9
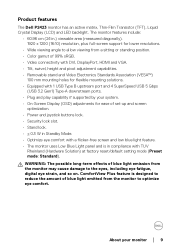
... Solution) at factory reset/default setting mode (Preset mode: Standard). Product features The Dell P2423 monitor has an active matrix, Thin-Film Transistor (TFT), Liquid Crystal Display (LCD) and LED backlight. About your system. • On-Screen Display (OSD) adjustments for ease of set-up and screen optimization. • Power and joystick buttons lock. • Security lock slot. • Stand lock. • < 0.3 W in Standby Mode. • Optimize eye comfort with a flicker-free screen and low blue light feature. • The monitor uses Low Blue Light panel and is designed...
... Solution) at factory reset/default setting mode (Preset mode: Standard). Product features The Dell P2423 monitor has an active matrix, Thin-Film Transistor (TFT), Liquid Crystal Display (LCD) and LED backlight. About your system. • On-Screen Display (OSD) adjustments for ease of set-up and screen optimization. • Power and joystick buttons lock. • Security lock slot. • Stand lock. • < 0.3 W in Standby Mode. • Optimize eye comfort with a flicker-free screen and low blue light feature. • The monitor uses Low Blue Light panel and is designed...
Monitor Users Guide
Page 11
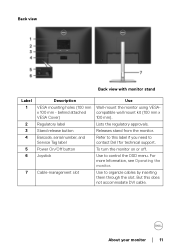
... monitor. Use to organize cables by inserting them through the slot. Lists the regulatory approvals. Back view Back view with monitor stand Label 1 2 3 4 5 6 7 Description VESA mounting holes (100 mm x 100 mm - To turn the monitor on or off. But this label if you need to control the OSD menu. behind attached VESA Cover) Regulatory label Stand release button Barcode, serial number, and Service Tag label Power On/Off button Joystick Cable-management slot Use Wall-mount the monitor using VESAcompatible wall mount...
... monitor. Use to organize cables by inserting them through the slot. Lists the regulatory approvals. Back view Back view with monitor stand Label 1 2 3 4 5 6 7 Description VESA mounting holes (100 mm x 100 mm - To turn the monitor on or off. But this label if you need to control the OSD menu. behind attached VESA Cover) Regulatory label Stand release button Barcode, serial number, and Service Tag label Power On/Off button Joystick Cable-management slot Use Wall-mount the monitor using VESAcompatible wall mount...

Monitor Users Guide
Page 13
... avoid signal interference, when a wireless USB device has been connected to a USB downstream port, it is NOT recommended to connect any other USB devices to the computer. 4 HDMI port Connect your computer with the HDMI cable. 5 Stand lock feature To lock the stand to the monitor using a M3 x 6 mm screw (screw not included). 6 DVI port Connect your computer with the DVI cable. 7 VGA connector Connect your computer with the VGA cable (shipped with your monitor, for Japan only). 8 SuperSpeed USB Connect the USB cable that...
... avoid signal interference, when a wireless USB device has been connected to a USB downstream port, it is NOT recommended to connect any other USB devices to the computer. 4 HDMI port Connect your computer with the HDMI cable. 5 Stand lock feature To lock the stand to the monitor using a M3 x 6 mm screw (screw not included). 6 DVI port Connect your computer with the DVI cable. 7 VGA connector Connect your computer with the VGA cable (shipped with your monitor, for Japan only). 8 SuperSpeed USB Connect the USB cable that...

Monitor Users Guide
Page 15
...° to 90° Dell Display Manager Easy Arrange and other key features compatibility Security Security lock slot (cable lock sold separately) Resolution specifications Model Horizontal scan range Vertical scan range Maximum preset resolution Supported video modes P2423 30 kHz to 83 kHz (automatic) 56 Hz to 76 Hz (automatic) 1920 x 1200 at 60 Hz Model P2423 Video display capabilities (VGA & DVI 480p, 576p, 720p, 1080i, 1080p, FHD & HDMI & DisplayPort playback) About your monitor │ 15
...° to 90° Dell Display Manager Easy Arrange and other key features compatibility Security Security lock slot (cable lock sold separately) Resolution specifications Model Horizontal scan range Vertical scan range Maximum preset resolution Supported video modes P2423 30 kHz to 83 kHz (automatic) 56 Hz to 76 Hz (automatic) 1920 x 1200 at 60 Hz Model P2423 Video display capabilities (VGA & DVI 480p, 576p, 720p, 1080i, 1080p, FHD & HDMI & DisplayPort playback) About your monitor │ 15
Monitor Users Guide
Page 18
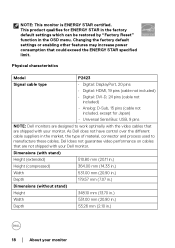
... characteristics Model P2423 Signal cable type • Digital: DisplayPort, 20 pins • Digital: HDMI, 19 pins (cable not included) • Digital: DVI-D, 24 pins (cable not included) • Analog: D-Sub, 15 pins (cable not included, except for ENERGY STAR in the factory default settings which can be restored by "Factory Reset" function in the OSD menu. As Dell does not have control over the different cable suppliers in .) 18 │ About your Dell monitor. Changing the factory default settings...
... characteristics Model P2423 Signal cable type • Digital: DisplayPort, 20 pins • Digital: HDMI, 19 pins (cable not included) • Digital: DVI-D, 24 pins (cable not included) • Analog: D-Sub, 15 pins (cable not included, except for ENERGY STAR in the factory default settings which can be restored by "Factory Reset" function in the OSD menu. As Dell does not have control over the different cable suppliers in .) 18 │ About your Dell monitor. Changing the factory default settings...

Monitor Users Guide
Page 32
... screw handle flat within the recess. 32 │ Setting up the monitor Attaching the stand NOTE: The stand is not installed at the factory when shipped. The appearance of illustration only. If you are used for attaching the stand that you purchased from the packaging cushion. To attach the monitor stand: 1. Remove the stand base and stand riser from any other source, follow the setup instructions available with your monitor. Setting...
... screw handle flat within the recess. 32 │ Setting up the monitor Attaching the stand NOTE: The stand is not installed at the factory when shipped. The appearance of illustration only. If you are used for attaching the stand that you purchased from the packaging cushion. To attach the monitor stand: 1. Remove the stand base and stand riser from any other source, follow the setup instructions available with your monitor. Setting...
Monitor Users Guide
Page 35
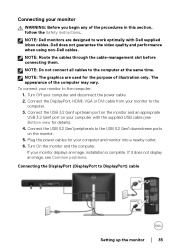
... computer. Turn Off your computer with Dell supplied inbox cables. NOTE: The graphics are designed to work optimally with the supplied USB cable (see Common problems. Connecting the DisplayPort (DisplayPort to DisplayPort) cable Setting up the monitor │ 35 Connect the USB 3.2 Gen1 upstream port on the monitor and an appropriate USB 3.2 Gen1 port on the monitor. 5. Connect the USB 3.2 Gen1 peripherals to the USB 3.2 Gen1 downstream ports on your computer and disconnect the power cable. 2. NOTE...
... computer. Turn Off your computer with Dell supplied inbox cables. NOTE: The graphics are designed to work optimally with the supplied USB cable (see Common problems. Connecting the DisplayPort (DisplayPort to DisplayPort) cable Setting up the monitor │ 35 Connect the USB 3.2 Gen1 upstream port on the monitor and an appropriate USB 3.2 Gen1 port on the monitor. 5. Connect the USB 3.2 Gen1 peripherals to the USB 3.2 Gen1 downstream ports on your computer and disconnect the power cable. 2. NOTE...
Monitor Users Guide
Page 48
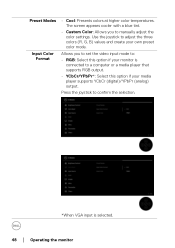
.... *When VGA input is connected to manually adjust the color settings. Allows you to a computer or a media player that supports RGB output. • YCbCr/YPbPr*: Select this option if your own preset color mode. Preset Modes Input Color Format • Cool: Presents colors at higher color temperatures. Use the joystick to : • RGB: Select this option if your media player supports YCbCr (digital)/YPbPr (analog) output. The screen appears cooler with a blue tint...
.... *When VGA input is connected to manually adjust the color settings. Allows you to a computer or a media player that supports RGB output. • YCbCr/YPbPr*: Select this option if your own preset color mode. Preset Modes Input Color Format • Cool: Presents colors at higher color temperatures. Use the joystick to : • RGB: Select this option if your media player supports YCbCr (digital)/YPbPr (analog) output. The screen appears cooler with a blue tint...

Monitor Users Guide
Page 49
... is available only when you select Movie or Game preset mode. NOTE: The feature is only available for VGA input. Aspect Ratio Horizontal Position Vertical Position Adjusts the image ratio to the factory settings. Operating the monitor │ 49 This feature can shift the color of the video image. Move the joystick to adjust the hue level from '0' to green or purple. Resets your monitor's color settings to 16:10, 4:3, or 5:4.
... is available only when you select Movie or Game preset mode. NOTE: The feature is only available for VGA input. Aspect Ratio Horizontal Position Vertical Position Adjusts the image ratio to the factory settings. Operating the monitor │ 49 This feature can shift the color of the video image. Move the joystick to adjust the hue level from '0' to green or purple. Resets your monitor's color settings to 16:10, 4:3, or 5:4.

Monitor Users Guide
Page 52
... unlock, move and hold the joystick up/ down /left /right for 4 seconds to set the lock options via the pop-up menu. Resets all OSD settings to confirm the configuration. Reset Menu • Menu Buttons: All joystick functions are locked and not accessible by the user. • Power Button: Only the Power button is Disable. The default setting is locked and not accessible by the user. • Menu + Power Buttons: Both the joystick & Power button are locked and...
... unlock, move and hold the joystick up/ down /left /right for 4 seconds to set the lock options via the pop-up menu. Resets all OSD settings to confirm the configuration. Reset Menu • Menu Buttons: All joystick functions are locked and not accessible by the user. • Power Button: Only the Power button is Disable. The default setting is locked and not accessible by the user. • Menu + Power Buttons: Both the joystick & Power button are locked and...

Monitor Users Guide
Page 55
... phone support, check your monitor. Resets all settings under the Others menu to end the testing process. You can enable this feature by selecting On. Service Tag Sel f- Initiates the following self-diagnostic process: 1. The color of your warranty status, update drivers on the degree of image retention. Operating the monitor │ 55 Diagnostic Reset Others Displays the service tag string of the screen changes to red. 4. Press...
... phone support, check your monitor. Resets all settings under the Others menu to end the testing process. You can enable this feature by selecting On. Service Tag Sel f- Initiates the following self-diagnostic process: 1. The color of your warranty status, update drivers on the degree of image retention. Operating the monitor │ 55 Diagnostic Reset Others Displays the service tag string of the screen changes to red. 4. Press...
Monitor Users Guide
Page 60
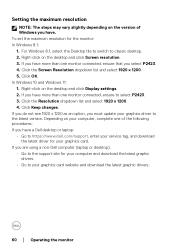
... one monitor connected, ensure that you select P2423. 4. Click the Screen Resolution dropdown list and select 1920 x 1200. 5. Setting the maximum resolution NOTE: The steps may vary slightly depending on the version of the following procedures: If you have a Dell desktop or laptop: • Go to https://www.dell.com/support, enter your service tag, and download the latest driver for your graphics card...
... one monitor connected, ensure that you select P2423. 4. Click the Screen Resolution dropdown list and select 1920 x 1200. 5. Setting the maximum resolution NOTE: The steps may vary slightly depending on the version of the following procedures: If you have a Dell desktop or laptop: • Go to https://www.dell.com/support, enter your service tag, and download the latest driver for your graphics card...

Monitor Users Guide
Page 65
... f-test Your monitor provides a self-test feature that allows you begin any of the procedures in self-test mode, the power LED remains white. 4. Troubleshooting WARNING: Before you to the connected input signal. then turn On both your computer and the monitor. Turn on the monitor. If your monitor screen remains blank after you use the previous procedure, check your video controller and computer, because your monitor and reconnect the video cable;
... f-test Your monitor provides a self-test feature that allows you begin any of the procedures in self-test mode, the power LED remains white. 4. Troubleshooting WARNING: Before you to the connected input signal. then turn On both your computer and the monitor. Turn on the monitor. If your monitor screen remains blank after you use the previous procedure, check your video controller and computer, because your monitor and reconnect the video cable;

Monitor Users Guide
Page 66
... the video cable connecting the monitor and the computer is properly connected and secure. • Verify that the power outlet is functioning properly using any other electrical equipment. • Ensure that the power button is pressed ful l y. • Ensure that the correct input source is selected in the Input Source menu. Picture is fuzzy, • Perform Auto Adjust via OSD. • Eliminate video extension cables. • Reset the monitor to factory settings. • Change the video resolution...
... the video cable connecting the monitor and the computer is properly connected and secure. • Verify that the power outlet is functioning properly using any other electrical equipment. • Ensure that the power button is pressed ful l y. • Ensure that the correct input source is selected in the Input Source menu. Picture is fuzzy, • Perform Auto Adjust via OSD. • Eliminate video extension cables. • Reset the monitor to factory settings. • Change the video resolution...
Monitor Users Guide
Page 67
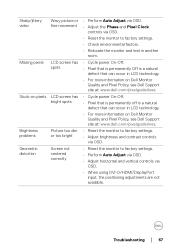
...; Cycle power On-Off. • Pixel that is permanently off is a natural defect that can occur in LCD technology. • For more information on Dell Monitor Quality and Pixel Policy, see Dell Support site at: www.dell.com/pixelguidelines. • Reset the monitor to factory settings. • Adjust brightness and contrast controls via OSD. • Reset the monitor to factory settings. • Perform Auto Adjust via OSD. • Adjust horizontal and vertical controls via OSD. • When using DVI-D/HDMI/DisplayPort input, the positioning adjustments are...
...; Cycle power On-Off. • Pixel that is permanently off is a natural defect that can occur in LCD technology. • For more information on Dell Monitor Quality and Pixel Policy, see Dell Support site at: www.dell.com/pixelguidelines. • Reset the monitor to factory settings. • Adjust brightness and contrast controls via OSD. • Reset the monitor to factory settings. • Perform Auto Adjust via OSD. • Adjust horizontal and vertical controls via OSD. • When using DVI-D/HDMI/DisplayPort input, the positioning adjustments are...

Monitor Users Guide
Page 68
... safe mode. Synchronization Screen is secure. • Reset the monitor to factory settings. • Perform monitor self-test feature check (see SelfDiagnostic). • When using DVI-D/HDMI/DisplayPort input, the Pixel Clock and Phase adjustments are not available. or more lines • Perform Auto Adjust via OSD. • Adjust the Phase and Pixel Clock controls via OSD. • Perform monitor self-test feature check (see Self-test) to factory settings. Intermittent problems Monitor • Ensure that the video cable connecting...
... safe mode. Synchronization Screen is secure. • Reset the monitor to factory settings. • Perform monitor self-test feature check (see SelfDiagnostic). • When using DVI-D/HDMI/DisplayPort input, the Pixel Clock and Phase adjustments are not available. or more lines • Perform Auto Adjust via OSD. • Adjust the Phase and Pixel Clock controls via OSD. • Perform monitor self-test feature check (see Self-test) to factory settings. Intermittent problems Monitor • Ensure that the video cable connecting...

Monitor Users Guide
Page 69
... Windows Power Options or Mac Energy Saver setting. • Alternatively, use a dynamically changing screensaver. • Change the Response Time in the Display menu OSD to turn off after a few minutes of the Preset Modes in the Color menu OSD depending on the application. • Adjust the R/G/B values under Custom Color in the Color menu OSD. • Change the Input Color Format to RGB or YCbCr/YPbPr in the Color settings OSD. • Run the built-in the video cable connector...
... Windows Power Options or Mac Energy Saver setting. • Alternatively, use a dynamically changing screensaver. • Change the Response Time in the Display menu OSD to turn off after a few minutes of the Preset Modes in the Color menu OSD depending on the application. • Adjust the R/G/B values under Custom Color in the Color menu OSD. • Change the Input Color Format to RGB or YCbCr/YPbPr in the Color settings OSD. • Run the built-in the video cable connector...

Monitor Users Guide
Page 70
... Display menu OSD. Product specific problems Common symptoms What you experience Possible solutions Screen image is too Image is centered on the screen power cord, plug it back, and then joystick turn On the monitor. • Check whether the OSD menu is locked. No input signal No picture, the LED when user controls light is white are pressed • Check the signal source. Re-plug the signal cable if necessary. • Reset the computer or video player. fill entire viewing area • Reset the monitor to different video...
... Display menu OSD. Product specific problems Common symptoms What you experience Possible solutions Screen image is too Image is centered on the screen power cord, plug it back, and then joystick turn On the monitor. • Check whether the OSD menu is locked. No input signal No picture, the LED when user controls light is white are pressed • Check the signal source. Re-plug the signal cable if necessary. • Reset the computer or video player. fill entire viewing area • Reset the monitor to different video...


