
Users Guide
Page 3
Contents About your monitor 6 Package contents 6 Product features 8 Identifying parts and controls 9 Front view 9 Back view 10 Side view 11 Bottom view 12 Monitor specifications 13 Resolution specifications 14 Supported video modes 14 Preset display modes 15 Electrical specifications 15 Physical characteristics 16 Environmental characteristics 17 Power management modes 18 Plug and play capability 24 LCD monitor quality and pixel policy 24 Maintenance guidelines 24 Cleaning your monitor 24 Setting up the monitor 25 Attaching the stand 25 3
Contents About your monitor 6 Package contents 6 Product features 8 Identifying parts and controls 9 Front view 9 Back view 10 Side view 11 Bottom view 12 Monitor specifications 13 Resolution specifications 14 Supported video modes 14 Preset display modes 15 Electrical specifications 15 Physical characteristics 16 Environmental characteristics 17 Power management modes 18 Plug and play capability 24 LCD monitor quality and pixel policy 24 Maintenance guidelines 24 Cleaning your monitor 24 Setting up the monitor 25 Attaching the stand 25 3

Users Guide
Page 4
Connecting your monitor 27 Connecting the DP and USB 3.0 cable 27 Organizing cables 28 Removing the stand 29 Wall mounting (optional 30 Operating your monitor 31 Power on the monitor 31 Using the control buttons 32 OSD controls 33 Using the On-Screen Display (OSD) menu 34 Accessing the OSD menu 34 Menu and Power button lock 45 OSD warning messages 47 Setting up your monitor 50 Setting the maximum resolution 50 If you have a Dell desktop or a Dell portable computer with internet access 50 If you...
Connecting your monitor 27 Connecting the DP and USB 3.0 cable 27 Organizing cables 28 Removing the stand 29 Wall mounting (optional 30 Operating your monitor 31 Power on the monitor 31 Using the control buttons 32 OSD controls 33 Using the On-Screen Display (OSD) menu 34 Accessing the OSD menu 34 Menu and Power button lock 45 OSD warning messages 47 Setting up your monitor 50 Setting the maximum resolution 50 If you have a Dell desktop or a Dell portable computer with internet access 50 If you...

Users Guide
Page 8
...;Stand lock. ∞∞Capability to switch from the monitor to optimize eye comfort. 8 │ About your system. ∞∞On-Screen Display (OSD) adjustments for ease of 99% sRGB. ∞∞High Dynamic Contrast Ratio. ∞∞Tilt, swivel, height, and rotate adjustment capabilities. ∞∞Removable stand and Video Electronics Standards Association (VESA™) 100 mm mounting holes for flexible mounting solutions. ∞∞Digital connectivity with DisplayPort and HDMI...
...;Stand lock. ∞∞Capability to switch from the monitor to optimize eye comfort. 8 │ About your system. ∞∞On-Screen Display (OSD) adjustments for ease of 99% sRGB. ∞∞High Dynamic Contrast Ratio. ∞∞Tilt, swivel, height, and rotate adjustment capabilities. ∞∞Removable stand and Video Electronics Standards Association (VESA™) 100 mm mounting holes for flexible mounting solutions. ∞∞Digital connectivity with DisplayPort and HDMI...

Users Guide
Page 10
... Back View with monitor stand Label Description 1 Cable management slot 2 VESA mounting holes (behind VESA cover) 3 Regulatory information label 4 Stand release button 5 Regulatory label (including Barcode serial number and Service Tag label) Use Use to contact Dell for Korea) 080-200-3800 Q40G024N-700-XXA R-41018660 www.bis.gov.in your computer and access warranty information. 10 │ About your monitor Lists the regulatory approvals. Back view 1 2 3 4 5 DELL P2421D Flat Panel Monitor /Monitor Plano Panel...
... Back View with monitor stand Label Description 1 Cable management slot 2 VESA mounting holes (behind VESA cover) 3 Regulatory information label 4 Stand release button 5 Regulatory label (including Barcode serial number and Service Tag label) Use Use to contact Dell for Korea) 080-200-3800 Q40G024N-700-XXA R-41018660 www.bis.gov.in your computer and access warranty information. 10 │ About your monitor Lists the regulatory approvals. Back view 1 2 3 4 5 DELL P2421D Flat Panel Monitor /Monitor Plano Panel...

Users Guide
Page 12
...view without monitor stand Label Description Use 1 Power connector Connect the power cable (shipped with your monitor). 2 Security-lock slot Secure your monitor using a security lock (purchased separately) to prevent unauthorized movement of your monitor. 3 Stand lock feature To lock the stand to enable the USB ports on your monitor. 7 USB 2.0 downstream ports x 2 Connect your monitor NOTE: To use this port, you must connect the USB upstream cable (shipped with your monitor). 6 USB 3.0 Connect the USB cable from this port to your upstream port computer to the monitor using...
...view without monitor stand Label Description Use 1 Power connector Connect the power cable (shipped with your monitor). 2 Security-lock slot Secure your monitor using a security lock (purchased separately) to prevent unauthorized movement of your monitor. 3 Stand lock feature To lock the stand to enable the USB ports on your monitor. 7 USB 2.0 downstream ports x 2 Connect your monitor NOTE: To use this port, you must connect the USB upstream cable (shipped with your monitor). 6 USB 3.0 Connect the USB cable from this port to your upstream port computer to the monitor using...

Users Guide
Page 18
VESA Modes Normal operation Horizontal Vertical Sync Sync Active Active Video Active Power Indicator White Active-off Inactive mode Switch off mode can be achieved by "Factory Reset" function in the OSD menu. This product qualifies for ENERGY STAR in the factory default settings which can only be restored by disconnecting the power cable from the keyboard, mouse or other features may perform differently, depending on the software, components and peripherals you have...
VESA Modes Normal operation Horizontal Vertical Sync Sync Active Active Video Active Power Indicator White Active-off Inactive mode Switch off mode can be achieved by "Factory Reset" function in the OSD menu. This product qualifies for ENERGY STAR in the factory default settings which can only be restored by disconnecting the power cable from the keyboard, mouse or other features may perform differently, depending on the software, components and peripherals you have...

Users Guide
Page 36
... Source HDMI Color Auto Select On Display Reset Input Source Menu Personalize Others DP HDMI Auto Select Reset Input Source Color Select DP input when you are using the HDMI connector. Select HDMI input when you are using the DP connector. Dell 24 Monitor Brightness / Contrast Input Source Color Display Menu Personalize Others Preset Modes Input Color Format Reset Color Standard RGB 36 │ Operating your monitor. Push to adjust the color setting mode. Input Source Use the input source menu to select between the different video signals that may be connected...
... Source HDMI Color Auto Select On Display Reset Input Source Menu Personalize Others DP HDMI Auto Select Reset Input Source Color Select DP input when you are using the HDMI connector. Select HDMI input when you are using the DP connector. Dell 24 Monitor Brightness / Contrast Input Source Color Display Menu Personalize Others Preset Modes Input Color Format Reset Color Standard RGB 36 │ Operating your monitor. Push to adjust the color setting mode. Input Source Use the input source menu to select between the different video signals that may be connected...
Users Guide
Page 37
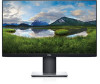
.../back/shoulders pain from using the monitor for long periods of blue light emitted from the list. ∞∞Standard: Loads the monitor's default color settings. This is the default preset mode. ∞∞ComfortView: Decreases the level of time, we suggest you can choose Standard, Comfortview, Movie, Game, Warm, Cool, or Custom color from the screen to make viewing more comfortable for at...
.../back/shoulders pain from using the monitor for long periods of blue light emitted from the list. ∞∞Standard: Loads the monitor's default color settings. This is the default preset mode. ∞∞ComfortView: Decreases the level of time, we suggest you can choose Standard, Comfortview, Movie, Game, Warm, Cool, or Custom color from the screen to make viewing more comfortable for at...
Users Guide
Page 38
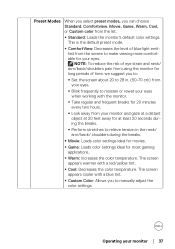
...;∞RGB: Select this option if your monitor is connected to a computer or DVD player using the HDMI cable. ∞∞YPbPr: Select this option if your DVD player supports only YPbPr output. NOTE: Hue adjustment is used to adjust the desired flesh tone color. Press the and buttons to adjust the three colors (R, G, B) values and create your monitor Dell 24 Monitor Brightness / Contrast Input Source Color Display Menu Personalize Others Preset Modes Input Color Format Reset Color RGB YPbPr...
...;∞RGB: Select this option if your monitor is connected to a computer or DVD player using the HDMI cable. ∞∞YPbPr: Select this option if your DVD player supports only YPbPr output. NOTE: Hue adjustment is used to adjust the desired flesh tone color. Press the and buttons to adjust the three colors (R, G, B) values and create your monitor Dell 24 Monitor Brightness / Contrast Input Source Color Display Menu Personalize Others Preset Modes Input Color Format Reset Color RGB YPbPr...

Users Guide
Page 39
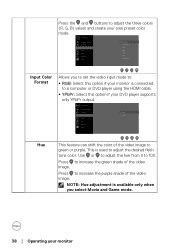
.... Dell 24 Monitor Brightness / Contrast Input Source Color Display Menu Personalize Others Aspect Ratio Sharpness Response Time Reset Display Wide 16:9 50 Normal Aspect Ratio Adjusts the image ratio to increase the monochrome appearance of the video image. Response Time User can make the image look sharper or softer. Use or to adjust the saturation from 0 to restore default display settings. Allows your monitor │ 39 Saturation Reset Color Display This feature can adjust the color saturation of the video image. Reset Display Select...
.... Dell 24 Monitor Brightness / Contrast Input Source Color Display Menu Personalize Others Aspect Ratio Sharpness Response Time Reset Display Wide 16:9 50 Normal Aspect Ratio Adjusts the image ratio to increase the monochrome appearance of the video image. Response Time User can make the image look sharper or softer. Use or to adjust the saturation from 0 to restore default display settings. Allows your monitor │ 39 Saturation Reset Color Display This feature can adjust the color saturation of the video image. Reset Display Select...
Users Guide
Page 43
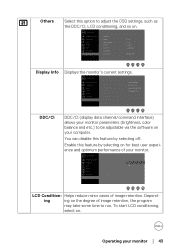
.... Dell 24 Monitor Brightness / Contrast Input Source Color Display Menu Personalize Others Display Info DDC/CI LCD Conditioning Firmware Service Tag Reset Others Factory Reset Model: Dell P2421D Input Source: DP Current: 2560x1440, 60Hz DP Capability: DP 1.2 DDC/CI DDC/CI (display data channel/command interface) allows your monitor. You can disable this option to adjust the OSD settings, such as the DDC/CI, LCD conditioning, and so on for best user experience and optimum performance of image retention. Depend- To start LCD...
.... Dell 24 Monitor Brightness / Contrast Input Source Color Display Menu Personalize Others Display Info DDC/CI LCD Conditioning Firmware Service Tag Reset Others Factory Reset Model: Dell P2421D Input Source: DP Current: 2560x1440, 60Hz DP Capability: DP 1.2 DDC/CI DDC/CI (display data channel/command interface) allows your monitor. You can disable this option to adjust the OSD settings, such as the DDC/CI, LCD conditioning, and so on for best user experience and optimum performance of image retention. Depend- To start LCD...
Users Guide
Page 45
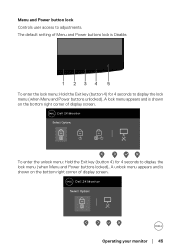
... enter the unlock menu: Hold the Exit key (button 4) for 4 seconds to display the lock menu (when Menu and Power buttons unlocked), A lock menu appears and is shown on the bottom right corner of display screen. Dell 24 Monitor Select Option: Operating your monitor │ 45 Menu and Power button lock Controls user access to display the lock menu (when Menu and Power buttons locked), A unlock menu appears and is shown on the bottom right corner of display screen. The default setting of Menu and Power buttons lock is Disable. 1 234...
... enter the unlock menu: Hold the Exit key (button 4) for 4 seconds to display the lock menu (when Menu and Power buttons unlocked), A lock menu appears and is shown on the bottom right corner of display screen. Dell 24 Monitor Select Option: Operating your monitor │ 45 Menu and Power button lock Controls user access to display the lock menu (when Menu and Power buttons locked), A unlock menu appears and is shown on the bottom right corner of display screen. The default setting of Menu and Power buttons lock is Disable. 1 234...

Users Guide
Page 50
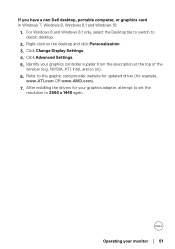
....dell.com/support, enter your computer's Service Tag, and download the latest driver for your graphics card. Right-click on your computer, complete one of the Screen Resolution and select 2560 x 1440. 4. Depending on the desktop and click Screen Resolution. 3. After installing the drivers for your monitor NOTE: If you are unable to set the resolution to 2560 x 1440, please contact Dell to your monitor Setting the maximum resolution...
....dell.com/support, enter your computer's Service Tag, and download the latest driver for your graphics card. Right-click on your computer, complete one of the Screen Resolution and select 2560 x 1440. 4. Depending on the desktop and click Screen Resolution. 3. After installing the drivers for your monitor NOTE: If you are unable to set the resolution to 2560 x 1440, please contact Dell to your monitor Setting the maximum resolution...
Users Guide
Page 51
... to switch to 2560 x 1440 again. Refer to the graphic card provider website for updated driver (for your monitor │ 51 Operating your graphics adapter, attempt to set the resolution to classic desktop. 2. NVIDIA, ATI, Intel, and so on the desktop and click Personalization. 3. After installing the drivers for example, www.ATI.com OR www.AMD.com). 7. Click Advanced Settings. 5. Click Change Display Settings...
... to switch to 2560 x 1440 again. Refer to the graphic card provider website for updated driver (for your monitor │ 51 Operating your graphics adapter, attempt to set the resolution to classic desktop. 2. NVIDIA, ATI, Intel, and so on the desktop and click Personalization. 3. After installing the drivers for example, www.ATI.com OR www.AMD.com). 7. Click Advanced Settings. 5. Click Change Display Settings...

Users Guide
Page 56
... the Exit key (button 4) for 4 seconds to enter the OSD lock/ unlock menu. 56 │ Troubleshooting If your monitor remains dark after you experience is in self-test mode. 1 234 5 To run the built-in diagnostics only when the video cable is unplugged and the monitor is an inherent problem with your monitor, or with your monitor and reconnect the video cable; Turn Off your computer and video card.
... the Exit key (button 4) for 4 seconds to enter the OSD lock/ unlock menu. 56 │ Troubleshooting If your monitor remains dark after you experience is in self-test mode. 1 234 5 To run the built-in diagnostics only when the video cable is unplugged and the monitor is an inherent problem with your monitor, or with your monitor and reconnect the video cable; Turn Off your computer and video card.

Users Guide
Page 58
... the Input Source menu. ∞∞Increase brightness and contrast controls using the OSD. ∞∞Perform monitor self-test feature check. ∞∞Check for bent or broken pins in the video cable connector. ∞∞Run the built-in diagnostics. ∞∞Ensure that the correct input source is selected via the Input Source menu. ∞∞Eliminate video extension cables. ∞∞Reset the monitor to Factory Settings (Factory Reset). ∞∞Change the video resolution to...
... the Input Source menu. ∞∞Increase brightness and contrast controls using the OSD. ∞∞Perform monitor self-test feature check. ∞∞Check for bent or broken pins in the video cable connector. ∞∞Run the built-in diagnostics. ∞∞Ensure that the correct input source is selected via the Input Source menu. ∞∞Eliminate video extension cables. ∞∞Reset the monitor to Factory Settings (Factory Reset). ∞∞Change the video resolution to...

Users Guide
Page 59
...;Reset the monitor to Factory Settings (Factory Reset). ∞∞Adjust horizontal & vertical controls via OSD. Intermittent Problems ∞∞Ensure that the video cable connecting the monitor to the computer is connected properly and is secure. ∞∞Check for bent or broken pins in the video cable connector. Missing Color ∞∞Perform monitor self-test feature check. ∞∞Ensure that can occur in LCD technology. ∞∞For more information on Dell Monitor...
...;Reset the monitor to Factory Settings (Factory Reset). ∞∞Adjust horizontal & vertical controls via OSD. Intermittent Problems ∞∞Ensure that the video cable connecting the monitor to the computer is connected properly and is secure. ∞∞Check for bent or broken pins in the video cable connector. Missing Color ∞∞Perform monitor self-test feature check. ∞∞Ensure that can occur in LCD technology. ∞∞For more information on Dell Monitor...

Users Guide
Page 60
... Color settings OSD. ∞∞Change the Input Color Format to RGB or YPbPr in the Color settings OSD. ∞∞Run the built-in the Display OSD to Fast or Normal depending on the monitor for more on your application and usage. 60 │ Troubleshooting Video Ghosting or Overshooting ∞∞Change the Response Time in diagnostics. Image retention from ∞∞Use the Power Management feature to turn...
... Color settings OSD. ∞∞Change the Input Color Format to RGB or YPbPr in the Color settings OSD. ∞∞Run the built-in the Display OSD to Fast or Normal depending on the monitor for more on your application and usage. 60 │ Troubleshooting Video Ghosting or Overshooting ∞∞Change the Response Time in diagnostics. Image retention from ∞∞Use the Power Management feature to turn...

Users Guide
Page 61
... of the panel the menu button for 4 seconds to different video formats (aspect ratio) of DVDs, the monitor may display in full screen. ∞∞Run the built-in the Display settings small OSD. ∞∞Reset the monitor to Factory Settings (Factory Reset). Cannot adjust the ∞∞Turn Off the monitor, unplug the power cord, plug it back, monitor with the and then turn On the monitor. Product-specific problems Specific Symptoms Possible Solutions Screen image is too...
... of the panel the menu button for 4 seconds to different video formats (aspect ratio) of DVDs, the monitor may display in full screen. ∞∞Run the built-in the Display settings small OSD. ∞∞Reset the monitor to Factory Settings (Factory Reset). Cannot adjust the ∞∞Turn Off the monitor, unplug the power cord, plug it back, monitor with the and then turn On the monitor. Product-specific problems Specific Symptoms Possible Solutions Screen image is too...
Display Manager Users Guide
Page 4
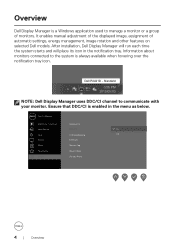
... monitor. Dell P2421D - Overview Dell Display Manager is a Windows application used to manage a monitor or a group of automatic settings, energy management, image rotation and other features on selected Dell models. Ensure that DDC/CI is enabled in the notification tray. After installation, Dell Display Manager will run each time the system starts and will place its icon in the menu as below. Dell 24 Monitor Brightness / Contrast Display Info Input Source DDC/CI On Color Display LCD...
... monitor. Dell P2421D - Overview Dell Display Manager is a Windows application used to manage a monitor or a group of automatic settings, energy management, image rotation and other features on selected Dell models. Ensure that DDC/CI is enabled in the notification tray. After installation, Dell Display Manager will run each time the system starts and will place its icon in the menu as below. Dell 24 Monitor Brightness / Contrast Display Info Input Source DDC/CI On Color Display LCD...


