Dell User Guide
Page 3
... Monitor Quality and Pixel Policy 19 Maintenance Guidelines 19 2 Setting Up the Monitor 21 Attaching the Stand 21 Connecting Your Monitor 21 Organizing Your Cables 23 Removing the Monitor Stand 24 Wall Mounting (Optional 25 3 Operating the Monitor 27 Power On the Monitor 27 Using the Front Panel Controls 27 Using...
... Monitor Quality and Pixel Policy 19 Maintenance Guidelines 19 2 Setting Up the Monitor 21 Attaching the Stand 21 Connecting Your Monitor 21 Organizing Your Cables 23 Removing the Monitor Stand 24 Wall Mounting (Optional 25 3 Operating the Monitor 27 Power On the Monitor 27 Using the Front Panel Controls 27 Using...
Dell User Guide
Page 6
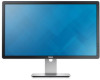
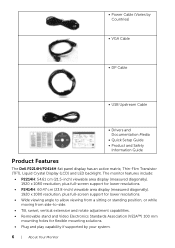
...cm (21.5-inch) viewable area display (measured diagonally). 1920 x 1080 resolution, plus full-screen support for lower resolutions. • P2414H: 60.47 cm (23.8-inch) viewable area display (measured diagonally). 1920 x 1080 resolution, plus full-screen support for lower resolutions. • Wide viewing... Upstream Cable • Drivers and Documentation Media • Quick Setup Guide • Product and Safety Information Guide Product Features The Dell P2214H/P2414H flat panel display has an active matrix, Thin-Film Transistor (TFT), Liquid Crystal Display (LCD) and LED backlight. • ...
...cm (21.5-inch) viewable area display (measured diagonally). 1920 x 1080 resolution, plus full-screen support for lower resolutions. • P2414H: 60.47 cm (23.8-inch) viewable area display (measured diagonally). 1920 x 1080 resolution, plus full-screen support for lower resolutions. • Wide viewing... Upstream Cable • Drivers and Documentation Media • Quick Setup Guide • Product and Safety Information Guide Product Features The Dell P2214H/P2414H flat panel display has an active matrix, Thin-Film Transistor (TFT), Liquid Crystal Display (LCD) and LED backlight. • ...
Dell User Guide
Page 10
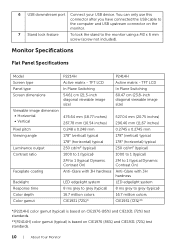
TFT LCD In Plane Switching 60.47 cm (23.8-inch diagonal viewable image size) 527.04 mm (20.75 inches) 296.46 ... On) Anti-Glare with 3H hardness LED edgelight system 8 ms grey to grey (typical) 16.7 million colors CIE1931 (72%)* P2414H Active matrix - You can only use this connector after you have connected the USB cable to the monitor using a M3 x...colors CIE1931 (72%)** *[P2214H] color gamut (typical) is based on CIE1976 (85%) and CIE1931 (72%) test standards. **[P2414H] color gamut (typical) is based on the monitor. 7 Stand lock feature To lock the stand to the computer and USB...
TFT LCD In Plane Switching 60.47 cm (23.8-inch diagonal viewable image size) 527.04 mm (20.75 inches) 296.46 ... On) Anti-Glare with 3H hardness LED edgelight system 8 ms grey to grey (typical) 16.7 million colors CIE1931 (72%)* P2414H Active matrix - You can only use this connector after you have connected the USB cable to the monitor using a M3 x...colors CIE1931 (72%)** *[P2214H] color gamut (typical) is based on CIE1976 (85%) and CIE1931 (72%) test standards. **[P2414H] color gamut (typical) is based on the monitor. 7 Stand lock feature To lock the stand to the computer and USB...
Dell User Guide
Page 16
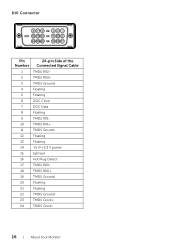
DVI Connector Pin 24-pin Side of the Number Connected Signal Cable 1 TMDS RX2- 2 TMDS RX2+ 3 TMDS Ground 4 Floating 5 Floating 6 DDC Clock 7 DDC Data 8 Floating 9 TMDS RX1- 10 TMDS RX1+ 11 TMDS Ground 12 Floating 13 Floating 14 +5 V/+3.3 V power 15 Self test 16 Hot Plug Detect 17 TMDS RX0- 18 TMDS RX0+ 19 TMDS Ground 20 Floating 21 Floating 22 TMDS Ground 23 TMDS Clock+ 24 TMDS Clock- 16 | About Your Monitor
DVI Connector Pin 24-pin Side of the Number Connected Signal Cable 1 TMDS RX2- 2 TMDS RX2+ 3 TMDS Ground 4 Floating 5 Floating 6 DDC Clock 7 DDC Data 8 Floating 9 TMDS RX1- 10 TMDS RX1+ 11 TMDS Ground 12 Floating 13 Floating 14 +5 V/+3.3 V power 15 Self test 16 Hot Plug Detect 17 TMDS RX0- 18 TMDS RX0+ 19 TMDS Ground 20 Floating 21 Floating 22 TMDS Ground 23 TMDS Clock+ 24 TMDS Clock- 16 | About Your Monitor
Dell User Guide
Page 23
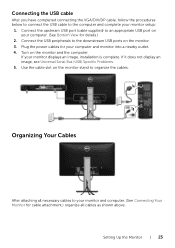
... shown above. Connect the upstream USB port (cable supplied) to an appropriate USB port on the monitor. 3. If your monitor setup: 1. Setting Up the Monitor | 23 Connect the USB peripherals to the downstream USB ports on your computer and monitor into a nearby outlet. 4. Connecting the USB cable After you have completed...
... shown above. Connect the upstream USB port (cable supplied) to an appropriate USB port on the monitor. 3. If your monitor setup: 1. Setting Up the Monitor | 23 Connect the USB peripherals to the downstream USB ports on your computer and monitor into a nearby outlet. 4. Connecting the USB cable After you have completed...
