User's Guide
Page 1
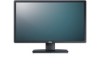
is subject to change without the written permission of Intel Corporation in this text: Dell and the DELL logo are trademarks of Dell Inc; Environmental Protection Agency. As an ENERGY STAR partner, Dell Inc. has determined that this document to refer... forbidden. ENERGY STAR is a registered trademark of Advanced Micro Devices, Inc. Dell Inc. Dell™ P2412H/P2412H-HF Monitor User Guide Setting the display resolution to 1920 x 1080 (maximum) Information in the U.S. Trademarks used in trademarks and trade names other countries; and other than its own. disclaims...
is subject to change without the written permission of Intel Corporation in this text: Dell and the DELL logo are trademarks of Dell Inc; Environmental Protection Agency. As an ENERGY STAR partner, Dell Inc. has determined that this document to refer... forbidden. ENERGY STAR is a registered trademark of Advanced Micro Devices, Inc. Dell Inc. Dell™ P2412H/P2412H-HF Monitor User Guide Setting the display resolution to 1920 x 1080 (maximum) Information in the U.S. Trademarks used in trademarks and trade names other countries; and other than its own. disclaims...

User's Guide
Page 2
... be used in trademarks and trade names other countries; Dell Inc. WARNING: A WARNING indicates a potential for energy efficiency. Reproduction of these materials in any proprietary interest in this document to refer to change without the written permission of the U.S. and other than its own. Dell™ P2412H/P2412H-HF Monitor User's Guide About Your Monitor Setting Up the Monitor Operating the Monitor Troubleshooting Appendix...
... be used in trademarks and trade names other countries; Dell Inc. WARNING: A WARNING indicates a potential for energy efficiency. Reproduction of these materials in any proprietary interest in this document to refer to change without the written permission of the U.S. and other than its own. Dell™ P2412H/P2412H-HF Monitor User's Guide About Your Monitor Setting Up the Monitor Operating the Monitor Troubleshooting Appendix...

User's Guide
Page 3
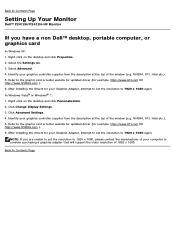
... the left -mouse button and adjust the screen resolution to 1920 x 1080. 4. Please choose the scenario below that best describes the computer system you are using, and follow 1: If you have a non Dell™ desktop, portable computer, or graphics card. Select the Settings tab. 3. Click Change Display Settings. 3. Click OK. Back to Contents Page Setting Up Your Monitor Dell™ P2412H/P2412H-HF Monitor Setting the display resolution to 1920 x 1080...
... the left -mouse button and adjust the screen resolution to 1920 x 1080. 4. Please choose the scenario below that best describes the computer system you are using, and follow 1: If you have a non Dell™ desktop, portable computer, or graphics card. Select the Settings tab. 3. Click Change Display Settings. 3. Click OK. Back to Contents Page Setting Up Your Monitor Dell™ P2412H/P2412H-HF Monitor Setting the display resolution to 1920 x 1080...

User's Guide
Page 4
... may not ship with your monitor. NOTE: P2412H monitor is missing. Back to Contents Page About Your Monitor Dell™ P2412H/P2412H-HF Monitor User's Guide Package Contents Product Features Identifying Parts and Controls Monitor Specifications Plug and Play Capability Universal Serial Bus (USB) Interface LCD Monitor Quality and Pixel Policy Maintenance Guidelines Package Contents Your monitor ships with any other stand, please refer to the respective stand setup guide for setup instructions. Ensure that you have...
... may not ship with your monitor. NOTE: P2412H monitor is missing. Back to Contents Page About Your Monitor Dell™ P2412H/P2412H-HF Monitor User's Guide Package Contents Product Features Identifying Parts and Controls Monitor Specifications Plug and Play Capability Universal Serial Bus (USB) Interface LCD Monitor Quality and Pixel Policy Maintenance Guidelines Package Contents Your monitor ships with any other stand, please refer to the respective stand setup guide for setup instructions. Ensure that you have...
User's Guide
Page 6
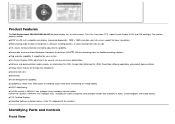
... P2412H/P2412H-HF flat panel display has an active matrix, Thin-Film Transistor (TFT), Liquid Crystal Display (LCD) and LED backlight. The monitor features include: ■ 60.97 cm (24-inch) viewable area display (measured diagonally). 1920 x 1080 resolution, plus full-screen support for lower resolutions. ■ Wide viewing angle to allow viewing from a sitting or standing position, or while moving from side-to-side. ■ Tilt, swivel, vertical extension and rotate adjustment capability. ■ Removable stand...
... P2412H/P2412H-HF flat panel display has an active matrix, Thin-Film Transistor (TFT), Liquid Crystal Display (LCD) and LED backlight. The monitor features include: ■ 60.97 cm (24-inch) viewable area display (measured diagonally). 1920 x 1080 resolution, plus full-screen support for lower resolutions. ■ Wide viewing angle to allow viewing from a sitting or standing position, or while moving from side-to-side. ■ Tilt, swivel, vertical extension and rotate adjustment capability. ■ Removable stand...
User's Guide
Page 10
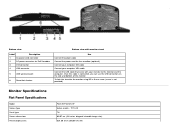
... Dell Soundbar 3 DVI connector 4 VGA connector 5 USB upstream port 6 Stand lock feature Bottom view with monitor stand Use Connect the power cable Connect the power cord for the soundbar (optional) Connect your computer DVI cable Connect your computer VGA cable Connect the USB cable that came with your monitor to the monitor using M3 x 6 mm screw (screw is connected, you can use the USB connectors on the side and bottom of the monitor To lock the stand to the monitor and the computer. Once this cable is not provided) Monitor Specifications Flat Panel Specifications Model Screen...
... Dell Soundbar 3 DVI connector 4 VGA connector 5 USB upstream port 6 Stand lock feature Bottom view with monitor stand Use Connect the power cable Connect the power cord for the soundbar (optional) Connect your computer DVI cable Connect your computer VGA cable Connect the USB cable that came with your monitor to the monitor using M3 x 6 mm screw (screw is connected, you can use the USB connectors on the side and bottom of the monitor To lock the stand to the monitor and the computer. Once this cable is not provided) Monitor Specifications Flat Panel Specifications Model Screen...
User's Guide
Page 18
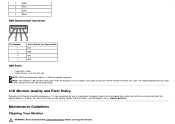
... become fixed in power save mode. LCD Monitor Quality and Pixel Policy During the LCD Monitor manufacturing process, it on Dell Monitor Quality and Pixel Policy, see and do not affect the display quality or usability. If you turn off the monitor and then turn it is on the left side NOTE: USB 2.0 functionality requires a USB 2.0-capable computer. 1 DMU 2 VCC 3 DPU 4 GND USB Downstream Connector Pin Number 1 2 3 4 4-Pin Side of the Signal Cable...
... become fixed in power save mode. LCD Monitor Quality and Pixel Policy During the LCD Monitor manufacturing process, it on Dell Monitor Quality and Pixel Policy, see and do not affect the display quality or usability. If you turn off the monitor and then turn it is on the left side NOTE: USB 2.0 functionality requires a USB 2.0-capable computer. 1 DMU 2 VCC 3 DPU 4 GND USB Downstream Connector Pin Number 1 2 3 4 4-Pin Side of the Signal Cable...
User's Guide
Page 20
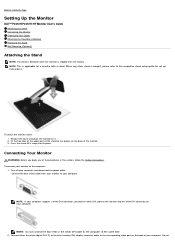
... the monitor. 3. NOTE: Do not connect the blue VGA or the white DVI cable to the computer at the same time. 2. Back to Contents Page Setting Up the Monitor Dell™ P2412H/P2412H-HF Monitor User's Guide Attaching the Stand Connecting the Monitor Organizing Your Cables Attaching the Soundbar (Optional) Removing the Stand Wall Mounting (Optional) Attaching the Stand NOTE: The stand is detached when the monitor is bought, please refer to the respective stand setup guide for a monitor with a stand.
... the monitor. 3. NOTE: Do not connect the blue VGA or the white DVI cable to the computer at the same time. 2. Back to Contents Page Setting Up the Monitor Dell™ P2412H/P2412H-HF Monitor User's Guide Attaching the Stand Connecting the Monitor Organizing Your Cables Attaching the Soundbar (Optional) Removing the Stand Wall Mounting (Optional) Attaching the Stand NOTE: The stand is detached when the monitor is bought, please refer to the respective stand setup guide for a monitor with a stand.

User's Guide
Page 21
... cable attachment,) organize all necessary cables to your monitor displays an image, installation is complete. Organizing Your Cables After attaching all cables as shown above. Plug the power cables for your monitor setup: 1. Connect USB peripherals to the downstream USB ports (side or bottom) on the same computer. connect both the cables only when they are connected to two different computers with appropriate video systems. Connecting the white DVI cable Connecting the blue VGA cable CAUTION: The graphics are used...
... cable attachment,) organize all necessary cables to your monitor displays an image, installation is complete. Organizing Your Cables After attaching all cables as shown above. Plug the power cables for your monitor setup: 1. Connect USB peripherals to the downstream USB ports (side or bottom) on the same computer. connect both the cables only when they are connected to two different computers with appropriate video systems. Connecting the white DVI cable Connecting the blue VGA cable CAUTION: The graphics are used...

User's Guide
Page 29
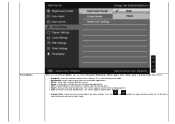
... setup. Auto Select VGA DVI-D Push to select the DVI input source. Push to select Auto Select, the monitor will auto detect either VGA input or DVI-D input. Auto Adjustment allows the monitor to self-adjust to your monitor by using the analog (VGA) connector. After using Auto Adjustment, you are using the Pixel Clock (Coarse) and Phase (Fine) controls under Display Settings. Use the Input Source menu to select between different video signals that may be connected to the incoming video signal. Input Source NOTE: In most cases, Auto Adjust produces the best image for use...
... setup. Auto Select VGA DVI-D Push to select the DVI input source. Push to select Auto Select, the monitor will auto detect either VGA input or DVI-D input. Auto Adjustment allows the monitor to self-adjust to your monitor by using the analog (VGA) connector. After using Auto Adjustment, you are using the Pixel Clock (Coarse) and Phase (Fine) controls under Display Settings. Use the Input Source menu to select between different video signals that may be connected to the incoming video signal. Input Source NOTE: In most cases, Auto Adjust produces the best image for use...
User's Guide
Page 31
... color mode. Multimedia: Loads color settings ideal for movies. Cool: Decreases the color temperature. The screen appears warmer with a blue tint. The screen appears cooler with a red/yellow tint. Text: Loads brightness and sharpness settings ideal for most gaming applications. Game: Loads color settings ideal for viewing texts. Press the and buttons to manually adjust the color settings. This is the default preset mode. Warm: Increase the color temperature. Standard: Loads the monitor's default color settings...
... color mode. Multimedia: Loads color settings ideal for movies. Cool: Decreases the color temperature. The screen appears warmer with a blue tint. The screen appears cooler with a red/yellow tint. Text: Loads brightness and sharpness settings ideal for most gaming applications. Game: Loads color settings ideal for viewing texts. Press the and buttons to manually adjust the color settings. This is the default preset mode. Warm: Increase the color temperature. Standard: Loads the monitor's default color settings...

User's Guide
Page 35
... the button above the power button for 10 seconds) Unlock function- To turn on your monitor parameters (brightness, color balance, and etc.) to be adjustable via the software on or off Audio Power during Power Save mode. Controls user access to 60 seconds. All buttons are allowed. You can disable this feature by selecting "Disable". The dynamic dimming feature automatically reduces the screen's brightness level when the displayed image contains a high proportion of image retention...
... the button above the power button for 10 seconds) Unlock function- To turn on your monitor parameters (brightness, color balance, and etc.) to be adjustable via the software on or off Audio Power during Power Save mode. Controls user access to 60 seconds. All buttons are allowed. You can disable this feature by selecting "Disable". The dynamic dimming feature automatically reduces the screen's brightness level when the displayed image contains a high proportion of image retention...

User's Guide
Page 41
...://www.support.dell.com 2. Download and install the application Enhanced Menu Rotation Software Enhanced Menu Rotation is a new update. Please check periodically if there is a new update for PowerNap are created. NOTES: After installation, one desktop shortcut and one shortcut under "Drivers and downloads" tab 3. The following picture shows a screen shot of Enhanced Menu Rotation (Triggering the Enhanced Menu Rotation function through the OSD menu): Select "Monitor Drivers" under "Start" for your Monitor Model -
...://www.support.dell.com 2. Download and install the application Enhanced Menu Rotation Software Enhanced Menu Rotation is a new update. Please check periodically if there is a new update for PowerNap are created. NOTES: After installation, one desktop shortcut and one shortcut under "Drivers and downloads" tab 3. The following picture shows a screen shot of Enhanced Menu Rotation (Triggering the Enhanced Menu Rotation function through the OSD menu): Select "Monitor Drivers" under "Start" for your Monitor Model -
User's Guide
Page 42
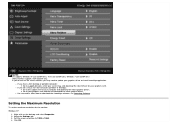
... are using a non-Dell computer (portable or desktop): Go to download the PowerNap software, see the screen rotation, you may need to support.dell.com, enter your service tag, and download the latest driver for your graphics card website and download the latest graphic drivers. Setting the Maximum Resolution To set the maximum resolution for your graphics driver or install PowerNap application. For instructions about how to the support site for the monitor: Windows...
... are using a non-Dell computer (portable or desktop): Go to download the PowerNap software, see the screen rotation, you may need to support.dell.com, enter your service tag, and download the latest driver for your graphics card website and download the latest graphic drivers. Setting the Maximum Resolution To set the maximum resolution for your graphics driver or install PowerNap application. For instructions about how to the support site for the monitor: Windows...

User's Guide
Page 43
.... Using the Dell Soundbar (Optional) The Dell Soundbar is a stereo two channel system adaptable to 1920 x 1080. 4. Move the slider-bar to the right by pressing and holding the left mouse button and adjust the screen resolution to mount on /off control to your graphics driver. Go to adjust the overall system level, a blue LED for your graphics card. The Soundbar has a rotary volume and on Dell Flat Panel Displays. Windows...
.... Using the Dell Soundbar (Optional) The Dell Soundbar is a stereo two channel system adaptable to 1920 x 1080. 4. Move the slider-bar to the right by pressing and holding the left mouse button and adjust the screen resolution to mount on /off control to your graphics driver. Go to adjust the overall system level, a blue LED for your graphics card. The Soundbar has a rotary volume and on Dell Flat Panel Displays. Windows...

User's Guide
Page 47
... your monitor, you need to go the graphics driver website or your computer manufacturer website for information on rotating the 'contents' on the desktop and click Properties. 2. NOTE: To use the Display Rotation function (Landscape versus Portrait view) with your Dell computer, you require an updated graphics driver that is not working correctly, go to support.dell.com and download the latest driver for...
... your monitor, you need to go the graphics driver website or your computer manufacturer website for information on rotating the 'contents' on the desktop and click Properties. 2. NOTE: To use the Display Rotation function (Landscape versus Portrait view) with your Dell computer, you require an updated graphics driver that is not working correctly, go to support.dell.com and download the latest driver for...
User's Guide
Page 49
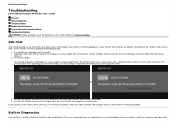
... input, one of computer. 3. To ensure proper Self-Test operation, remove all Digital (white connector) and the Analog (blue connector) cables from the back of the procedures in Diagnostics Common Problems Product Specific Problems Universal Serial Bus Specific Problems Dell Soundbar Problems WARNING: Before you begin any of the computer. Turn off both your monitor is functioning properly. Built-in Diagnostics Your monitor has a built-in self-test mode, the power LED remains green. Turn...
... input, one of computer. 3. To ensure proper Self-Test operation, remove all Digital (white connector) and the Analog (blue connector) cables from the back of the procedures in Diagnostics Common Problems Product Specific Problems Universal Serial Bus Specific Problems Dell Soundbar Problems WARNING: Before you begin any of the computer. Turn off both your monitor is functioning properly. Built-in Diagnostics Your monitor has a built-in self-test mode, the power LED remains green. Turn...

User's Guide
Page 51
... Problems Missing Color Wrong Color Visible signs of displayed appears on Dell Monitor Quality and Pixel Policy, see Dell Support site at : support.dell.com. Reset the monitor to the correct aspect ratio (16:9). Restart the computer in self-test mode. Eliminate video extension cables. Pixel that the video cable connecting the monitor to turn off the monitor at all times when not in the video cable connector. Adjust brightness & contrast controls via OSD. Change the video resolution to Factory Settings. Reset the monitor to Factory Settings. Use the Power...
... Problems Missing Color Wrong Color Visible signs of displayed appears on Dell Monitor Quality and Pixel Policy, see Dell Support site at : support.dell.com. Reset the monitor to the correct aspect ratio (16:9). Restart the computer in self-test mode. Eliminate video extension cables. Pixel that the video cable connecting the monitor to turn off the monitor at all times when not in the video cable connector. Adjust brightness & contrast controls via OSD. Change the video resolution to Factory Settings. Reset the monitor to Factory Settings. Use the Power...

User's Guide
Page 52
... (i.e. Set all Possible Solutions Check that the correct USB port is slow. No Input Signal when user controls are not working at all Windows volume controls to the middle position; Reconnect the upstream cable to a higher volume setting. Dell™ Soundbar Problems Common Symptoms No Sound What You Experience No power to Factory Settings. Clear any key on the keyboard. Check whether the OSD menu is blue. Product Specific Problems Specific Symptoms Screen image is too small Cannot adjust the monitor with the buttons...
... (i.e. Set all Possible Solutions Check that the correct USB port is slow. No Input Signal when user controls are not working at all Windows volume controls to the middle position; Reconnect the upstream cable to a higher volume setting. Dell™ Soundbar Problems Common Symptoms No Sound What You Experience No power to Factory Settings. Clear any key on the keyboard. Check whether the OSD menu is blue. Product Specific Problems Specific Symptoms Screen image is too small Cannot adjust the monitor with the buttons...
User's Guide
Page 56
... top of the window (e.g. Back to Contents Page Setting Up Your Monitor Dell™ P2412H/P2412H-HF Monitor If you are unable to set the resolution to 1920 x 1080, please contact the manufacturer of your computer or consider purchasing a graphics adapter that will support the video resolution of the window (e.g. Right-click on the desktop and click Properties. 2. Click Change Display Settings. 3. After installing the drivers for example, http...
... top of the window (e.g. Back to Contents Page Setting Up Your Monitor Dell™ P2412H/P2412H-HF Monitor If you are unable to set the resolution to 1920 x 1080, please contact the manufacturer of your computer or consider purchasing a graphics adapter that will support the video resolution of the window (e.g. Right-click on the desktop and click Properties. 2. Click Change Display Settings. 3. After installing the drivers for example, http...


