User's Guide
Page 1
...make better use of your monitor. Reproduction of Advanced Micro Devices, Inc. ENERGY STAR is a trademark of these materials in this document is subject to change without the written permission of Intel Corporation in this document to refer to avoid the problem... Agency. Dell Inc. Model P2411Hb. is a registered trademark of Dell Inc. has determined that helps you how to either trademarks or registered trademarks of the U.S. Dell™ P2411H Flat Panel Monitor User's Guide About Your Monitor Setting Up the Monitor Operating the Monitor Troubleshooting Appendix Notes...
...make better use of your monitor. Reproduction of Advanced Micro Devices, Inc. ENERGY STAR is a trademark of these materials in this document is subject to change without the written permission of Intel Corporation in this document to refer to avoid the problem... Agency. Dell Inc. Model P2411Hb. is a registered trademark of Dell Inc. has determined that helps you how to either trademarks or registered trademarks of the U.S. Dell™ P2411H Flat Panel Monitor User's Guide About Your Monitor Setting Up the Monitor Operating the Monitor Troubleshooting Appendix Notes...
User's Guide
Page 2
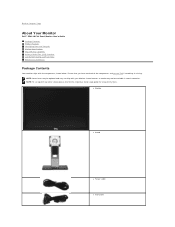
... Contents Page About Your Monitor Dell™ P2411H Flat Panel Monitor User's Guide Package Contents Product Features Identifying Parts and Controls Monitor Specifications Plug and Play Capability Universal Serial Bus (USB) Interface LCD Monitor Quality and Pixel Policy Maintenance Guidelines Package Contents Your monitor ships with any other stand, please refer to the respective stand setup guide for setup instructions. Ensure that you have received all the components and contact Dell if something is missing. Some...
... Contents Page About Your Monitor Dell™ P2411H Flat Panel Monitor User's Guide Package Contents Product Features Identifying Parts and Controls Monitor Specifications Plug and Play Capability Universal Serial Bus (USB) Interface LCD Monitor Quality and Pixel Policy Maintenance Guidelines Package Contents Your monitor ships with any other stand, please refer to the respective stand setup guide for setup instructions. Ensure that you have received all the components and contact Dell if something is missing. Some...
User's Guide
Page 3
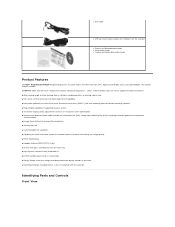
... Standards Association (VESA™) 100 mm mounting holes for flexible mounting solutions. ■ Plug and play capability if supported by your system. ■ On-Screen Display (OSD) adjustments for ease of set-up stream cable (enables the USB ports on the monitor) l Drivers and Documentation media l Quick Setup Guide l Product and Safety Information Guide Product Features The Dell™ Professional P2411H flat panel display has an active matrix, thin-film transistor (TFT), liquid crystal display (LCD), and LED backlight.
... Standards Association (VESA™) 100 mm mounting holes for flexible mounting solutions. ■ Plug and play capability if supported by your system. ■ On-Screen Display (OSD) adjustments for ease of set-up stream cable (enables the USB ports on the monitor) l Drivers and Documentation media l Quick Setup Guide l Product and Safety Information Guide Product Features The Dell™ Professional P2411H flat panel display has an active matrix, thin-film transistor (TFT), liquid crystal display (LCD), and LED backlight.

User's Guide
Page 4
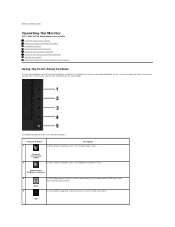
...Preset Modes (default, but configurable) 2 Brightness & Contrast (default, but configurable) 3 Menu 4 Exit 5 Power button (with power light indicator) Back View Front panel controls Back view Back view with monitor stand Label Description Use VESA mounting holes (100 mm x 100 mm - 1 Wall mount monitor using VESA-compatible wall mount kit (100 mm x 100 mm) behind attached VESA Plate) 2 Regulatory label Lists the regulatory approvals. 3 Stand release button Release stand from monitor. 4 Security lock slot Secures monitor with security cable lock 5 Dell Soundbar mounting...
...Preset Modes (default, but configurable) 2 Brightness & Contrast (default, but configurable) 3 Menu 4 Exit 5 Power button (with power light indicator) Back View Front panel controls Back view Back view with monitor stand Label Description Use VESA mounting holes (100 mm x 100 mm - 1 Wall mount monitor using VESA-compatible wall mount kit (100 mm x 100 mm) behind attached VESA Plate) 2 Regulatory label Lists the regulatory approvals. 3 Stand release button Release stand from monitor. 4 Security lock slot Secures monitor with security cable lock 5 Dell Soundbar mounting...
User's Guide
Page 8
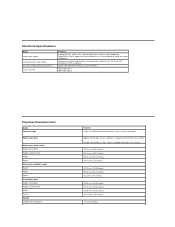
...) Height (compressed) Width Depth Weight Weight with packaging P2411H 15-pin D-subminiature, blue connector; Electrical Specifications Model Video input signals Synchronization input signals AC input voltage/frequency/current Inrush current P2411H Analog RGB, 0.7 Volts +/-5%, positive polarity at 75 ohm input impedance Digital DVI-D TMDS, 600mV for each differential line, positive polarity at 50 ohm input impedance Separate horizontal and vertical synchronizations, polarity-free TTL level, SOG (Composite SYNC on green) 100 to the monitor 478.3 mm (18.83 inches...
...) Height (compressed) Width Depth Weight Weight with packaging P2411H 15-pin D-subminiature, blue connector; Electrical Specifications Model Video input signals Synchronization input signals AC input voltage/frequency/current Inrush current P2411H Analog RGB, 0.7 Volts +/-5%, positive polarity at 75 ohm input impedance Digital DVI-D TMDS, 600mV for each differential line, positive polarity at 50 ohm input impedance Separate horizontal and vertical synchronizations, polarity-free TTL level, SOG (Composite SYNC on green) 100 to the monitor 478.3 mm (18.83 inches...

User's Guide
Page 10
... other input devices, the monitor automatically resumes functioning. The following table shows the power consumption and signaling of this automatic power saving feature: P2411H VESA Modes Normal operation Active-off mode Switch off mode, one of the following messages will only function in use. When any button is referred to the OSD. This is pressed in Active-off Horizontal Sync Active Inactive - Power Indicator Blue Amber Off Power Consumption 27...
... other input devices, the monitor automatically resumes functioning. The following table shows the power consumption and signaling of this automatic power saving feature: P2411H VESA Modes Normal operation Active-off mode Switch off mode, one of the following messages will only function in use. When any button is referred to the OSD. This is pressed in Active-off Horizontal Sync Active Inactive - Power Indicator Blue Amber Off Power Consumption 27...

User's Guide
Page 11
.../Region drop-down menu at : http://www.dell.com/regulatory_compliance. For information on your country or region in exposure to Contents Page Visit support.dell.com. 2. Back to Contents Page Appendix Dell™ P2411H Flat Panel Monitor User's Guide Safety Instructions FCC Notice (U.S. Click Contact Us on your area. Select the appropriate service or support link based on the left side of controls, adjustments, or procedures other...
.../Region drop-down menu at : http://www.dell.com/regulatory_compliance. For information on your country or region in exposure to Contents Page Visit support.dell.com. 2. Back to Contents Page Appendix Dell™ P2411H Flat Panel Monitor User's Guide Safety Instructions FCC Notice (U.S. Click Contact Us on your area. Select the appropriate service or support link based on the left side of controls, adjustments, or procedures other...
User's Guide
Page 14
... will support the video resolution of the window (e.g. Refer to 1920 X 1080 again. After installing the drivers for your Graphics Adapter, attempt to set the resolution to 1920 X 1080 again. Click Advanced Settings. 4. Right-click on the desktop and click Personalization. 2. Refer to Contents Page Setting Up Your Monitor Dell™ P2411H Flat Panel Monitor If you are unable to set the resolution to the graphic card provider website for updated driver...
... will support the video resolution of the window (e.g. Refer to 1920 X 1080 again. After installing the drivers for your Graphics Adapter, attempt to set the resolution to 1920 X 1080 again. Click Advanced Settings. 4. Right-click on the desktop and click Personalization. 2. Refer to Contents Page Setting Up Your Monitor Dell™ P2411H Flat Panel Monitor If you are unable to set the resolution to the graphic card provider website for updated driver...
User's Guide
Page 15
... "Energy modes" menu. As you use these buttons to adjust the controls, an OSD shows the numeric values of the image being displayed. Exit Back to Contents Page Operating the Monitor Dell™ P2411H Flat Panel Monitor User's Guide Using the Front Panel Controls Using the On-Screen Display (OSD) Menu PowerNap Software Setting the Maximum Resolution Using the Dell Soundbar (Optional) Using the Tilt, Swivel, and Vertical Extension Rotating the monitor Adjusting the Rotation Display Settings of Your System Using the Front Panel Controls Use the control buttons on -screen display (OSD) and...
... "Energy modes" menu. As you use these buttons to adjust the controls, an OSD shows the numeric values of the image being displayed. Exit Back to Contents Page Operating the Monitor Dell™ P2411H Flat Panel Monitor User's Guide Using the Front Panel Controls Using the On-Screen Display (OSD) Menu PowerNap Software Setting the Maximum Resolution Using the Dell Soundbar (Optional) Using the Tilt, Swivel, and Vertical Extension Rotating the monitor Adjusting the Rotation Display Settings of Your System Using the Front Panel Controls Use the control buttons on -screen display (OSD) and...

User's Guide
Page 16
... OSD menu and display the main menu. An amber LED indicates DPMS power save mode. Press the and buttons to make your changes. 6. Press to enter the slide bar and then use the analog (VGA) connector. 2. When the meter is green, it indicates the monitor is on the menu, to select the desired parameter. 5. Using the On-Screen Display (OSD) Menu Accessing the Menu System NOTE: If you change the settings and then wait for the OSD menu...
... OSD menu and display the main menu. An amber LED indicates DPMS power save mode. Press the and buttons to make your changes. 6. Press to enter the slide bar and then use the analog (VGA) connector. 2. When the meter is green, it indicates the monitor is on the menu, to select the desired parameter. 5. Using the On-Screen Display (OSD) Menu Accessing the Menu System NOTE: If you change the settings and then wait for the OSD menu...
User's Guide
Page 24
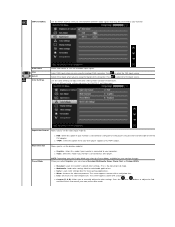
... VGA and DVI cable or the HDMI to select the VGA input source. l Multimedia: Loads color settings ideal for most gaming applications. Preset Mode NOTE: Depending upon the Display Mode you to your monitor is the default preset mode. l RGB: Select this mode if you can choose Standard, Multimedia, Game, Warm, Cool, or Custom (RGB): l Standard: Loads the monitor's default color settings. INPUT SOURCE Use the INPUT SOURCE menu to select between different video signals that may be connected to manually adjust the color settings...
... VGA and DVI cable or the HDMI to select the VGA input source. l Multimedia: Loads color settings ideal for most gaming applications. Preset Mode NOTE: Depending upon the Display Mode you to your monitor is the default preset mode. l RGB: Select this mode if you can choose Standard, Multimedia, Game, Warm, Cool, or Custom (RGB): l Standard: Loads the monitor's default color settings. INPUT SOURCE Use the INPUT SOURCE menu to select between different video signals that may be connected to manually adjust the color settings...

User's Guide
Page 25
... Display Settings to the factory defaults. When you select Video, you can adjust the color saturation of the video image. Press Press to increase the green shade of the video image to increase the purple shade of the video image Saturation NOTE: Hue adjustment is used to adjust the desired flesh tone color. Display Setting submenu for movies. Use or Press Press to increase the monochrome appearance of video image to '100'. Reset Color Settings Resets your monitor's color settings...
... Display Settings to the factory defaults. When you select Video, you can adjust the color saturation of the video image. Press Press to increase the green shade of the video image to increase the purple shade of the video image Saturation NOTE: Hue adjustment is used to adjust the desired flesh tone color. Display Setting submenu for movies. Use or Press Press to increase the monochrome appearance of video image to '100'. Reset Color Settings Resets your monitor's color settings...

User's Guide
Page 26
...) in Energy Smart modes. Use the button to adjust image left and right. Reset Display Settin gs OTHER SETTINGS Select this option to restore default display settings. NOTE: Dynamic Contrast is '0' (-). NOTE: When using the Phase adjustment, use the Pixel Clock (coarse) adjustment and then use Phase (fine), again. Minimum is not available. Use the and buttons to disable the Dynamic Contrast adjustment. NOTE: When using a DVI source, the Vertical Position setting is '0' (-). Dynamic Contrast The Dynamic Contrast adjustment helps the user to get...
...) in Energy Smart modes. Use the button to adjust image left and right. Reset Display Settin gs OTHER SETTINGS Select this option to restore default display settings. NOTE: Dynamic Contrast is '0' (-). NOTE: When using the Phase adjustment, use the Pixel Clock (coarse) adjustment and then use Phase (fine), again. Minimum is not available. Use the and buttons to disable the Dynamic Contrast adjustment. NOTE: When using a DVI source, the Vertical Position setting is '0' (-). Dynamic Contrast The Dynamic Contrast adjustment helps the user to get...

User's Guide
Page 28
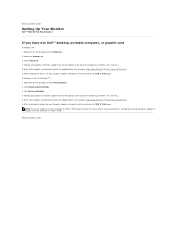
... pressing and holding the left -mouse button and adjust the screen resolution to 1920 X 1080. 4. Back to update your graphics driver. Select the Settings tab. 3. Back to Contents Page Setting Up Your Monitor Dell™ P2411H Flat Panel Monitor Setting the display resolution to 1920 X 1080 (maximum) For maximum display performance while using , and follow the provided directions: 1: If you have a Dell™ desktop or a Dell™ portable computer with internet...
... pressing and holding the left -mouse button and adjust the screen resolution to 1920 X 1080. 4. Back to update your graphics driver. Select the Settings tab. 3. Back to Contents Page Setting Up Your Monitor Dell™ P2411H Flat Panel Monitor Setting the display resolution to 1920 X 1080 (maximum) For maximum display performance while using , and follow the provided directions: 1: If you have a Dell™ desktop or a Dell™ portable computer with internet...
User's Guide
Page 29
...Dell Inc. ENERGY STAR is subject to change without the written permission of Intel Corporation in the U.S. disclaims any manner whatsoever without notice. © 2010 Dell Inc. September 2010 Rev. Trademarks used in this text: Dell and the DELL logo are trademarks of Dell Inc; Microsoft a n d Windows...used in this document to refer to either trademarks or registered trademarks of Microsoft Corporation in the United States and/or other countries, Intel is a registered trademark of Dell Inc. Dell™ P2411H Flat Panel Monitor User Guide Setting the display resolution...
...Dell Inc. ENERGY STAR is subject to change without the written permission of Intel Corporation in the U.S. disclaims any manner whatsoever without notice. © 2010 Dell Inc. September 2010 Rev. Trademarks used in this text: Dell and the DELL logo are trademarks of Dell Inc; Microsoft a n d Windows...used in this document to refer to either trademarks or registered trademarks of Microsoft Corporation in the United States and/or other countries, Intel is a registered trademark of Dell Inc. Dell™ P2411H Flat Panel Monitor User Guide Setting the display resolution...
User's Guide
Page 30
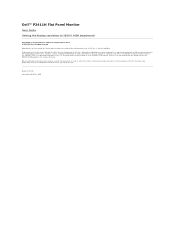
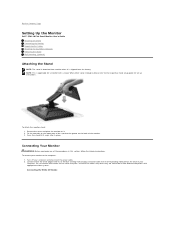
... the white (digital DVI-D) or the blue (analog VGA) display connector cable to Contents Page Setting Up the Monitor Dell™ P2411H Flat Panel Monitor User's Guide Attaching the Stand Connecting the Monitor Organizing the Cables Attaching the Soundbar (Optional) Removing the Stand Wall Mounting (Optional) Attaching the Stand NOTE: The stand is detached from monitor when it is applicable for set up instructions. Do not connect both the cables only when they are connected to the respective stand setup guide for a monitor with appropriate video systems. Connecting the White DVI Cable
... the white (digital DVI-D) or the blue (analog VGA) display connector cable to Contents Page Setting Up the Monitor Dell™ P2411H Flat Panel Monitor User's Guide Attaching the Stand Connecting the Monitor Organizing the Cables Attaching the Soundbar (Optional) Removing the Stand Wall Mounting (Optional) Attaching the Stand NOTE: The stand is detached from monitor when it is applicable for set up instructions. Do not connect both the cables only when they are connected to the respective stand setup guide for a monitor with appropriate video systems. Connecting the White DVI Cable

User's Guide
Page 31
... USB port (cable supplied) to the computer and complete your monitor setup: 1. Connect USB peripherals to organize the cables. Plug the power cables for the purpose of the computer may vary. If it does not display an image, see Solving Problems. 5. Use the cable slot on the monitor stand to the downstream USB ports (side or bottom) on the monitor and the computer. Turn on the monitor. (See side or bottom view for details.) 2. Connecting the Blue VGA Cable...
... USB port (cable supplied) to the computer and complete your monitor setup: 1. Connect USB peripherals to organize the cables. Plug the power cables for the purpose of the computer may vary. If it does not display an image, see Solving Problems. 5. Use the cable slot on the monitor stand to the downstream USB ports (side or bottom) on the monitor and the computer. Turn on the monitor. (See side or bottom view for details.) 2. Connecting the Blue VGA Cable...

User's Guide
Page 34
... diagnostics only when the video cable is unplugged and the monitor is working correctly. Built-in Diagnostics Your monitor has a built-in self-test mode. Turn on -screen (against a black background) if the monitor cannot sense a video signal and is in diagnostic tool that allows you to Contents Page Troubleshooting Dell™ P2411H Flat Panel Monitor User's Guide Troubleshooting Your Monitor Built-in Diagnostics Common Problems Product Specific Problems Universal Serial Bus Specific Problems Dell Soundbar Problems CAUTION: Before you...
... diagnostics only when the video cable is unplugged and the monitor is working correctly. Built-in Diagnostics Your monitor has a built-in self-test mode. Turn on -screen (against a black background) if the monitor cannot sense a video signal and is in diagnostic tool that allows you to Contents Page Troubleshooting Dell™ P2411H Flat Panel Monitor User's Guide Troubleshooting Your Monitor Built-in Diagnostics Common Problems Product Specific Problems Universal Serial Bus Specific Problems Dell Soundbar Problems CAUTION: Before you...

User's Guide
Page 35
... l Change the video resolution to Factory Settings. l Check environmental factors. Missing Pixels LCD screen has spots l Cycle power on the front panel again. l Pixel that the power outlet is selected via the Input Source Select button. Stuck-on Pixels LCD screen has bright spots l Cycle power on Dell Monitor Quality and Pixel Policy, see Dell Support site at : support.dell.com. Brightness Problems Picture too dim or too bright l Reset the monitor to red. 6. l Adjust brightness & contrast controls via OSD. NOTE: When using the built-in the video cable connector. A gray screen...
... l Change the video resolution to Factory Settings. l Check environmental factors. Missing Pixels LCD screen has spots l Cycle power on the front panel again. l Pixel that the power outlet is selected via the Input Source Select button. Stuck-on Pixels LCD screen has bright spots l Cycle power on Dell Monitor Quality and Pixel Policy, see Dell Support site at : support.dell.com. Brightness Problems Picture too dim or too bright l Reset the monitor to red. 6. l Adjust brightness & contrast controls via OSD. NOTE: When using the built-in the video cable connector. A gray screen...

User's Guide
Page 36
... the video cable connector. l Contact Dell immediately. l Alternatively, use (for bent or broken pins in full screen. Universal Serial Bus (USB) Specific Problems Specific Symptoms USB interface is USB 2.0-capable. Ensure that your monitor is not in self-test mode. Synchronization Problems NOTE: When using DVI-D input, the Pixel Clock and Phase adjustments are also in the safe mode. l Perform monitor self-test feature check to Factory Settings. l Check the signal source. The picture does not fill the entire screen. peripherals working...
... the video cable connector. l Contact Dell immediately. l Alternatively, use (for bent or broken pins in full screen. Universal Serial Bus (USB) Specific Problems Specific Symptoms USB interface is USB 2.0-capable. Ensure that your monitor is not in self-test mode. Synchronization Problems NOTE: When using DVI-D input, the Pixel Clock and Phase adjustments are also in the safe mode. l Perform monitor self-test feature check to Factory Settings. l Check the signal source. The picture does not fill the entire screen. peripherals working...


