
Users Guide
Page 3
Contents About your monitor 5 Package contents 5 Product features 7 Identifying parts and controls 8 Monitor specifications 12 Universal serial bus (USB) interface 26 Plug and play capability 29 LCD monitor quality and pixel policy 29 Maintenance guidelines 29 Setting up the monitor 30 Attaching the stand 30 Connecting your monitor 32 Organizing cables 34 Disconnecting the monitor stand 35 Wall mounting (optional 36 Operating your monitor 37 Power on the monitor 37 Using the front panel controls 37 Contents | 3
Contents About your monitor 5 Package contents 5 Product features 7 Identifying parts and controls 8 Monitor specifications 12 Universal serial bus (USB) interface 26 Plug and play capability 29 LCD monitor quality and pixel policy 29 Maintenance guidelines 29 Setting up the monitor 30 Attaching the stand 30 Connecting your monitor 32 Organizing cables 34 Disconnecting the monitor stand 35 Wall mounting (optional 36 Operating your monitor 37 Power on the monitor 37 Using the front panel controls 37 Contents | 3

Users Guide
Page 7
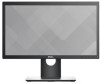
...; VGA, HDMI and DisplayPort connectivity. ∞ Equipped with 1 USB upstream port and 2 USB2.0 / 2 USB3.0 downstream ports. ∞ On-Screen Display (OSD) adjustments for ease of set-up and screen optimization. ∞ Security-cable slot. ∞ Tilt,swivel,height and rotate adjustment capabilities. ∞ Removable stand and Video Electronics Standards Association (VESA™) 100 mm mounting holes for lower resolutions. ∞ Plug and play capability if supported by your monitor | 7 Product features The Dell P1917S/P1917SWh/P2017H/P2217/P2217Wh flat panel display...
...; VGA, HDMI and DisplayPort connectivity. ∞ Equipped with 1 USB upstream port and 2 USB2.0 / 2 USB3.0 downstream ports. ∞ On-Screen Display (OSD) adjustments for ease of set-up and screen optimization. ∞ Security-cable slot. ∞ Tilt,swivel,height and rotate adjustment capabilities. ∞ Removable stand and Video Electronics Standards Association (VESA™) 100 mm mounting holes for lower resolutions. ∞ Plug and play capability if supported by your monitor | 7 Product features The Dell P1917S/P1917SWh/P2017H/P2217/P2217Wh flat panel display...

Users Guide
Page 9
... remove the plastic strip covering the mounting slots before affixing the Dell Soundbar. L'appareil doit être branché sur une prise de courant munie d'une mise à la terre. About your monitor | 9 behind attached VESA Cover) compatible wall mount kit (100 mm x 100 mm). 2 Regulatory label Lists the regulatory approvals. 3 Stand release button Release stand from monitor. 4 Security lock slot Secures monitor with monitor stand Label Description Use 1 VESA mounting...
... remove the plastic strip covering the mounting slots before affixing the Dell Soundbar. L'appareil doit être branché sur une prise de courant munie d'une mise à la terre. About your monitor | 9 behind attached VESA Cover) compatible wall mount kit (100 mm x 100 mm). 2 Regulatory label Lists the regulatory approvals. 3 Stand release button Release stand from monitor. 4 Security lock slot Secures monitor with monitor stand Label Description Use 1 VESA mounting...

Users Guide
Page 11
... cable is connected, you can use the USB connectors on the rear side and bottom side of the monitor. Connect your monitor to the monitor using a DP cable. CAN ICES-3 (B)/NMB-3(B) XXXXXXX-XXXXX MSIP-REM-TPV-SE2416Hc Bottom View 61 234 5 Bottom view without monitor stand Label Description 1 Power port 2 HDMI port 3 DP port 4 VGA port 5 USB connector (x2 downstream, x1 upstream) 6 Stand lock feature Use Connect the power cable. About your computer to the monitor using a M3 x 6mm screw (screw not included). Connect the USB cable...
... cable is connected, you can use the USB connectors on the rear side and bottom side of the monitor. Connect your monitor to the monitor using a DP cable. CAN ICES-3 (B)/NMB-3(B) XXXXXXX-XXXXX MSIP-REM-TPV-SE2416Hc Bottom View 61 234 5 Bottom view without monitor stand Label Description 1 Power port 2 HDMI port 3 DP port 4 VGA port 5 USB connector (x2 downstream, x1 upstream) 6 Stand lock feature Use Connect the power cable. About your computer to the monitor using a M3 x 6mm screw (screw not included). Connect the USB cable...

Users Guide
Page 29
For best practices, follow the Safety instructions before cleaning the monitor. Do not use . Plug and play capability You can install the monitor in any kind as some detergents leave a milky film on the monitor. ∞ If you notice white powder when you can configure itself and optimize the monitor settings. For more information on your monitor, use a dynamically changing screen saver and turn off with a cloth. ∞ Handle...
For best practices, follow the Safety instructions before cleaning the monitor. Do not use . Plug and play capability You can install the monitor in any kind as some detergents leave a milky film on the monitor. ∞ If you notice white powder when you can configure itself and optimize the monitor settings. For more information on your monitor, use a dynamically changing screen saver and turn off with a cloth. ∞ Handle...

Users Guide
Page 30
... the factory. To attach the monitor stand. 1. Lift the cover, as shown, to the respective stand setup guide for a monitor with a stand. Insert the stand base blocks fully into the stand slot. 3. Setting up the monitor Lift the screw handle and turn the screw clockwise. 4. After fully tightening the screw, fold the screw handle flat within the recess. 5. NOTE: This is bought, please refer to expose the VESA area for stand assembly. 30 | Setting...
... the factory. To attach the monitor stand. 1. Lift the cover, as shown, to the respective stand setup guide for a monitor with a stand. Insert the stand base blocks fully into the stand slot. 3. Setting up the monitor Lift the screw handle and turn the screw clockwise. 4. After fully tightening the screw, fold the screw handle flat within the recess. 5. NOTE: This is bought, please refer to expose the VESA area for stand assembly. 30 | Setting...

Users Guide
Page 33
If it does not display an image, see Universal serial bus (USB) specific problems. 5. Plug the power cables for details.) 2. Use the cable slot on the monitor stand to the downstream USB 3.0 ports on the monitor. 3. Connect the USB 3.0 peripherals to organize the cables. If your computer and monitor into a nearby outlet. 4. Connecting the DP cable Connecting the USB 3.0 cable After you have completed connecting the DP/HDMI cable, follow the procedures below to connect the USB 3.0 cable to the computer and...
If it does not display an image, see Universal serial bus (USB) specific problems. 5. Plug the power cables for details.) 2. Use the cable slot on the monitor stand to the downstream USB 3.0 ports on the monitor. 3. Connect the USB 3.0 peripherals to organize the cables. If your computer and monitor into a nearby outlet. 4. Connecting the DP cable Connecting the USB 3.0 cable After you have completed connecting the DP/HDMI cable, follow the procedures below to connect the USB 3.0 cable to the computer and...

Users Guide
Page 38
... power button to turn the monitor on . save mode. OSD controls Use the buttons on the front of the monitor to adjust the image settings. 12 34 Front Panel Button Description 1 Use the up button to decrease values or move up in a menu. Up 2 Use the down button to increase values or move down in a menu. Back 38 | Operating your selection in power- Down 3 Use the OK button to the previous menu. Power On/Off button (with Solid white light...
... power button to turn the monitor on . save mode. OSD controls Use the buttons on the front of the monitor to adjust the image settings. 12 34 Front Panel Button Description 1 Use the up button to decrease values or move up in a menu. Up 2 Use the down button to increase values or move down in a menu. Back 38 | Operating your selection in power- Down 3 Use the OK button to the previous menu. Power On/Off button (with Solid white light...
Users Guide
Page 40
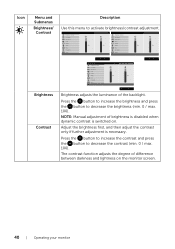
... Color Display Energy Menu Personalize Others Resolution: 1600x900, 60Hz Energy Use 75% 75% Dell P2217/P2217Wh Brightness / Contrast Auto Adjust Input Source Color Display Energy Menu Personalize Others Resolution: 1680x1050, 60Hz Energy Use 75% 75% Brightness Contrast Brightness adjusts the luminance of difference between darkness and lightness on . The contrast function adjusts the degree of the backlight. Adjust the brightness first, and then adjust the contrast only if further adjustment is switched on the monitor screen. 40 | Operating your monitor Press the button...
... Color Display Energy Menu Personalize Others Resolution: 1600x900, 60Hz Energy Use 75% 75% Dell P2217/P2217Wh Brightness / Contrast Auto Adjust Input Source Color Display Energy Menu Personalize Others Resolution: 1680x1050, 60Hz Energy Use 75% 75% Brightness Contrast Brightness adjusts the luminance of difference between darkness and lightness on . The contrast function adjusts the degree of the backlight. Adjust the brightness first, and then adjust the contrast only if further adjustment is switched on the monitor screen. 40 | Operating your monitor Press the button...

Users Guide
Page 41
... video input signals or attached cables. This option is only available when you press the button while there are using the pixel clock (coarse) and phase (fine) controls under display settings. The following dialog appears on a black screen as the monitor self-adjusts to adjust the screen automatically. Dell P2217/P2217Wh Brightness / Contrast Auto Adjust Input Source Color Display Energy Menu Personalize Others Resolution: 1680x1050, 60Hz Energy Use Press to adjust the screen automatically. Operating your monitor by using the analog (VGA) connector. Dell P1917S...
... video input signals or attached cables. This option is only available when you press the button while there are using the pixel clock (coarse) and phase (fine) controls under display settings. The following dialog appears on a black screen as the monitor self-adjusts to adjust the screen automatically. Dell P2217/P2217Wh Brightness / Contrast Auto Adjust Input Source Color Display Energy Menu Personalize Others Resolution: 1680x1050, 60Hz Energy Use Press to adjust the screen automatically. Operating your monitor by using the analog (VGA) connector. Dell P1917S...
Users Guide
Page 42
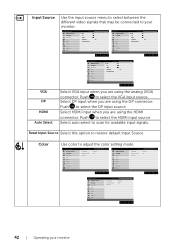
... input source. Push to select the HDMI input source. Input Source Use the input source menu to select between the different video signals that may be connected to restore default Input Source. Reset Input Source Select this option to your monitor Color Use color to adjust the color setting mode. Dell P1917S/P1917SWh Brightness / Contrast Auto Adjust Input Source Color Display Energy Menu Personalize Others Resolution: 1280x1024, 60Hz Energy Use VGA DP HDMI Auto Select On Reset Input Source Dell P2017H Brightness / Contrast Auto Adjust Input Source Color Display Energy...
... input source. Push to select the HDMI input source. Input Source Use the input source menu to select between the different video signals that may be connected to restore default Input Source. Reset Input Source Select this option to your monitor Color Use color to adjust the color setting mode. Dell P1917S/P1917SWh Brightness / Contrast Auto Adjust Input Source Color Display Energy Menu Personalize Others Resolution: 1280x1024, 60Hz Energy Use VGA DP HDMI Auto Select On Reset Input Source Dell P2017H Brightness / Contrast Auto Adjust Input Source Color Display Energy...
Users Guide
Page 43
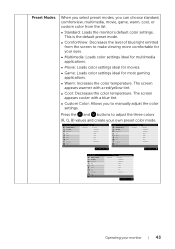
...Warm Cool Custom Color Dell P2017H Brightness / Contrast Auto Adjust Input Source Color Display Energy Menu Personalize Others Resolution: 1600x900, 60Hz Energy Use Preset Modes Standard ComfortView Multimedia Movie Game Warm Cool Custom Color Dell P2217/P2217Wh Brightness / Contrast Auto Adjust Input Source Color Display Energy Menu Personalize Others Resolution: 1680x1050, 60Hz Energy Use Preset Modes Standard ComfortView Multimedia Movie Game Warm Cool Custom Color Operating your own preset color mode. The screen appears warmer with a blue tint. ∞ Custom Color: Allows you...
...Warm Cool Custom Color Dell P2017H Brightness / Contrast Auto Adjust Input Source Color Display Energy Menu Personalize Others Resolution: 1600x900, 60Hz Energy Use Preset Modes Standard ComfortView Multimedia Movie Game Warm Cool Custom Color Dell P2217/P2217Wh Brightness / Contrast Auto Adjust Input Source Color Display Energy Menu Personalize Others Resolution: 1680x1050, 60Hz Energy Use Preset Modes Standard ComfortView Multimedia Movie Game Warm Cool Custom Color Operating your own preset color mode. The screen appears warmer with a blue tint. ∞ Custom Color: Allows you...

Users Guide
Page 44
... supports only YPbPr output. Allows your monitor color settings to 100. This feature can shift the color of the video image. Dell P1917S/P1917SWh Brightness / Contrast Auto Adjust Input Source Color Display Energy Menu Personalize Others Resolution: 1280x1024, 60Hz Energy Use Input Color Format RGB YPbPr Dell P2017H Brightness / Contrast Auto Adjust Input Source Color Display Energy Menu Personalize Others Resolution: 1600x900, 60Hz Energy Use Input Color Format RGB YPbPr Dell P2217/P2217Wh Brightness / Contrast Auto Adjust Input Source Color Display Energy Menu Personalize...
... supports only YPbPr output. Allows your monitor color settings to 100. This feature can shift the color of the video image. Dell P1917S/P1917SWh Brightness / Contrast Auto Adjust Input Source Color Display Energy Menu Personalize Others Resolution: 1280x1024, 60Hz Energy Use Input Color Format RGB YPbPr Dell P2017H Brightness / Contrast Auto Adjust Input Source Color Display Energy Menu Personalize Others Resolution: 1600x900, 60Hz Energy Use Input Color Format RGB YPbPr Dell P2217/P2217Wh Brightness / Contrast Auto Adjust Input Source Color Display Energy Menu Personalize...
Users Guide
Page 45
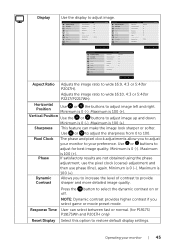
... buttons to wide 16:9, 4:3 or 5:4(for best image quality. If satisfactory results are not obtained using the phase adjustment, use the pixel clock (coarse) adjustment and then use phase (fine), again. Operating your monitor | 45 Dell P1917S/P1917SWh Brightness / Contrast Auto Adjust Input Source Color Display Energy Menu Personalize Others Resolution: 1280x1024, 60Hz Energy Use Horizontal Position 50 Vertical Position 50 Sharpness 50 Pixel Clock 50 Phase 12 Dynamic Contrast Response Time Normal Reset Display Dell P2017H Brightness / Contrast Auto Adjust Input Source...
... buttons to wide 16:9, 4:3 or 5:4(for best image quality. If satisfactory results are not obtained using the phase adjustment, use the pixel clock (coarse) adjustment and then use phase (fine), again. Operating your monitor | 45 Dell P1917S/P1917SWh Brightness / Contrast Auto Adjust Input Source Color Display Energy Menu Personalize Others Resolution: 1280x1024, 60Hz Energy Use Horizontal Position 50 Vertical Position 50 Sharpness 50 Pixel Clock 50 Phase 12 Dynamic Contrast Response Time Normal Reset Display Dell P2017H Brightness / Contrast Auto Adjust Input Source...
Users Guide
Page 46
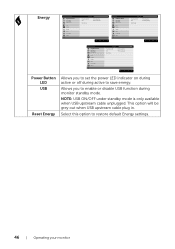
... Dell P2217/P2217Wh Brightness / Contrast Auto Adjust Input Source Color Display Energy Menu Personalize Others Resolution: 1680x1050, 60Hz Energy Use Power Button LED USB On During Active Off During Standby Reset Energy Power Button LED USB Reset Energy Allows you to enable or disable USB function during active to restore default Energy settings. 46 | Operating your monitor Select this option to save energy. NOTE: USB ON/OFF under standby mode is only available when USB upstream cable unplugged. Allows you to set the power LED...
... Dell P2217/P2217Wh Brightness / Contrast Auto Adjust Input Source Color Display Energy Menu Personalize Others Resolution: 1680x1050, 60Hz Energy Use Power Button LED USB On During Active Off During Standby Reset Energy Power Button LED USB Reset Energy Allows you to enable or disable USB function during active to restore default Energy settings. 46 | Operating your monitor Select this option to save energy. NOTE: USB ON/OFF under standby mode is only available when USB upstream cable unplugged. Allows you to set the power LED...

Users Guide
Page 47
... user access to one of the eight languages (English, Spanish, French, German, Brazilian Portuguese, Russian, Simplified Chinese, or Japanese). Reset all applicable settings. Menu Select this option to change the menu transparency by 90 degrees counter-clockwise. Select this option to 60 seconds. Dell P1917S/P1917SWh Brightness / Contrast Auto Adjust Input Source Color Display Energy Menu Personalize Others Resolution: 1280x1024, 60Hz Energy Use Language English Rotation Transparency 20 Timer 20 s Lock Reset Menu Unlock Dell P2017H Brightness / Contrast Auto Adjust Input...
... user access to one of the eight languages (English, Spanish, French, German, Brazilian Portuguese, Russian, Simplified Chinese, or Japanese). Reset all applicable settings. Menu Select this option to change the menu transparency by 90 degrees counter-clockwise. Select this option to 60 seconds. Dell P1917S/P1917SWh Brightness / Contrast Auto Adjust Input Source Color Display Energy Menu Personalize Others Resolution: 1280x1024, 60Hz Energy Use Language English Rotation Transparency 20 Timer 20 s Lock Reset Menu Unlock Dell P2017H Brightness / Contrast Auto Adjust Input...
Users Guide
Page 56
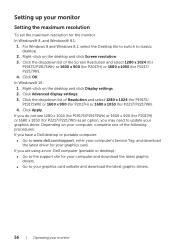
... Screen resolution. 3. If you may need to update your graphics driver. For Windows 8 and Windows 8.1, select the Desktop tile to switch to classic desktop. 2. Click the dropdown list of the following procedures: If you are using a non-Dell computer (portable or desktop): ∞ Go to the support site for the monitor: In Windows® 8, and Windows® 8.1: 1. Right-click on the desktop and click Display settings...
... Screen resolution. 3. If you may need to update your graphics driver. For Windows 8 and Windows 8.1, select the Desktop tile to switch to classic desktop. 2. Click the dropdown list of the following procedures: If you are using a non-Dell computer (portable or desktop): ∞ Go to the support site for the monitor: In Windows® 8, and Windows® 8.1: 1. Right-click on the desktop and click Display settings...
Users Guide
Page 63
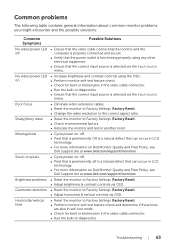
... Possible Solutions No video/power LED off ∞ Ensure that the video cable connecting the monitor and the computer is properly connected and secure. ∞ Verify that the power outlet is functioning properly using the OSD. ∞ Perform monitor self-test feature check. ∞ Check for bent or broken pins in the video cable connector. ∞ Run the built-in diagnostics. Brightness problems ∞ Reset the monitor to Factory Settings (Factory Reset). ∞ Adjust brightness & contrast controls via the Input source menu.
... Possible Solutions No video/power LED off ∞ Ensure that the video cable connecting the monitor and the computer is properly connected and secure. ∞ Verify that the power outlet is functioning properly using the OSD. ∞ Perform monitor self-test feature check. ∞ Check for bent or broken pins in the video cable connector. ∞ Run the built-in diagnostics. Brightness problems ∞ Reset the monitor to Factory Settings (Factory Reset). ∞ Adjust brightness & contrast controls via the Input source menu.

Users Guide
Page 64
... ∞ Use the Power Management feature to RGB or YPbPr in the Color settings OSD. ∞ Run the built-in diagnostics. Safety related issues Intermittent problems ∞ Do not perform any troubleshooting steps. ∞ Contact Dell immediately. ∞ Ensure that the video cable connecting the monitor to the computer is connected properly and is secure. ∞ Reset the monitor to Factory Settings (Factory Reset). ∞ Perform monitor self-test feature check to...
... ∞ Use the Power Management feature to RGB or YPbPr in the Color settings OSD. ∞ Run the built-in diagnostics. Safety related issues Intermittent problems ∞ Do not perform any troubleshooting steps. ∞ Contact Dell immediately. ∞ Ensure that the video cable connecting the monitor to the computer is connected properly and is secure. ∞ Reset the monitor to Factory Settings (Factory Reset). ∞ Perform monitor self-test feature check to...

Users Guide
Page 65
...; Check if the OSD menu is plugged in standby or sleep mode by moving the mouse or pressing any key on the keyboard. ∞ Check if the video cable is locked. Product-specific problems Specific Symptoms Possible Solutions Screen image is too ∞ Check the Aspect Ratio setting in diagnostics. No input signal when user controls are pressed ∞ Check the signal source. If yes, press and hold the button above the power button for 6 seconds to Factory Settings (Factory Reset...
...; Check if the OSD menu is plugged in standby or sleep mode by moving the mouse or pressing any key on the keyboard. ∞ Check if the video cable is locked. Product-specific problems Specific Symptoms Possible Solutions Screen image is too ∞ Check the Aspect Ratio setting in diagnostics. No input signal when user controls are pressed ∞ Check the signal source. If yes, press and hold the button above the power button for 6 seconds to Factory Settings (Factory Reset...


