Dell Display Manager User's Guide
Page 1
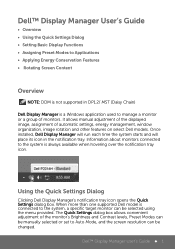
...) Dell Display Manager is a Windows application used to manage a monitor or a group of monitors. Dell™ Display Manager User's Guide 1 It allows manual adjustment of the displayed image, assignment of the monitor's Brightness and Contrast levels, Preset Modes can be manually selected or set to Auto Mode, and the screen resolution can be changed. Information about monitors connected to the system, a specific target monitor can be selected using the menu provided. Dell™ Display Manager User's Guide • Overview • Using the Quick Settings Dialog...
...) Dell Display Manager is a Windows application used to manage a monitor or a group of monitors. Dell™ Display Manager User's Guide 1 It allows manual adjustment of the displayed image, assignment of the monitor's Brightness and Contrast levels, Preset Modes can be manually selected or set to Auto Mode, and the screen resolution can be changed. Information about monitors connected to the system, a specific target monitor can be selected using the menu provided. Dell™ Display Manager User's Guide • Overview • Using the Quick Settings Dialog...
Dell Display Manager User's Guide
Page 2
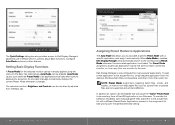
... be enabled that will automatically switch to be manually applied using the menu on each connected monitor, or it automatically. The Quick Settings dialog box also provides access to Dell Display Manager's advanced user interface which is used any time a Direct3D application is run fullscreen. Alternatively, Auto Mode can be used to the assignment list with a different Preset Mode. Dell™ Display Manager User's Guide 3 Applications present in the...
... be enabled that will automatically switch to be manually applied using the menu on each connected monitor, or it automatically. The Quick Settings dialog box also provides access to Dell Display Manager's advanced user interface which is used any time a Direct3D application is run fullscreen. Alternatively, Auto Mode can be used to the assignment list with a different Preset Mode. Dell™ Display Manager User's Guide 3 Applications present in the...
DELL Users Guide
Page 2
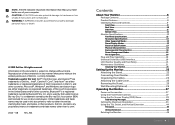
... Flat-Panel Specifications 12 Resolution Specifications 13 Video Supported Modes 13 Preset Display Modes 13 Electrical Specifications 13 Physical Characteristics 14 Environmental Characteristics 14 Power Management Modes 15 Pin Assignments 16 Plug and Play Capability 18 Universal Serial Bus (USB) Interface 19 LCD Monitor Quality and Pixel Policy 21 Maintenance Guidelines 21 Cleaning Your Monitor 21 Setting Up the Monitor 22 Attaching the Stand 22 Connecting Your Monitor 22 Organizing the Cables 24 Attaching the Cable Cover 25 Removing...
... Flat-Panel Specifications 12 Resolution Specifications 13 Video Supported Modes 13 Preset Display Modes 13 Electrical Specifications 13 Physical Characteristics 14 Environmental Characteristics 14 Power Management Modes 15 Pin Assignments 16 Plug and Play Capability 18 Universal Serial Bus (USB) Interface 19 LCD Monitor Quality and Pixel Policy 21 Maintenance Guidelines 21 Cleaning Your Monitor 21 Setting Up the Monitor 22 Attaching the Stand 22 Connecting Your Monitor 22 Organizing the Cables 24 Attaching the Cable Cover 25 Removing...

DELL Users Guide
Page 3
... Contacting Dell 57 Setting Up Your Monitor 58 Setting the display resolution to 1600 x 900 (maximum 58 If you have a Dell desktop or a Dell portable computer with internet access...59 If you have non Dell desktop, portable computer, or graphic card....60 Procedure on setting up dual monitors in Diagnostics 49 Common Problems 50 Product Specific Problems 55 Universal Serial Bus(USB) Specific Problems 56 Appendix 57 WARNING: Safety Instructions...
... Contacting Dell 57 Setting Up Your Monitor 58 Setting the display resolution to 1600 x 900 (maximum 58 If you have a Dell desktop or a Dell portable computer with internet access...59 If you have non Dell desktop, portable computer, or graphic card....60 Procedure on setting up dual monitors in Diagnostics 49 Common Problems 50 Product Specific Problems 55 Universal Serial Bus(USB) Specific Problems 56 Appendix 57 WARNING: Safety Instructions...
DELL Users Guide
Page 5
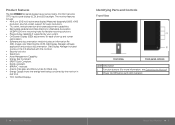
... x 900 resolution, plus full-screen support for lower resolutions. • Tilt, swivel, vertical extension and rotate adjustment capabilities. • Removable pedestal and Video Electronics Standards Association (VESA™) 100 mm mounting holes for ease of set-up and screen optimization. • Software and documentation media includes an information file (INF), Image color Matching File (ICM), Dell Display Manager software application and product documentation. Function buttons (For more information, see Operating the Monitor) 2.
... x 900 resolution, plus full-screen support for lower resolutions. • Tilt, swivel, vertical extension and rotate adjustment capabilities. • Removable pedestal and Video Electronics Standards Association (VESA™) 100 mm mounting holes for ease of set-up and screen optimization. • Software and documentation media includes an information file (INF), Image color Matching File (ICM), Dell Display Manager software application and product documentation. Function buttons (For more information, see Operating the Monitor) 2.
DELL Users Guide
Page 6
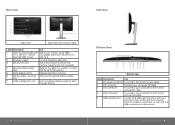
... the optional Dell Soundbar. Use to secure the monitor. (security lock not included). Use a security lock to organize cables by placing them through the slot. 10 About Your Monitor Bottom View Bottom view Label Description Use 1. About Your Monitor 11 AC power connector To connect the monitor power cable. 2. behind attached VESA Cover) 2 Regulatory label 3 Security lock slot 4 Barcode serial number label 5 Stand release button 6 Dell Soundbar mounting slots 7 Cable management slot Use Wall mount monitor using VESAcompatible wall mount kit (100 mm...
... the optional Dell Soundbar. Use to secure the monitor. (security lock not included). Use a security lock to organize cables by placing them through the slot. 10 About Your Monitor Bottom View Bottom view Label Description Use 1. About Your Monitor 11 AC power connector To connect the monitor power cable. 2. behind attached VESA Cover) 2 Regulatory label 3 Security lock slot 4 Barcode serial number label 5 Stand release button 6 Dell Soundbar mounting slots 7 Cable management slot Use Wall mount monitor using VESAcompatible wall mount kit (100 mm...
DELL Users Guide
Page 7
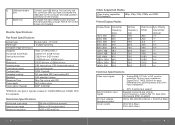
... Synchronization input signals AC input voltage/ frequency/current Inrush current • DP 1.2 signal input support Separate horizontal and vertical synchronizations, polarity-free TTL level, SOG (Composite SYNC on green) 100 to -g with OD 16.7 million colors 83%* (CIE1976) *[P2014Ht] color gamut (typical) is based on the monitor. 7 Stand lock To disable the stand release button and lock the stand assembly using an M3 X 6 mm screw (screw not included). 6 USB downstream Connect your USB device. TFT LCD In plane switching 49.41 cm (19.5 inches...
... Synchronization input signals AC input voltage/ frequency/current Inrush current • DP 1.2 signal input support Separate horizontal and vertical synchronizations, polarity-free TTL level, SOG (Composite SYNC on green) 100 to -g with OD 16.7 million colors 83%* (CIE1976) *[P2014Ht] color gamut (typical) is based on the monitor. 7 Stand lock To disable the stand release button and lock the stand assembly using an M3 X 6 mm screw (screw not included). 6 USB downstream Connect your USB device. TFT LCD In plane switching 49.41 cm (19.5 inches...

DELL Users Guide
Page 8
...) Power Management Modes If you have VESA's DPM™ compliance display card or software installed in your PC, the monitor can automatically reduce its power consumption when not in use. Vertical Sync Active Video Active Inactive Blanked - - DP, black connector Digital: Detachable, DVI-D, Solid pins. DVI-D, white connector; If the computer detects input from keyboard, mouse, or other input devices, the monitor automatically resumes functioning. Analog: Detachable, D-Sub, 15 pins 467.9 mm (18.42 inches...
...) Power Management Modes If you have VESA's DPM™ compliance display card or software installed in your PC, the monitor can automatically reduce its power consumption when not in use. Vertical Sync Active Video Active Inactive Blanked - - DP, black connector Digital: Detachable, DVI-D, Solid pins. DVI-D, white connector; If the computer detects input from keyboard, mouse, or other input devices, the monitor automatically resumes functioning. Analog: Detachable, D-Sub, 15 pins 467.9 mm (18.42 inches...

DELL Users Guide
Page 13
... connecting the DVI/VGA/DisplayPort cable, follow the procedures below to connect the USB cable to an appropriate USB port on your computer. (See bottom view for details.) 2. Organizing the Cables Attaching the Cable Cover Removing the Stand NOTE: To prevent scratches on the LCD screen while removing the stand, ensure that the monitor is applicable for your monitor setup: 1. Place the monitor on a clean surface. Turn on the monitor stand to the respective stand setup guide for cable attachment,) use the cable...
... connecting the DVI/VGA/DisplayPort cable, follow the procedures below to connect the USB cable to an appropriate USB port on your computer. (See bottom view for details.) 2. Organizing the Cables Attaching the Cable Cover Removing the Stand NOTE: To prevent scratches on the LCD screen while removing the stand, ensure that the monitor is applicable for your monitor setup: 1. Place the monitor on a clean surface. Turn on the monitor stand to the respective stand setup guide for cable attachment,) use the cable...

DELL Users Guide
Page 14
... OSD shows the numeric values of the characteristics as they change. Attach the mounting bracket from the wall mounting kit to remove the four screws securing the plastic cover. 4. As you use only with UL Listed Wall Mount Bracket with the VESA-compatible wall mounting kit. 1. Wall Mounting (Optional) Operating the Monitor Power On the Monitor Press the button to turn on the front of the monitor to adjust the characteristics of the image being displayed...
... OSD shows the numeric values of the characteristics as they change. Attach the mounting bracket from the wall mounting kit to remove the four screws securing the plastic cover. 4. As you use only with UL Listed Wall Mount Bracket with the VESA-compatible wall mounting kit. 1. Wall Mounting (Optional) Operating the Monitor Power On the Monitor Press the button to turn on the front of the monitor to adjust the characteristics of the image being displayed...

DELL Users Guide
Page 15
... LED indicates DPMS power (with power light save mode. Shortcut key / Brightness/Contrast Use the MENU button to launch the on the front of preset color modes. See Menu Accessing the Menu System. 4 Use this button to go back to the previous menu. Shortcut key/ Preset Modes 2 Use this button to choose from a list of the monitor to adjust the image settings. Front panel Button Description 1 Use the Up key to turn the monitor on and off. 5 The Blue LED indicates the monitor...
... LED indicates DPMS power (with power light save mode. Shortcut key / Brightness/Contrast Use the MENU button to launch the on the front of preset color modes. See Menu Accessing the Menu System. 4 Use this button to go back to the previous menu. Shortcut key/ Preset Modes 2 Use this button to choose from a list of the monitor to adjust the image settings. Front panel Button Description 1 Use the Up key to turn the monitor on and off. 5 The Blue LED indicates the monitor...

DELL Users Guide
Page 18
... connected to a computer or DVD player using the VGA and DVI cable or the HDMI to manually adjust the color settings. The screen appears warmer with a blue tint. • Custom Color: Allows you to DVI adapter. • YPbPr: Select this option if your DVD player supports only YPbPr output. • Standard: Loads the monitor's default color settings. Input Color Format Allows you to adjust the Red, Green, and Blue values and create your monitor is the default preset mode...
... connected to a computer or DVD player using the VGA and DVI cable or the HDMI to manually adjust the color settings. The screen appears warmer with a blue tint. • Custom Color: Allows you to DVI adapter. • YPbPr: Select this option if your DVD player supports only YPbPr output. • Standard: Loads the monitor's default color settings. Input Color Format Allows you to adjust the Red, Green, and Blue values and create your monitor is the default preset mode...

DELL Users Guide
Page 19
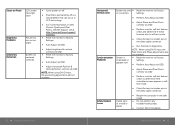
...'. Wide Mode Horizontal Position Vertical Position Sharpness Pixel Clock Adjust the image ratio to 2,000,000 : 1. Minimum is not available. NOTE: When using a DVI source, the Horizontal Position setting is '0' (-). Use the and buttons to adjust image left and right. This feature can automatically sharpen images, enhance hues and boost color contrast. Use or to adjust the sharpness from '0' to green or purple. NOTE: Pixel Clock and Phase Adjustments are not obtained using a DVI source, the Vertical Position setting is '100' (+). Press image. Use the...
...'. Wide Mode Horizontal Position Vertical Position Sharpness Pixel Clock Adjust the image ratio to 2,000,000 : 1. Minimum is not available. NOTE: When using a DVI source, the Horizontal Position setting is '0' (-). Use the and buttons to adjust image left and right. This feature can automatically sharpen images, enhance hues and boost color contrast. Use or to adjust the sharpness from '0' to green or purple. NOTE: Pixel Clock and Phase Adjustments are not obtained using a DVI source, the Vertical Position setting is '100' (+). Press image. Use the...

DELL Users Guide
Page 20
.... Controls user access to transparent. Either soft lock (through OSD menu) or hard lock (Press and hold the button above power button for 10 sec) Select this option to restore default Energy Settings. 38 Operating the Monitor MENU SETTINGS Language Transparency Timer Lock Reset Menu Settings Language option to set the power LED indicator on or off ". Energy Smart turned "on , the monitor will consume overall less power compared to when Energy Smart is used to change...
.... Controls user access to transparent. Either soft lock (through OSD menu) or hard lock (Press and hold the button above power button for 10 sec) Select this option to restore default Energy Settings. 38 Operating the Monitor MENU SETTINGS Language Transparency Timer Lock Reset Menu Settings Language option to set the power LED indicator on or off ". Energy Smart turned "on , the monitor will consume overall less power compared to when Energy Smart is used to change...

DELL Users Guide
Page 25
... 5 and 6 to inspect the display in self-test mode, the power LED remains blue. Check the video card and computer. If your monitor and reconnect the video cable; Turn off both your computer and video card. Ensure that helps you determine if the screen abnormality you are properly connected but the monitor screen remains dark, run the monitor self-test by performing the following steps: 1. The color of the computer. To...
... 5 and 6 to inspect the display in self-test mode, the power LED remains blue. Check the video card and computer. If your monitor and reconnect the video cable; Turn off both your computer and video card. Ensure that helps you determine if the screen abnormality you are properly connected but the monitor screen remains dark, run the monitor self-test by performing the following steps: 1. The color of the computer. To...
DELL Users Guide
Page 27
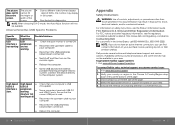
... Pixels LCD screen has bright spots Brightness Problems Picture too dim or too bright Geometric Distortion Screen not centered correctly • Cycle power on Dell Monitor Quality and Pixel Policy, see Dell Support site at: http://www.dell.com/support/ monitors. • Reset the monitor to Factory Settings. • Auto Adjust via OSD. • Adjust brightness & contrast controls via OSD. • Reset the monitor to Factory Settings. • Auto Adjust via OSD. • Adjust Horizontal Position & Vertical Position controls via OSD. • Perform monitor self-test feature check...
... Pixels LCD screen has bright spots Brightness Problems Picture too dim or too bright Geometric Distortion Screen not centered correctly • Cycle power on Dell Monitor Quality and Pixel Policy, see Dell Support site at: http://www.dell.com/support/ monitors. • Reset the monitor to Factory Settings. • Auto Adjust via OSD. • Adjust brightness & contrast controls via OSD. • Reset the monitor to Factory Settings. • Auto Adjust via OSD. • Adjust Horizontal Position & Vertical Position controls via OSD. • Perform monitor self-test feature check...

DELL Users Guide
Page 28
...; Check to make sure Video Source to Graphics or Video depending on the application. • Try different Color Preset Settings in properly. Alternatively, use (for a long displayed period of time appears on the front panel Turn off the monitor, unplug the power cord, plug back, and then turn off • Ensure that the video cable connecting the monitor to Factory Settings. No Input No picture, Signal when the LED light user controls is turned off. • Change the Input Color Format to PC RGB...
...; Check to make sure Video Source to Graphics or Video depending on the application. • Try different Color Preset Settings in properly. Alternatively, use (for a long displayed period of time appears on the front panel Turn off the monitor, unplug the power cord, plug back, and then turn off • Ensure that the video cable connecting the monitor to Factory Settings. No Input No picture, Signal when the LED light user controls is turned off. • Change the Input Color Format to PC RGB...
DELL Users Guide
Page 29
... Product Information Guide. Reboot the computer. 56 Operating the Monitor Appendix Safety Instructions WARNING: Use of DVDs, the monitor may not be available. Dell provides several online and telephone-based support and service options. Verify your computer is slow. NOTE: When choosing DVI-D mode, the Auto Adjust function will not be available in full screen. Universal Serial Bus (USB) Specific Problems Specific Symptoms USB interface is not working What You...
... Product Information Guide. Reboot the computer. 56 Operating the Monitor Appendix Safety Instructions WARNING: Use of DVDs, the monitor may not be available. Dell provides several online and telephone-based support and service options. Verify your computer is slow. NOTE: When choosing DVI-D mode, the Auto Adjust function will not be available in full screen. Universal Serial Bus (USB) Specific Problems Specific Symptoms USB interface is not working What You...

DELL Users Guide
Page 30
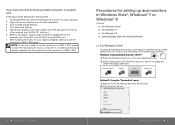
... switch to update your graphics driver. If you do not see 1600 x 900 as an option, you may need to classic desktop. 2. Right-click on the desktop and click Screen Resolution. 3. Go to 1600 x 900 pixels by performing the following steps: In Windows Vista®, Windows® 7, Windows® 8: 1. Setting Up Your Monitor Setting the display resolution to 1600 x 900 (maximum) For maximum display performance while using...
... switch to update your graphics driver. If you do not see 1600 x 900 as an option, you may need to classic desktop. 2. Right-click on the desktop and click Screen Resolution. 3. Go to 1600 x 900 pixels by performing the following steps: In Windows Vista®, Windows® 7, Windows® 8: 1. Setting Up Your Monitor Setting the display resolution to 1600 x 900 (maximum) For maximum display performance while using...
DELL Users Guide
Page 31
.... 3. Method 2: Using the "Personalize" menu 1. Click Display Settings. 60 Setting Up Your Monitor Setting Up Your Monitor 61 Identify your Graphics Adapter, attempt to set the resolution to the graphic card provider website for updated driver (for setting up dual monitors in Windows Vista®, Windows® 7 or Windows® 8 Content (a) For Windows Vista® (b) For Windows® 7 (c) For Windows® 8 (d) Setting Display Styles For Multiple Monitor (a) For Windows Vista® Connect the external monitor(s) to...
.... 3. Method 2: Using the "Personalize" menu 1. Click Display Settings. 60 Setting Up Your Monitor Setting Up Your Monitor 61 Identify your Graphics Adapter, attempt to set the resolution to the graphic card provider website for updated driver (for setting up dual monitors in Windows Vista®, Windows® 7 or Windows® 8 Content (a) For Windows Vista® (b) For Windows® 7 (c) For Windows® 8 (d) Setting Display Styles For Multiple Monitor (a) For Windows Vista® Connect the external monitor(s) to...


