
Owner's Manual
Page 2
USA Canada Mexico Puerto Rico UK Ireland France Italy Spain Germany Austria Netherlands Belgium Sweden Norway Denmark Finland Switzerland 877-465-2968 (877-Ink2You) 877-501-4803 001-800-210-7607 800-805-7545 0870 907 4574 1850 707 407 0825387247 800602705 902120385 0800 2873355 08 20 - 24 05 30 35 020 - 674 4881 02.713 1590 08 587 705 81 231622 64 3287 5215 09 2533 1411 0848 801 888 www.dell.com/supplies | support.dell.com You can order toner cartridges online at www.dell.com/supplies or by phone. Order toner cartridges Dell™ toner cartridges are available only through Dell.
USA Canada Mexico Puerto Rico UK Ireland France Italy Spain Germany Austria Netherlands Belgium Sweden Norway Denmark Finland Switzerland 877-465-2968 (877-Ink2You) 877-501-4803 001-800-210-7607 800-805-7545 0870 907 4574 1850 707 407 0825387247 800602705 902120385 0800 2873355 08 20 - 24 05 30 35 020 - 674 4881 02.713 1590 08 587 705 81 231622 64 3287 5215 09 2533 1411 0848 801 888 www.dell.com/supplies | support.dell.com You can order toner cartridges online at www.dell.com/supplies or by phone. Order toner cartridges Dell™ toner cartridges are available only through Dell.

Owner's Manual
Page 3
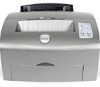
... card stock. www.dell.com/supplies | support.dell.com Load a single sheet of paper or other media. Check the status of your paper capacity. Stack printed documents face down. Increase your printer. Adjust the width of the media in tray 1 or the top output bin. Dell™ Personal Laser Printer P1500 Paper support Top output bin...
... card stock. www.dell.com/supplies | support.dell.com Load a single sheet of paper or other media. Check the status of your paper capacity. Stack printed documents face down. Increase your printer. Adjust the width of the media in tray 1 or the top output bin. Dell™ Personal Laser Printer P1500 Paper support Top output bin...

Owner's Manual
Page 14
... • Operator panel overlay (non-English only) If any items are missing or damaged, contact Dell at support.dell.com for proper ventilation. • Provide the proper environment: - Free of air conditioners, heaters, or ventilators - www.dell.com/supplies | support.dell.com 1 Select a location for your printer. • Leave enough room to repack the printer. 14...
... • Operator panel overlay (non-English only) If any items are missing or damaged, contact Dell at support.dell.com for proper ventilation. • Provide the proper environment: - Free of air conditioners, heaters, or ventilators - www.dell.com/supplies | support.dell.com 1 Select a location for your printer. • Leave enough room to repack the printer. 14...

Owner's Manual
Page 18
Cartridge handle 3 Remove the protective foam packaging from the toner cartridge. 18 Install printer supplies www.dell.com/supplies | support.dell.com Installing the print cartridge Removing toner cartridge packaging 1 Use the finger tab to pull down the printer cover. 2 Grasp the cartridge handle (behind the packaging tag in the illustration) and pull the toner cartridge straight up.
Cartridge handle 3 Remove the protective foam packaging from the toner cartridge. 18 Install printer supplies www.dell.com/supplies | support.dell.com Installing the print cartridge Removing toner cartridge packaging 1 Use the finger tab to pull down the printer cover. 2 Grasp the cartridge handle (behind the packaging tag in the illustration) and pull the toner cartridge straight up.

Owner's Manual
Page 20
Do not force the cover closed. 20 Install printer supplies c Push down and guide it is positioned correctly. www.dell.com/supplies | support.dell.com 6 Insert the toner cartridge: a Align the colored arrows on the cartridge until it between the toner cartridge grooves. If you cannot close the printer cover, make sure the toner cartridge is firmly in the printer. b Holding the cartridge by the handle, tilt the cartridge down on either side of the cartridge with the corresponding arrows in place. 7 Close the printer cover.
Do not force the cover closed. 20 Install printer supplies c Push down and guide it is positioned correctly. www.dell.com/supplies | support.dell.com 6 Insert the toner cartridge: a Align the colored arrows on the cartridge until it between the toner cartridge grooves. If you cannot close the printer cover, make sure the toner cartridge is firmly in the printer. b Holding the cartridge by the handle, tilt the cartridge down on either side of the cartridge with the corresponding arrows in place. 7 Close the printer cover.

Owner's Manual
Page 22
NOTE: If you have chosen for your printer. 22 Install the optional 250-sheet drawer Base Tray If you ordered this optional drawer, follow the instructions below to install it. 1 Remove the tray from the base. 2 Remove all packing material and tape from the tray and the base. 3 Place the base in the location you install the optional 250-sheet drawer at a later time, be sure to turn off the printer before installing it. www.dell.com/supplies | support.dell.com To increase paper capacity, you can purchase the optional 250-sheet drawer, which consists of a base and a tray.
NOTE: If you have chosen for your printer. 22 Install the optional 250-sheet drawer Base Tray If you ordered this optional drawer, follow the instructions below to install it. 1 Remove the tray from the base. 2 Remove all packing material and tape from the tray and the base. 3 Place the base in the location you install the optional 250-sheet drawer at a later time, be sure to turn off the printer before installing it. www.dell.com/supplies | support.dell.com To increase paper capacity, you can purchase the optional 250-sheet drawer, which consists of a base and a tray.

Owner's Manual
Page 24
www.dell.com/supplies | support.dell.com 5 Insert the tray. When you complete setting up the printer, print a menu settings page to verify the 250-sheet drawer is listed under Installed Features (see "Loading the optional 250-sheet tray" on page 61. 24 Install the optional 250-sheet drawer For more information on configuring the 250-sheet drawer for printing, see "Configure paper trays" on page 40. For more information on loading the 250-sheet drawer, see page 66).
www.dell.com/supplies | support.dell.com 5 Insert the tray. When you complete setting up the printer, print a menu settings page to verify the 250-sheet drawer is listed under Installed Features (see "Loading the optional 250-sheet tray" on page 61. 24 Install the optional 250-sheet drawer For more information on configuring the 250-sheet drawer for printing, see "Configure paper trays" on page 40. For more information on loading the 250-sheet drawer, see page 66).

Owner's Manual
Page 26
www.dell.com/supplies | support.dell.com You can customize your printer memory capacity and connectivity by adding optional cards. CAUTION: If you must remove the printer side cover. 1 Open the printer front cover. 26 Install optional memory cards Removing the printer side cover Before installing any memory options, you are installing memory cards sometime after setting up the printer, turn the printer off and unplug the power cord before continuing.
www.dell.com/supplies | support.dell.com You can customize your printer memory capacity and connectivity by adding optional cards. CAUTION: If you must remove the printer side cover. 1 Open the printer front cover. 26 Install optional memory cards Removing the printer side cover Before installing any memory options, you are installing memory cards sometime after setting up the printer, turn the printer off and unplug the power cord before continuing.

Owner's Manual
Page 28
www.dell.com/supplies | support.dell.com Removing the system board shield Use a No. 2 Phillips screwdriver to remove the system board shield. 1 Remove screw #1 and set it aside. 1 2 3 4 2 Loosen screws #2, #3, and #4, but do not remove them. 28 Install optional memory cards
www.dell.com/supplies | support.dell.com Removing the system board shield Use a No. 2 Phillips screwdriver to remove the system board shield. 1 Remove screw #1 and set it aside. 1 2 3 4 2 Loosen screws #2, #3, and #4, but do not remove them. 28 Install optional memory cards

Owner's Manual
Page 30
Latch Latch 4 Guide the card between the latches on each end of the connector and push the card firmly into the connector. 5 Make sure each latch fits over the notch on each end of the card with the notches on the bottom of the memory card. 6 Reattach the metal shield and side cover. Save the packaging. 3 Align the notches on the connector. See page 31 for instructions. 30 Install optional memory cards www.dell.com/supplies | support.dell.com 2 Unpack the printer memory card. Notches Connection points Avoid touching the connection points along the edge of the card.
Latch Latch 4 Guide the card between the latches on each end of the connector and push the card firmly into the connector. 5 Make sure each latch fits over the notch on each end of the card with the notches on the bottom of the memory card. 6 Reattach the metal shield and side cover. Save the packaging. 3 Align the notches on the connector. See page 31 for instructions. 30 Install optional memory cards www.dell.com/supplies | support.dell.com 2 Unpack the printer memory card. Notches Connection points Avoid touching the connection points along the edge of the card.

Owner's Manual
Page 32
Tab Tab 2 As you close the printer side cover, push the oval tabs firmly into the slots. 3 Close the printer front cover. 32 Install optional memory cards www.dell.com/supplies | support.dell.com 2 Tighten screws #2, #3, and #4, and reattach screw #1 to keep the shield in place. 1 2 3 4 Reattaching the printer side cover 1 Align the top and bottom tabs with the corresponding slots.
Tab Tab 2 As you close the printer side cover, push the oval tabs firmly into the slots. 3 Close the printer front cover. 32 Install optional memory cards www.dell.com/supplies | support.dell.com 2 Tighten screws #2, #3, and #4, and reattach screw #1 to keep the shield in place. 1 2 3 4 Reattaching the printer side cover 1 Align the top and bottom tabs with the corresponding slots.

Owner's Manual
Page 34
... your printer's paper capacity with the optional 250-sheet tray. An output bin on top of plain paper, and a single-sheet manual feed. www.dell.com/supplies | support.dell.com Your printer has two standard paper sources: tray 1, which holds up to 150 sheets of the printer holds up to 100 sheets. Use...
... your printer's paper capacity with the optional 250-sheet tray. An output bin on top of plain paper, and a single-sheet manual feed. www.dell.com/supplies | support.dell.com Your printer has two standard paper sources: tray 1, which holds up to 150 sheets of the printer holds up to 100 sheets. Use...

Owner's Manual
Page 35
The following table lists page numbers where you can find loading instructions for each tray. Source Tray 1 Capacity (sheets) 150 Paper sizes supported Optional 250 250-sheet tray Manual feed 1 A4, A5, B5, letter, legal, executive, folio Paper types supported Plain paper, transparencies, labels, card stock Plain paper Plain paper, transparencies, envelopes, labels, card stock Go to page... 36 40 45 Load paper 35
The following table lists page numbers where you can find loading instructions for each tray. Source Tray 1 Capacity (sheets) 150 Paper sizes supported Optional 250 250-sheet tray Manual feed 1 A4, A5, B5, letter, legal, executive, folio Paper types supported Plain paper, transparencies, labels, card stock Plain paper Plain paper, transparencies, envelopes, labels, card stock Go to page... 36 40 45 Load paper 35

Owner's Manual
Page 36
Tray 1 holds up to 150 sheets of paper, 10 sheets of transparencies or labels, 10 envelopes, 10 sheets of card stock. 1 Extend the rear paper support until you hear it click twice. 2 Flex the sheets back and forth to feed paper and specialty media. www.dell.com/supplies | support.dell.com Loading tray 1 Use tray 1, which is behind the manual feed, to loosen them, fan the sheets on all four sides, and flex them again. 36 Load paper
Tray 1 holds up to 150 sheets of paper, 10 sheets of transparencies or labels, 10 envelopes, 10 sheets of card stock. 1 Extend the rear paper support until you hear it click twice. 2 Flex the sheets back and forth to feed paper and specialty media. www.dell.com/supplies | support.dell.com Loading tray 1 Use tray 1, which is behind the manual feed, to loosen them, fan the sheets on all four sides, and flex them again. 36 Load paper

Owner's Manual
Page 38
www.dell.com/supplies | support.dell.com • envelopes, insert them vertically, flap side down with the stamp area in the sealed position 38 Load paper Contain windows, holes, perforations, cutouts, or embossing - Have postage stamps attached - Are stuck together - Have excessive curl - Use metal clasps, string ties, or metal folding bars - Have any way - Are damaged in any exposed adhesive when the flap is in the top left corner To reduce paper jams, do not use envelopes that: -
www.dell.com/supplies | support.dell.com • envelopes, insert them vertically, flap side down with the stamp area in the sealed position 38 Load paper Contain windows, holes, perforations, cutouts, or embossing - Have postage stamps attached - Are stuck together - Have excessive curl - Use metal clasps, string ties, or metal folding bars - Have any way - Are damaged in any exposed adhesive when the flap is in the top left corner To reduce paper jams, do not use envelopes that: -

Owner's Manual
Page 39
NOTE: Do not forget to select the paper type and paper size from your software application. 5 Extend the front paper support on the top output bin until you hear it click once. 6 If you are printing on legal size paper, extend the front paper support until you hear it click twice. 4 Slide the paper guides against the edges of the paper or envelopes. Load paper 39
NOTE: Do not forget to select the paper type and paper size from your software application. 5 Extend the front paper support on the top output bin until you hear it click once. 6 If you are printing on legal size paper, extend the front paper support until you hear it click twice. 4 Slide the paper guides against the edges of the paper or envelopes. Load paper 39

Owner's Manual
Page 40
Loading the optional 250-sheet tray 1 Grasp the tabs on specialty media. www.dell.com/supplies | support.dell.com 7 Open the front output door for a straight-through paper path if you are printing on either side of the tray and pull it completely out of the printer. 40 Load paper
Loading the optional 250-sheet tray 1 Grasp the tabs on specialty media. www.dell.com/supplies | support.dell.com 7 Open the front output door for a straight-through paper path if you are printing on either side of the tray and pull it completely out of the printer. 40 Load paper

Owner's Manual
Page 41
After the tray is pressed down before inserting the tray into the printer. 3 If loading A4 or legal size paper, extend the paper support on the front of the tray. Load paper 41 2 Make sure the metal plate is inserted, the metal plate springs back up so the paper can feed into the printer.
After the tray is pressed down before inserting the tray into the printer. 3 If loading A4 or legal size paper, extend the paper support on the front of the tray. Load paper 41 2 Make sure the metal plate is inserted, the metal plate springs back up so the paper can feed into the printer.

Owner's Manual
Page 42
www.dell.com/supplies | support.dell.com 4 Flex the sheets back and forth to loosen them, fan the sheets on all four sides, and flex them again. 5 If loading letterhead paper, insert letterhead face down with the top of the page entering the printer first. 42 Load paper
www.dell.com/supplies | support.dell.com 4 Flex the sheets back and forth to loosen them, fan the sheets on all four sides, and flex them again. 5 If loading letterhead paper, insert letterhead face down with the top of the page entering the printer first. 42 Load paper

Owner's Manual
Page 44
NOTE: Do not forget to select the paper type and paper size from your software application. 44 Load paper www.dell.com/supplies | support.dell.com 7 Slide the paper guides flush against the edges of the paper. 8 Reinstall the tray, making sure it is pushed all the way in.
NOTE: Do not forget to select the paper type and paper size from your software application. 44 Load paper www.dell.com/supplies | support.dell.com 7 Slide the paper guides flush against the edges of the paper. 8 Reinstall the tray, making sure it is pushed all the way in.


