Quick Reference Guide
Page 3
... 11 Desktop Computer - Front View 13 Small Form Factor Computer - Front View 17 Ultra-Small Form Factor Computer - Back View 10 Desktop Computer - Back View 18 Removing the Computer Cover 20 Before You Begin 20 Mini Tower Computer 21 Desktop Computer 23 Small...32 System Lights 35 Diagnostic Lights 36 Beep Codes 39 Running the Dell™ IDE Hard Drive Diagnostics 40 Resolving Software and Hardware Incompatibilities 40 Using Microsoft® Windows® XP System Restore 40 Reinstalling Microsoft® Windows® XP 42 Contents 3 Front View 8 Mini Tower Computer ...
... 11 Desktop Computer - Front View 13 Small Form Factor Computer - Front View 17 Ultra-Small Form Factor Computer - Back View 10 Desktop Computer - Back View 18 Removing the Computer Cover 20 Before You Begin 20 Mini Tower Computer 21 Desktop Computer 23 Small...32 System Lights 35 Diagnostic Lights 36 Beep Codes 39 Running the Dell™ IDE Hard Drive Diagnostics 40 Resolving Software and Hardware Incompatibilities 40 Using Microsoft® Windows® XP System Restore 40 Reinstalling Microsoft® Windows® XP 42 Contents 3 Front View 8 Mini Tower Computer ...

Quick Reference Guide
Page 9
...in a normal operating state. • Blinking green - Quick Reference Guide 9 Press this button to attach a microphone. The computer is in the Windows Device Manager. See "Power Problems" in a power-saving mode. • Blinking or solid amber - NOTICE: If your operating system has ACPI ... button for a description of speakers. 5 diagnostic lights 6 power button 7 power light 8 hard-drive activity light 9 headphone connector 10 microphone connector Use these lights to help you press the power button the computer will perform an operating system shutdown. Use the headphone...
...in a normal operating state. • Blinking green - Quick Reference Guide 9 Press this button to attach a microphone. The computer is in the Windows Device Manager. See "Power Problems" in a power-saving mode. • Blinking or solid amber - NOTICE: If your operating system has ACPI ... button for a description of speakers. 5 diagnostic lights 6 power button 7 power light 8 hard-drive activity light 9 headphone connector 10 microphone connector Use these lights to help you press the power button the computer will perform an operating system shutdown. Use the headphone...
Quick Reference Guide
Page 12
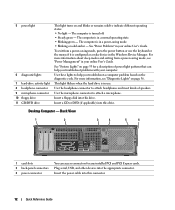
... help you troubleshoot problems with your computer. 5 power light 6 diagnostic lights 7 hard-drive activity light 8 headphone connector 9 microphone connector 10 floppy drive 11 CD/DVD drive This light turns on and blinks or remains solid to attach a microphone. The computer is in a... normal operating state. • Blinking green - The computer is configured as a wake device in the Windows Device Manager. The computer is turned off. • Steady green - For more information, see "Power Management" in your online User's Guide. ...
... help you troubleshoot problems with your computer. 5 power light 6 diagnostic lights 7 hard-drive activity light 8 headphone connector 9 microphone connector 10 floppy drive 11 CD/DVD drive This light turns on and blinks or remains solid to attach a microphone. The computer is in a... normal operating state. • Blinking green - The computer is configured as a wake device in the Windows Device Manager. The computer is turned off. • Steady green - For more information, see "Power Management" in your online User's Guide. ...
Quick Reference Guide
Page 14
... The computer is configured as a wake device in your online User's Guide. For more information, see "Power Management" in the Windows Device Manager. Use the headphone connector to this connector. 14 Quick Reference Guide Plug serial, USB, and other devices into this drive....mode, see "Diagnostic Lights" on page 36. 5 diagnostic lights 6 hard-drive activity light 7 power light 8 headphone connector 9 microphone connector 10 floppy drive 11 CD/DVD drive Use the lights to help you troubleshoot a computer problem based on the diagnostic code. This light flickers when ...
... The computer is configured as a wake device in your online User's Guide. For more information, see "Power Management" in the Windows Device Manager. Use the headphone connector to this connector. 14 Quick Reference Guide Plug serial, USB, and other devices into this drive....mode, see "Diagnostic Lights" on page 36. 5 diagnostic lights 6 hard-drive activity light 7 power light 8 headphone connector 9 microphone connector 10 floppy drive 11 CD/DVD drive Use the lights to help you troubleshoot a computer problem based on the diagnostic code. This light flickers when ...
Quick Reference Guide
Page 20
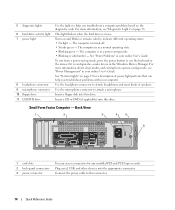
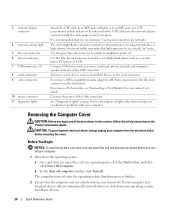
...: To guard against electrical shock, always unplug your computer. Use the blue line-in connector 7 USB connectors (5) 8 serial connector 9 video connector 10 power connector 11 diagnostic lights Attach the UTP cable to an RJ45 jack wall plate or to an RJ45 port on the back panel. 3 network...press the other end of light codes that can help you use Category 5 wiring and connectors for networks. b In the Turn off computer window, click Turn off after the operating system shutdown process finishes. 2 Ensure that you troubleshoot problems with your computer from your computer. 1 Shut...
...: To guard against electrical shock, always unplug your computer. Use the blue line-in connector 7 USB connectors (5) 8 serial connector 9 video connector 10 power connector 11 diagnostic lights Attach the UTP cable to an RJ45 jack wall plate or to an RJ45 port on the back panel. 3 network...press the other end of light codes that can help you use Category 5 wiring and connectors for networks. b In the Turn off computer window, click Turn off after the operating system shutdown process finishes. 2 Ensure that you troubleshoot problems with your computer from your computer. 1 Shut...
Quick Reference Guide
Page 43
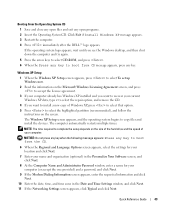
...Restart the computer. 4 Press immediately after the DELL™ logo appears. Quick Reference Guide 43 NOTICE: Do not press any key when the following message appears: Press any key to boot from CD message appears, press any key. The Windows XP Setup screen appears, and the operating system ... click Next. 9 If the Modem Dialing Information screen appears, enter the requested information and click Next. 10 Enter the date, time, and time zone in the Date and Time Settings window, and click Next. 11 If the Networking Settings screen appears, click Typical and click Next. Booting From...
...Restart the computer. 4 Press immediately after the DELL™ logo appears. Quick Reference Guide 43 NOTICE: Do not press any key when the following message appears: Press any key to boot from CD message appears, press any key. The Windows XP Setup screen appears, and the operating system ... click Next. 9 If the Modem Dialing Information screen appears, enter the requested information and click Next. 10 Enter the date, time, and time zone in the Date and Time Settings window, and click Next. 11 If the Networking Settings screen appears, click Typical and click Next. Booting From...


