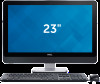
Dell OptiPlex 9020 AIO Owners Manual
Page 1
Dell OptiPlex 9020 AIO Owner's Manual Regulatory Model: W04C Regulatory Type: W04C002
Dell OptiPlex 9020 AIO Owner's Manual Regulatory Model: W04C Regulatory Type: W04C002
Dell OptiPlex 9020 AIO Owners Manual
Page 2
... that helps you how to hardware or loss of Microsoft Corporation in this text: Dell™, the DELL logo, Dell Precision™, Precision ON™,ExpressCharge™, Latitude™, Latitude ON™, OptiPlex™, Venue™, Vostro™, and Wi-Fi Catcher™ are trademarks of... is a trademark owned by the Blu-ray Disc Association (BDA) and licensed for property damage, personal injury, or death. © 2013 Dell Inc. WARNING: A WARNING indicates a potential for use of Advanced Micro Devices, Inc. All Rights Reserved. and other countries. The Bluetooth®...
... that helps you how to hardware or loss of Microsoft Corporation in this text: Dell™, the DELL logo, Dell Precision™, Precision ON™,ExpressCharge™, Latitude™, Latitude ON™, OptiPlex™, Venue™, Vostro™, and Wi-Fi Catcher™ are trademarks of... is a trademark owned by the Blu-ray Disc Association (BDA) and licensed for property damage, personal injury, or death. © 2013 Dell Inc. WARNING: A WARNING indicates a potential for use of Advanced Micro Devices, Inc. All Rights Reserved. and other countries. The Bluetooth®...
Dell OptiPlex 9020 AIO Owners Manual
Page 3
Contents 1 Working on Your Computer...5 Before Working Inside Your Computer...5 Recommended Tools...6 Turning Off Your Computer...6 After Working Inside Your Computer...7 Important Information...7 2 Removing and Installing Components 9 System Overview...9 Removing the VESA Stand...10 Installing the VESA Stand...11 Removing the Back Cover...11 Installing the Back Cover...12 Removing the Memory...12 Installing the Memory...13 Removing the VESA Mount Bracket...13 Installing the VESA Mount Bracket...14 Removing the Power and On-Screen Display (OSD) Buttons Board 14 Installing the Power and OSD ...
Contents 1 Working on Your Computer...5 Before Working Inside Your Computer...5 Recommended Tools...6 Turning Off Your Computer...6 After Working Inside Your Computer...7 Important Information...7 2 Removing and Installing Components 9 System Overview...9 Removing the VESA Stand...10 Installing the VESA Stand...11 Removing the Back Cover...11 Installing the Back Cover...12 Removing the Memory...12 Installing the Memory...13 Removing the VESA Mount Bracket...13 Installing the VESA Mount Bracket...14 Removing the Power and On-Screen Display (OSD) Buttons Board 14 Installing the Power and OSD ...
Dell OptiPlex 9020 AIO Owners Manual
Page 4
... Setup Password...53 Assigning a System Password and Setup Password 54 Deleting or Changing an Existing System and/or Setup Password 54 4 Technical Specifications...57 5 Contacting Dell...63
... Setup Password...53 Assigning a System Password and Setup Password 54 Deleting or Changing an Existing System and/or Setup Password 54 4 Technical Specifications...57 5 Contacting Dell...63
Dell OptiPlex 9020 AIO Owners Manual
Page 5
... that your warranty. Disconnect your computer and all network cables from the computer. 4. Damage due to servicing that is not authorized by Dell is unplugged to prevent the computer cover from being scratched. 2. As you connect a cable, ensure that both connectors are disconnecting this ... to help protect your computer from potential damage and to help to ensure your computer (see the Regulatory Compliance Homepage at www.dell.com/ regulatory_compliance CAUTION: Many repairs may appear differently than shown in this document assumes that the following conditions exist: • ...
... that your warranty. Disconnect your computer and all network cables from the computer. 4. Damage due to servicing that is not authorized by Dell is unplugged to prevent the computer cover from being scratched. 2. As you connect a cable, ensure that both connectors are disconnecting this ... to help protect your computer from potential damage and to help to ensure your computer (see the Regulatory Compliance Homepage at www.dell.com/ regulatory_compliance CAUTION: Many repairs may appear differently than shown in this document assumes that the following conditions exist: • ...
Dell OptiPlex 9020 AIO Owners Manual
Page 6
Select the * Using a mouse: and then select Shut down . 1. In Windows 7: and select Shut down a. Click the arrow in the lower-right corner of the Start menu as the metal at the back of the computer. If your computer and attached devices did not automatically turn off when you shut down the operating system: - Recommended Tools The procedures in from the right edge of the screen and click Settings. In Windows 8: * Using a touch-enabled device: a. b. or 1. Ensure that the computer and all open programs before you work, periodically touch an unpainted metal surface to...
Select the * Using a mouse: and then select Shut down . 1. In Windows 7: and select Shut down a. Click the arrow in the lower-right corner of the Start menu as the metal at the back of the computer. If your computer and attached devices did not automatically turn off when you shut down the operating system: - Recommended Tools The procedures in from the right edge of the screen and click Settings. In Windows 8: * Using a touch-enabled device: a. b. or 1. Ensure that the computer and all open programs before you work, periodically touch an unpainted metal surface to...
Dell OptiPlex 9020 AIO Owners Manual
Page 7
If required, verify that the computer works correctly by running the Dell Diagnostics. Important Information NOTE: Avoid using the touchscreen in temperature may cause condensation on the inner surface of the glass screen, which will disappear after a ...
If required, verify that the computer works correctly by running the Dell Diagnostics. Important Information NOTE: Avoid using the touchscreen in temperature may cause condensation on the inner surface of the glass screen, which will disappear after a ...
Dell OptiPlex 9020 AIO Owners Manual
Page 9
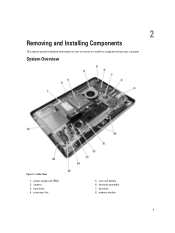
coin-cell battery 6. heat sink 8. hard drive 4. heat sink assembly 7. System Overview Figure 1. Inside View 1. camera 3. power supply unit (PSU) 2. processor fan 5. memory module 9 2 Removing and Installing Components This section provides detailed information on how to remove or install the components from your computer.
coin-cell battery 6. heat sink 8. hard drive 4. heat sink assembly 7. System Overview Figure 1. Inside View 1. camera 3. power supply unit (PSU) 2. processor fan 5. memory module 9 2 Removing and Installing Components This section provides detailed information on how to remove or install the components from your computer.
Dell OptiPlex 9020 AIO Owners Manual
Page 10
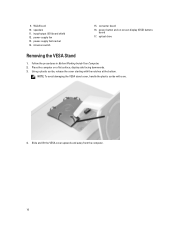
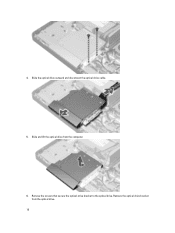
Follow the procedures in Before Working Inside Your Computer. 2. NOTE: To avoid damaging the VESA stand cover, handle the plastic scribe with the notches at the bottom. speakers 11. Place the computer on -screen display (OSD) buttons board 17. power-supply fan bracket 14. Using a plastic scribe, release the cover starting with care. 4. power-supply fan 13. converter board 16. optical drive Removing the VESA Stand 1. 9. input/output (I/O) board shield 12. intrusion switch 15. Slide and lift the VESA cover upwards and away from the computer. 10 WLAN card 10. ...
Follow the procedures in Before Working Inside Your Computer. 2. NOTE: To avoid damaging the VESA stand cover, handle the plastic scribe with the notches at the bottom. speakers 11. Place the computer on -screen display (OSD) buttons board 17. power-supply fan bracket 14. Using a plastic scribe, release the cover starting with care. 4. power-supply fan 13. converter board 16. optical drive Removing the VESA Stand 1. 9. input/output (I/O) board shield 12. intrusion switch 15. Slide and lift the VESA cover upwards and away from the computer. 10 WLAN card 10. ...

Dell OptiPlex 9020 AIO Owners Manual
Page 11
Installing the VESA Stand 1. Place and press the VESA cover on the back of the computer. 11 Follow the procedures in Before Working Inside Your Computer. 2. Remove the VESA stand. 3. Remove the screws that secure the VESA stand to the computer and lift the VESA stand away from the base of the computer. 2. Follow the procedures in After Working Inside Your Computer. Remove the screws from the computer. Tighten the screws that secure the VESA stand to the computer. 3. 5. Align and place the VESA stand on the computer, until it clicks into place. 4. Removing the Back...
Installing the VESA Stand 1. Place and press the VESA cover on the back of the computer. 11 Follow the procedures in Before Working Inside Your Computer. 2. Remove the VESA stand. 3. Remove the screws that secure the VESA stand to the computer and lift the VESA stand away from the base of the computer. 2. Follow the procedures in After Working Inside Your Computer. Remove the screws from the computer. Tighten the screws that secure the VESA stand to the computer. 3. 5. Align and place the VESA stand on the computer, until it clicks into place. 4. Removing the Back...

Dell OptiPlex 9020 AIO Owners Manual
Page 12
Installing the Back Cover 1. Install the VESA stand. 4. Follow the procedures in place. 2. Align the back cover to the computer. 3. Remove the: a) VESA stand b) back cover 12 4. Removing the Memory 1. Tighten the screws to secure the back cover to its original position on the computer and press until it from the computer using the notches near the input/output (I/O) panel. Follow the procedures in Before Working Inside Your Computer. 2. Lift the cover and remove it clicks in After Working Inside Your Computer.
Installing the Back Cover 1. Install the VESA stand. 4. Follow the procedures in place. 2. Align the back cover to the computer. 3. Remove the: a) VESA stand b) back cover 12 4. Removing the Memory 1. Tighten the screws to secure the back cover to its original position on the computer and press until it from the computer using the notches near the input/output (I/O) panel. Follow the procedures in Before Working Inside Your Computer. 2. Lift the cover and remove it clicks in After Working Inside Your Computer.
Dell OptiPlex 9020 AIO Owners Manual
Page 13
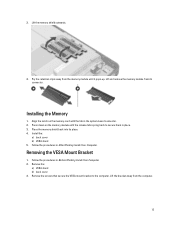
Remove the: a) VESA stand b) back cover 3. Remove the screws that secure the VESA mount bracket to secure them in the system-board connector. 2. Lift the bracket away from its place. 4. 3. Follow the procedures in After Working Inside Your Computer. Install the: a) back cover b) VESA stand 5. Lift and remove the memory module from the computer. 13 Press down on the memory-card with the tab in place. 3. Removing the VESA Mount Bracket 1. Follow the procedures in Before Working Inside Your Computer. 2. Lift the memory shield outwards. 4. Installing the Memory 1. ...
Remove the: a) VESA stand b) back cover 3. Remove the screws that secure the VESA mount bracket to secure them in the system-board connector. 2. Lift the bracket away from its place. 4. 3. Follow the procedures in After Working Inside Your Computer. Install the: a) back cover b) VESA stand 5. Lift and remove the memory module from the computer. 13 Press down on the memory-card with the tab in place. 3. Removing the VESA Mount Bracket 1. Follow the procedures in Before Working Inside Your Computer. 2. Lift the memory shield outwards. 4. Installing the Memory 1. ...
Dell OptiPlex 9020 AIO Owners Manual
Page 14
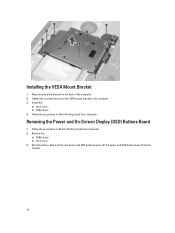
Installing the VESA Mount Bracket 1. Follow the procedures in Before Working Inside Your Computer. 2. Removing the Power and On-Screen Display (OSD) Buttons Board 1. Lift the power and OSD buttons board from the and power and OSD buttons board. Tighten the screws that secure the VESA mount bracket to the computer. 3. Install the: a) back cover b) VESA stand 4. Disconnect the cable from the chassis. 14 Remove the: a) VESA stand b) back cover 3. Align and place the bracket on the back of the computer. 2. Follow the procedures in After Working Inside Your Computer.
Installing the VESA Mount Bracket 1. Follow the procedures in Before Working Inside Your Computer. 2. Removing the Power and On-Screen Display (OSD) Buttons Board 1. Lift the power and OSD buttons board from the and power and OSD buttons board. Tighten the screws that secure the VESA mount bracket to the computer. 3. Install the: a) back cover b) VESA stand 4. Disconnect the cable from the chassis. 14 Remove the: a) VESA stand b) back cover 3. Align and place the bracket on the back of the computer. 2. Follow the procedures in After Working Inside Your Computer.

Dell OptiPlex 9020 AIO Owners Manual
Page 15
Align and place the power and OSD buttons board on the computer. 2. Follow the procedures in After Working Inside Your Computer. Remove the screws that secure the system-board shield to the power and OSD buttons board. 3. Lift the system-board shield away from the computer. 15 Connect the cable to the computer. Install: a) back cover b) VESA stand 4. Follow the procedures in Before Working Inside Your Computer. 2. Installing the Power and OSD Buttons Board 1. Removing the System-Board Shield 1. Remove the: a) VESA stand b) back cover c) VESA mount bracket 3.
Align and place the power and OSD buttons board on the computer. 2. Follow the procedures in After Working Inside Your Computer. Remove the screws that secure the system-board shield to the power and OSD buttons board. 3. Lift the system-board shield away from the computer. 15 Connect the cable to the computer. Install: a) back cover b) VESA stand 4. Follow the procedures in Before Working Inside Your Computer. 2. Installing the Power and OSD Buttons Board 1. Removing the System-Board Shield 1. Remove the: a) VESA stand b) back cover c) VESA mount bracket 3.
Dell OptiPlex 9020 AIO Owners Manual
Page 16
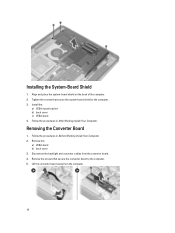
Follow the procedures in After Working Inside Your Computer. Align and place the system-board shield on the back of the computer. 2. Install the: a) VESA mount bracket b) back cover c) VESA stand 4. Disconnect the backlight and converter cables from the computer. 16 Remove the screws that secure the system-board shield to the computer. 5. Remove the: a) VESA stand b) back cover 3. Lift the convertor board away from the converter board. 4. Installing the System-Board Shield 1. Tighten the screws that secure the converter board to the computer. 3. Removing the Converter ...
Follow the procedures in After Working Inside Your Computer. Align and place the system-board shield on the back of the computer. 2. Install the: a) VESA mount bracket b) back cover c) VESA stand 4. Disconnect the backlight and converter cables from the computer. 16 Remove the screws that secure the system-board shield to the computer. 5. Remove the: a) VESA stand b) back cover 3. Lift the convertor board away from the converter board. 4. Installing the System-Board Shield 1. Tighten the screws that secure the converter board to the computer. 3. Removing the Converter ...
Dell OptiPlex 9020 AIO Owners Manual
Page 17
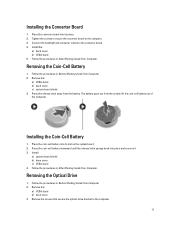
Connect the backlight and converter cables to the computer. 17 Press the coin-cell battery downward until the release latch springs back into its place. 2. Installing the Converter Board 1. Place the convertor board into its slot on the system board. 2. Install the: a) back cover b) VESA stand 5. Remove the: a) VESA stand b) back cover c) system-board shield 3. Installing the Coin-Cell Battery 1. Install: a) system-board shield b) base cover c) VESA stand 4. Removing the Optical Drive 1. Removing the Coin-Cell Battery 1. The battery pops-out from the battery....
Connect the backlight and converter cables to the computer. 17 Press the coin-cell battery downward until the release latch springs back into its place. 2. Installing the Converter Board 1. Place the convertor board into its slot on the system board. 2. Install the: a) back cover b) VESA stand 5. Remove the: a) VESA stand b) back cover c) system-board shield 3. Installing the Coin-Cell Battery 1. Install: a) system-board shield b) base cover c) VESA stand 4. Removing the Optical Drive 1. Removing the Coin-Cell Battery 1. The battery pops-out from the battery....
Dell OptiPlex 9020 AIO Owners Manual
Page 18
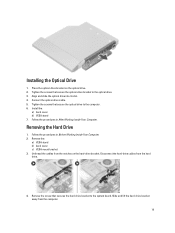
Slide and lift the optical drive from the optical drive. 18 Remove the optical-drive bracket from the computer. 6. Remove the screws that secure the optical-drive bracket to the optical drive. Slide the optical drive outward and disconnect the optical-drive cable. 5. 4.
Slide and lift the optical drive from the optical drive. 18 Remove the optical-drive bracket from the computer. 6. Remove the screws that secure the optical-drive bracket to the optical drive. Slide the optical drive outward and disconnect the optical-drive cable. 5. 4.
Dell OptiPlex 9020 AIO Owners Manual
Page 19
Connect the optical-drive cable. 5. Slide and lift the hard-drive bracket away from the hard drive. 4. Tighten the screws that secure the optical drive to the system board. Install the: a) back cover b) VESA stand 7. Disconnect the hard-drive cables from the computer. 19 Place the optical-drive bracket on the hard-drive bracket. Follow the procedures in Before Working Inside Your Computer. 2. Remove the screw that secure the optical-drive bracket to the optical drive. 3. Installing the Optical Drive 1. Removing the Hard Drive 1. Tighten the screws that secures the hard-...
Connect the optical-drive cable. 5. Slide and lift the hard-drive bracket away from the hard drive. 4. Tighten the screws that secure the optical drive to the system board. Install the: a) back cover b) VESA stand 7. Disconnect the hard-drive cables from the computer. 19 Place the optical-drive bracket on the hard-drive bracket. Follow the procedures in Before Working Inside Your Computer. 2. Remove the screw that secure the optical-drive bracket to the optical drive. 3. Installing the Optical Drive 1. Removing the Hard Drive 1. Tighten the screws that secures the hard-...

Dell OptiPlex 9020 AIO Owners Manual
Page 20
For a 3.5-inch hard drive, remove the screws that secure the hard drive to the hard-drive bracket. Installing the Hard Drive 1. Install: a) VESA mount bracket b) back cover 20 For a 2.5-inch hard drive, remove the screws that secure the hard drive to the hard-drive bracket. Remove the screws that secure the hard drive to the hard drive. 6. For a 3.5-inch hard drive, slide the hard drive into the hard-drive bracket. 3. Align and place the hard-drive bracket on the hard-drive bracket. 6. 5. Slide the hard drive from the hard-drive bracket. Thread the cables into the notches on...
For a 3.5-inch hard drive, remove the screws that secure the hard drive to the hard-drive bracket. Installing the Hard Drive 1. Install: a) VESA mount bracket b) back cover 20 For a 2.5-inch hard drive, remove the screws that secure the hard drive to the hard-drive bracket. Remove the screws that secure the hard drive to the hard drive. 6. For a 3.5-inch hard drive, slide the hard drive into the hard-drive bracket. 3. Align and place the hard-drive bracket on the hard-drive bracket. 6. 5. Slide the hard drive from the hard-drive bracket. Thread the cables into the notches on...
Dell OptiPlex 9020 AIO Owners Manual
Page 21
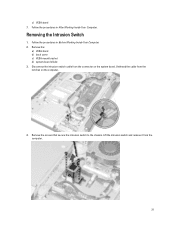
c) VESA stand 7. Removing the Intrusion Switch 1. Remove the screws that secure the intrusion switch to the chassis. Follow the procedures in Before Working Inside Your Computer. 2. Remove the: a) VESA stand b) back cover c) VESA mount bracket d) system-board shield 3. Unthread the cable from the notches on the system board. Follow the procedures in After Working Inside Your Computer. Lift the intrusion switch and remove it from the connector on the computer. 4. Disconnect the intrusion-switch cable from the computer. 21
c) VESA stand 7. Removing the Intrusion Switch 1. Remove the screws that secure the intrusion switch to the chassis. Follow the procedures in Before Working Inside Your Computer. 2. Remove the: a) VESA stand b) back cover c) VESA mount bracket d) system-board shield 3. Unthread the cable from the notches on the system board. Follow the procedures in After Working Inside Your Computer. Lift the intrusion switch and remove it from the connector on the computer. 4. Disconnect the intrusion-switch cable from the computer. 21
