
Dell OptiPlex 9020 AIO Owners Manual
Page 3
... Converter Board...16 Installing the Converter Board...17 Removing the Coin-Cell Battery...17 Installing the Coin-Cell Battery...17 Removing the Optical Drive...17 Installing the Optical Drive...19 Removing the Hard Drive...19 Installing the Hard Drive...20 Removing the Intrusion Switch...21 Installing the Intrusion Switch...22 Removing the Wireless Local Area Network (WLAN) Card 22 Installing the WLAN Card...23 Removing the Heat-Sink Assembly...23 Installing the Heat-Sink Assembly...23 Removing the Processor Fan...24 Installing the Processor Fan...24 Removing the Power-Supply Fan...
... Converter Board...16 Installing the Converter Board...17 Removing the Coin-Cell Battery...17 Installing the Coin-Cell Battery...17 Removing the Optical Drive...17 Installing the Optical Drive...19 Removing the Hard Drive...19 Installing the Hard Drive...20 Removing the Intrusion Switch...21 Installing the Intrusion Switch...22 Removing the Wireless Local Area Network (WLAN) Card 22 Installing the WLAN Card...23 Removing the Heat-Sink Assembly...23 Installing the Heat-Sink Assembly...23 Removing the Processor Fan...24 Installing the Processor Fan...24 Removing the Power-Supply Fan...
Dell OptiPlex 9020 AIO Owners Manual
Page 4
... System Board Layout...32 Installing the System Board...34 Removing the Heat Sink (Graphics Card)...34 Installing the Heat Sink (Graphics Card)...35 Removing the Antenna Module...36 Installing the Antenna Module...37 Removing the Display Panel...37 Installing the Display Panel...39 Removing the Camera...40 Installing the Camera...41 3 System Setup...43 Boot Sequence...43 Navigation Keys...43 System Setup Options...44 Updating the BIOS ...53 System and Setup Password...53 Assigning a System Password and Setup Password 54 Deleting or Changing...
... System Board Layout...32 Installing the System Board...34 Removing the Heat Sink (Graphics Card)...34 Installing the Heat Sink (Graphics Card)...35 Removing the Antenna Module...36 Installing the Antenna Module...37 Removing the Display Panel...37 Installing the Display Panel...39 Removing the Camera...40 Installing the Camera...41 3 System Setup...43 Boot Sequence...43 Navigation Keys...43 System Setup Options...44 Updating the BIOS ...53 System and Setup Password...53 Assigning a System Password and Setup Password 54 Deleting or Changing...
Dell OptiPlex 9020 AIO Owners Manual
Page 5
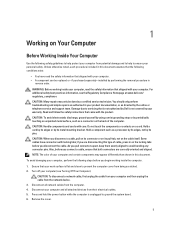
... only be replaced or--if purchased separately--installed by its metal mounting bracket. NOTE: The color of cable, press in on a card. Hold a card by its edges or by performing the removal procedure in this type of your computer. Turn off your work surface is flat and clean to avoid bending any connector pins. 1 Working on Your Computer Before Working Inside Your Computer Use the...
... only be replaced or--if purchased separately--installed by its metal mounting bracket. NOTE: The color of cable, press in on a card. Hold a card by its edges or by performing the removal procedure in this type of your computer. Turn off your work surface is flat and clean to avoid bending any connector pins. 1 Working on Your Computer Before Working Inside Your Computer Use the...
Dell OptiPlex 9020 AIO Owners Manual
Page 7
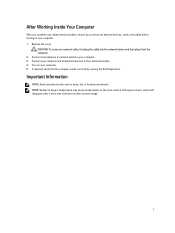
..., verify that the computer works correctly by running the Dell Diagnostics. CAUTION: To connect a network cable, first plug the cable into the network device and then plug it into the computer. 2. Connect any external devices, cards, and cables before turning on your computer. 5. Important Information NOTE: Avoid using the touchscreen in temperature may cause condensation on your computer. 1. Turn on the inner surface of the glass screen, which will disappear after...
..., verify that the computer works correctly by running the Dell Diagnostics. CAUTION: To connect a network cable, first plug the cable into the network device and then plug it into the computer. 2. Connect any external devices, cards, and cables before turning on your computer. 5. Important Information NOTE: Avoid using the touchscreen in temperature may cause condensation on your computer. 1. Turn on the inner surface of the glass screen, which will disappear after...
Dell OptiPlex 9020 AIO Owners Manual
Page 10
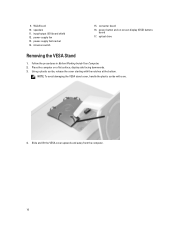
... intrusion switch 15. WLAN card 10. input/output (I/O) board shield 12. Follow the procedures in Before Working Inside Your Computer. 2. 9. power-button and on a flat surface, display side facing downwards. 3. Using a plastic scribe, release the cover starting with care. 4. power-supply fan 13. speakers 11. NOTE: To avoid damaging the VESA stand cover, handle the plastic scribe with the notches at the bottom. converter board 16. optical drive Removing the...
... intrusion switch 15. WLAN card 10. input/output (I/O) board shield 12. Follow the procedures in Before Working Inside Your Computer. 2. 9. power-button and on a flat surface, display side facing downwards. 3. Using a plastic scribe, release the cover starting with care. 4. power-supply fan 13. speakers 11. NOTE: To avoid damaging the VESA stand cover, handle the plastic scribe with the notches at the bottom. converter board 16. optical drive Removing the...

Dell OptiPlex 9020 AIO Owners Manual
Page 20
... the hard-drive case to the hard drive. Connect the hard-drive cables to the hard drive. Thread the cables into the notches on the computer. 4. Install: a) VESA mount bracket b) back cover 20 Remove the screws that secure the hard drive to the hard drive. 6. Slide the hard drive from the hard-drive bracket. Tighten the screws that secure the hard-drive case to the hard-drive bracket 5. Align and place the hard-drive bracket on the hard-drive bracket. 6. 5. Slide the hard drive...
... the hard-drive case to the hard drive. Connect the hard-drive cables to the hard drive. Thread the cables into the notches on the computer. 4. Install: a) VESA mount bracket b) back cover 20 Remove the screws that secure the hard drive to the hard drive. 6. Slide the hard drive from the hard-drive bracket. Tighten the screws that secure the hard-drive case to the hard-drive bracket 5. Align and place the hard-drive bracket on the hard-drive bracket. 6. 5. Slide the hard drive...
Dell OptiPlex 9020 AIO Owners Manual
Page 43
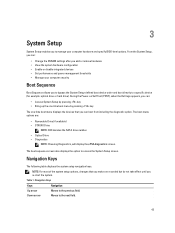
... key The one-time boot menu displays the devices that you add or remove hardware • View the system hardware configuration • Enable or disable integrated devices • Set performance and power management thresholds • Manage your computer hardware and specify BIOS‐level options. 3 System Setup System Setup enables you to manage your computer security Boot Sequence Boot Sequence allows you to bypass the System Setup‐defined boot device order and boot directly to a specific device (for example: optical drive or hard drive). The boot sequence screen...
... key The one-time boot menu displays the devices that you add or remove hardware • View the system hardware configuration • Enable or disable integrated devices • Set performance and power management thresholds • Manage your computer hardware and specify BIOS‐level options. 3 System Setup System Setup enables you to manage your computer security Boot Sequence Boot Sequence allows you to bypass the System Setup‐defined boot device order and boot directly to a specific device (for example: optical drive or hard drive). The boot sequence screen...
Dell OptiPlex 9020 AIO Owners Manual
Page 44
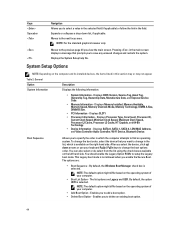
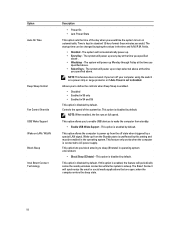
... Express Service Code. • Memory Information - Displays SATA-0, SATA-1, SATA-4, LOM MAC Address, and Video Controller Audio Controller, Wi-Fi Device, Bluetooth Device. By default, the Windows Boot Manager check box is selected. NOTE: The default option might differ based on the right-hand side. NOTE: For the standard graphics browser only. The options are Legacy and UEFI. NOTE: The default option might differ based on the left hand side. Displays Processor Type, Core Count, Processor ID...
... Express Service Code. • Memory Information - Displays SATA-0, SATA-1, SATA-4, LOM MAC Address, and Video Controller Audio Controller, Wi-Fi Device, Bluetooth Device. By default, the Windows Boot Manager check box is selected. NOTE: The default option might differ based on the right-hand side. NOTE: For the standard graphics browser only. The options are Legacy and UEFI. NOTE: The default option might differ based on the left hand side. Displays Processor Type, Core Count, Processor ID...
Dell OptiPlex 9020 AIO Owners Manual
Page 45
...; Apply - Enables you to support RAID mode. The changes to apply the settings. • Exit - Allows you to the system date and time takes effect immediately. Option Advanced Boot Options Date/Time Table 3. Restores the default settings of the integrated SATA hard drive controller. • Disabled - SATA is not allowed when you to load, when in this option, only UEFI option ROMs will allow the legacy option ROMs to enable or disable the integrated network card. Without...
...; Apply - Enables you to support RAID mode. The changes to apply the settings. • Exit - Allows you to the system date and time takes effect immediately. Option Advanced Boot Options Date/Time Table 3. Restores the default settings of the integrated SATA hard drive controller. • Disabled - SATA is not allowed when you to load, when in this option, only UEFI option ROMs will allow the legacy option ROMs to enable or disable the integrated network card. Without...
Dell OptiPlex 9020 AIO Owners Manual
Page 46
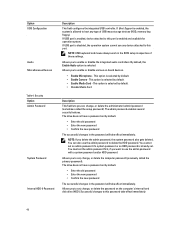
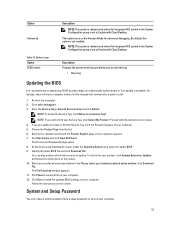
... to set , change, or delete the administrator (admin) password (sometimes called the primary password). Allows you to this port. Security Option Admin Password System Password Internal HDD-0 Password Description This field configures the integrated USB controller. You can also use the admin password with a system password and/or HDD password. Successful changes to set by default. • Enter the old password • Enter the new password • Confirm the new password The successful changes in the BIOS setup irrespective of USB mass storage devices (HDD, memory key...
... to set , change, or delete the administrator (admin) password (sometimes called the primary password). Allows you to this port. Security Option Admin Password System Password Internal HDD-0 Password Description This field configures the integrated USB controller. You can also use the admin password with a system password and/or HDD password. Successful changes to set by default. • Enter the old password • Enter the new password • Confirm the new password The successful changes in the BIOS setup irrespective of USB mass storage devices (HDD, memory key...
Dell OptiPlex 9020 AIO Owners Manual
Page 47
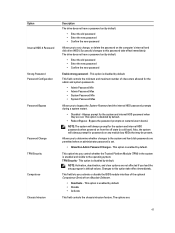
... a password set . The drive does not have a password set by default. • Enter the old password • Enter the new password • Confirm the new password Allows you to determine whether changes to the operating system. This option is enabled by default. Successful changes to set . • Allow Non-Admin Password Changes - This field controls the minimum and maximum number of the optional Computrace Service from the off state (a cold boot). Bypass the password prompts on the computer's internal hard disk drive (HDD). Changes...
... a password set . The drive does not have a password set by default. • Enter the old password • Enter the new password • Confirm the new password Allows you to determine whether changes to the operating system. This option is enabled by default. Successful changes to set . • Allow Non-Admin Password Changes - This field controls the minimum and maximum number of the optional Computrace Service from the off state (a cold boot). Bypass the password prompts on the computer's internal hard disk drive (HDD). Changes...
Dell OptiPlex 9020 AIO Owners Manual
Page 48
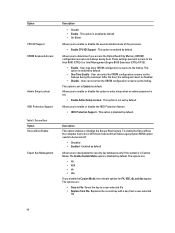
... default. • One-Time Enable - After the boot, the setting will revert to the Intel RAID (CTRL+I) or Intel Management Engine BIOS Extension (CTRL+P/F12). • Enable - This option is in UEFI boot mode and the Enable Legacy Option ROMs option needs to enable or disable the HDD Protection feature. • HDD Protection Support - The Enable Custom Mode option is enabled by default. Replaces the current key with a key from File- This option is disabled by default. This option is set to enter setup when an admin password...
... default. • One-Time Enable - After the boot, the setting will revert to the Intel RAID (CTRL+I) or Intel Management Engine BIOS Extension (CTRL+P/F12). • Enable - This option is in UEFI boot mode and the Enable Legacy Option ROMs option needs to enable or disable the HDD Protection feature. • HDD Protection Support - The Enable Custom Mode option is enabled by default. Replaces the current key with a key from File- This option is disabled by default. This option is set to enter setup when an admin password...
Dell OptiPlex 9020 AIO Owners Manual
Page 49
...; Reset All Keys- Enabled by putting system into a low power state during Sleep, after an AC power loss. The timer can set starting from File- Power Management Option AC Recovery Description • Append from the value "0". Deletes all the changes made will be faster than 3. • Enable CPUID Limit - This option is enabled by default Allows you to enable or disable Intel TurboBoost mode of the Standard CPUID Fuction support. This option...
...; Reset All Keys- Enabled by putting system into a low power state during Sleep, after an AC power loss. The timer can set starting from File- Power Management Option AC Recovery Description • Append from the value "0". Deletes all the changes made will be faster than 3. • Enable CPUID Limit - This option is enabled by default Allows you to enable or disable Intel TurboBoost mode of the Standard CPUID Fuction support. This option...
Dell OptiPlex 9020 AIO Owners Manual
Page 50
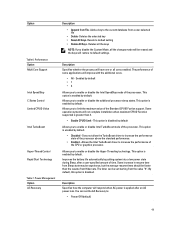
... Connect will power up . • Every Day - Allows you to enable USB devices to AC power supply. Option Auto On Time Deep Sleep Control Fan Control Override USB Wake Support Wake on LAN / WLAN Block Sleep Intel Smart Connect Technology Description • Power On • Last Power State This option sets the time of the system fan. fields. • Disabled - The system will not automatically power up on days selected above at full speed. This option is disabled by default...
... Connect will power up . • Every Day - Allows you to enable USB devices to AC power supply. Option Auto On Time Deep Sleep Control Fan Control Override USB Wake Support Wake on LAN / WLAN Block Sleep Intel Smart Connect Technology Description • Power On • Last Power State This option sets the time of the system fan. fields. • Disabled - The system will not automatically power up on days selected above at full speed. This option is disabled by default...
Dell OptiPlex 9020 AIO Owners Manual
Page 52
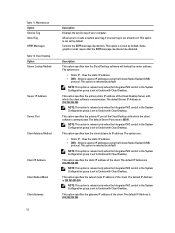
... Method Server IP Address Server Port Client Address Method Client IP Address Client Subnet Mask Client Gateway 52 Description Displays the service tag of the client. Some graphics cards require that the SERR message mechanism be disabled. The options are : • Static IP - This option specifies how the client obtains its IP address. Uses the static IP address • DNS - The default...
... Method Server IP Address Server Port Client Address Method Client IP Address Client Subnet Mask Client Gateway 52 Description Displays the service tag of the client. Some graphics cards require that the SERR message mechanism be disabled. The options are : • Static IP - This option specifies how the client obtains its IP address. Uses the static IP address • DNS - The default...
Dell OptiPlex 9020 AIO Owners Manual
Page 53
...; Clear Log Updating the BIOS It is recommended to update your computer battery is not enabled. Option Advanced Description NOTE: This option is relevant only when the Integrated NIC control in the System Configuration group is set to Enable with Cloud Desktop. NOTE: To locate the Service Tag, click Where is available. This option turns on replacing the system board or if an update is my Service Tag? Select your preferred download...
...; Clear Log Updating the BIOS It is recommended to update your computer battery is not enabled. Option Advanced Description NOTE: This option is relevant only when the Integrated NIC control in the System Configuration group is set to Enable with Cloud Desktop. NOTE: To locate the Service Tag, click Where is available. This option turns on replacing the system board or if an update is my Service Tag? Select your preferred download...
Dell OptiPlex 9020 AIO Owners Manual
Page 58
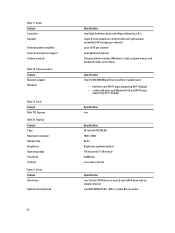
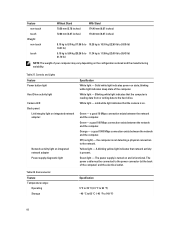
..., and keyboard media-control keys Specification Intel 10/100/1000 Mbps Ethernet LAN on system board • half mini-card (Wi-Fi b/g/n supporting Wi-Fi display) • combo half mini-card (Bluetooth 4.0 and Wi-Fi b/g/n supporting Wi-Fi display) Specification one Specification 23-inch full-HD WLED 1920 x 1080 60 Hz Brightness up/down buttons 178 horizontal / 178 vertical 0.2652 mm on-screen controls Specification one 3.5-inch SATA drive or one 2.5-inch SATA drive with an adapter bracket one DVD-ROM, DVD...
..., and keyboard media-control keys Specification Intel 10/100/1000 Mbps Ethernet LAN on system board • half mini-card (Wi-Fi b/g/n supporting Wi-Fi display) • combo half mini-card (Bluetooth 4.0 and Wi-Fi b/g/n supporting Wi-Fi display) Specification one Specification 23-inch full-HD WLED 1920 x 1080 60 Hz Brightness up/down buttons 178 horizontal / 178 vertical 0.2652 mm on-screen controls Specification one 3.5-inch SATA drive or one 2.5-inch SATA drive with an adapter bracket one DVD-ROM, DVD...
Dell OptiPlex 9020 AIO Owners Manual
Page 60
... power supply is turned on and is not detecting a physical connection to the network. Blinking white light indicates that the computer is present. a good 100 Mbps connection exists between the network and the computer. A blinking yellow light indicates that the camera is on integrated network adapter Power supply diagnostic light Specification White light - Table 28. Controls and Lights Feature Power button light Hard Drive activity light Camera LED Back panel: Link integrity light on integrated network adapter : Network activity light on . White light - solid while light...
... power supply is turned on and is not detecting a physical connection to the network. Blinking white light indicates that the computer is present. a good 100 Mbps connection exists between the network and the computer. A blinking yellow light indicates that the camera is on integrated network adapter Power supply diagnostic light Specification White light - Table 28. Controls and Lights Feature Power button light Hard Drive activity light Camera LED Back panel: Link integrity light on integrated network adapter : Network activity light on . White light - solid while light...
OptiPlex 9020 AIO Statement of Volatility
Page 1
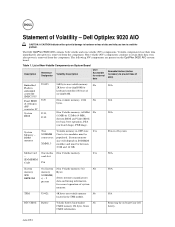
... avoid the problem. Power off system Media Card - TPM U9421 4K bytes non-volatile memory No N/A located in bytes. The following NV components are present on -chip RAM. Statement of controller on the OptiPlex 9020 AIO system board. No N/A Flash in OFF state Yes SODIMM One to prevent loss of system memory. Stores CMOS information. Dell Optiplex 9020 AIO CAUTION: A CAUTION indicates either potential damage to hardware or loss...
... avoid the problem. Power off system Media Card - TPM U9421 4K bytes non-volatile memory No N/A located in bytes. The following NV components are present on -chip RAM. Statement of controller on the OptiPlex 9020 AIO system board. No N/A Flash in OFF state Yes SODIMM One to prevent loss of system memory. Stores CMOS information. Dell Optiplex 9020 AIO CAUTION: A CAUTION indicates either potential damage to hardware or loss...
OptiPlex 9020 AIO Setup And Features Information Tech Sheet
Page 3
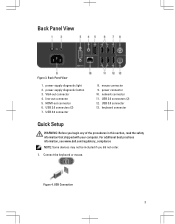
... 9. USB 2.0 connectors (2) 12. power-supply diagnostic light 2. line-out connector 5. For additional best practices information, see www.dell.com/regulatory_compliance NOTE: Some devices may not be included if you begin any of the procedures in this section, read the safety information that shipped with your computer. HDMI-out connector 6. power connector 10. USB 3.0 connector 13. Connect the keyboard or mouse. USB Connection 3 VGA-out connector 4. network connector 11. USB 3.0 connector 8. Back Panel View Figure 3. Back Panel View 1. keyboard connector Quick Setup...
... 9. USB 2.0 connectors (2) 12. power-supply diagnostic light 2. line-out connector 5. For additional best practices information, see www.dell.com/regulatory_compliance NOTE: Some devices may not be included if you begin any of the procedures in this section, read the safety information that shipped with your computer. HDMI-out connector 6. power connector 10. USB 3.0 connector 13. Connect the keyboard or mouse. USB Connection 3 VGA-out connector 4. network connector 11. USB 3.0 connector 8. Back Panel View Figure 3. Back Panel View 1. keyboard connector Quick Setup...


